Spider Web Craft Projects 🦇 FCC 19
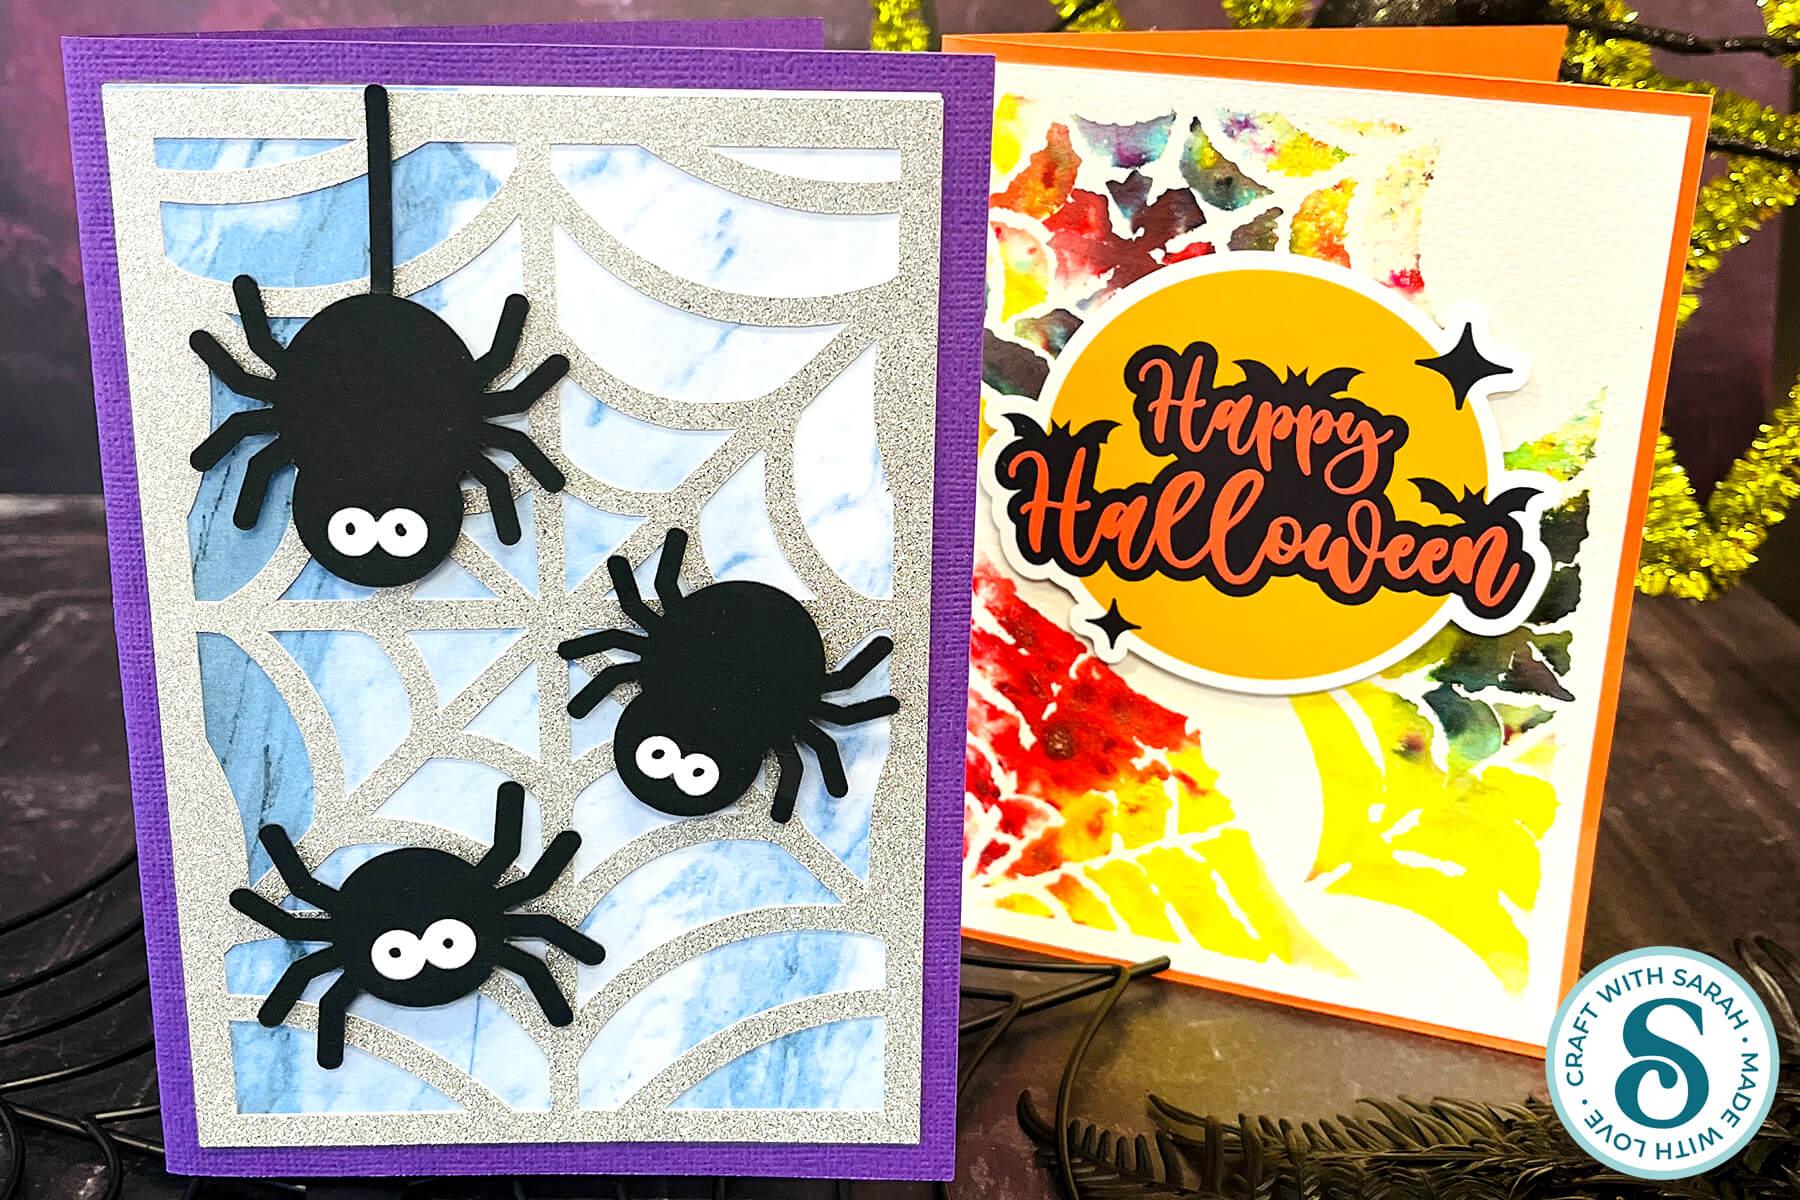
Design your own spooky Halloween crafts with these spider web SVGs.
Spider webs are such a versatile design for Halloween crafting, so for this project we’re doing something a little bit different!
Instead of making one finished project, I’ve created a collection of spider web SVGs that can be used in lots of different ways.
There are smaller spider webs for cards and other papercrafts, plus giant versions that have been specially designed to cut in sections so that you can make them much larger than a Cricut mat would usually allow.
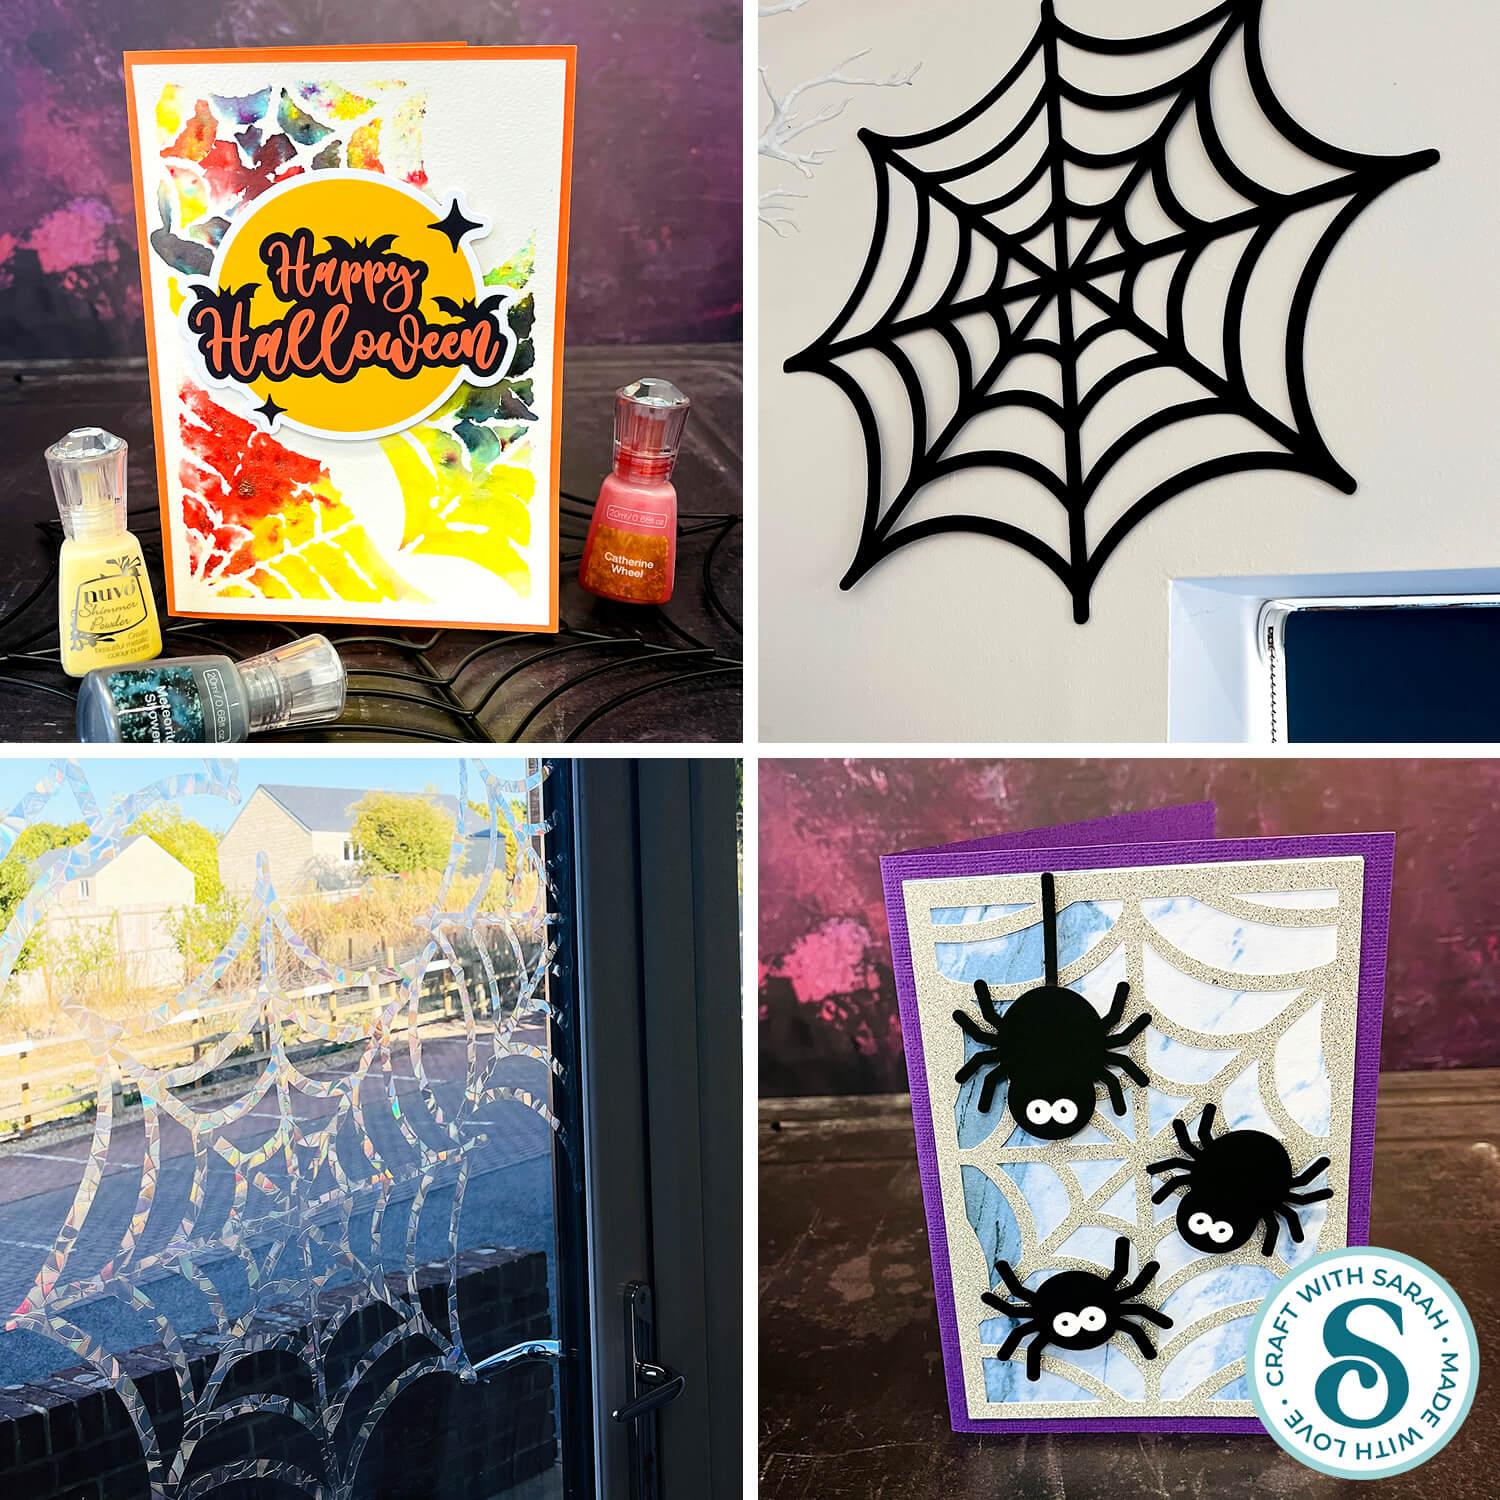
In this tutorial, I’ll show you several different ways to use the spider web SVGs, including window cling decorations, giant cardstock wall decorations, a custom spider web greetings card and a reusable acetate stencil for creating mixed-media backgrounds.
This project is suitable for the following types of Cricut machines: Explore series, Maker series, Joy Xtra, Joy and Joy 2.
Please note that this project does not include a hand-cutting version.
This project is part of the 2026 Falloween Craft Countdown
Foundation learning
If you're new to making papercrafts with your cutting machine, check out these links to get you started.
They include videos on topics such as: which file to use with your type of cutting machine, how to load the files into your cutting machine's software, how to cut cardstock with your type of cutting machine, how to recolor and modify/customize the cut files and tips for displaying your projects.
- How to use zip folder downloads
- Help guides for Cricut machines
- Help guides for Silhouette machines
- Help guides for ScanNCut machines
The following tutorials are Cricut-specific, but many of the ideas will work similarly with a Silhouette or ScanNCut machine and any cut files that are shared in them are compatible with all types of cutting machine.
- How to score with a Cricut (even without scoring tools)
- Print then cut tutorial
- Design Space tools (Combine, Attach, Slice, Weld, Flatten, etc.)
- Pattern fill tutorial (for making backgrounds & cutting images to a specific shape/size)
- Free envelope SVGs that can be sized to fit any card
- Presentation boxes for handmade cards
- How to write inside cards with Cricut pens
- How to cut layered designs at a small size
- Design Space tips & tricks
- Cricut pens tutorial
- How to mount multiple designs in the same frame with magic guides
Spider web crafts video tutorial
Watch the video below to see how to make this project. Keep scrolling for a written tutorial.
About the spider web SVGs
Get the files using the box below.
Purchase the File(s)
This cut file is available as part of the Instant Access Bundle.
Or, purchase this design individually here
Before you upload the SVGs to Design Space, you need to unzip the download folder that they come in.
Not sure how to do this? Click here for a tutorial that covers all the following types of computer and device:
- How to unzip a folder on a Windows computer
- How to unzip a folder on a Mac
- How to unzip a folder on an iPad
- How to unzip a folder on an iPhone
- How to unzip a folder on an Android device
After unzipping, upload the SVG file(s) into your cutting machine software.
Not sure how to use cut files with your type of machine? The following links lead to tutorials on how to use cut files in:
- Cricut Design Space
- Silhouette Studio
- CanvasWorkspace (for ScanNCut machines)
If you are using Cricut Design Space, start a new project and then click the “Upload” button on the left of the screen.
You can then either click “Browse” to find the file on your computer, or drag-and-drop it.
When you load the spider web SVGs into Cricut Design Space, you’ll see that there are several different versions to choose from.
The smaller file contains a corner web, a full spider web and a half web. Each spider web is on its own separate, complete layer so that you can easily choose the one you want for your project.
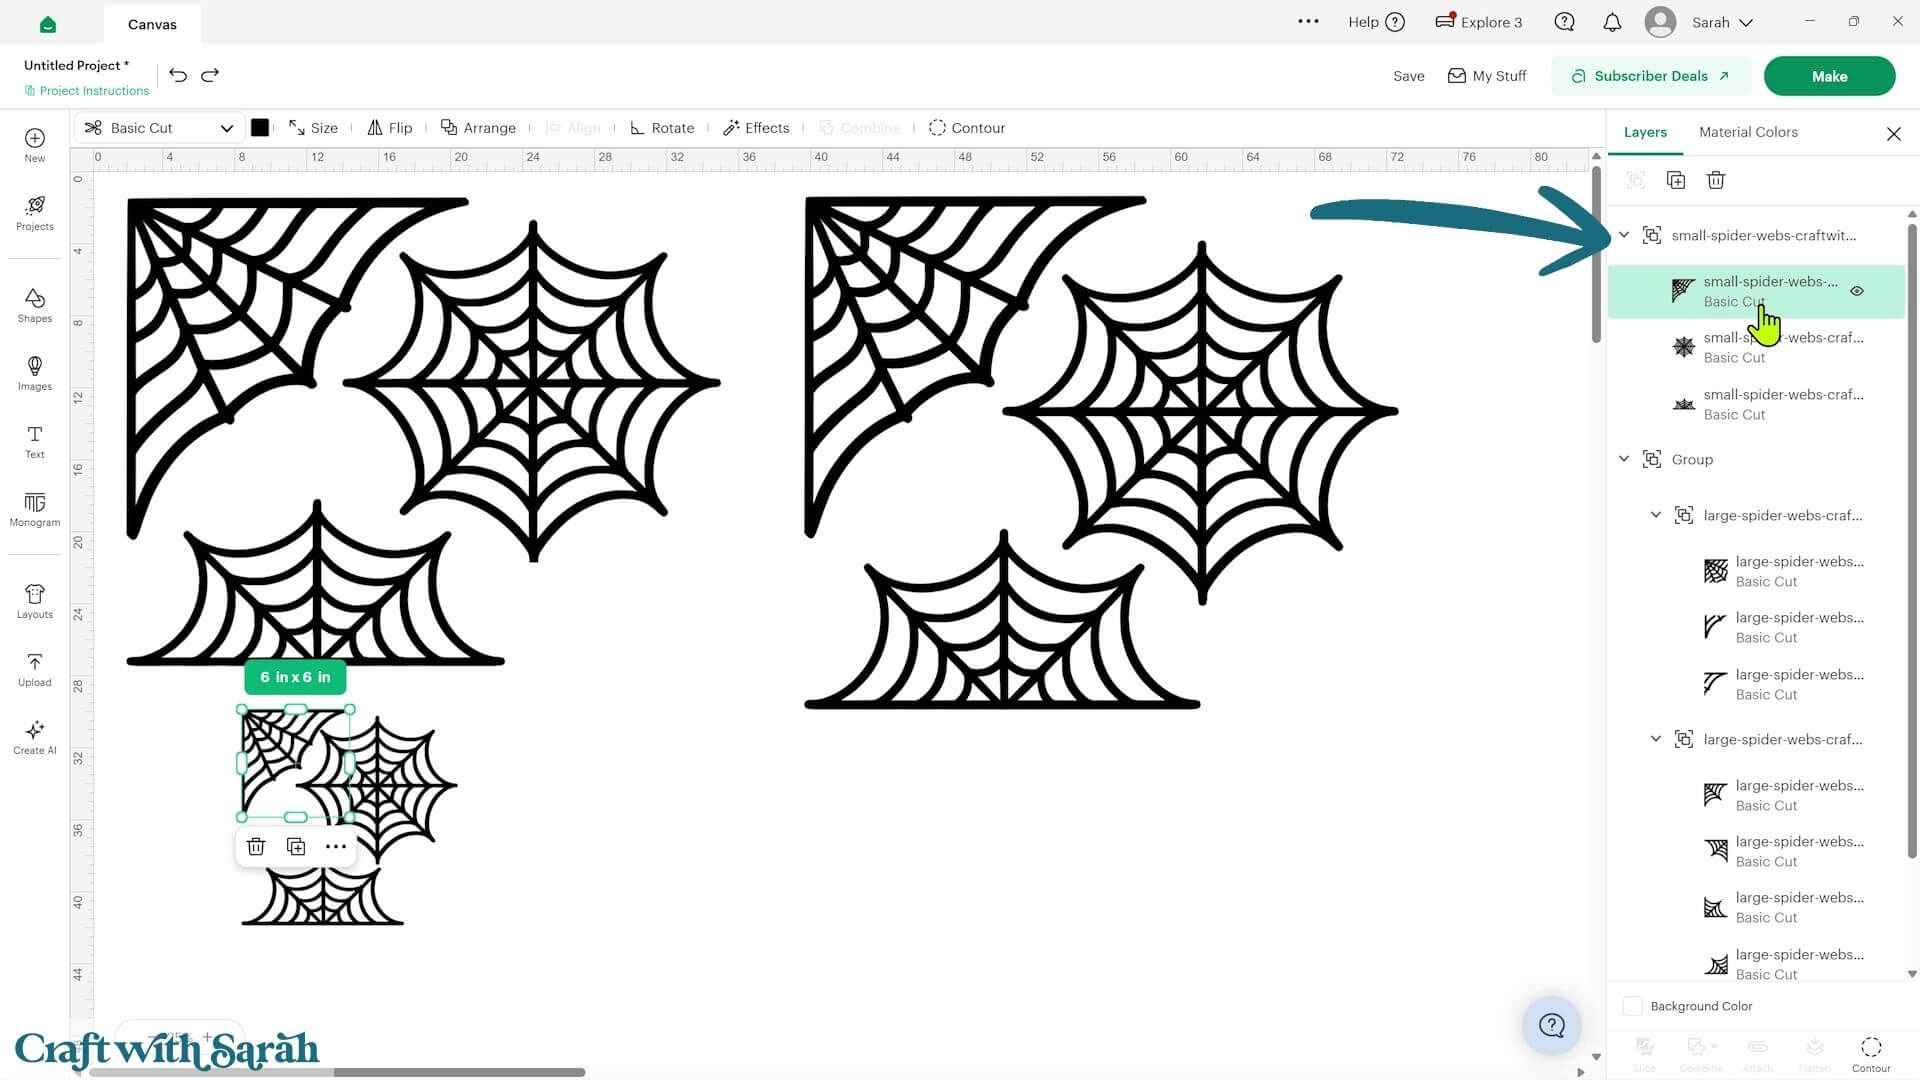
There are also two sets of larger spider webs. These have been specially designed to cut in sections so that you can create spider webs much larger than your Cricut mat.
One version has pieces that push directly up against each other without overlapping. This version is particularly useful for making window cling decorations because window cling doesn’t stick particularly well to itself.
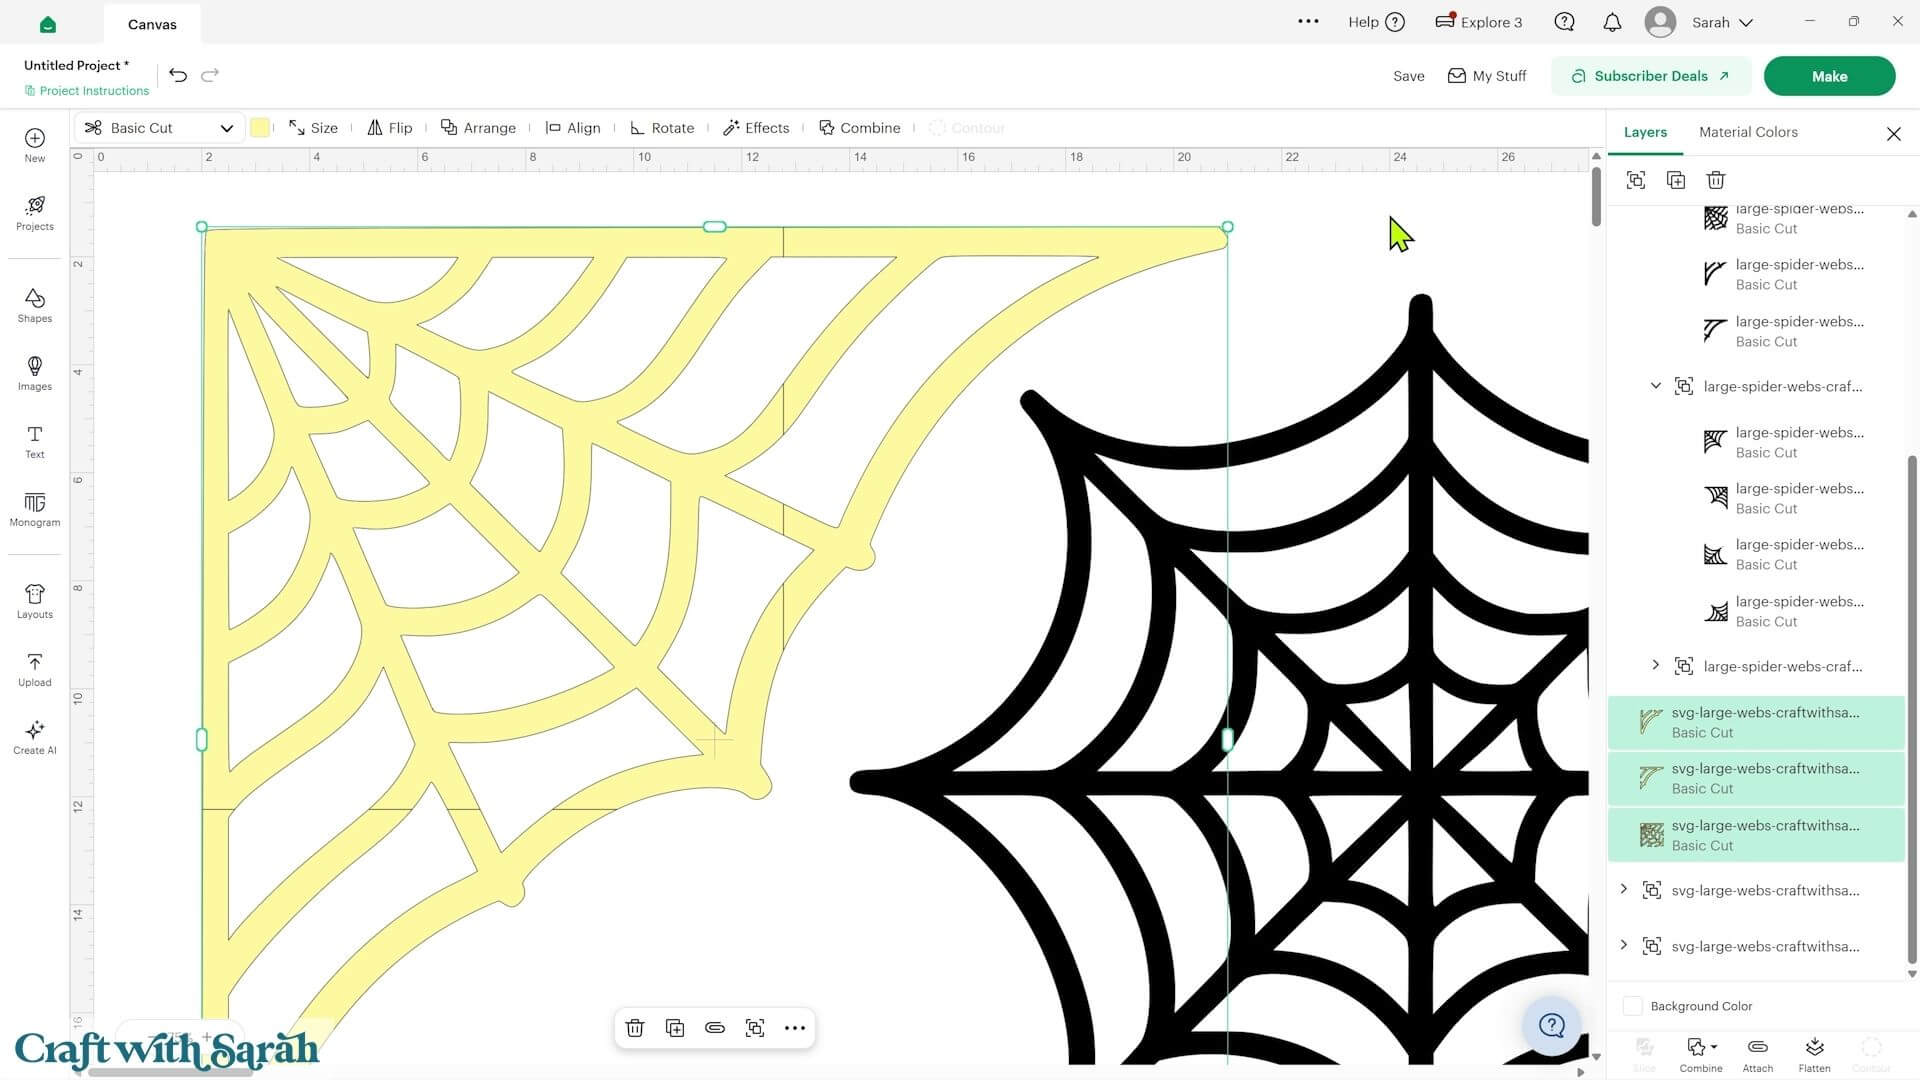
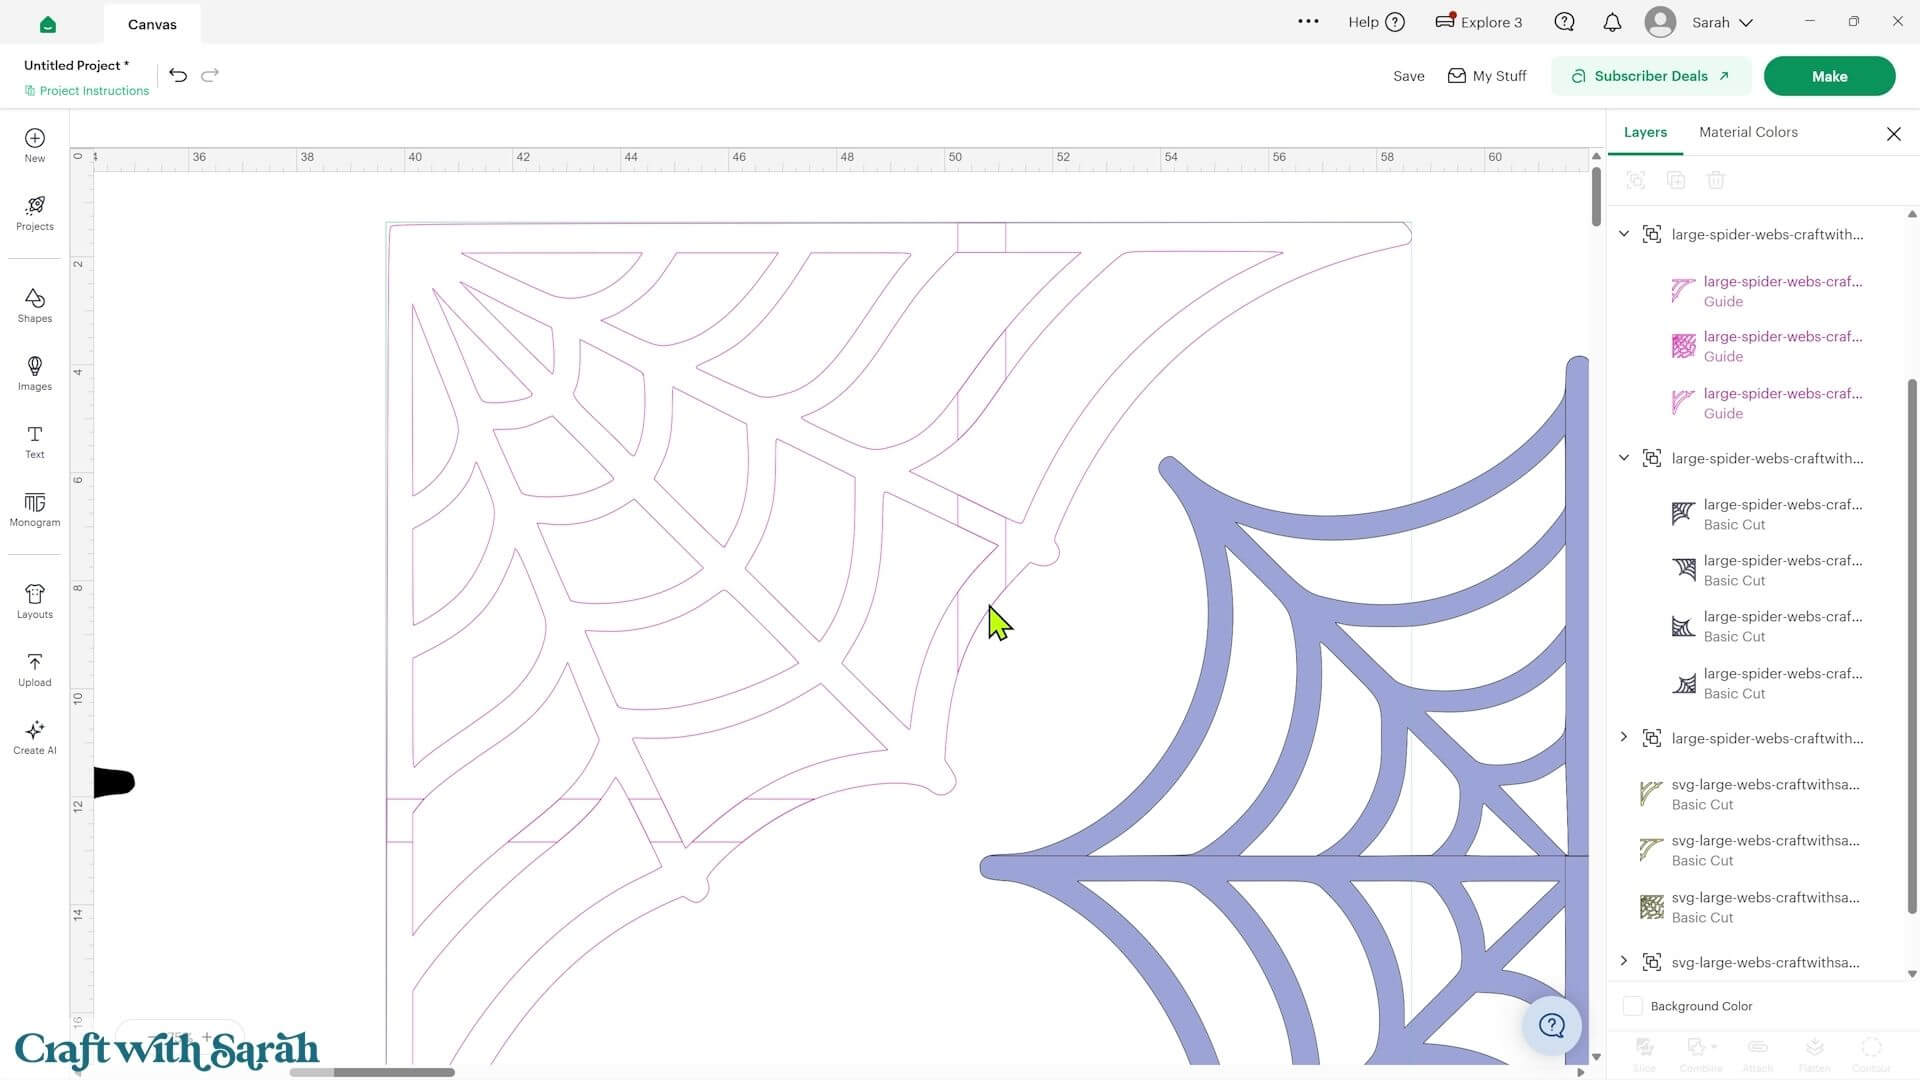
The other version has small overlapping sections where the pieces join. This makes it perfect for giant cardstock spider webs because you can glue the overlapping sections together to create one large, sturdy decoration.
Here’s a closer look at the pieces so that you can see where they overlap:
Let’s start by looking at how to use both of these larger versions.
Please note that some of the links included in this article are affiliate links, which means that if you click through and make a purchase I may receive a commission (at no additional cost to you). You can read my full disclosure at the bottom of the page.
Project 1) Giant window cling spider webs
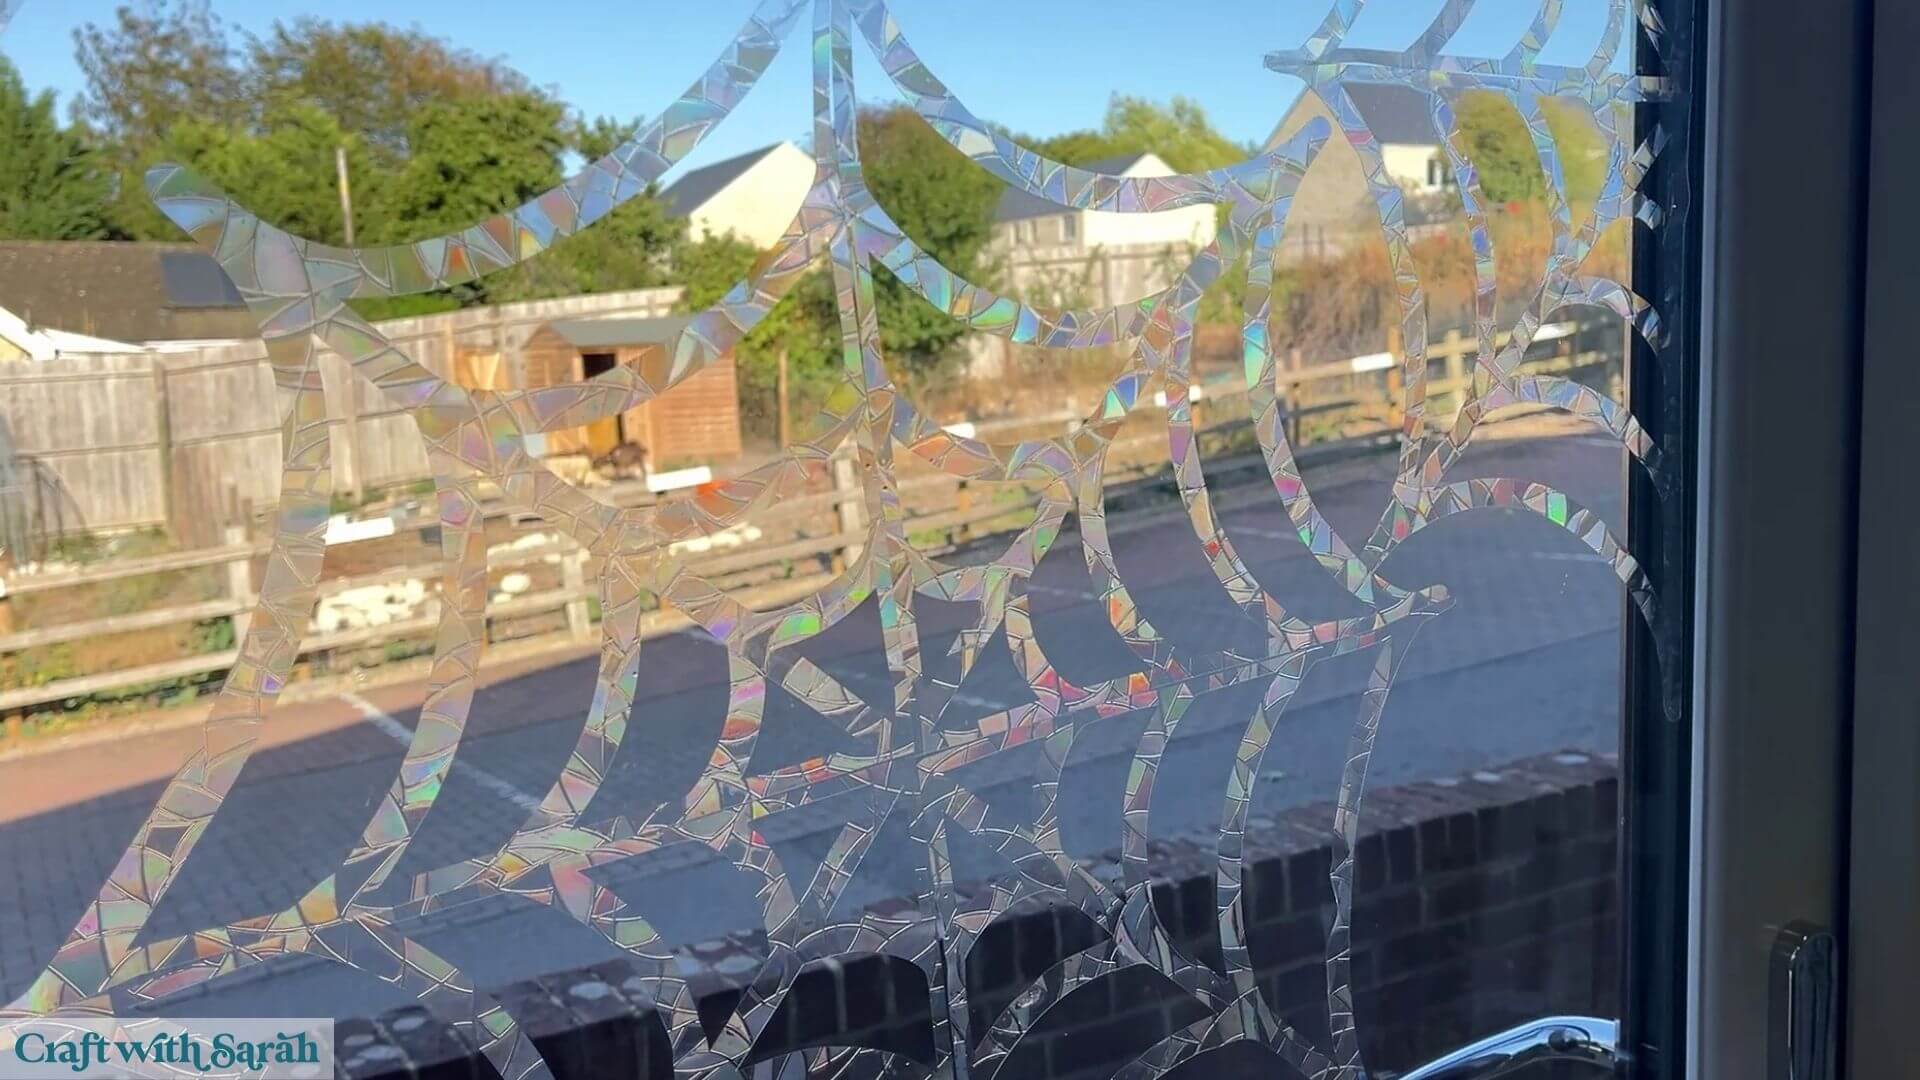
Window cling is a plastic-type material that sticks directly onto glass. The particular type I used creates a beautiful rainbow effect when the sunlight shines through it, which makes a really fun Halloween window decoration.
For my project, I used the large spider web SVGs without the overlapping sections.
Cut the spider web pieces from your window cling. I used the regular Heavy Cardstock setting on my Cricut machine.
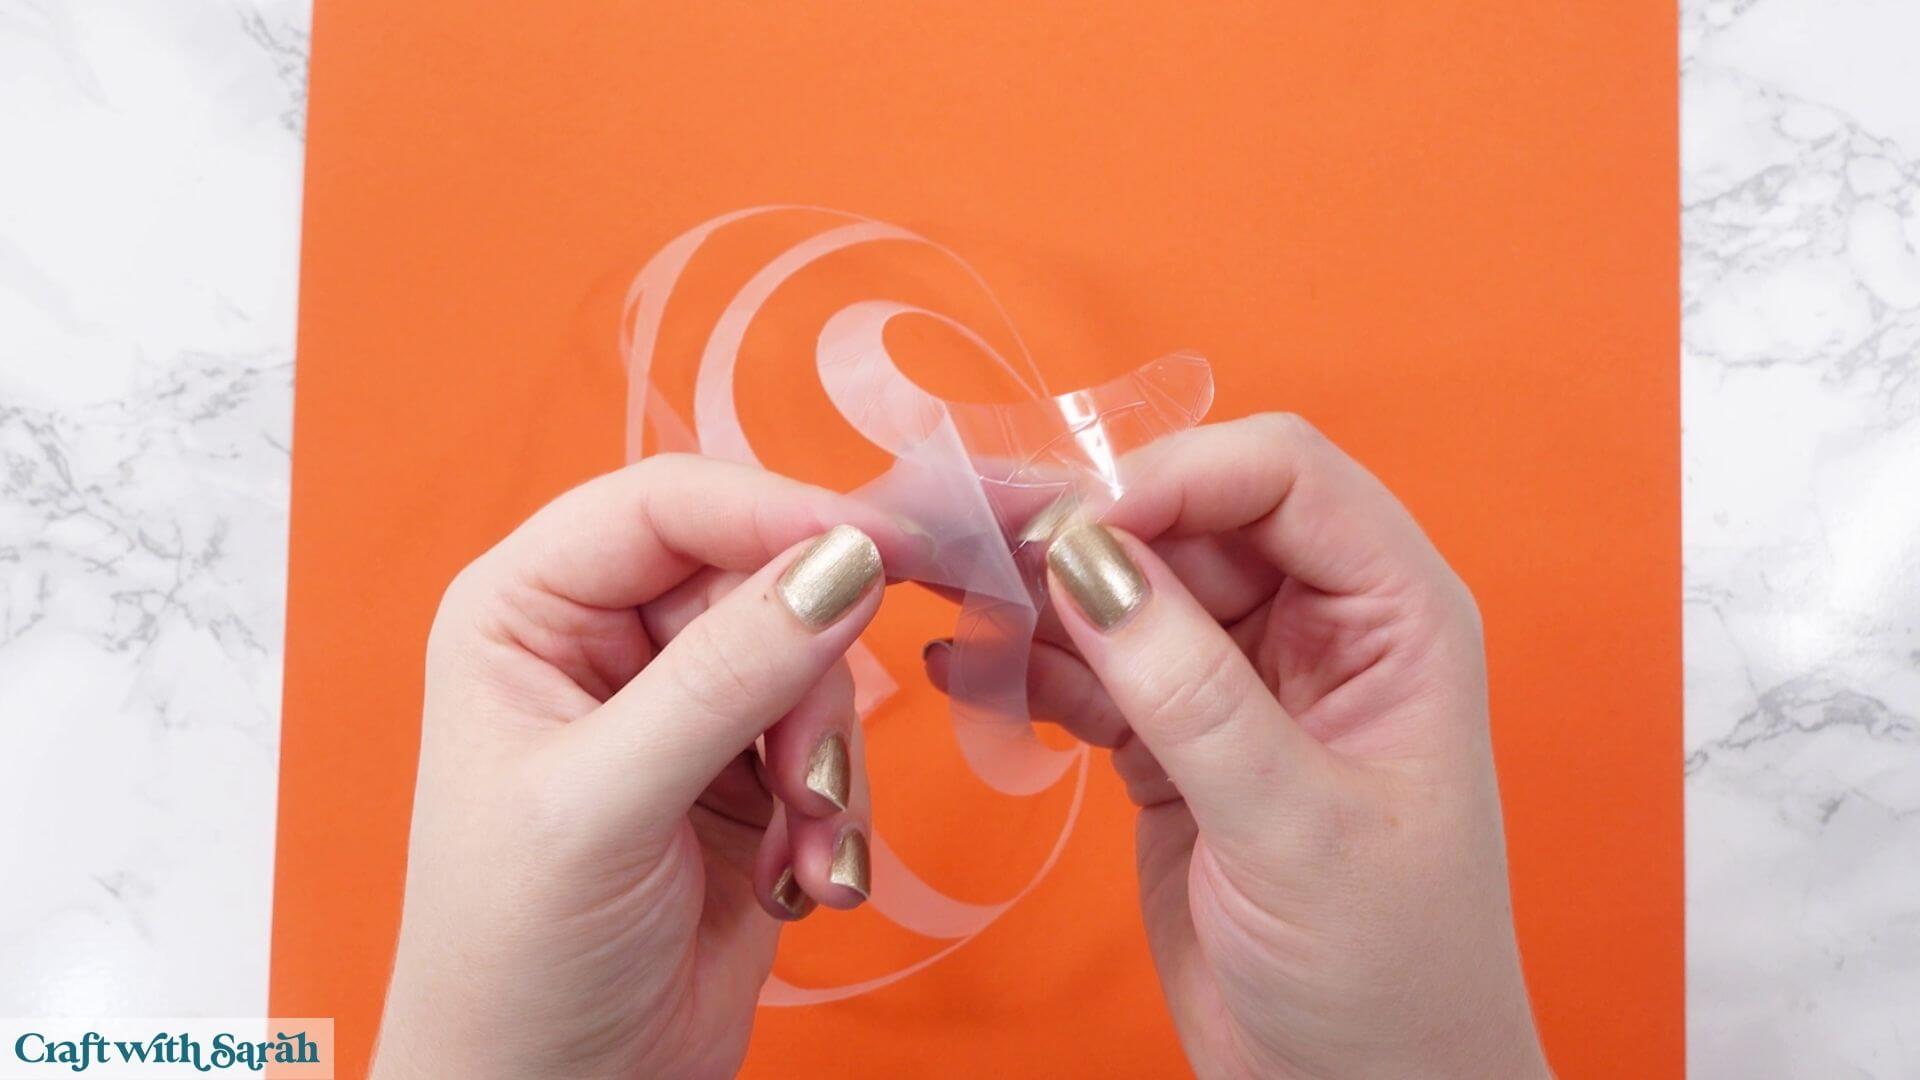
Window cling comes with a plastic backing, and it’s important that you leave this in place while cutting. Your Cricut needs to cut through both the window cling and the backing underneath.
Once your pieces have been cut, leave the protective plastic backing in place until you’re ready to put the spider webs onto the window. If you remove it too early, dust or dirt could get onto the slightly tacky surface and prevent it from sticking properly.
Before adding the spider webs, thoroughly clean your window to remove any dust and dirt.
I find that adding a tiny amount of water can help window cling stick to the glass. You could lightly mist the window with a spray bottle, but don’t make it soaking wet or the pieces will simply slide around.
Alternatively, use a paintbrush and a small dish of water to dab a tiny amount onto the back of each spider web piece.
Position your first section on the window, then use its edges as a guide for adding the next piece.
Remember that this version of the SVG doesn’t have any overlaps. The separate sections simply push right up against one another to create the completed spider web.
Continue until you’ve added all of your spider web pieces.
I used mine on the glass door to my office, and the finished effect is wonderfully spooky and spider webby!
Project 2) Giant cardstock spider webs
The second large version of the spider web SVGs is designed for cardstock.
This time, the sections contain small areas that overlap. These give you somewhere to add glue so that the individual pieces can be joined together into one enormous spider web.
Cut the pieces from your chosen cardstock. I used black for a classic Halloween look.
Before adding any glue, arrange the pieces on your work surface and check which way around they go.
This is important! I discovered that the hard way by adding glue before checking one of mine and then realising I had the piece the wrong way around.
Once you’re happy with the positioning, add glue to the overlapping sections and carefully join the pieces together.
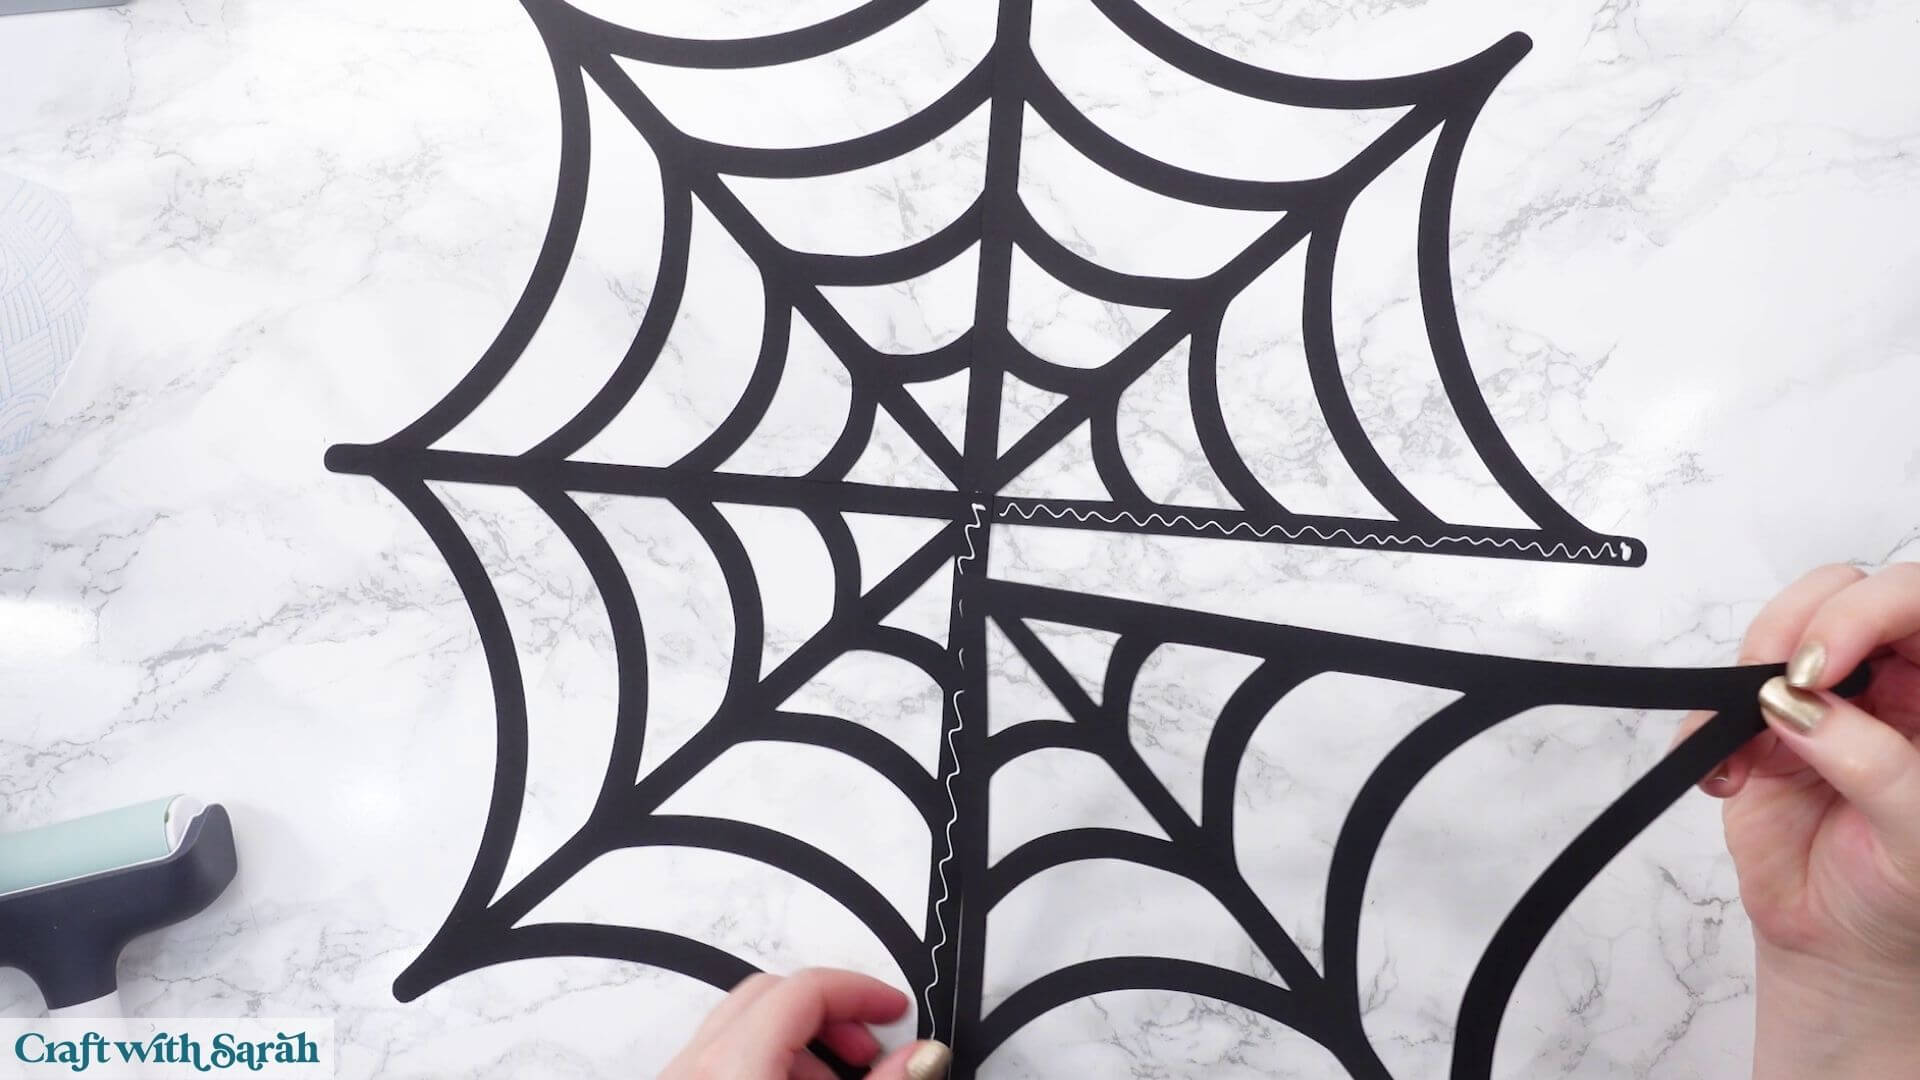
Continue until all of the sections have been attached and your giant spider web is complete.
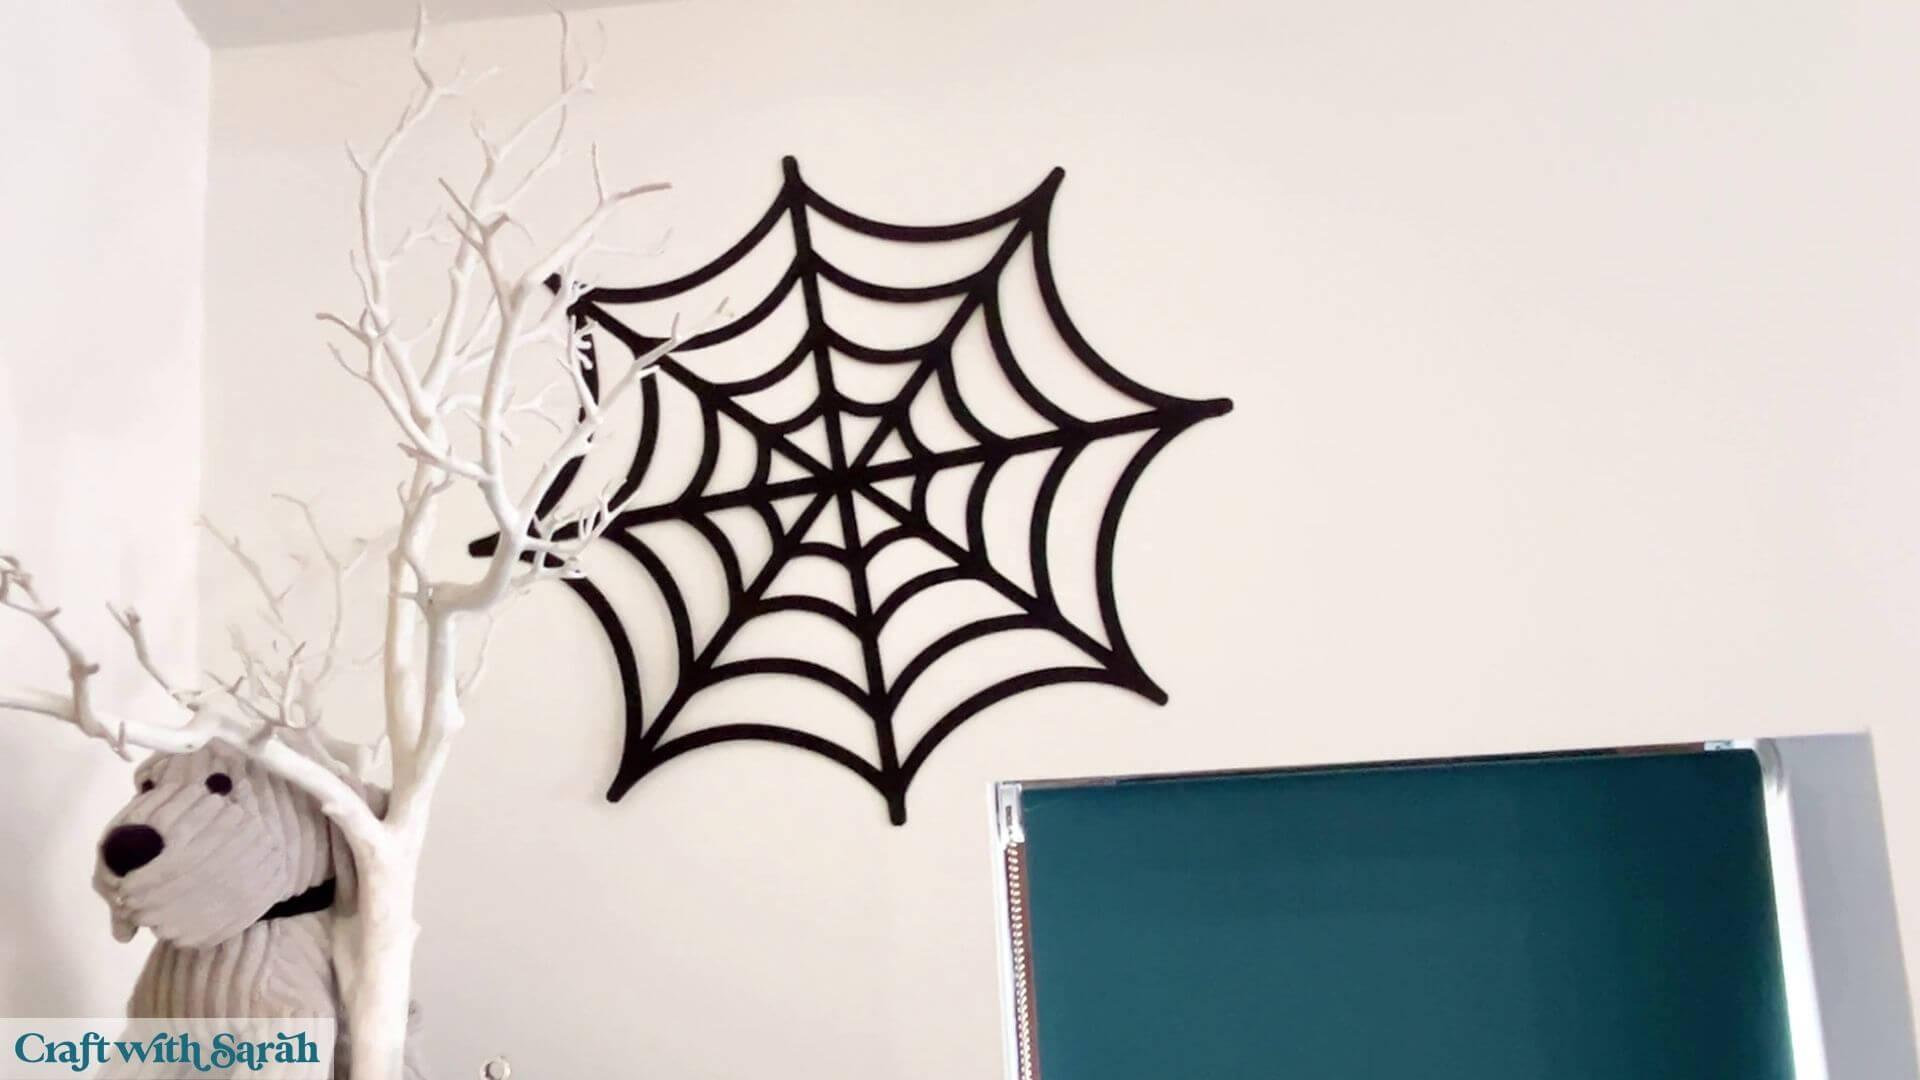
I used Blu-Tack to attach mine to the wall of my craft studio. This type of adhesive putty is useful for temporary seasonal decorations because it can generally be removed again without damaging the wall.
The finished spider web is a really good size and definitely makes an impact!
Project 3) Spider web greetings cards
Now that we’ve looked at some giant projects, let’s use the smaller spider web SVGs to make a greetings card.
Step 1) Create a base card
I’m making a 5×7 inch card, so the unfolded base card needs to measure 10×7 inches.
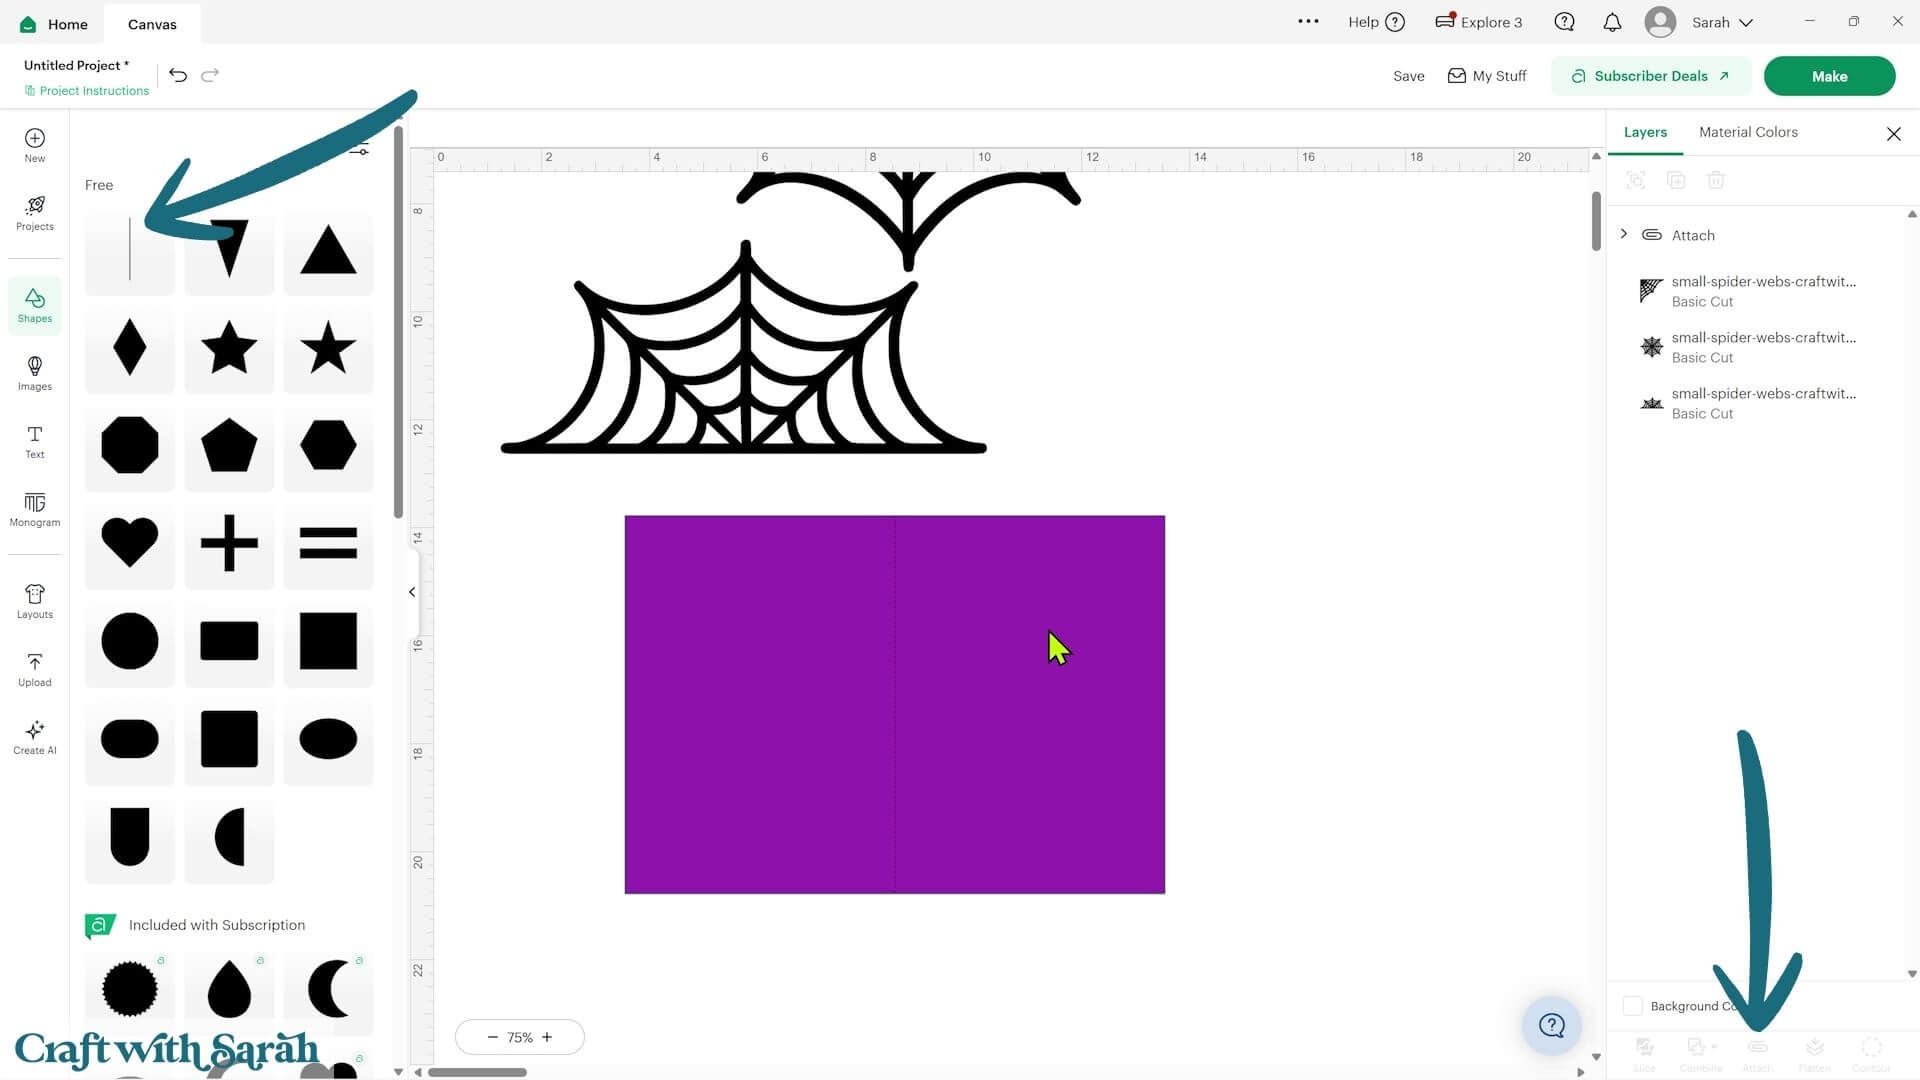
Go into ‘Shapes’ in Cricut Design Space and choose a square.
Open the padlock between the width and height boxes so that you can change the measurements independently, then resize the shape to 10 inches wide and 7 inches tall.
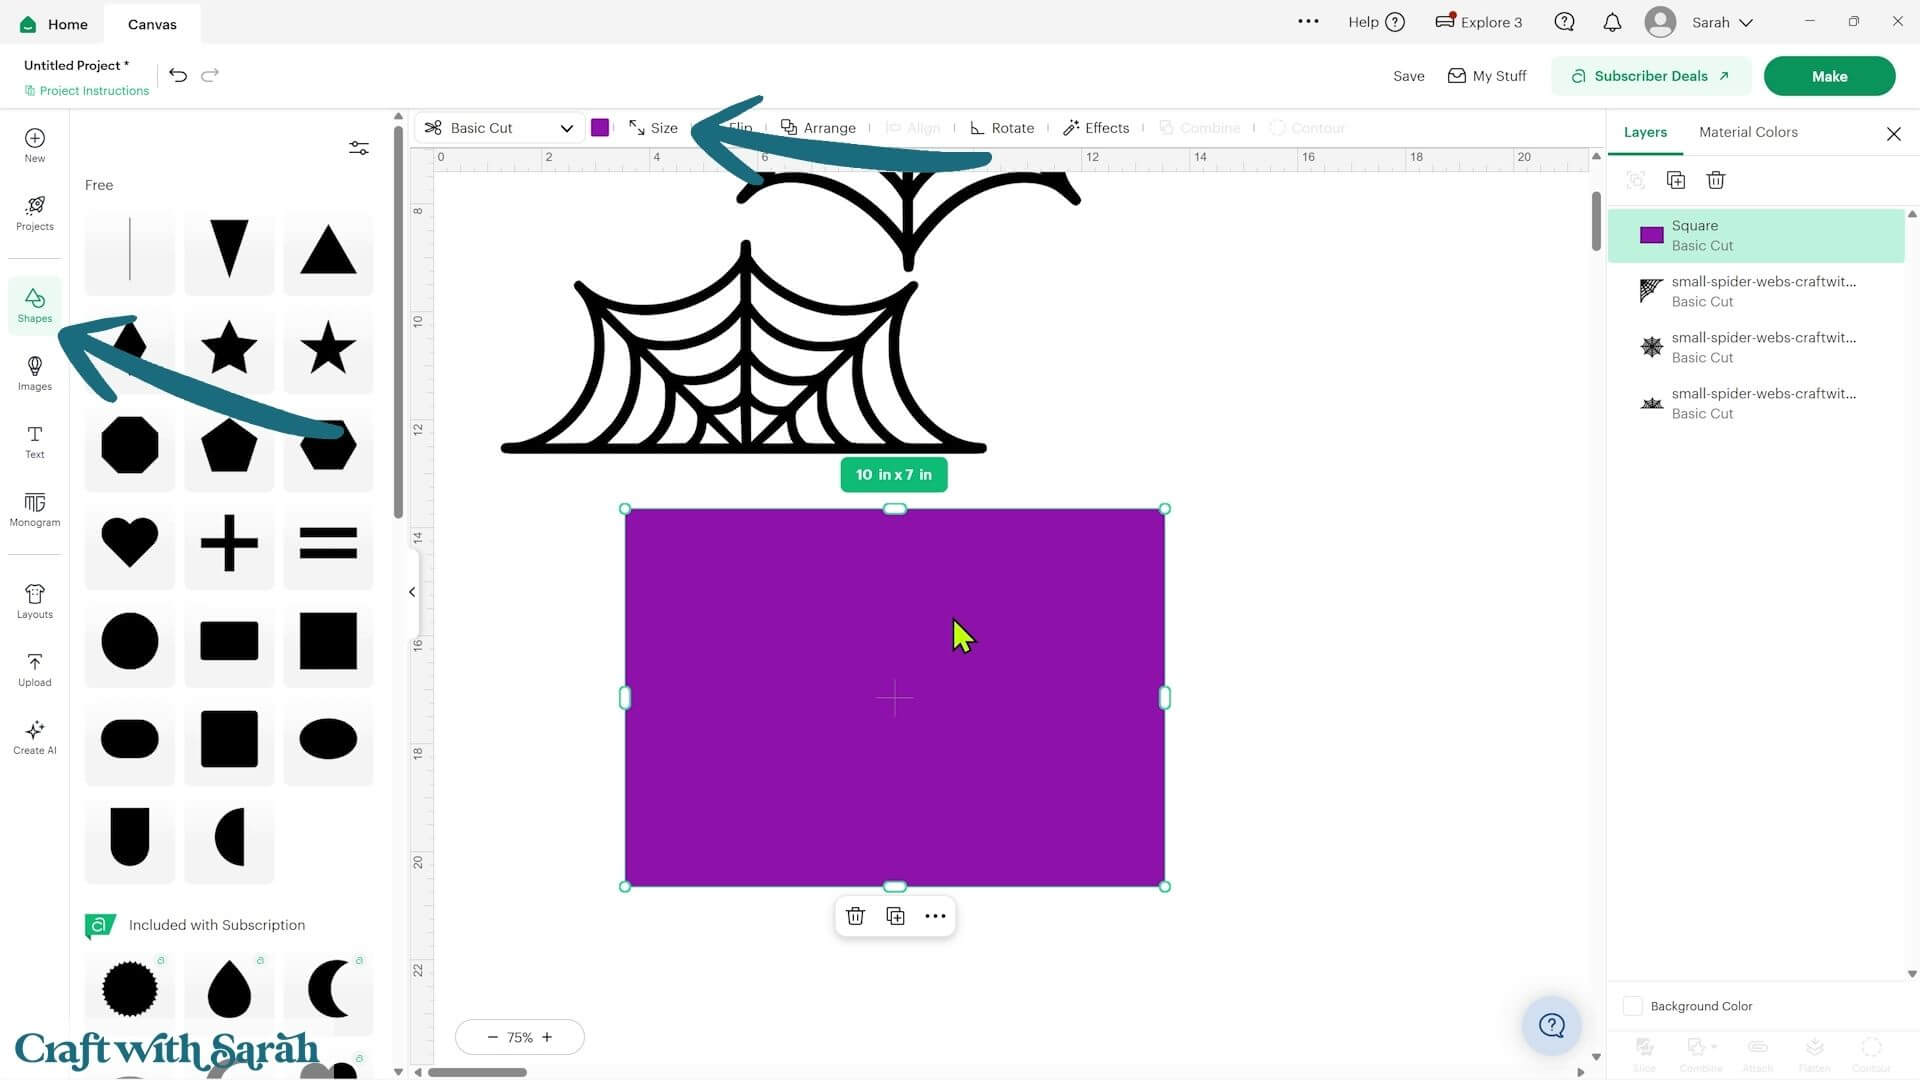
Go back into ‘Shapes’ and add a score line. Change the height of the score line to 7 inches.
Select the score line and base card together and press ‘Align’ and ‘Center’. This puts the score line exactly in the middle of the card.
With both layers still selected, press ‘Attach’. Attach tells your Cricut where to do the scoring.
Next, we’ll make a rectangle of patterned paper to go on the front.
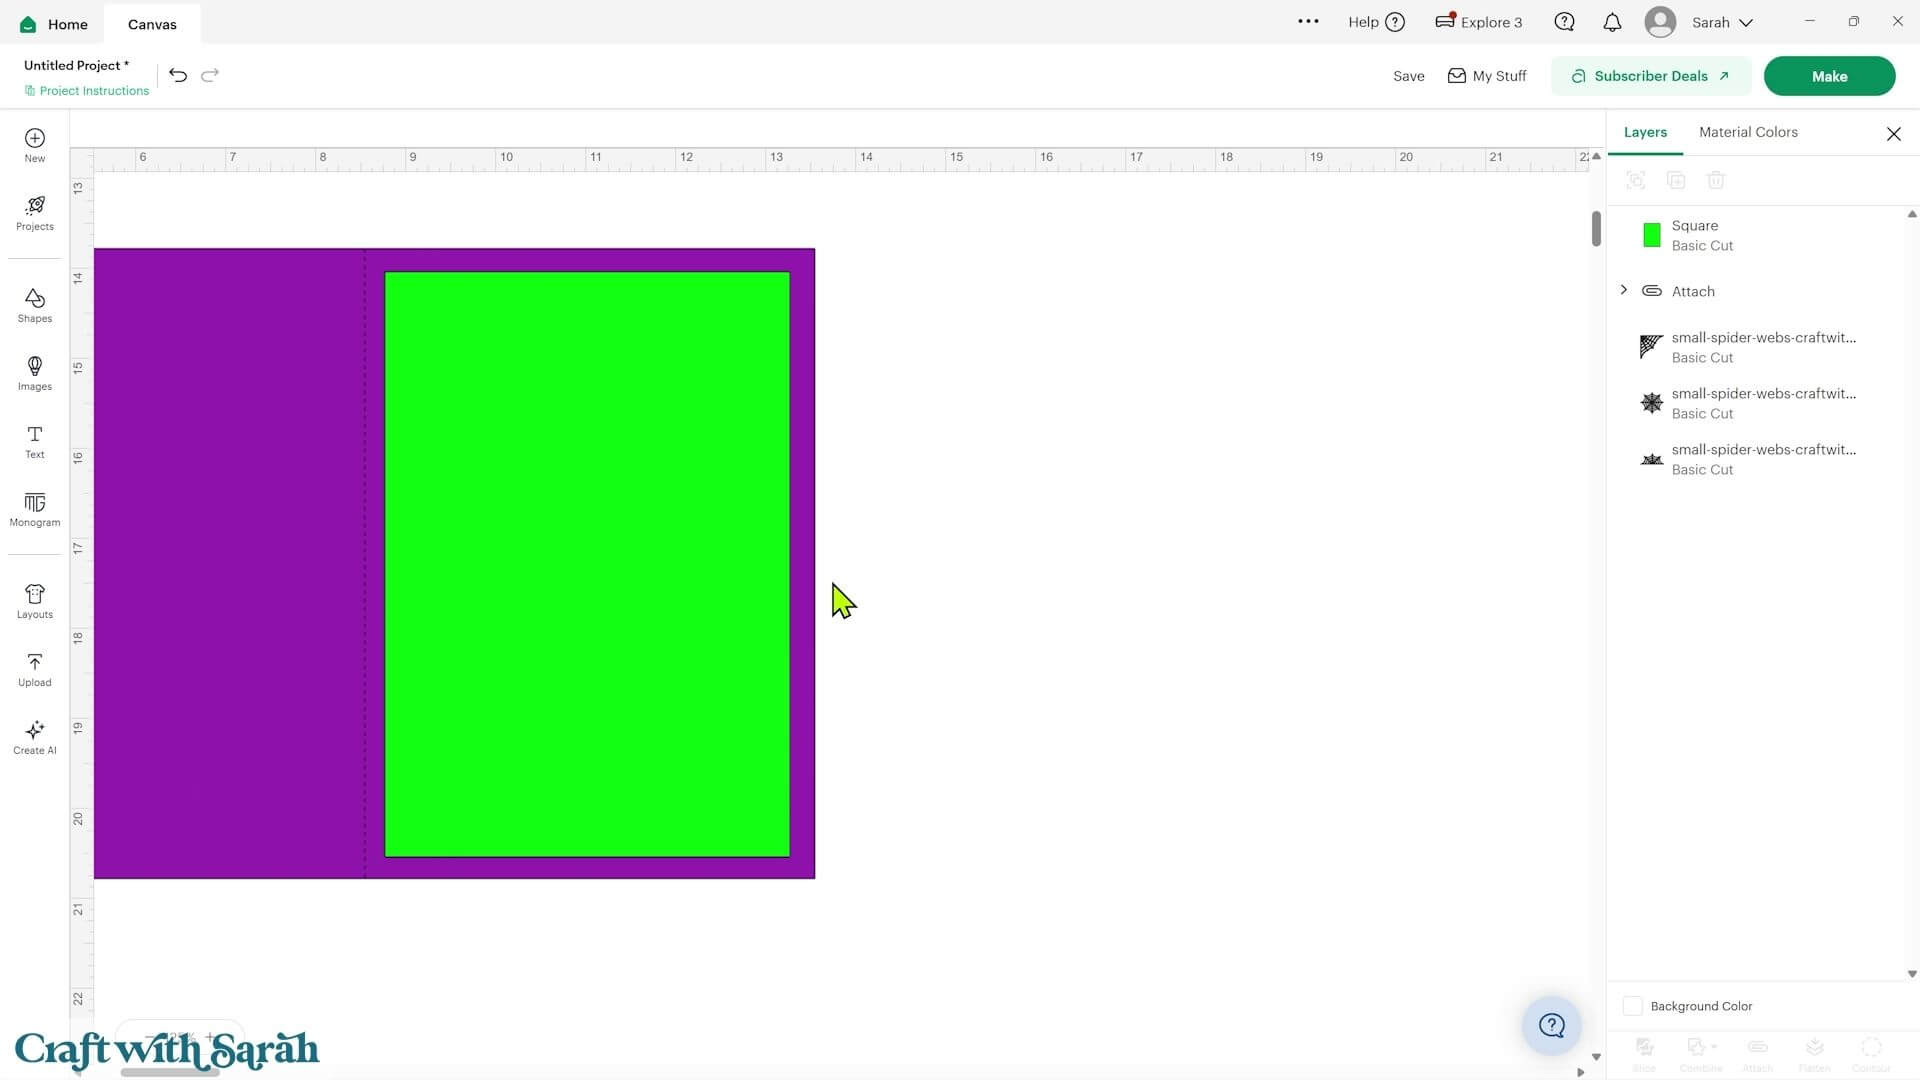
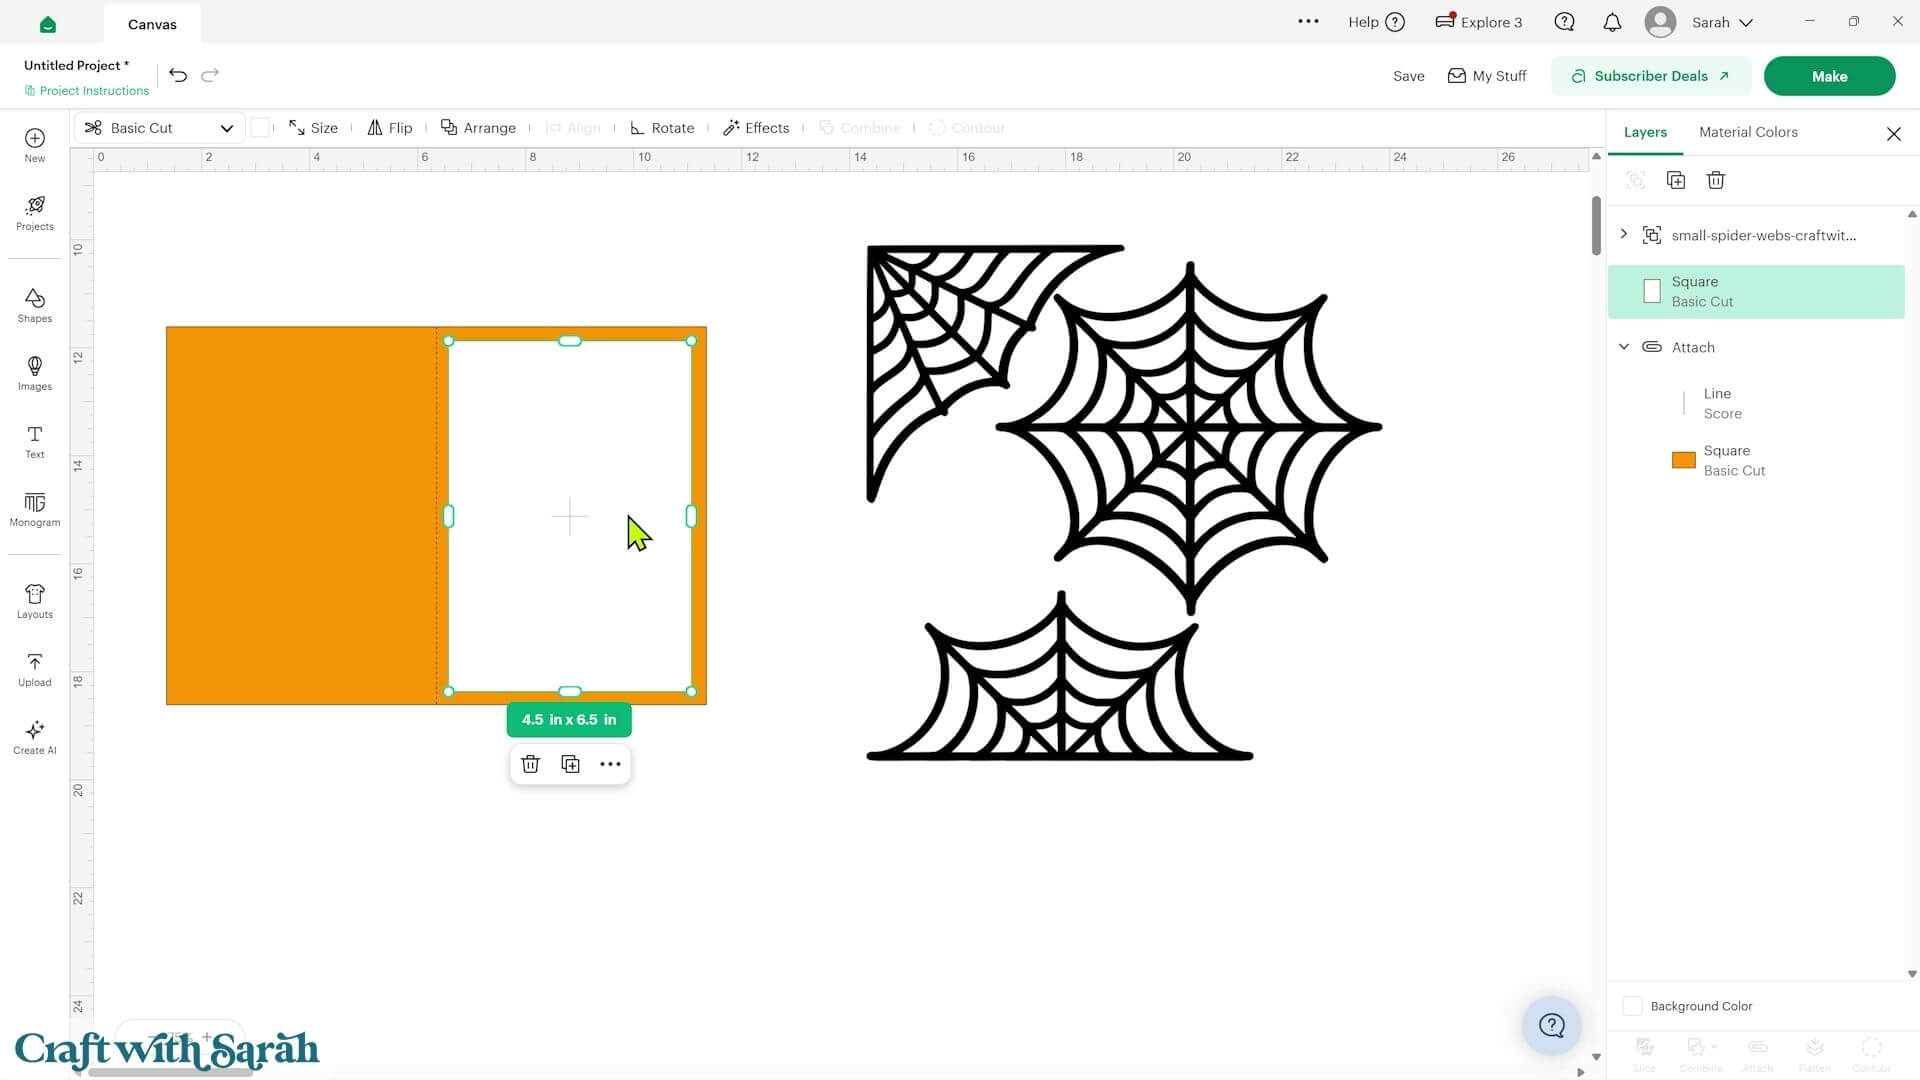
Add another square and resize it to 4.5 inches wide and 6.5 inches tall.
When I’m designing with patterned paper in Design Space, I like to make those layers either very bright green or very bright pink. This reminds me when I’m cutting the project that the layer should be made from patterned paper rather than ordinary cardstock.
Step 2) Add the spider web
We’re going to create a decorative frame the same size as the patterned paper and join one of the spider webs into it.
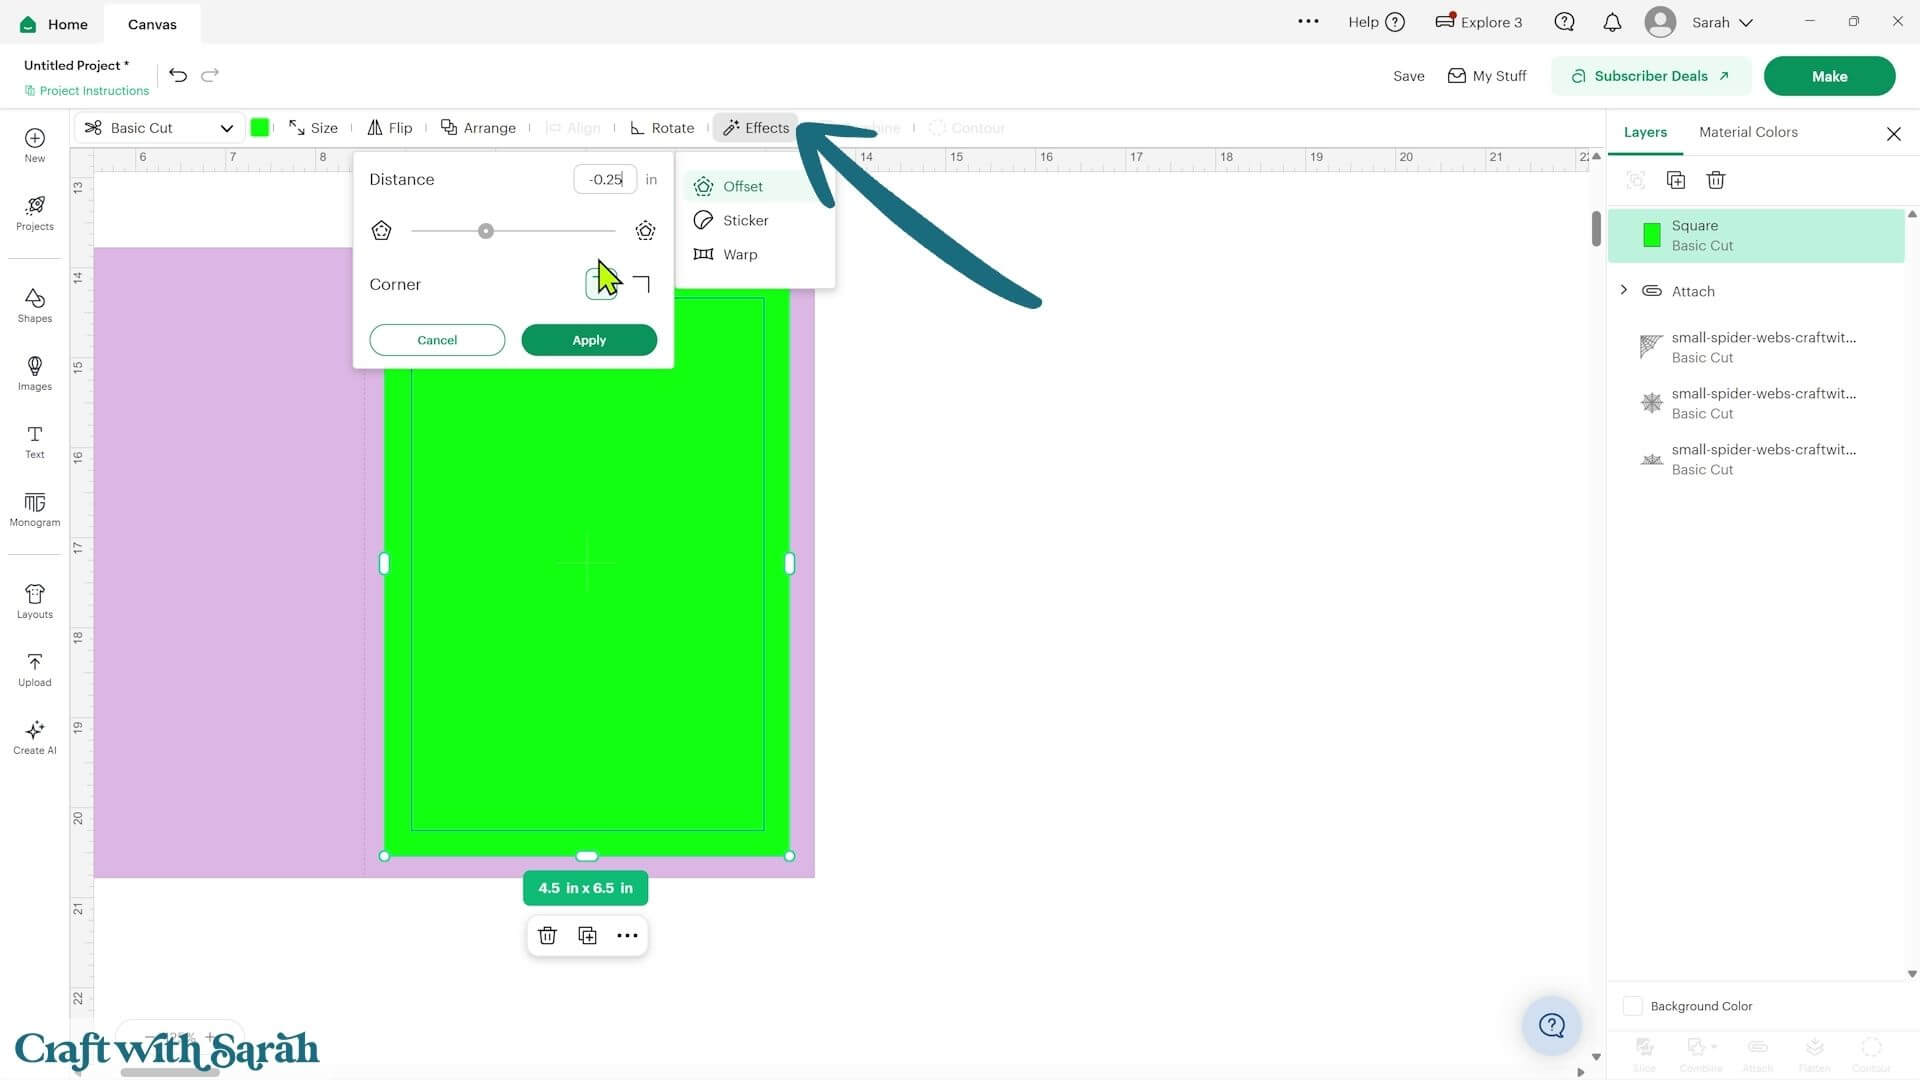
Select the 4.5×6.5 inch rectangle and go into ‘Effects’ and then ‘Offset’.
Instead of creating a normal positive offset around the outside, drag the slider into a negative number to make a smaller rectangle inside the original.
I used an offset of approximately 0.25 inches. You want the finished frame to be thick enough that your Cricut can cut it easily.
Press ‘Apply’.
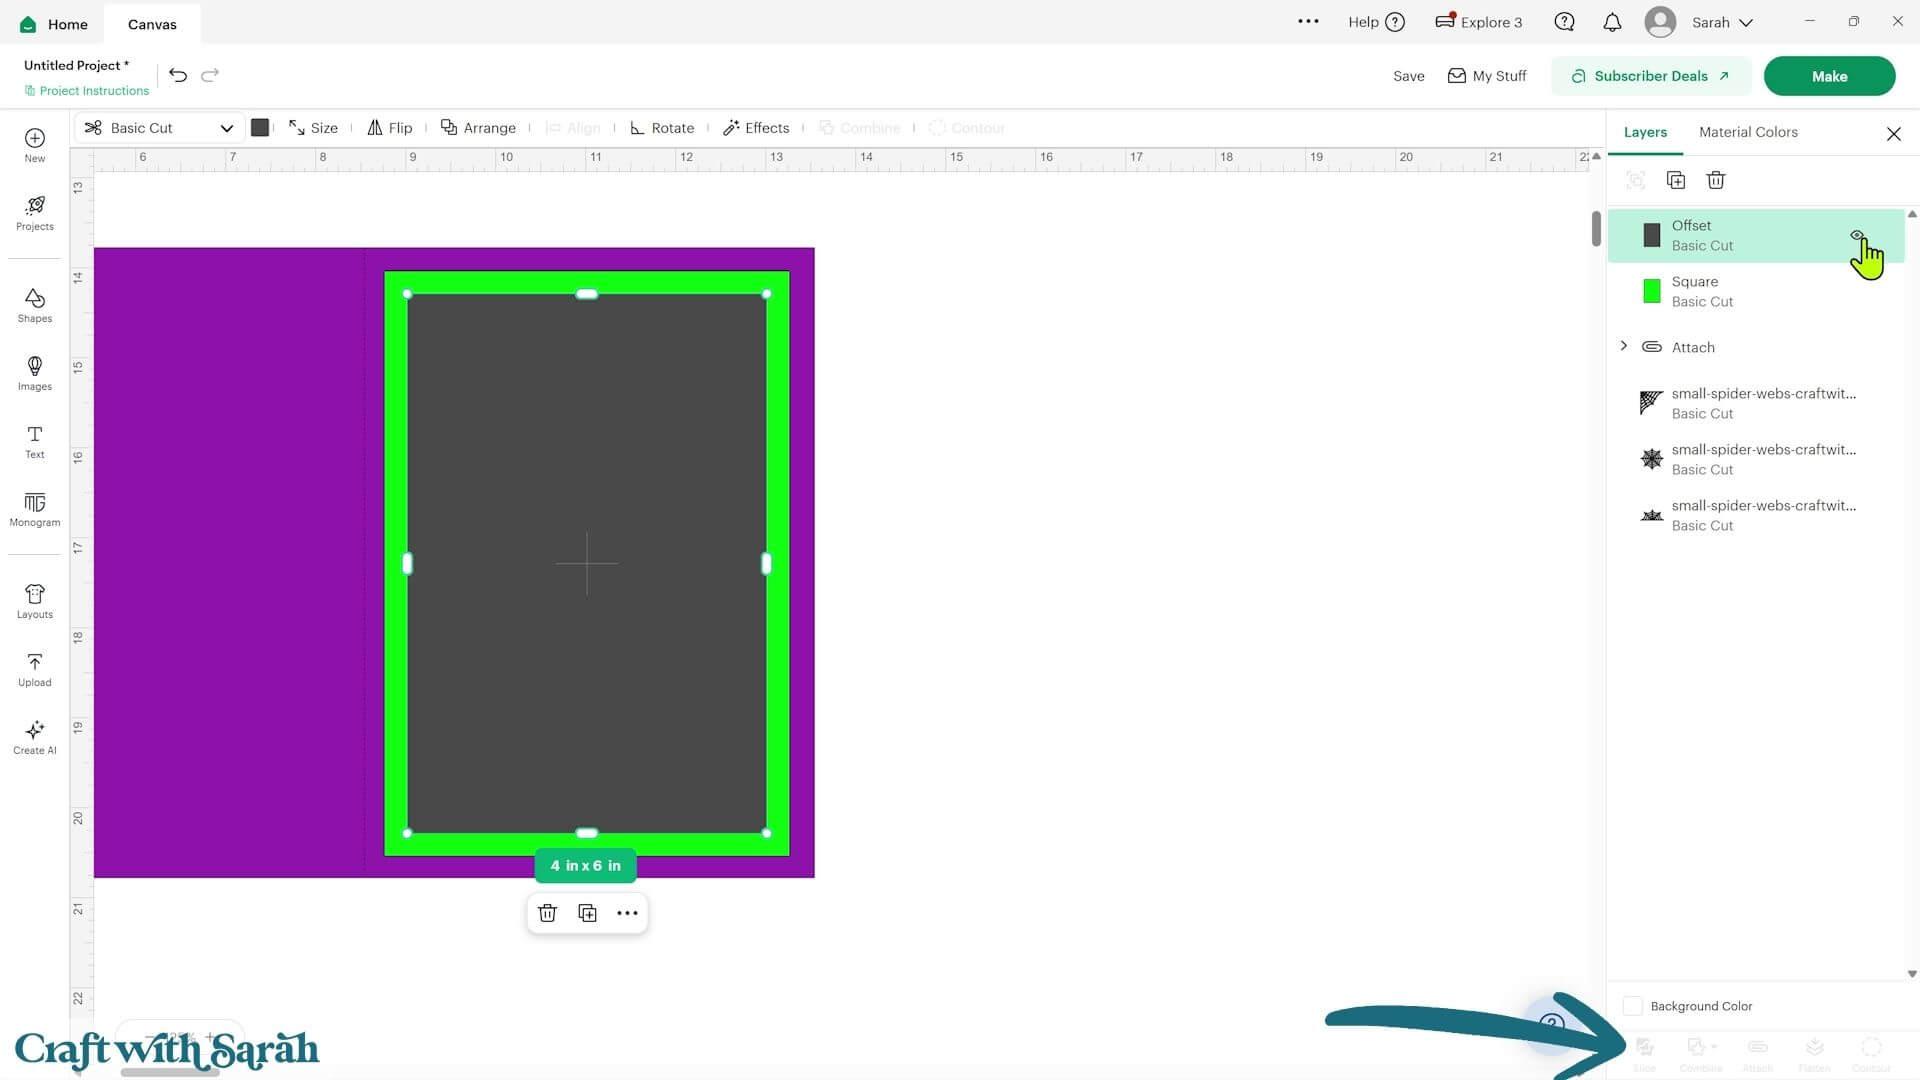
Next, make a copy of the original rectangle in exactly the same position. On a Windows computer, hold the Alt key and click the rectangle. On a Mac, hold Option and click.
Hide one of the copies for now.
Select the smaller offset rectangle and the larger rectangle, then press ‘Slice’.
Delete the two unwanted pieces and you’ll be left with a rectangular frame.
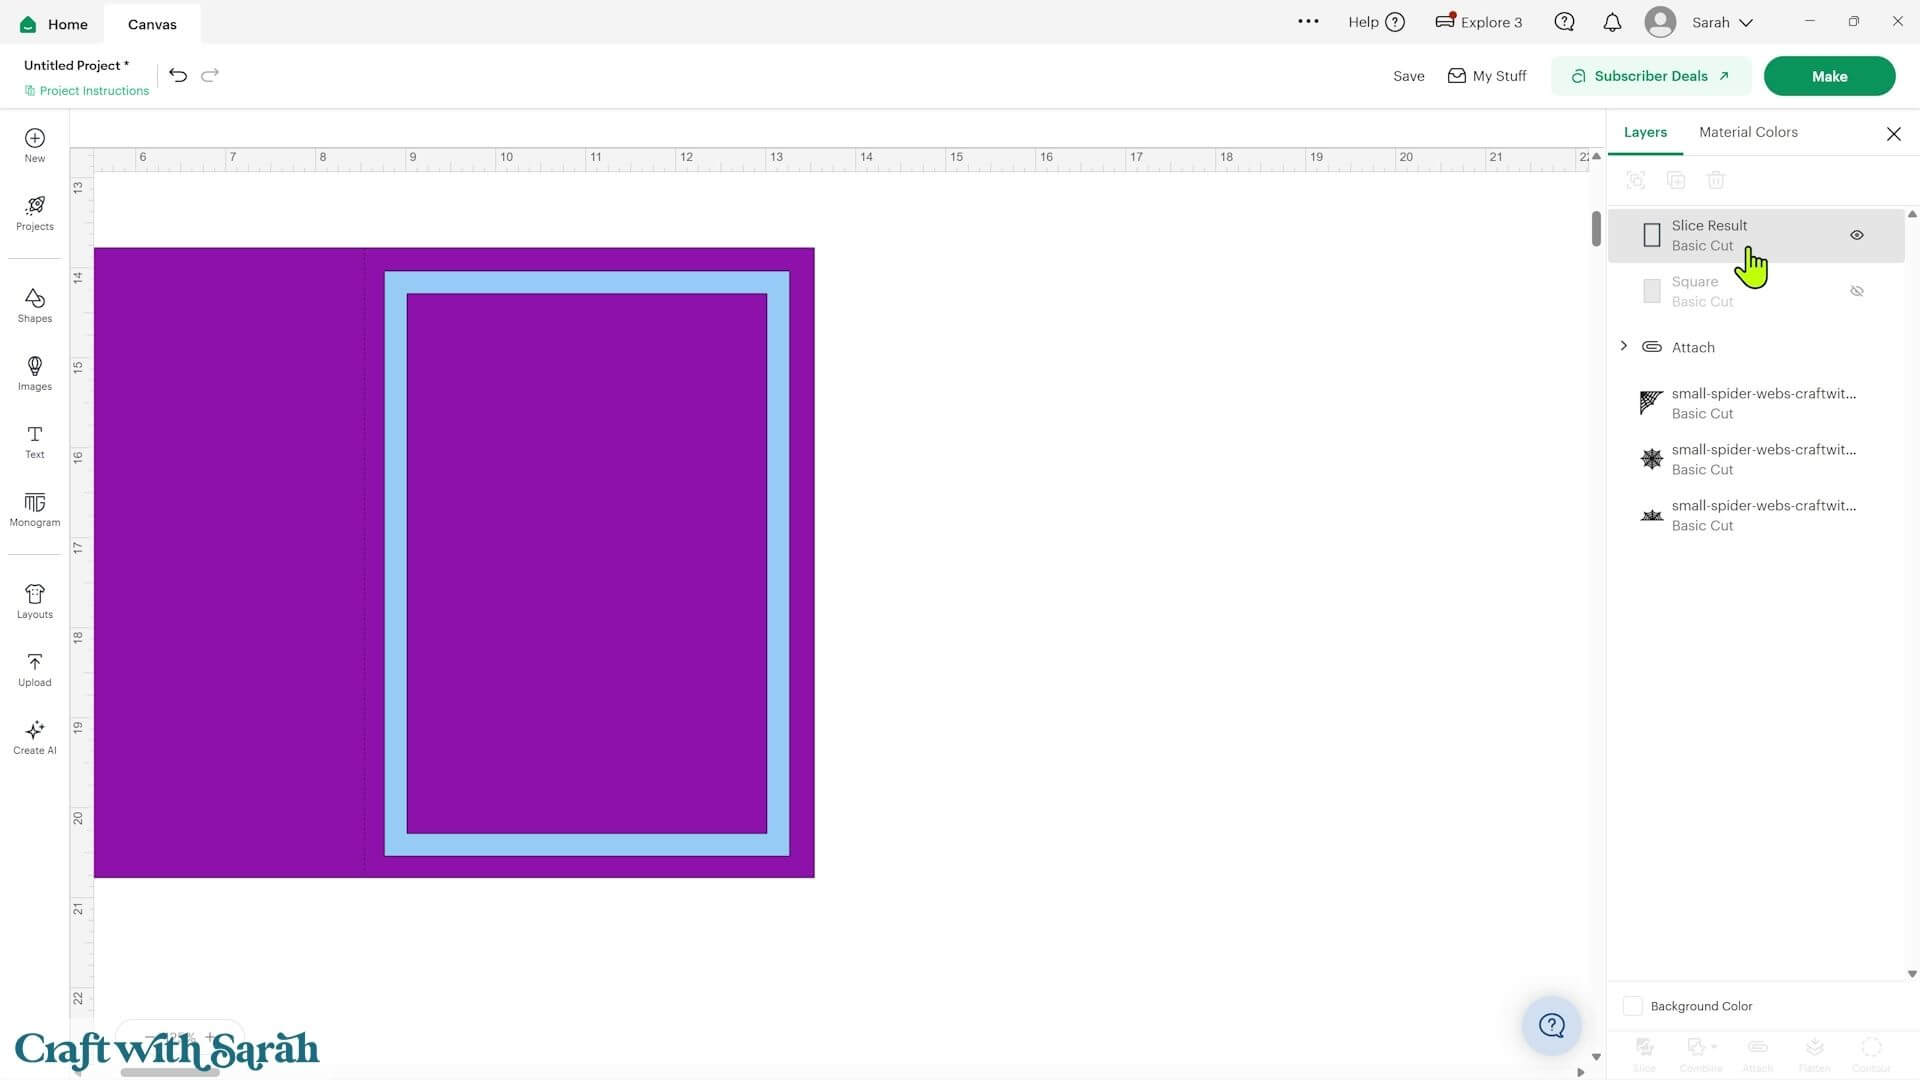
Bring one of the small spider web SVGs onto the Canvas and position it over the frame.
You can experiment with the placement here. It could sit in the middle, come out from one corner or you could even use several smaller webs around the card.
Be careful about making the spider web too small. The smaller it gets, the thinner those lines become and the more difficult it will be for your Cricut to cut from cardstock.
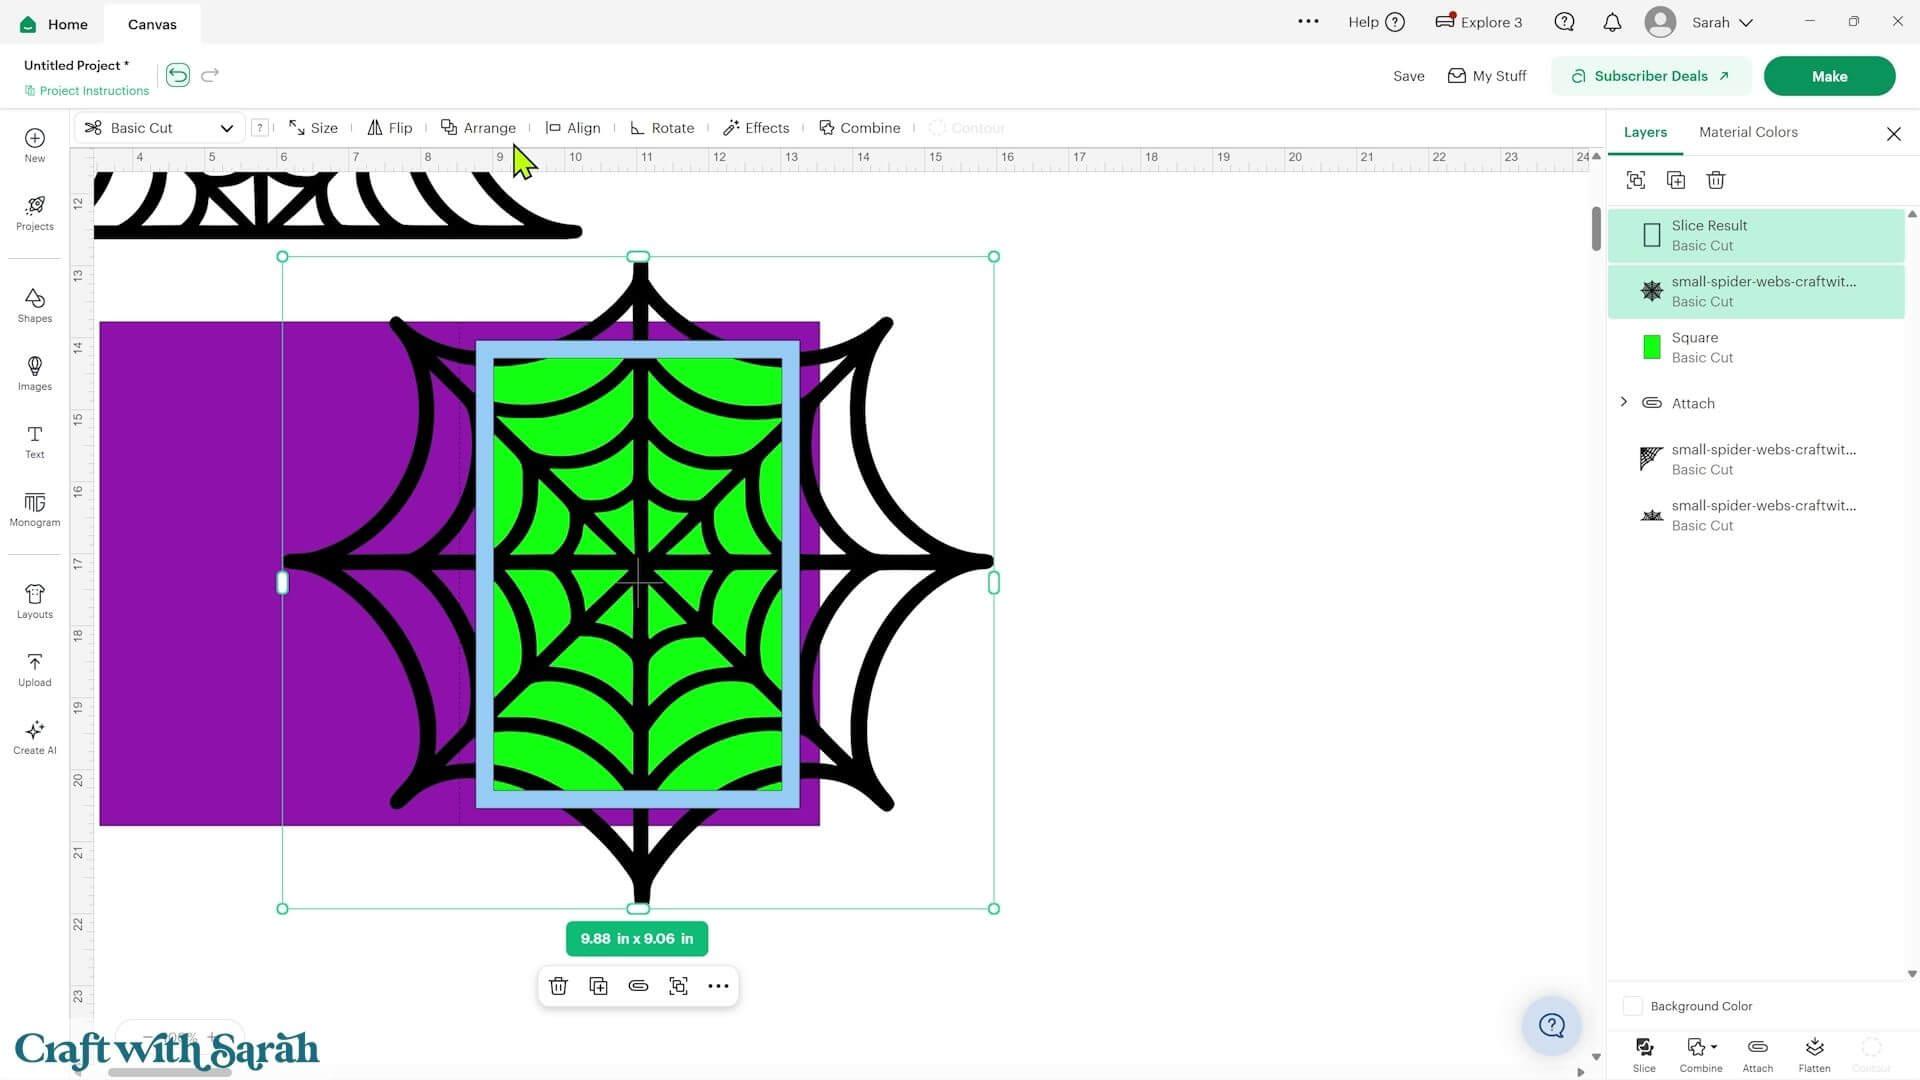
When you’re happy with the position, we need to remove any parts of the spider web that extend beyond the outside of the frame.
Duplicate the frame in place and hide one of the copies.
Select the visible frame and go into ‘Contour’. Press ‘Hide All Contours’ and apply the change. This fills the frame back in to create a solid rectangle.
Select that rectangle and the spider web, then press ‘Combine’ and ‘Intersect’.
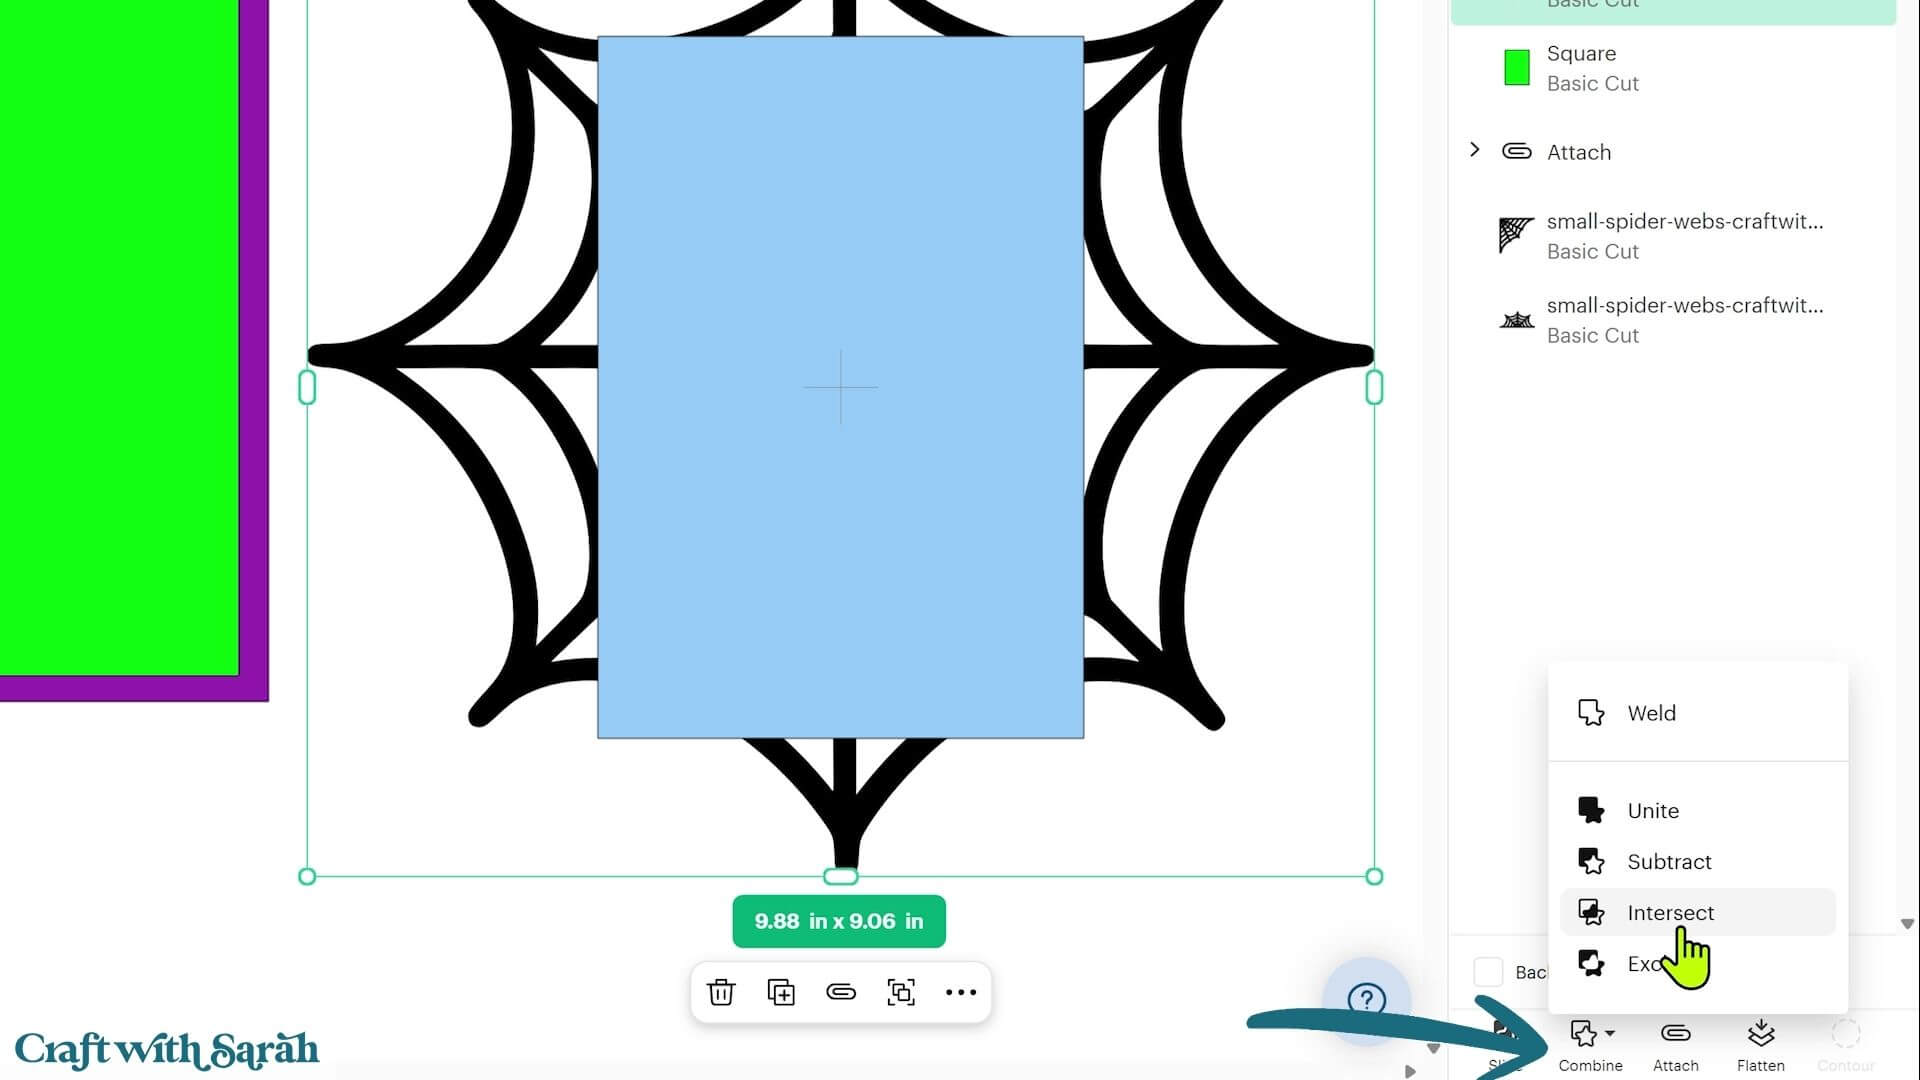
This keeps only the parts of the spider web that were overlapping the rectangle.
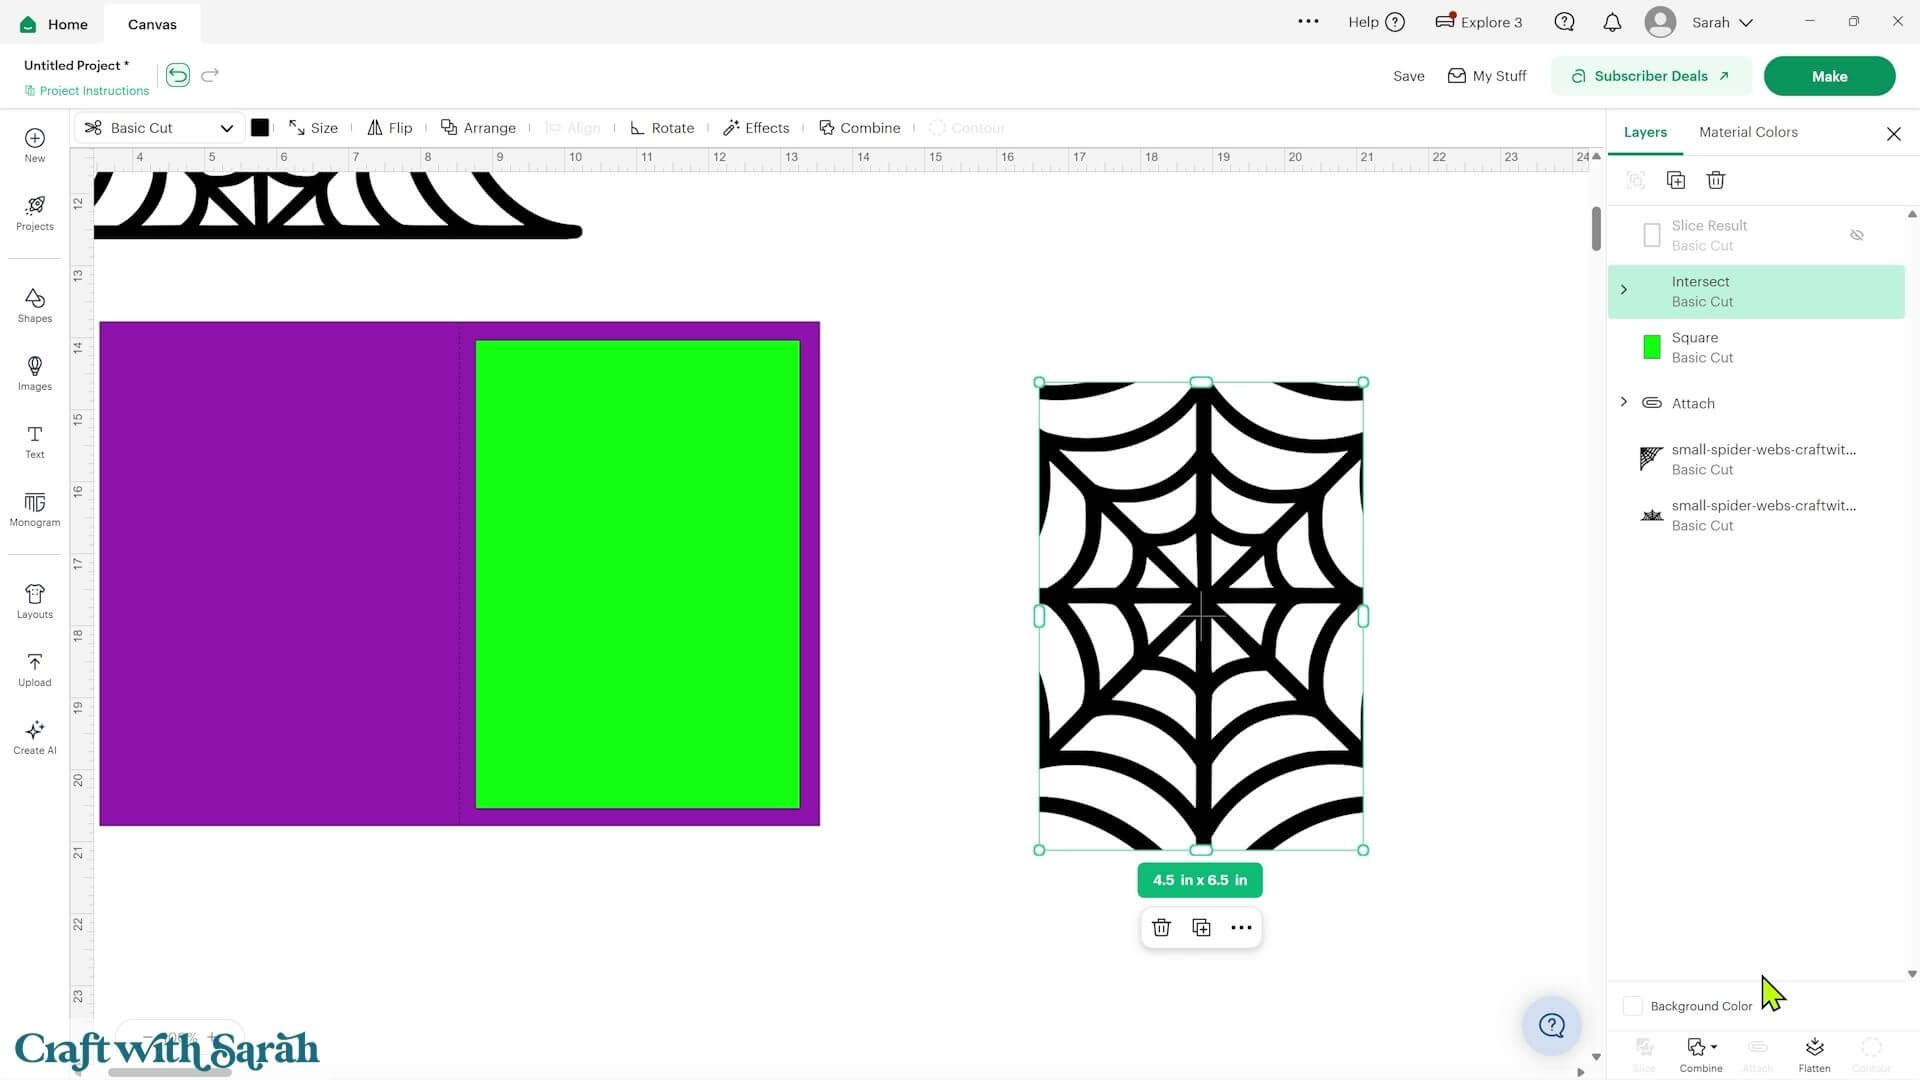
Turn your original frame back on.
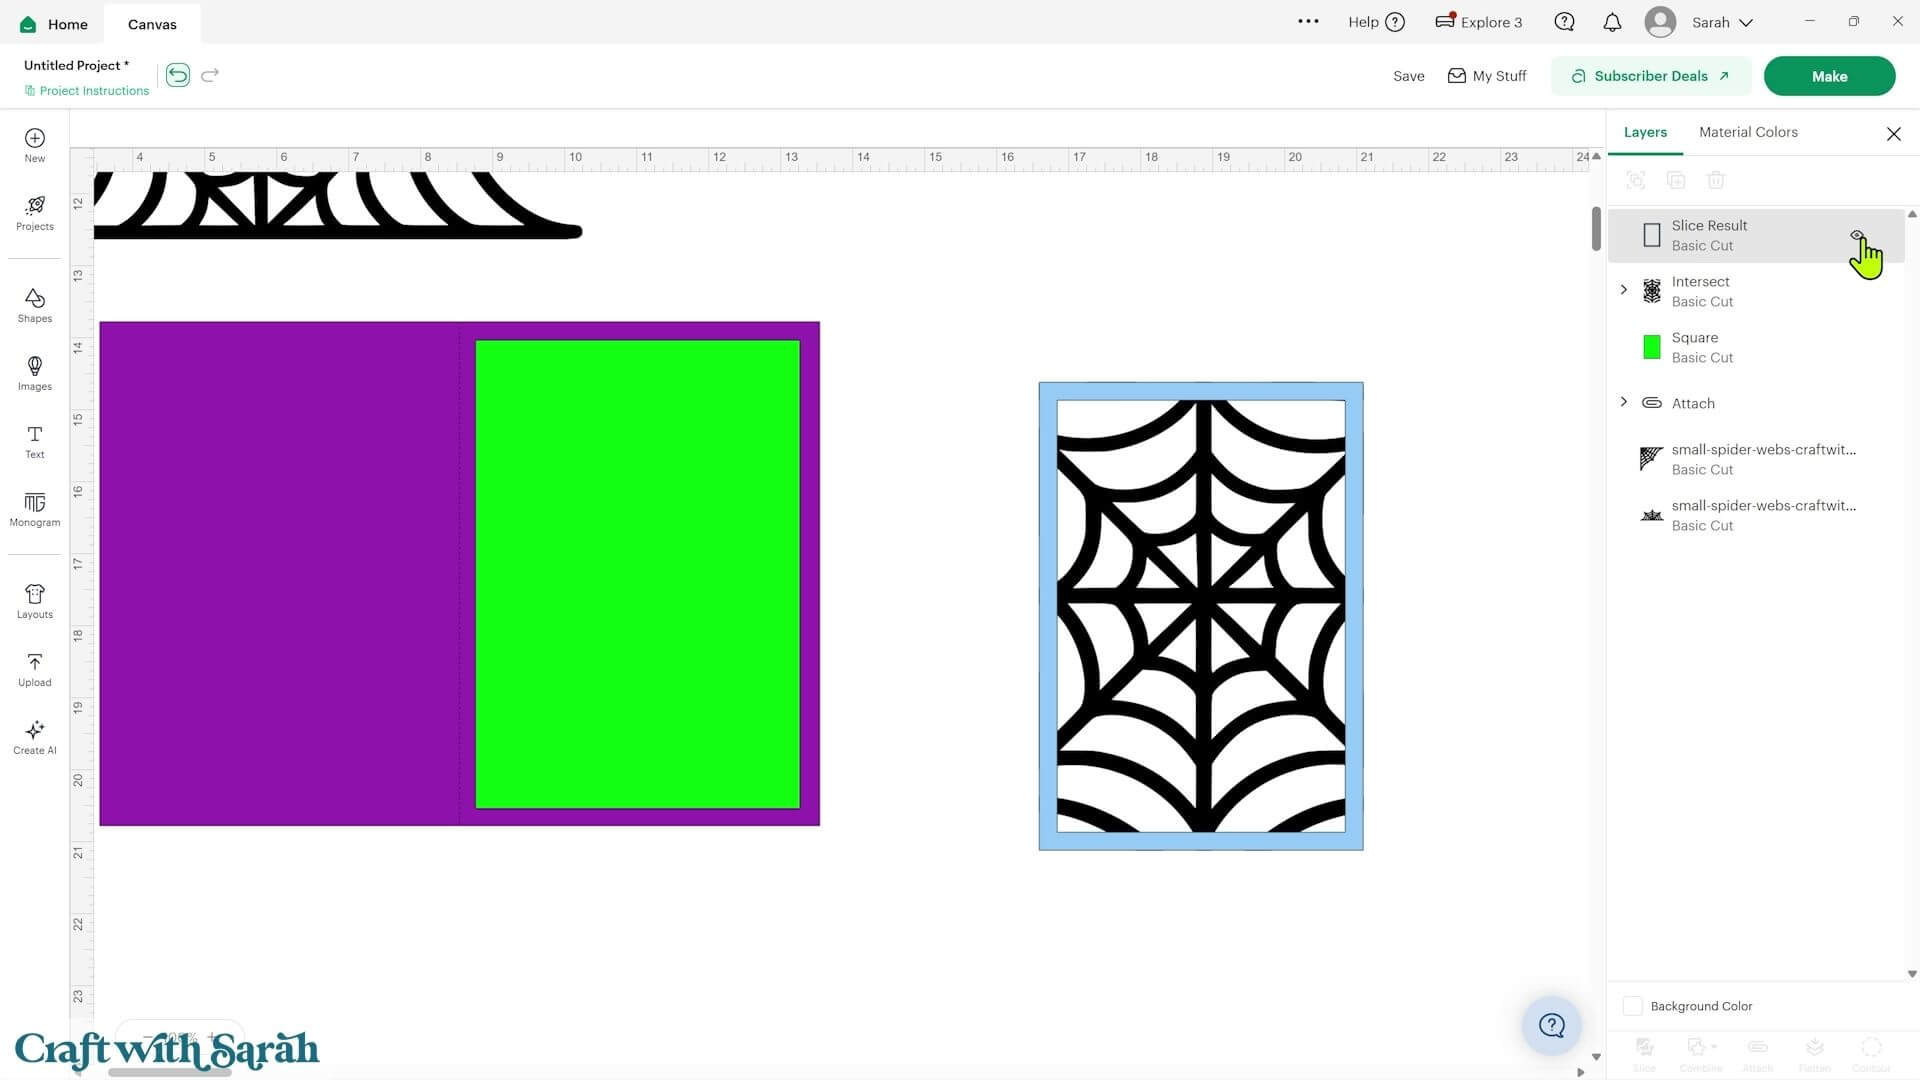
Select the frame and spider web together and press ‘Combine’ and ‘Weld’.
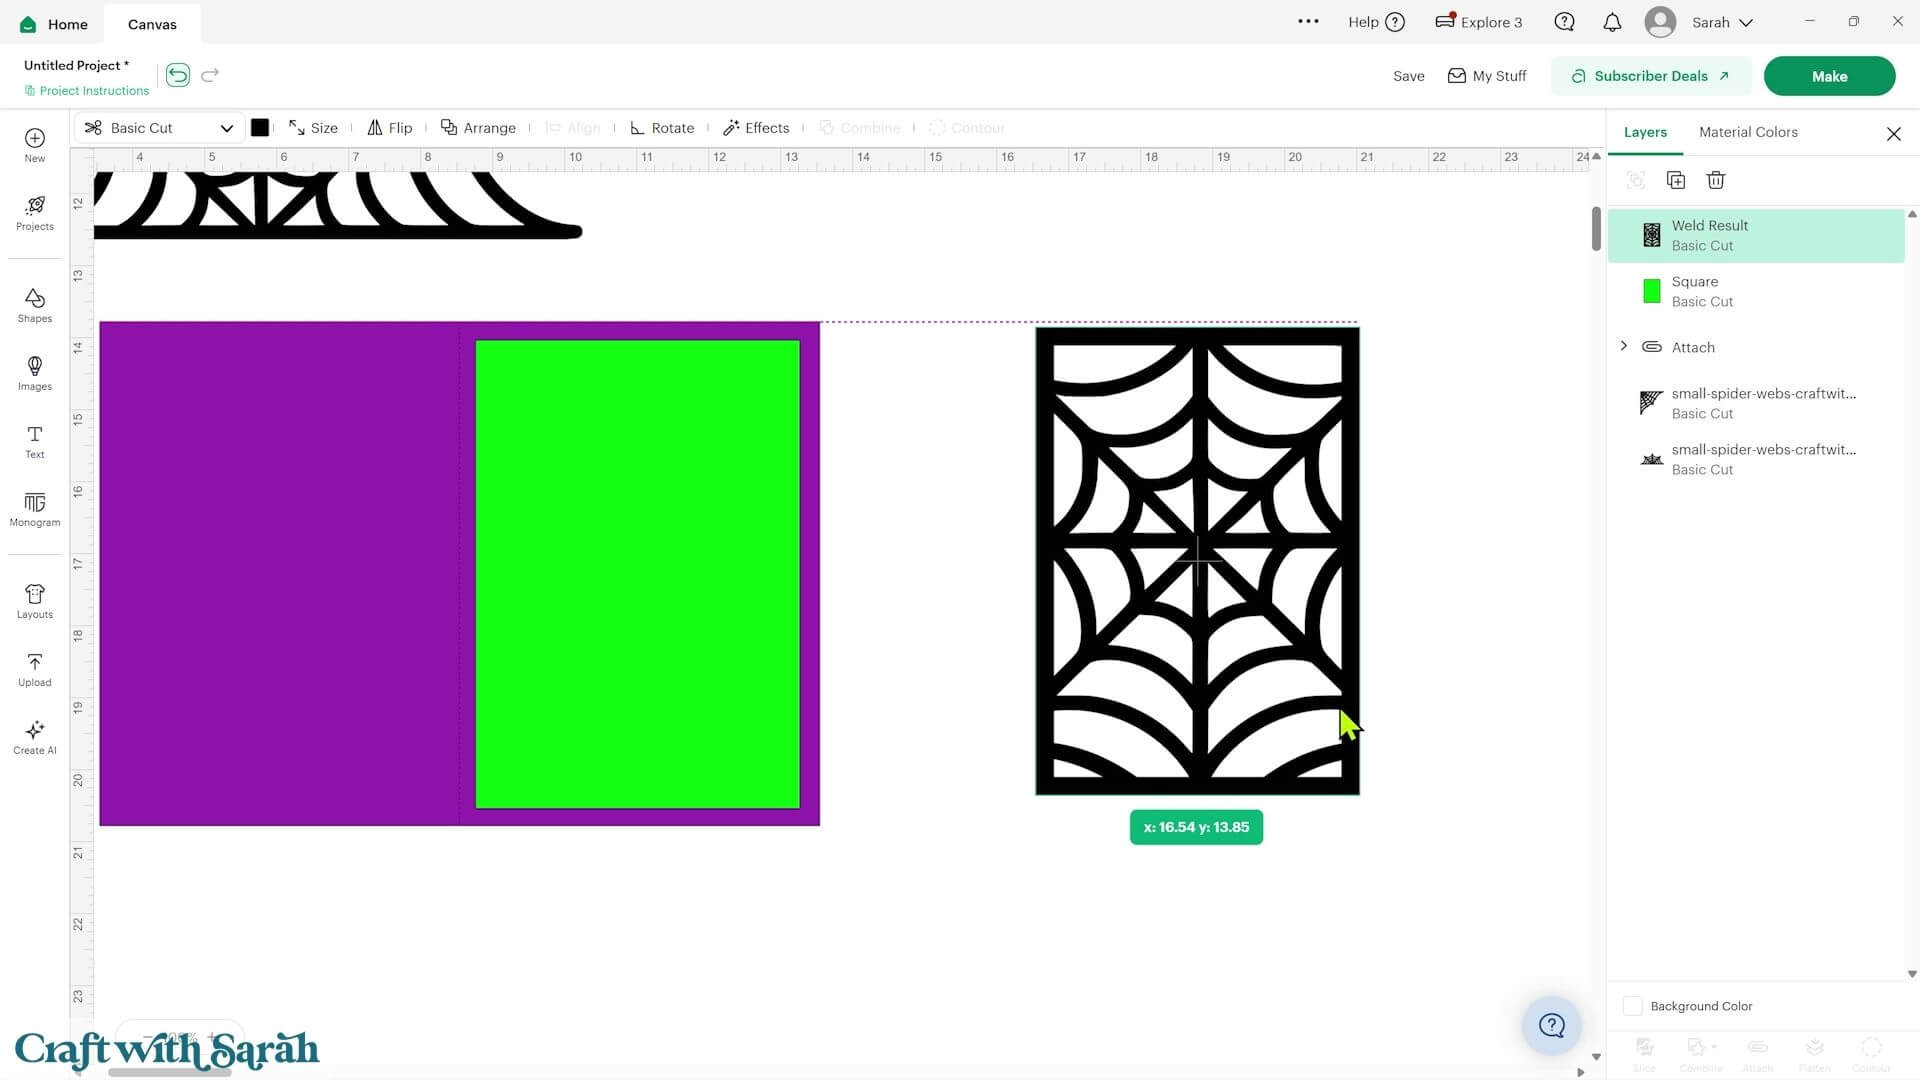
You now have one complete layer containing both the frame and the spider web.
Step 3) Decorate the card
Decorate the card however you like. I used some spiders from Cricut Access.
I hid the dots in the middle of their eyes as they were very small circles. I’ll draw them on with a black pen instead when the spiders are cut out.
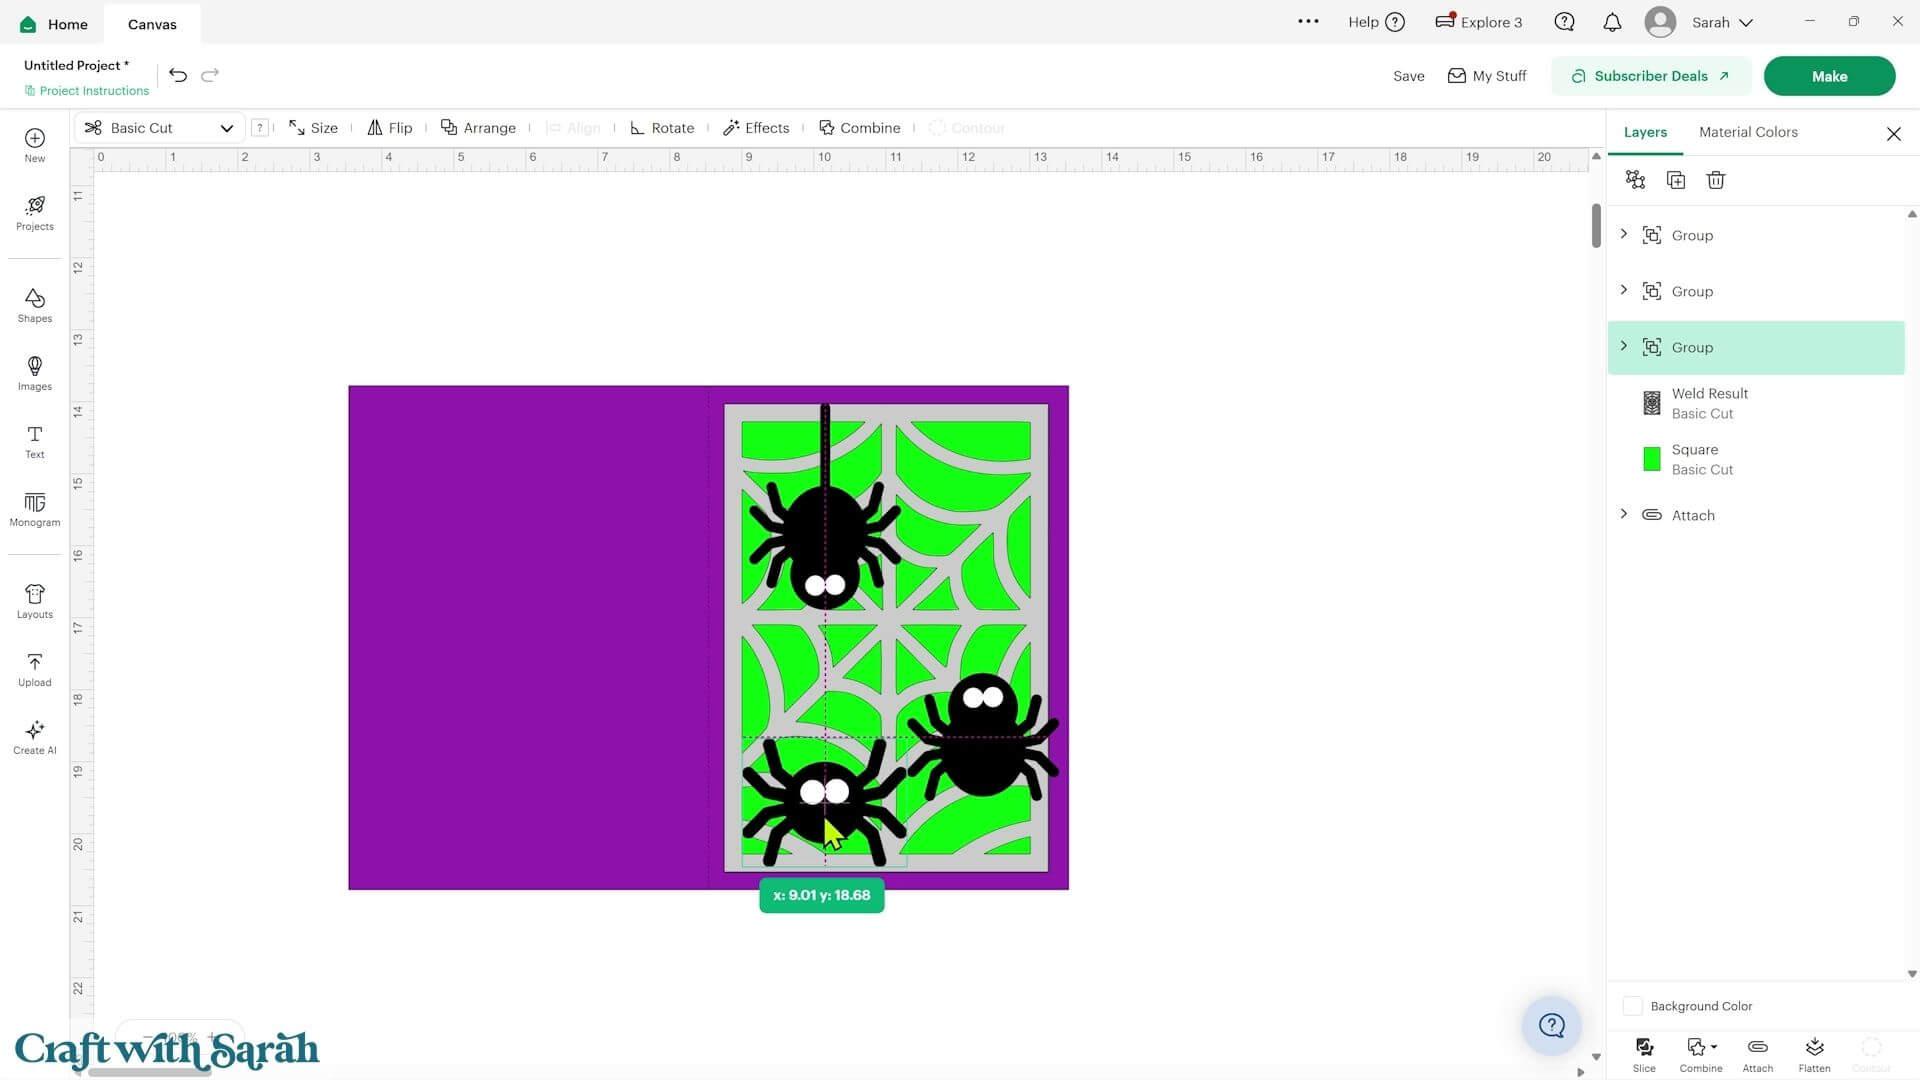
Step 4) Cut the project
When your design is finished, save your project, connect to your Cricut and press ‘Make’.
Check each mat and change the paper sizes where needed. You can also rotate and reposition pieces to use your cardstock more efficiently.
Get everything cut out and then we’re ready to assemble the card.
Step 5) Assemble the card
Fold the base card in half along the score line.
Glue the patterned paper rectangle onto the middle of the card front, trying to keep the border around all four sides as even as possible.
Next, glue the spider web frame over the patterned paper. I cut mine from shiny, glittery silver cardstock.
Don’t push down too hard when sticking the spider web into position. The edges are quite thin, so give it just a gentle press to avoid making the glue smush out around the sides.
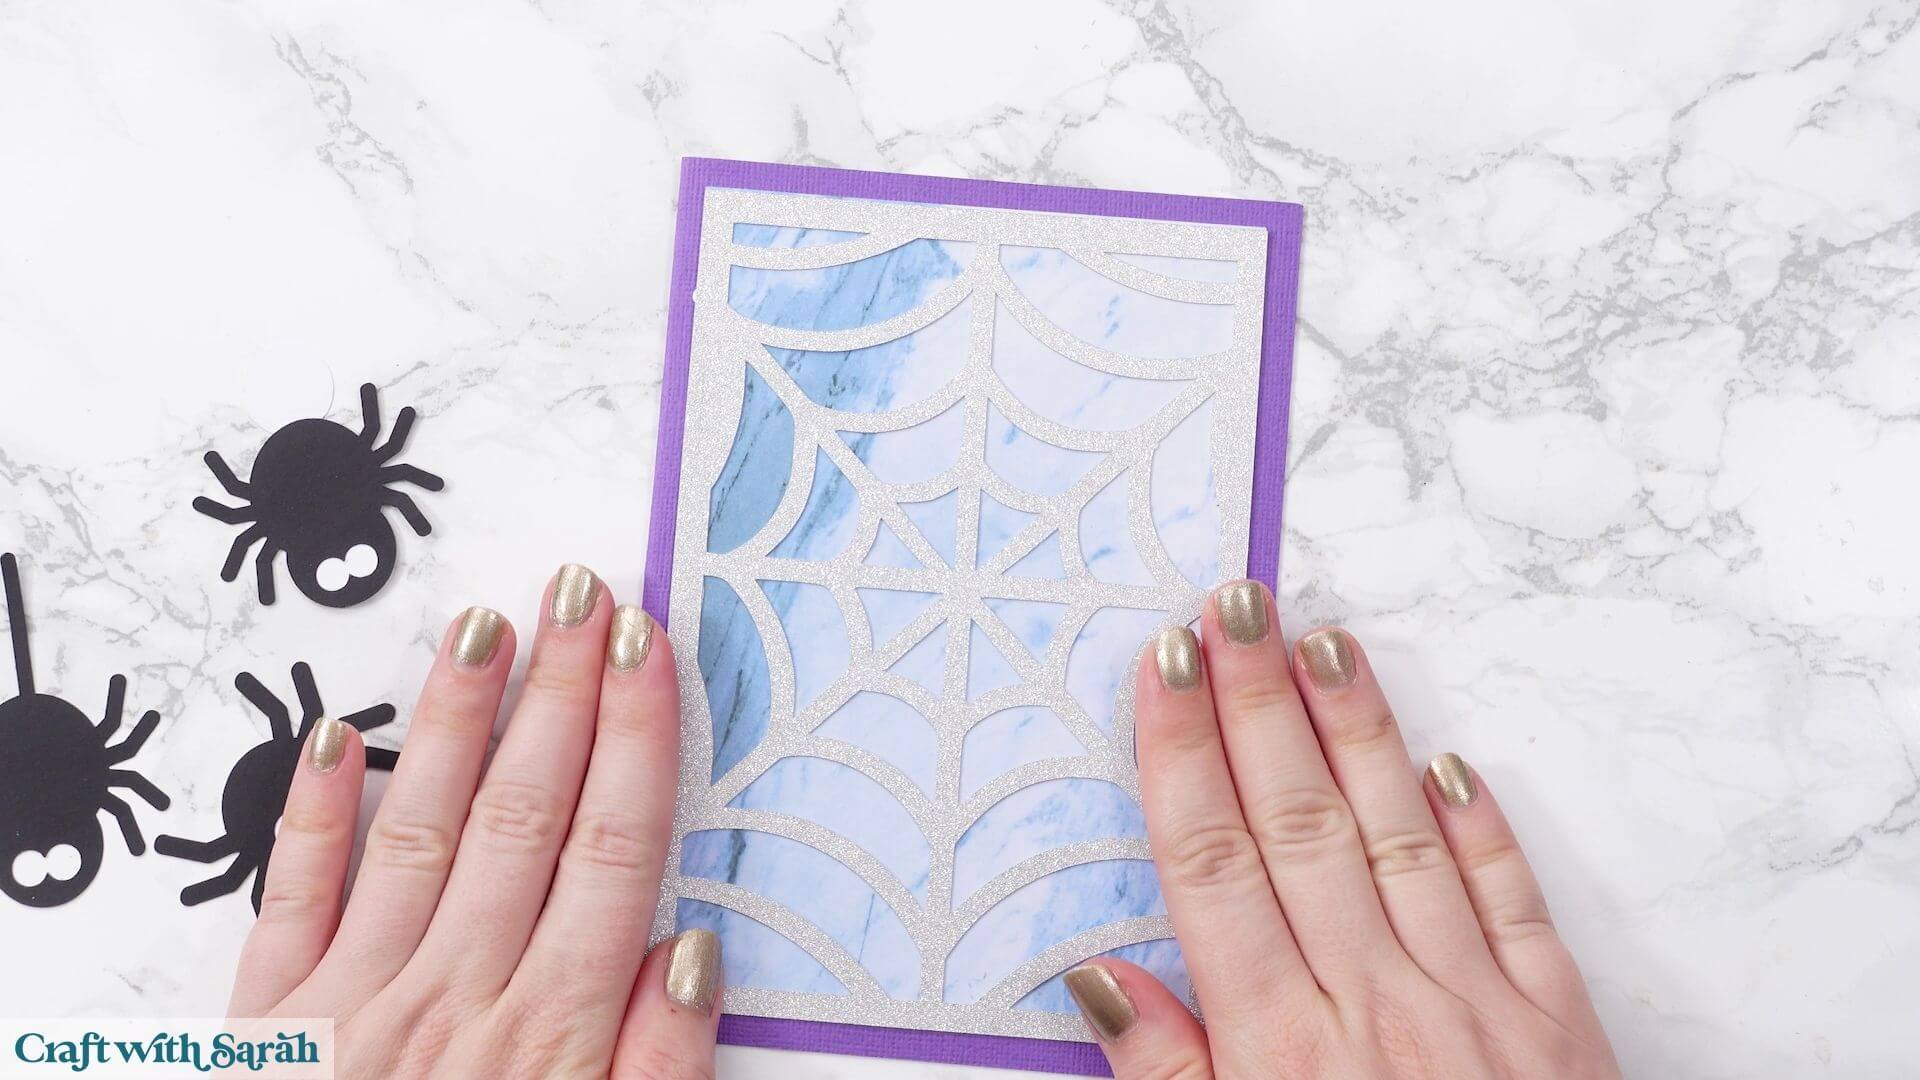
Turn the spiders upside down and glue the white circles behind their eyes.
Use a black pen to draw the pupils onto the white circles.
You could glue the spiders directly onto the card, but I used foam squares because I wanted them to pop out from the background slightly.
Arrange the spiders around the spider web and stick them into position.
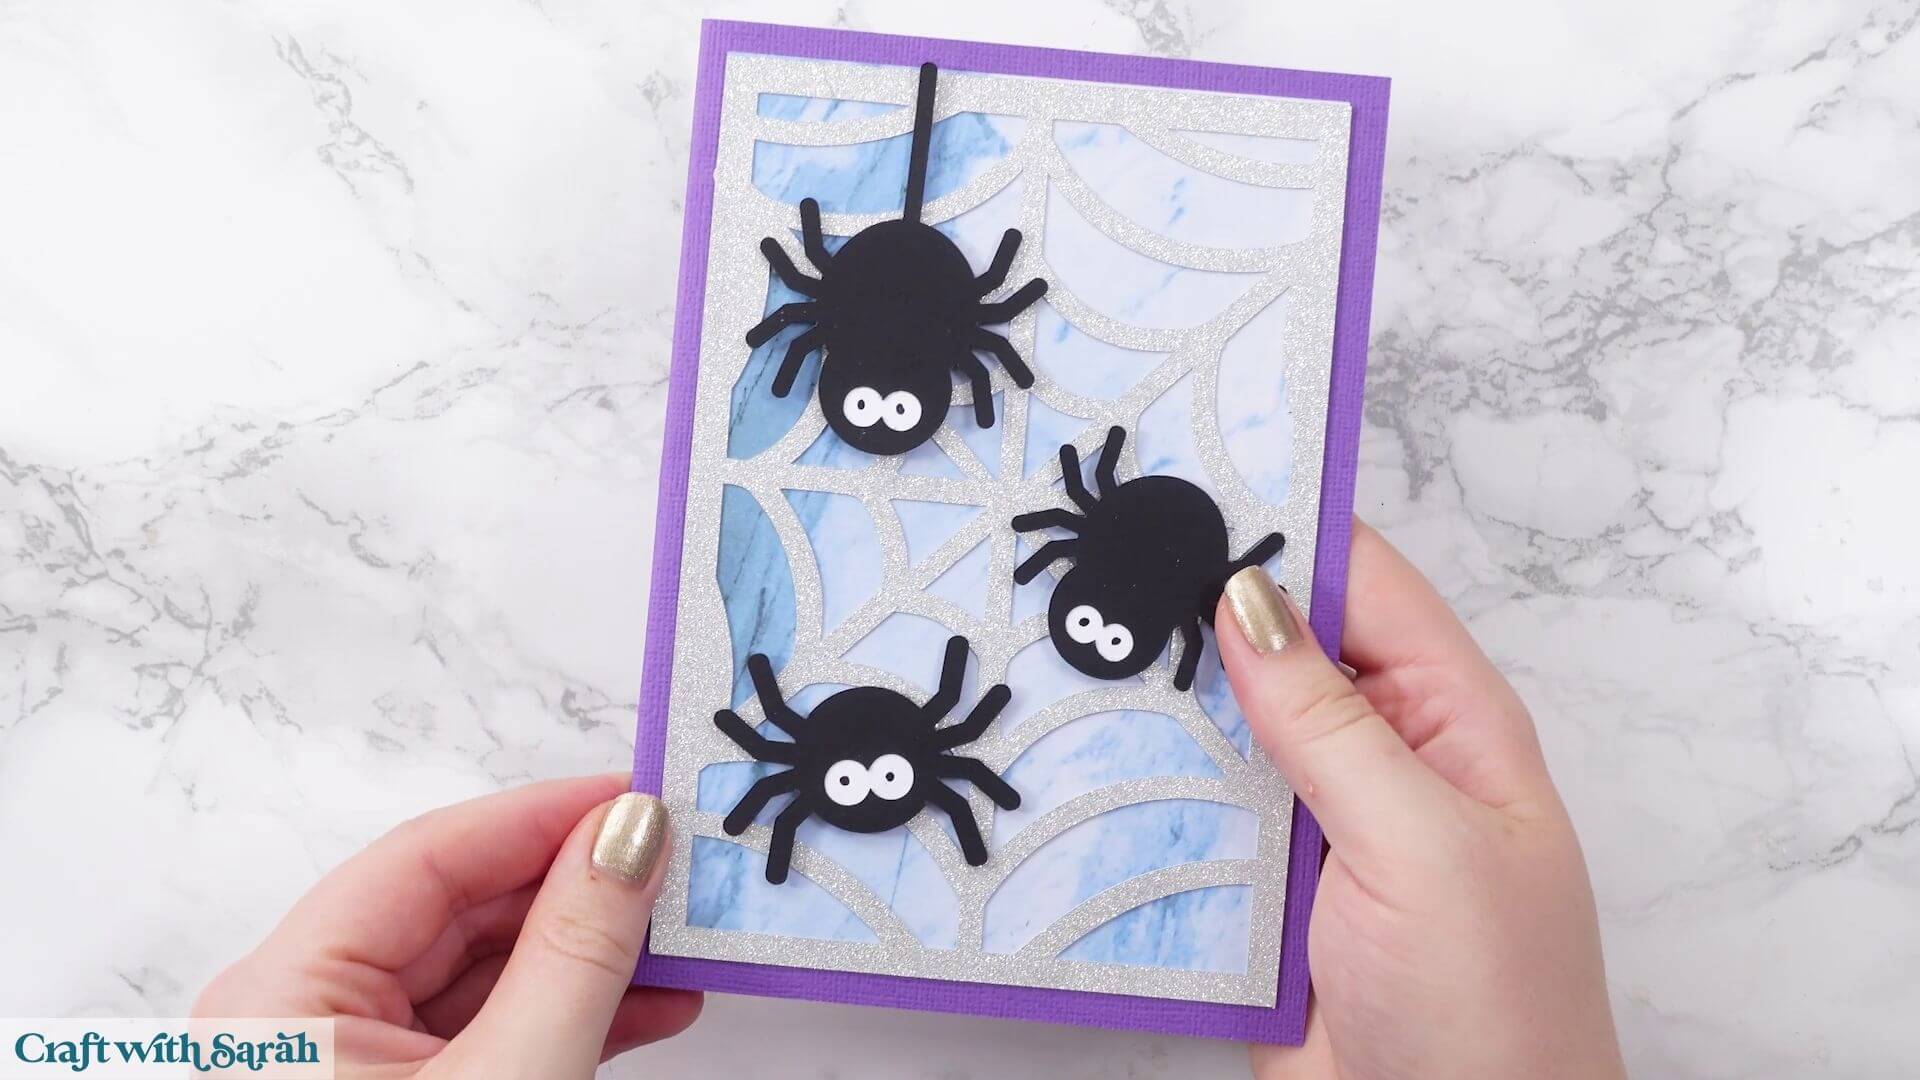
That’s the first spider web card finished!
If you’ve used a dark colour for your base card, you may also want to cut a white rectangle to glue inside the card to give you somewhere to write your message.
Project 4) Acetate spider web stencils
For the next card, we’re going to try a couple of different techniques.
This will also be a 5×7 inch card, using the same base card that we made previously.
This time, we’ll turn the spider web SVGs into a stencil, cut the stencil from acetate and use it to make a mixed-media background on watercolour paper.
You could use paints, inks, pastels, chalks or anything else that can be painted or drawn over a stencil.
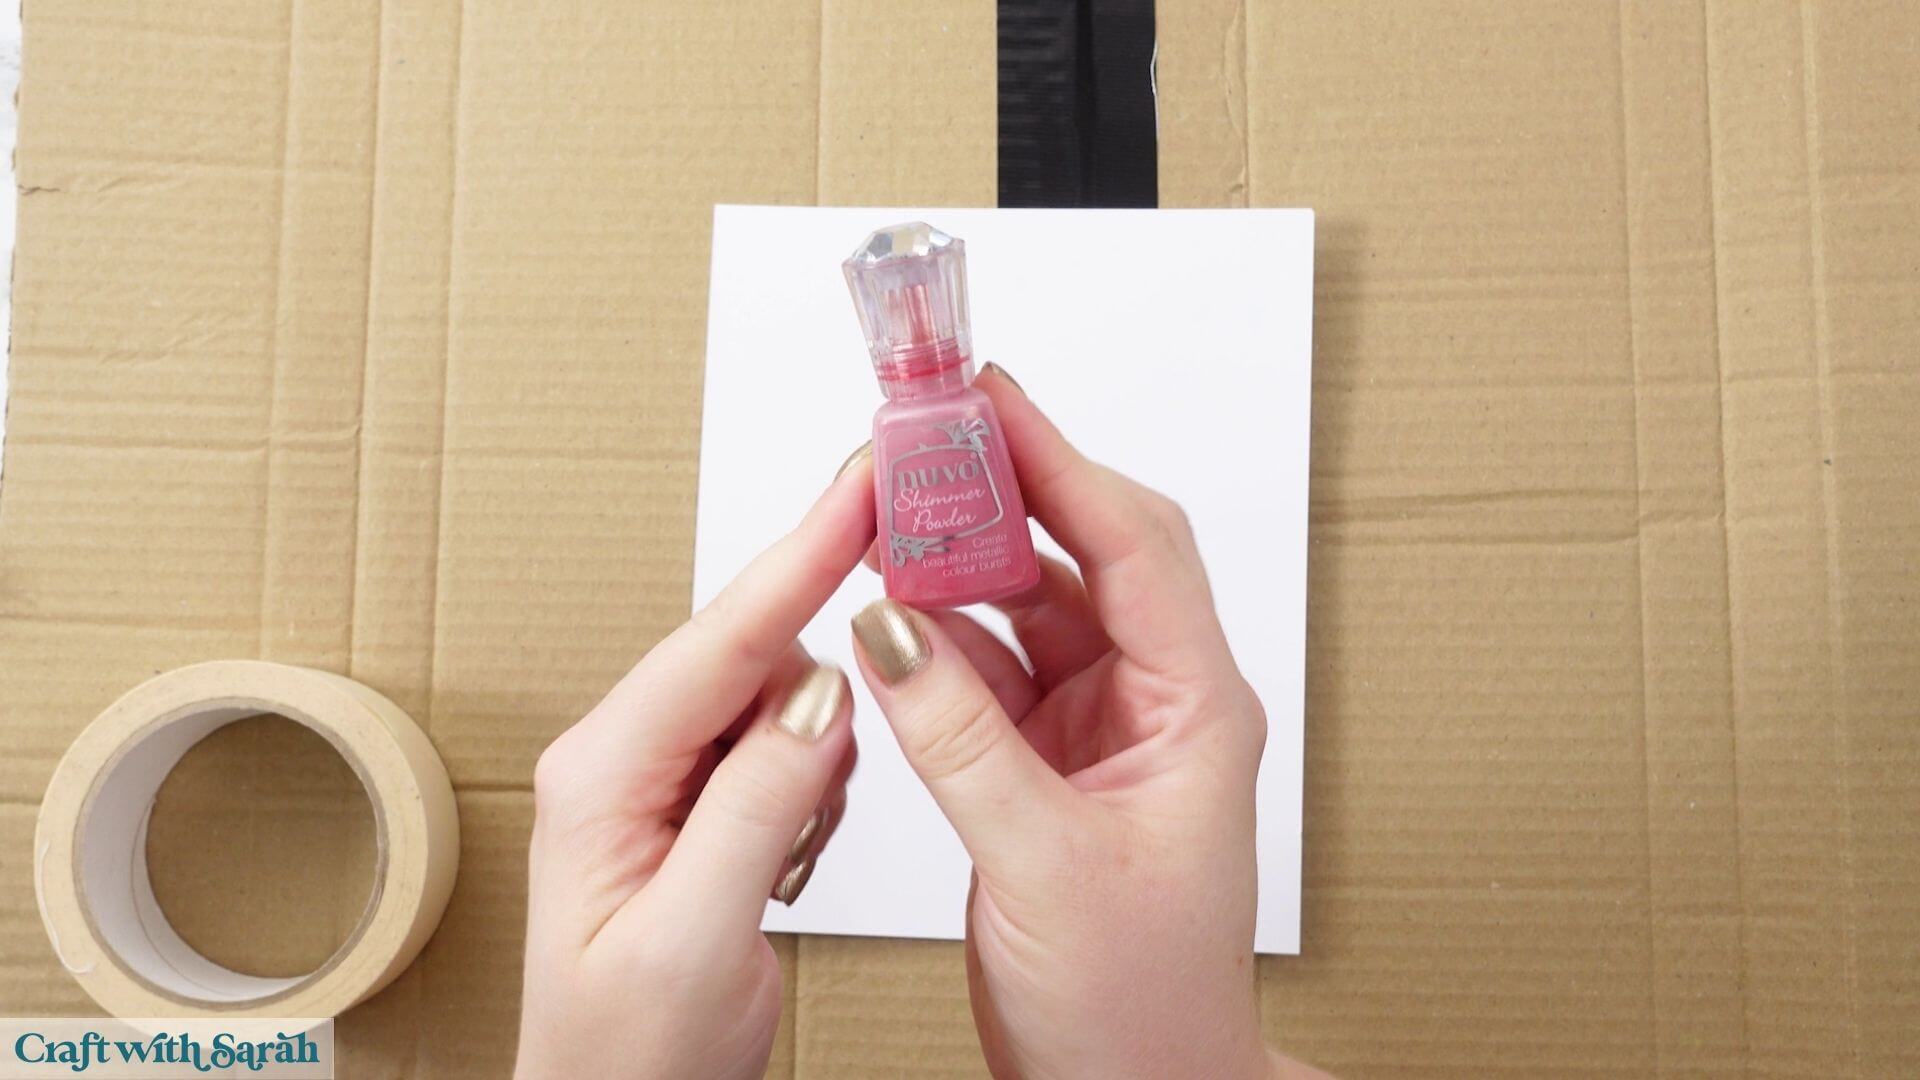
I’m using Nuvo Shimmer Powder.
Step 1) Create a base card
Start with your 5×7 inch base card and create a 6.5×4.5 inch white rectangle for the background.
I’ll be cutting this rectangle from watercolour paper because the Nuvo Shimmer Powder needs to be sprayed with water to activate it. Watercolour paper will handle that moisture better than regular cardstock.
Depending on the thickness of your watercolour paper, you could try either the Heavy Cardstock or Kraft Board setting on your Cricut.
Step 2) Create the spider web stencil
Create another rectangle for the stencil itself. I made mine 5×7 inches so that it would be slightly larger than the watercolour paper. This gives me some extra acetate around the edges that I can use to tape the stencil to my work surface without damaging the card.
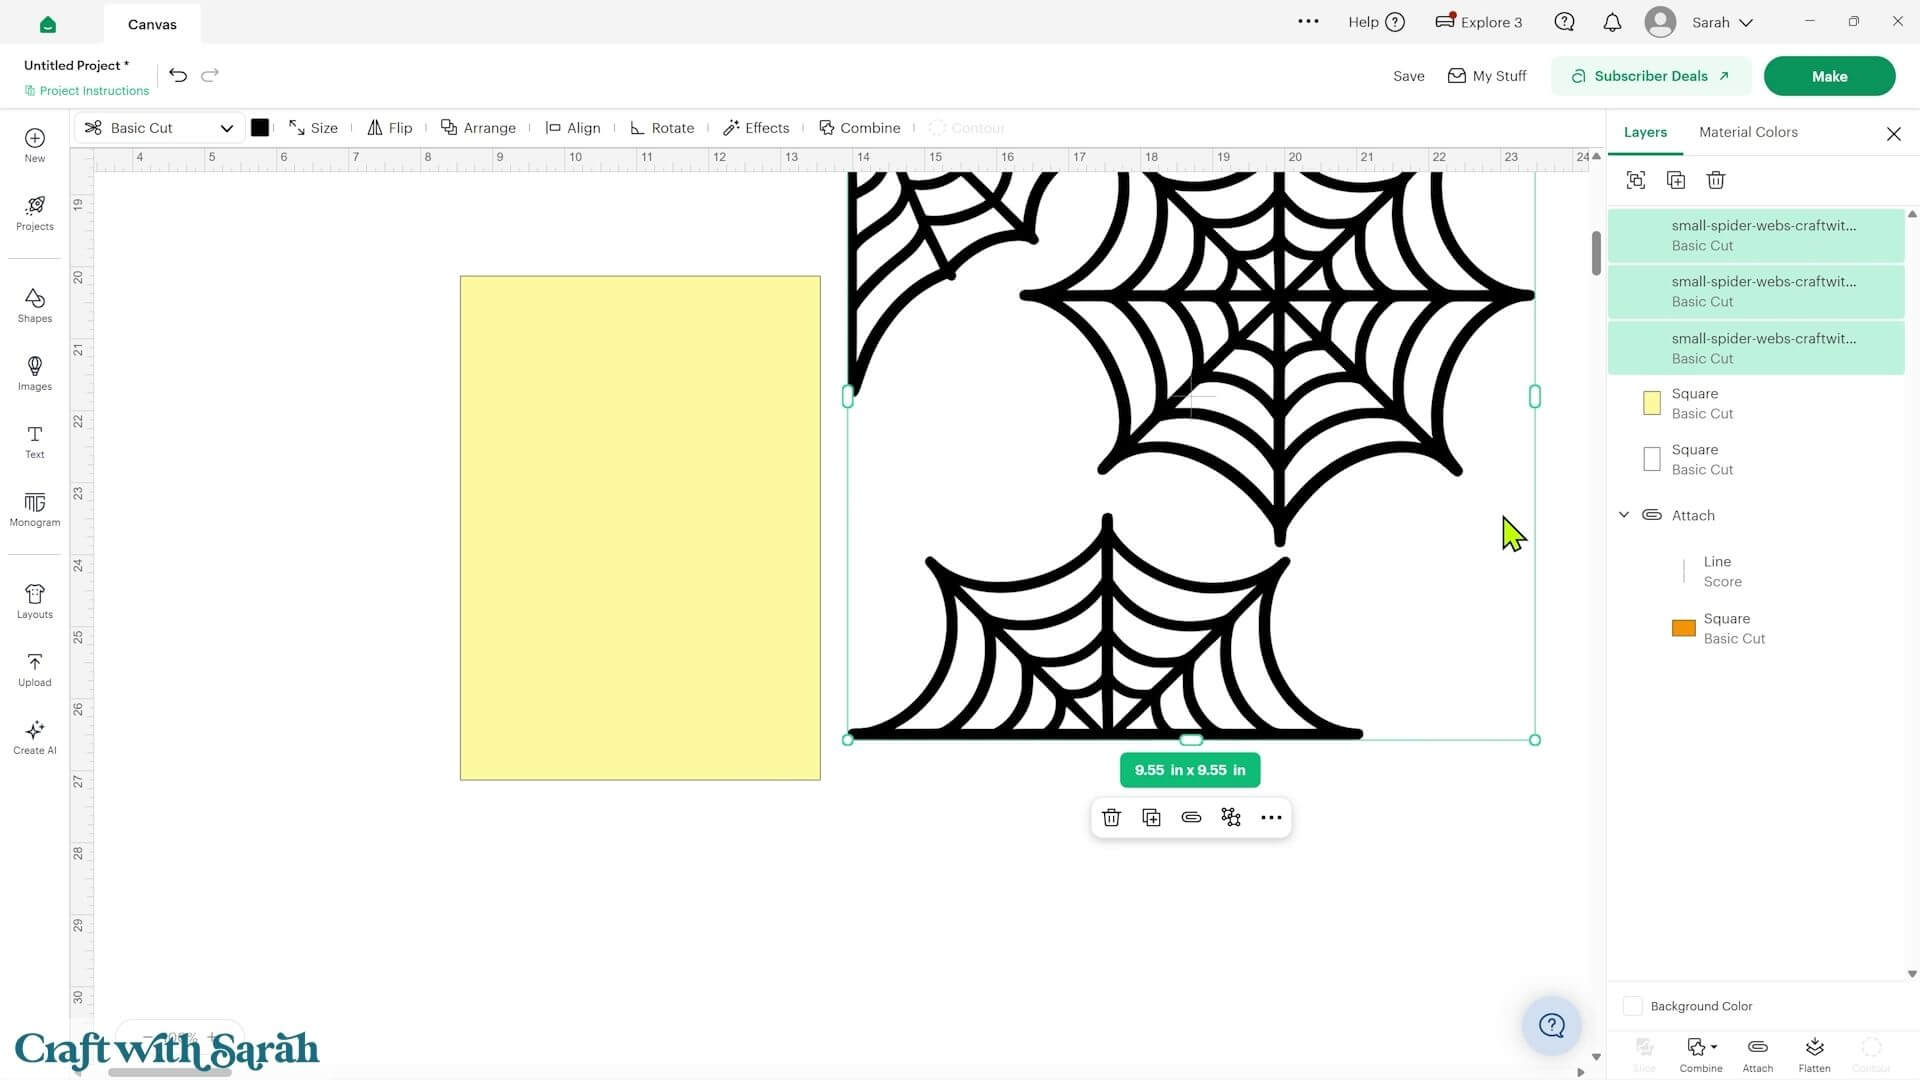
Ungroup the small spider web SVGs and choose the webs that you want to include in your stencil.
Position them around the rectangle.
At the moment, the spider webs aren’t suitable for cutting as a stencil, so we need to invert them.
Click one of the spider webs and go into ‘Contour’.
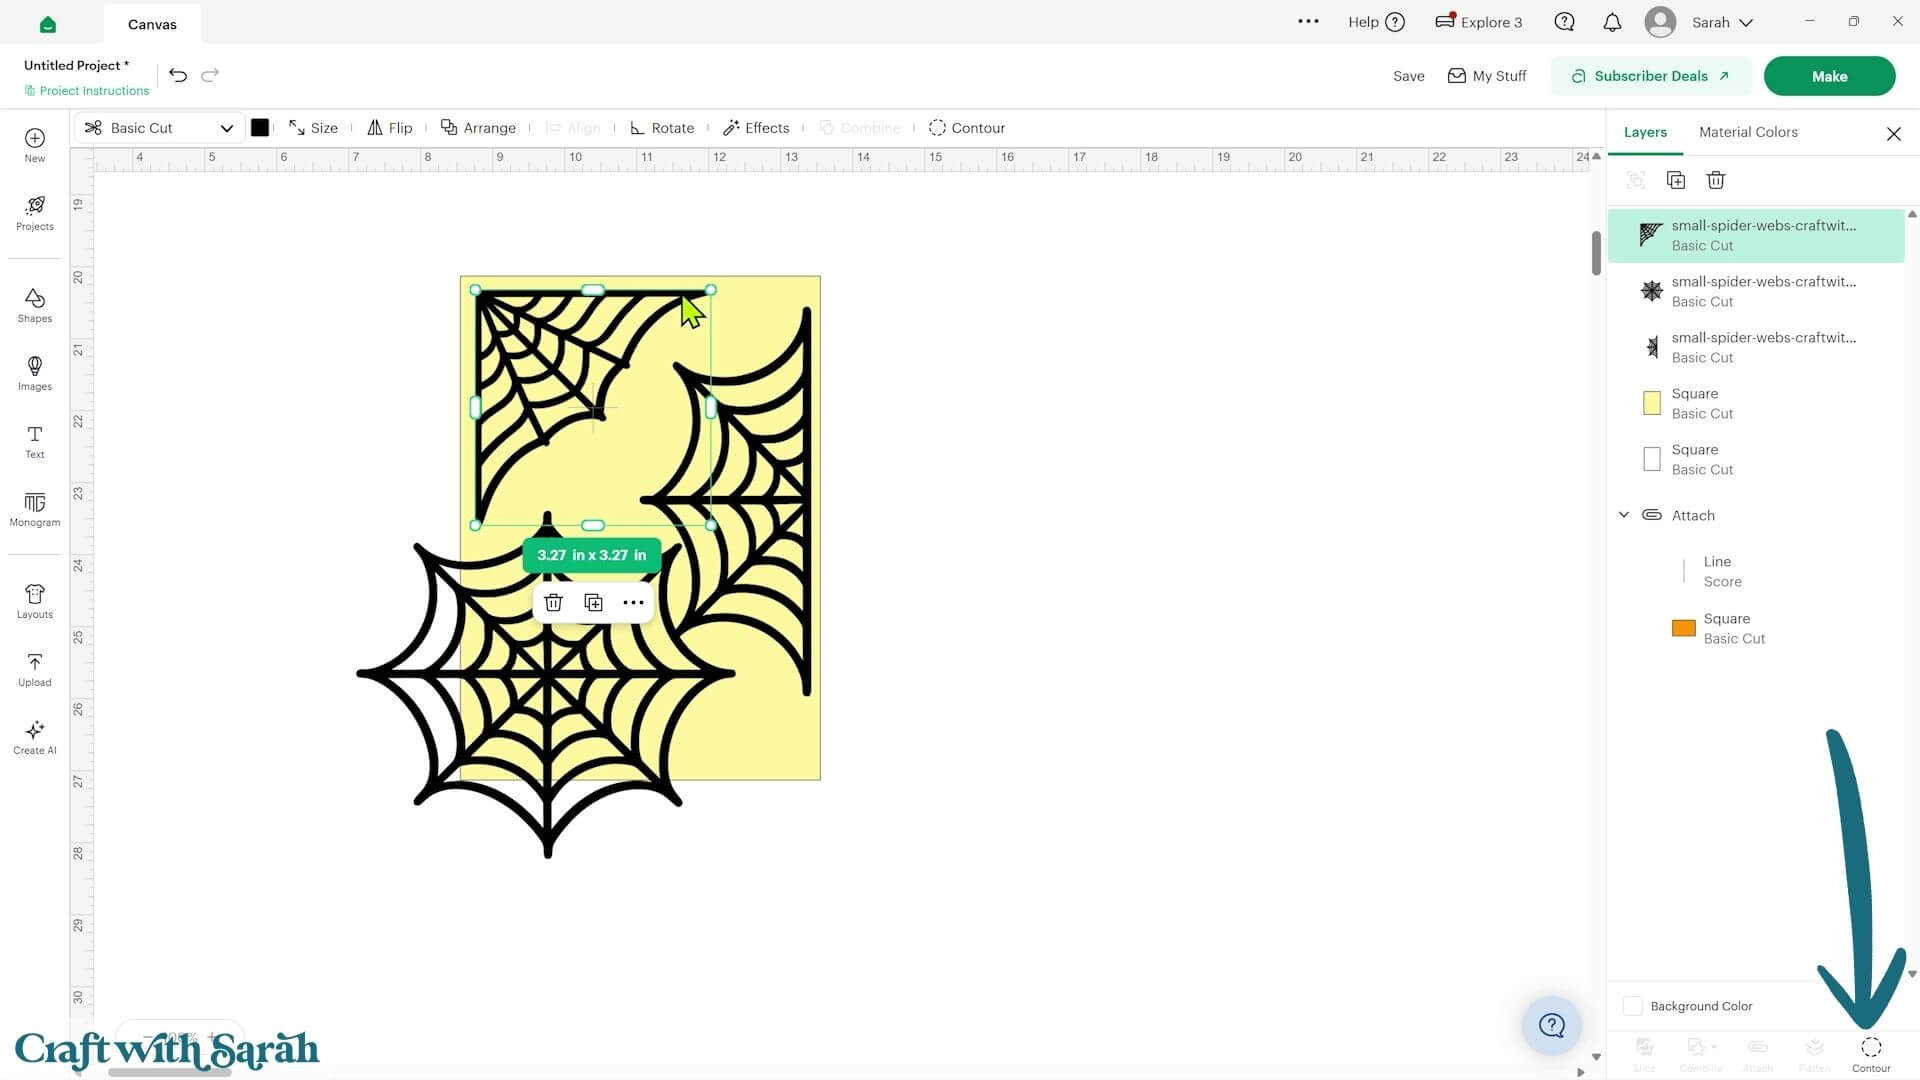
Click the top layer in the Contour window, which is the outline of the spider web, and press ‘Apply’.
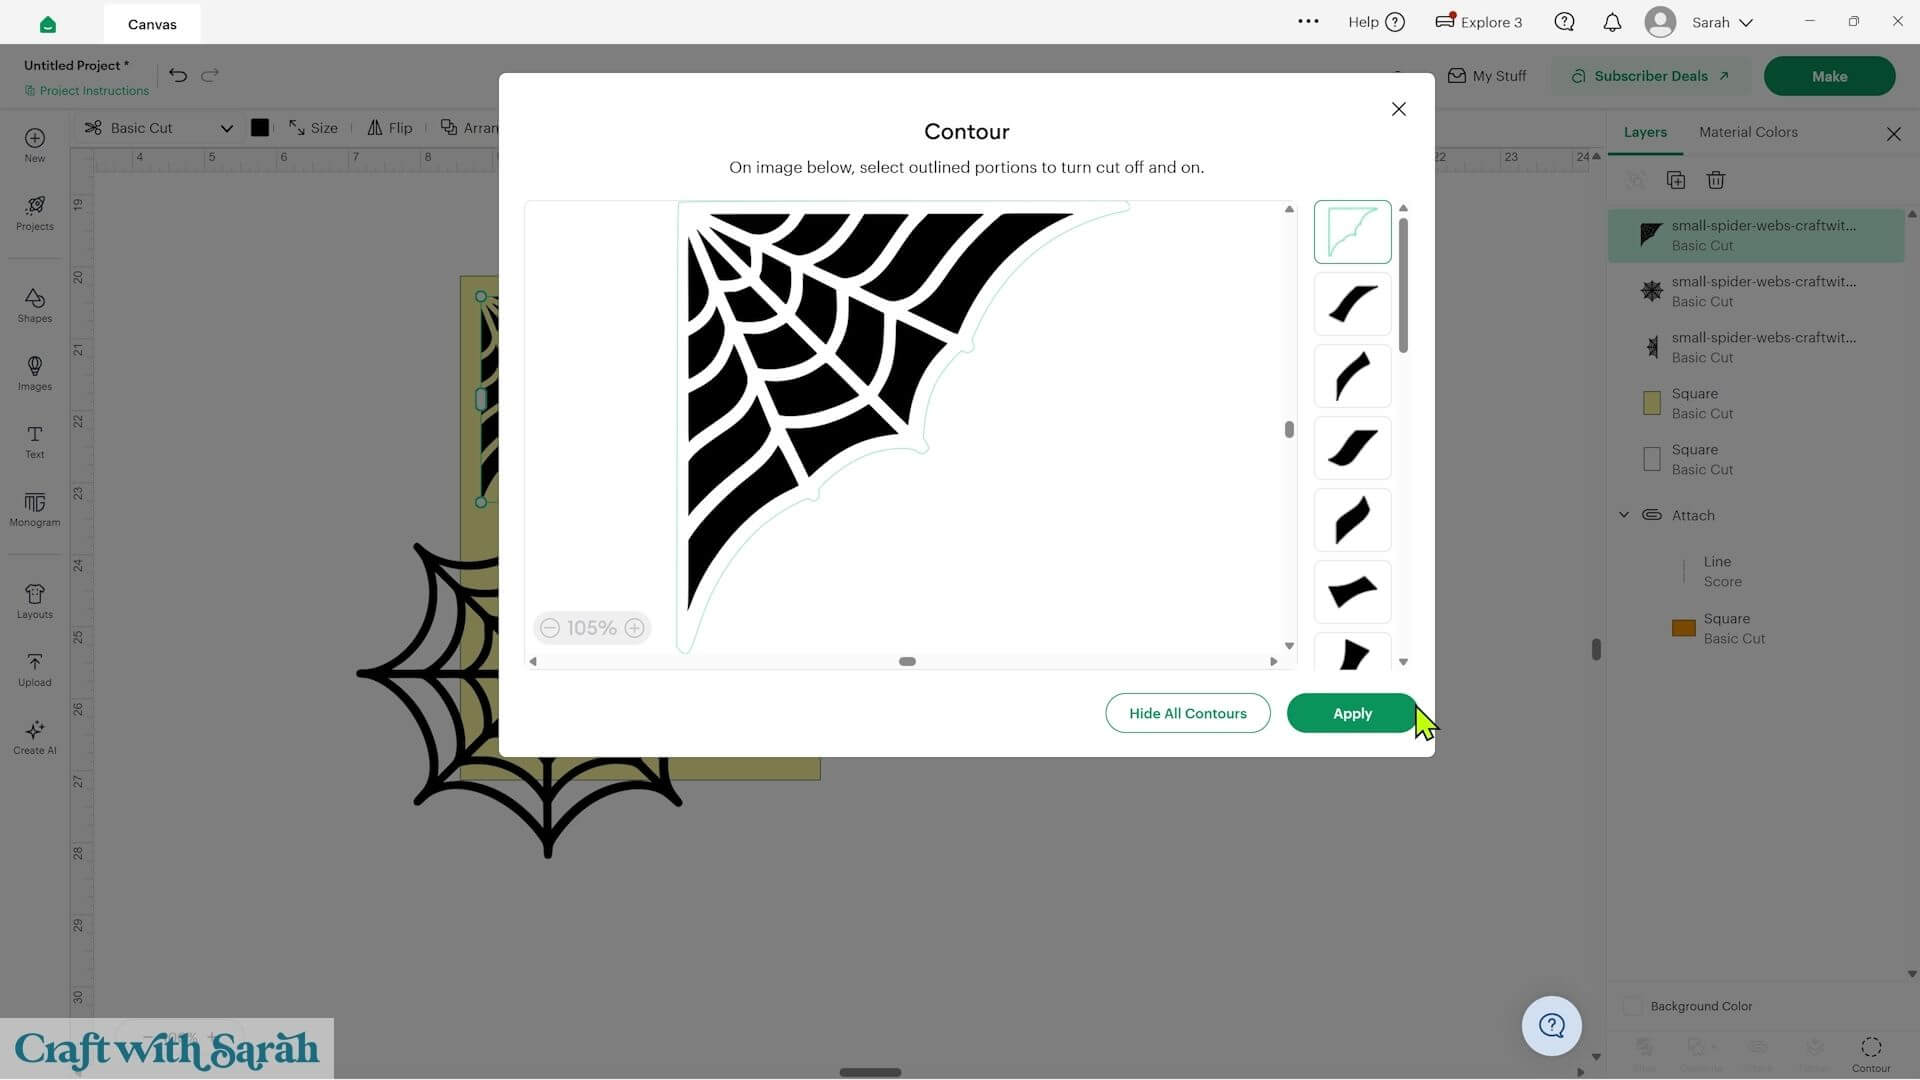
This inverts the design so that the areas that previously formed the spider web lines will eventually become the open areas of the stencil.
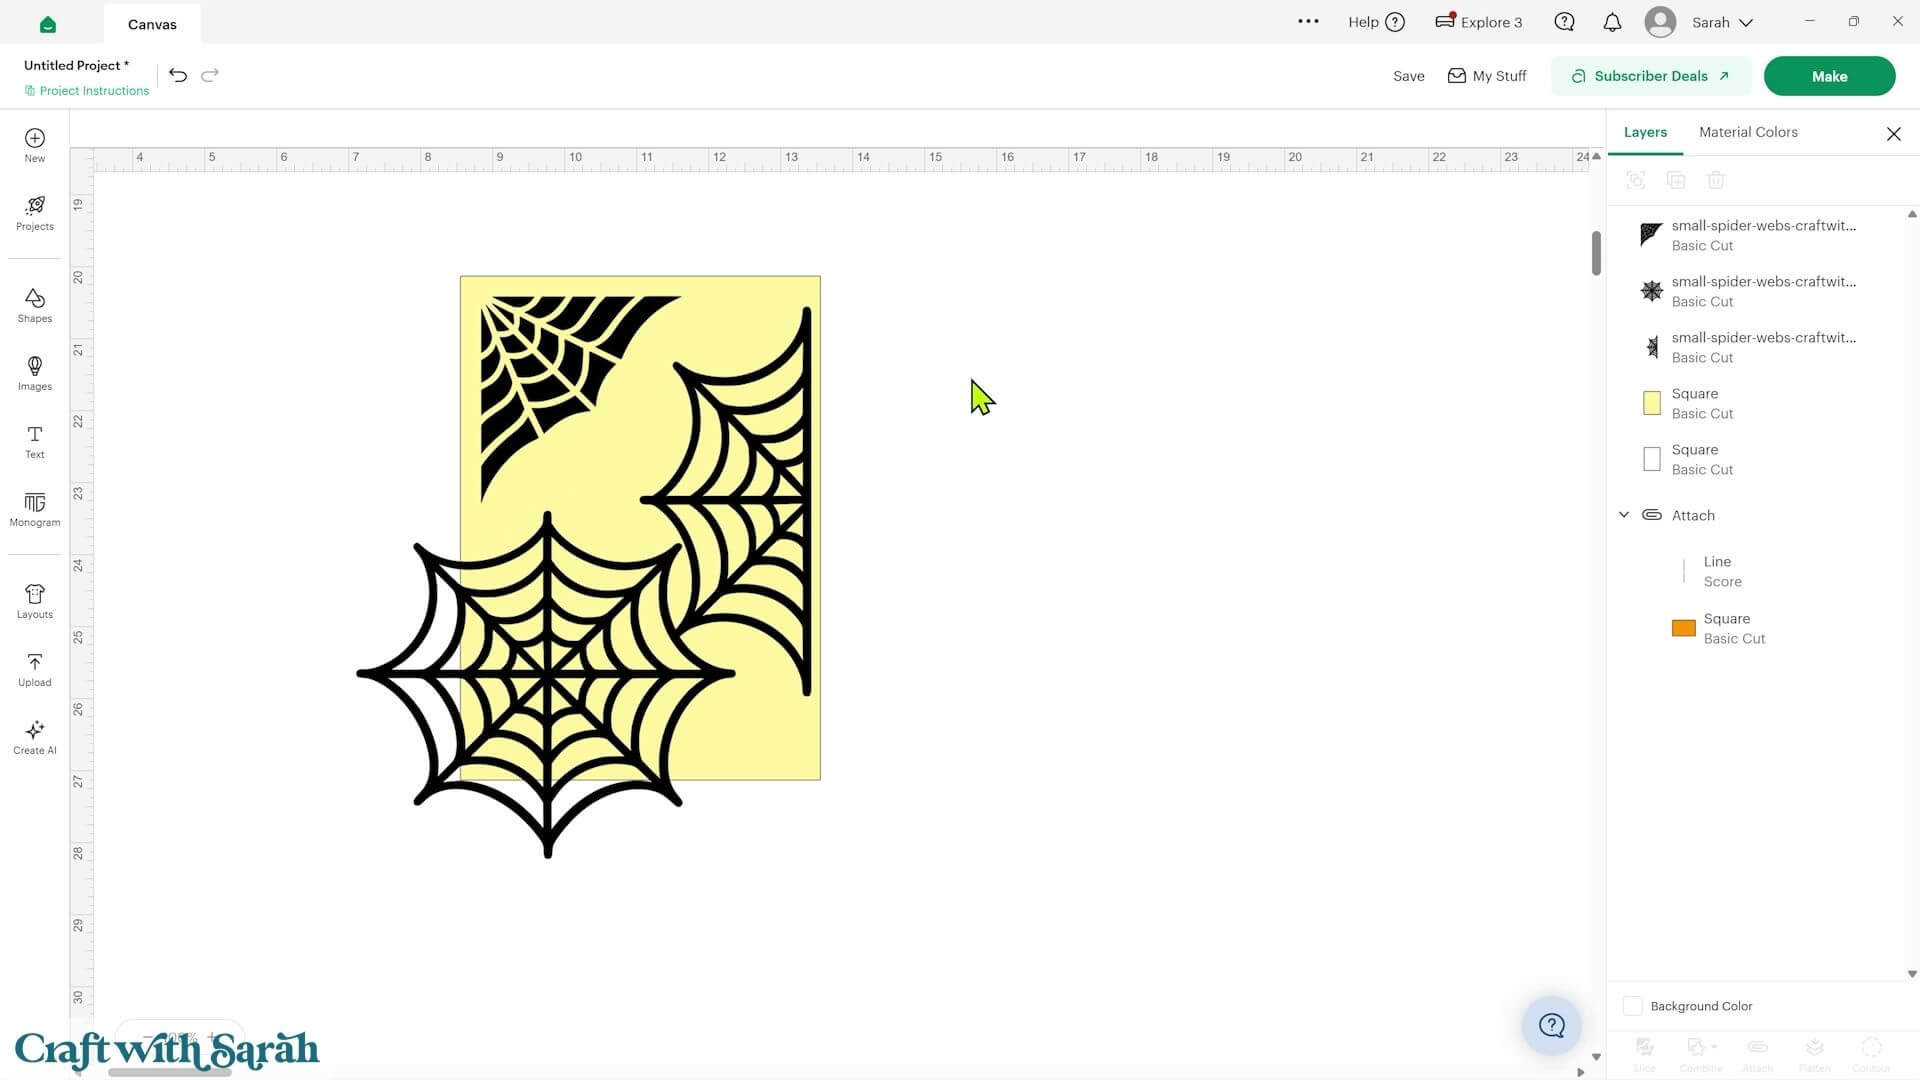
Repeat this for your other spider webs.
Move and resize the webs until you’re happy with the arrangement.
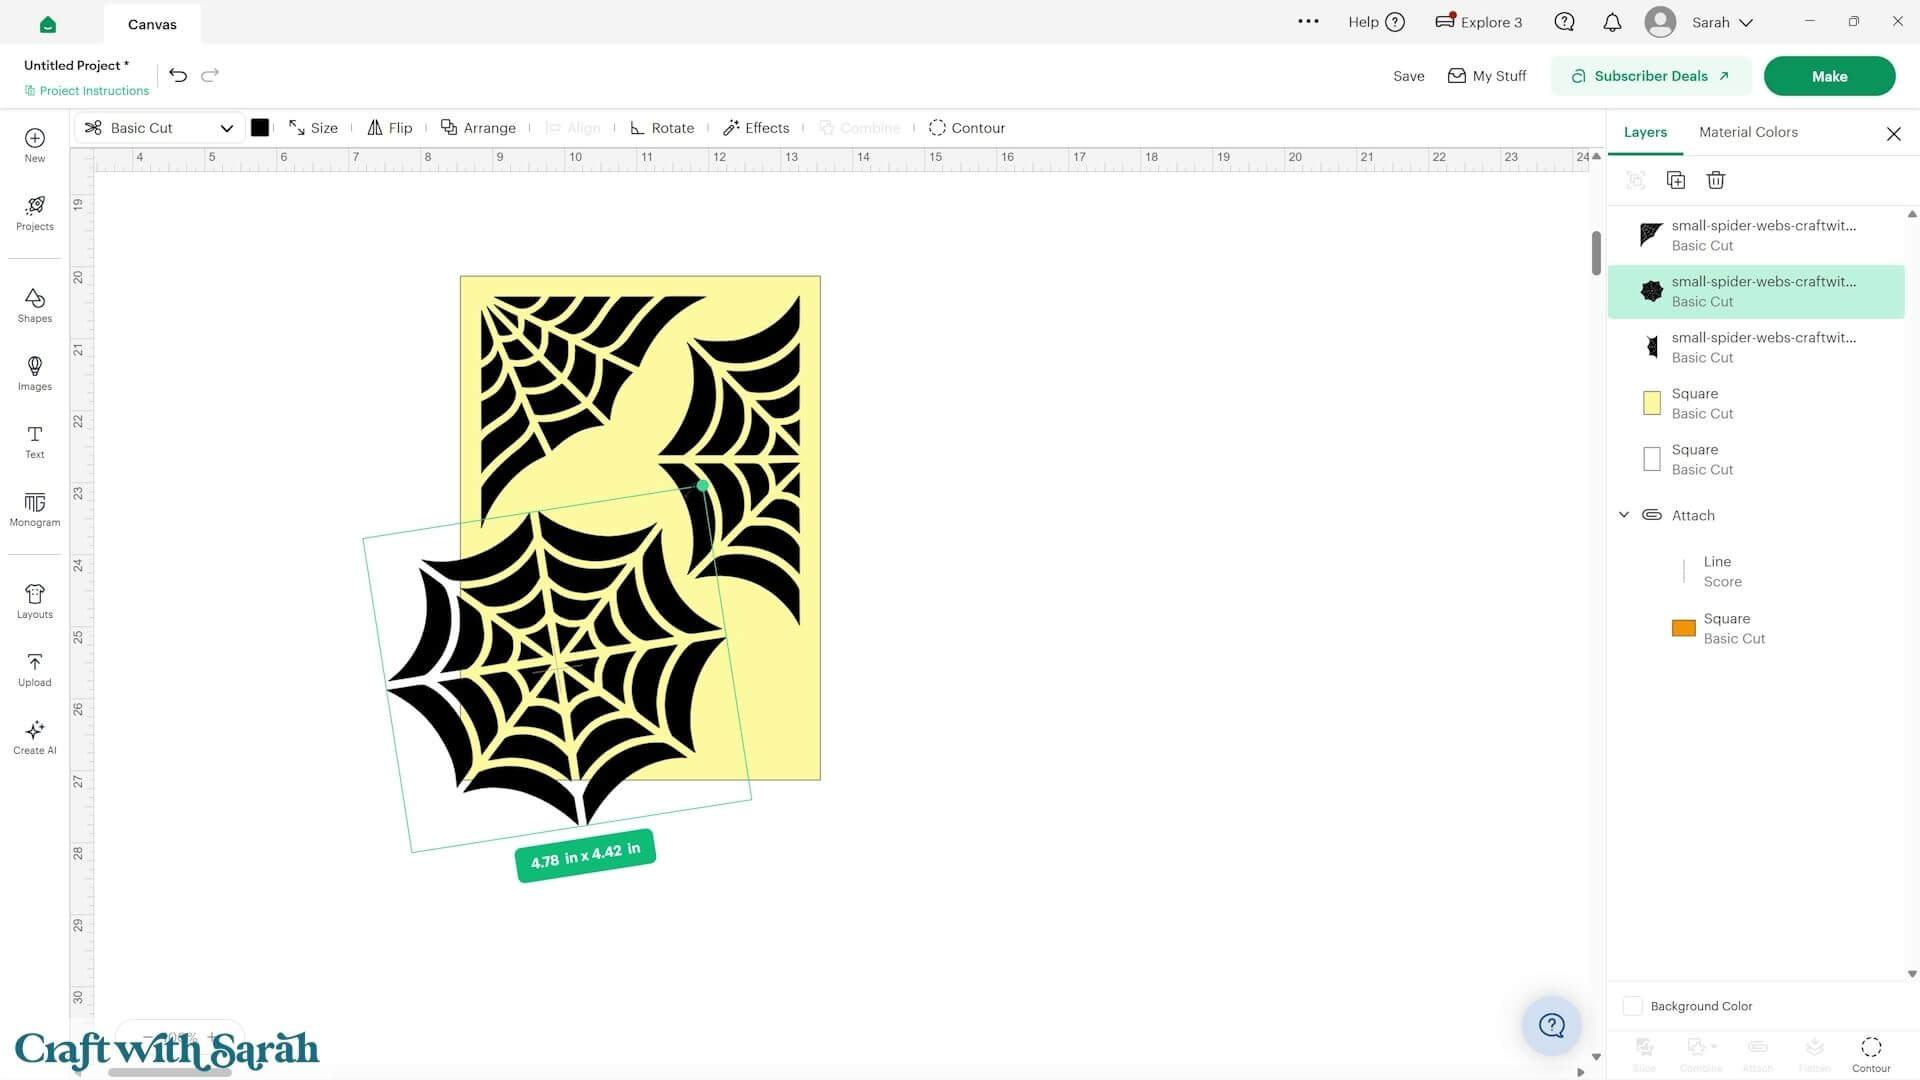
Make sure that none of your spider webs break through the outside edge of the acetate rectangle. We want the stencil to remain as one solid rectangular piece.
If a web is extending outside the rectangle (like my bottom-left one), you can use additional square shapes and ‘Slice’ to trim away those unwanted areas.
Add as many squares as you need, then Weld them together into one shape.
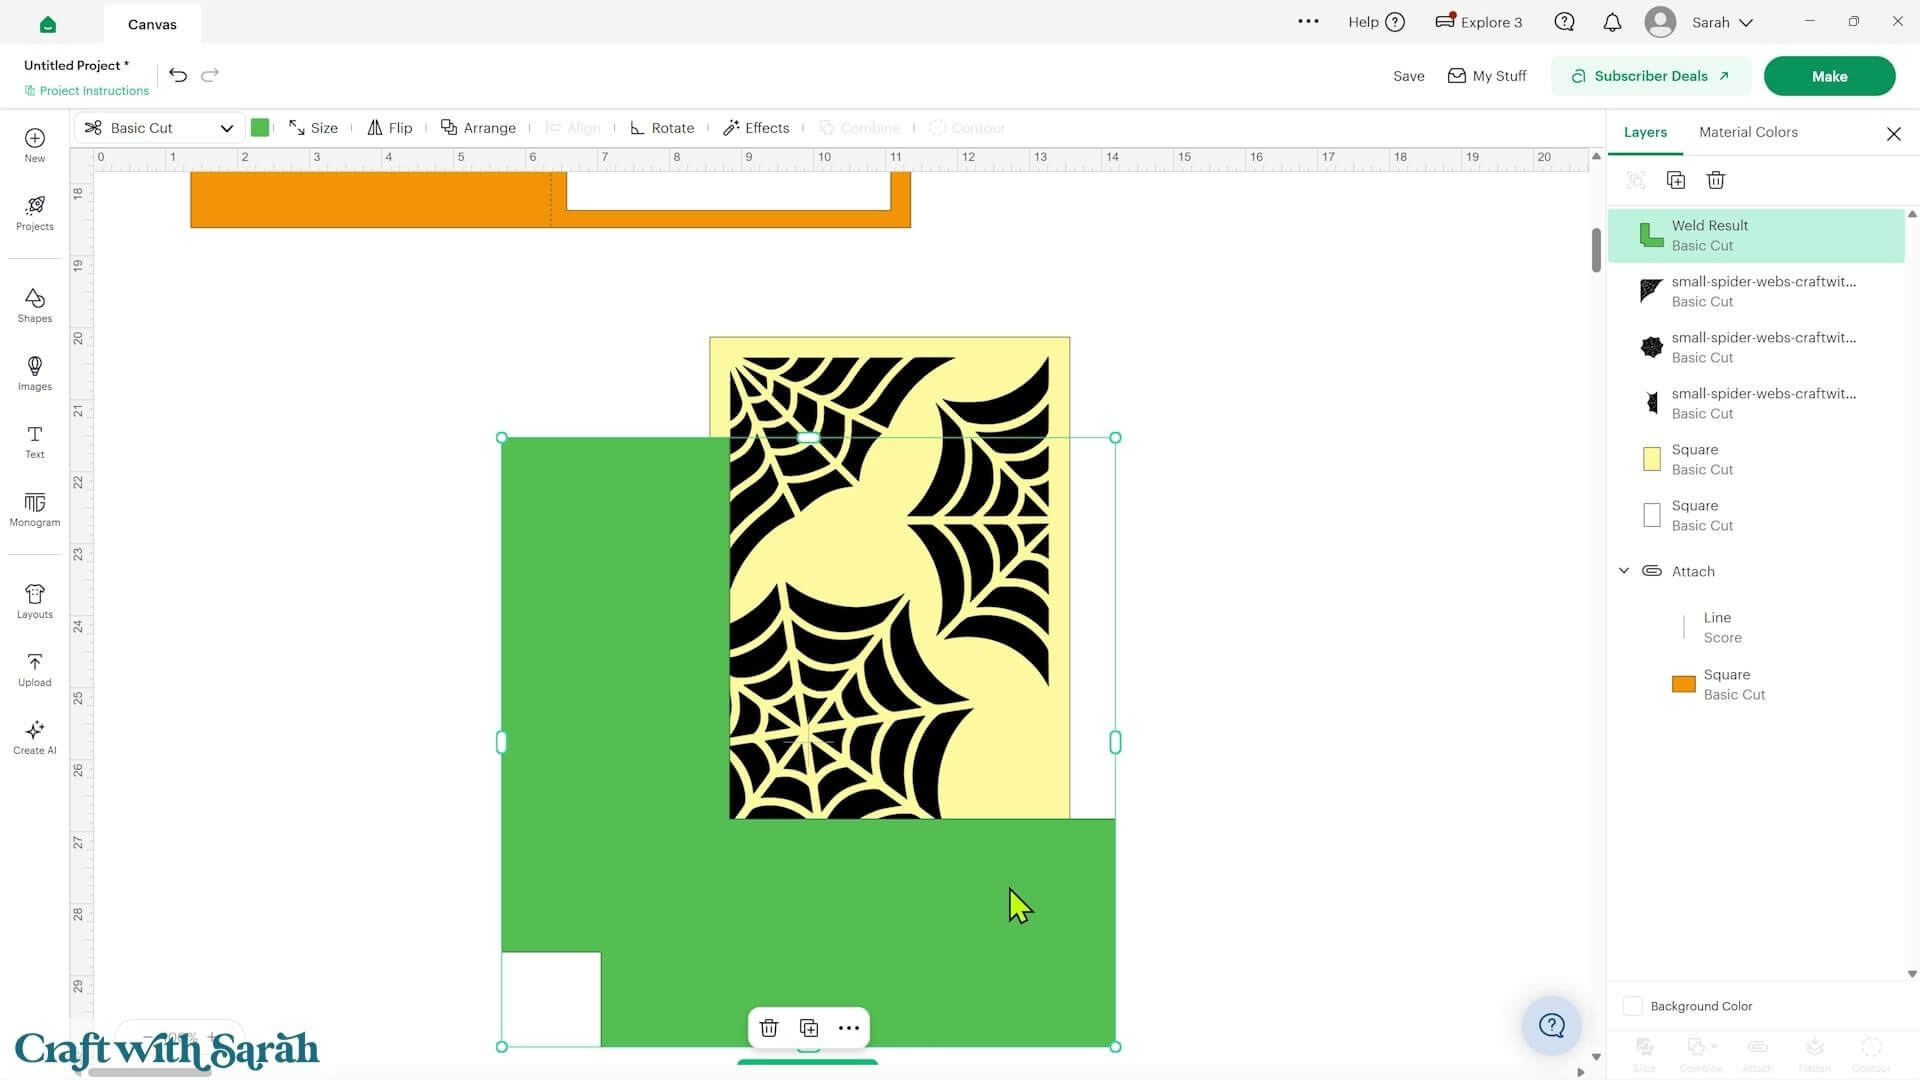
Select that shape and the spider web and press ‘Slice’.
You can then delete the excess parts to get your spider web fitting inside the rectangle.
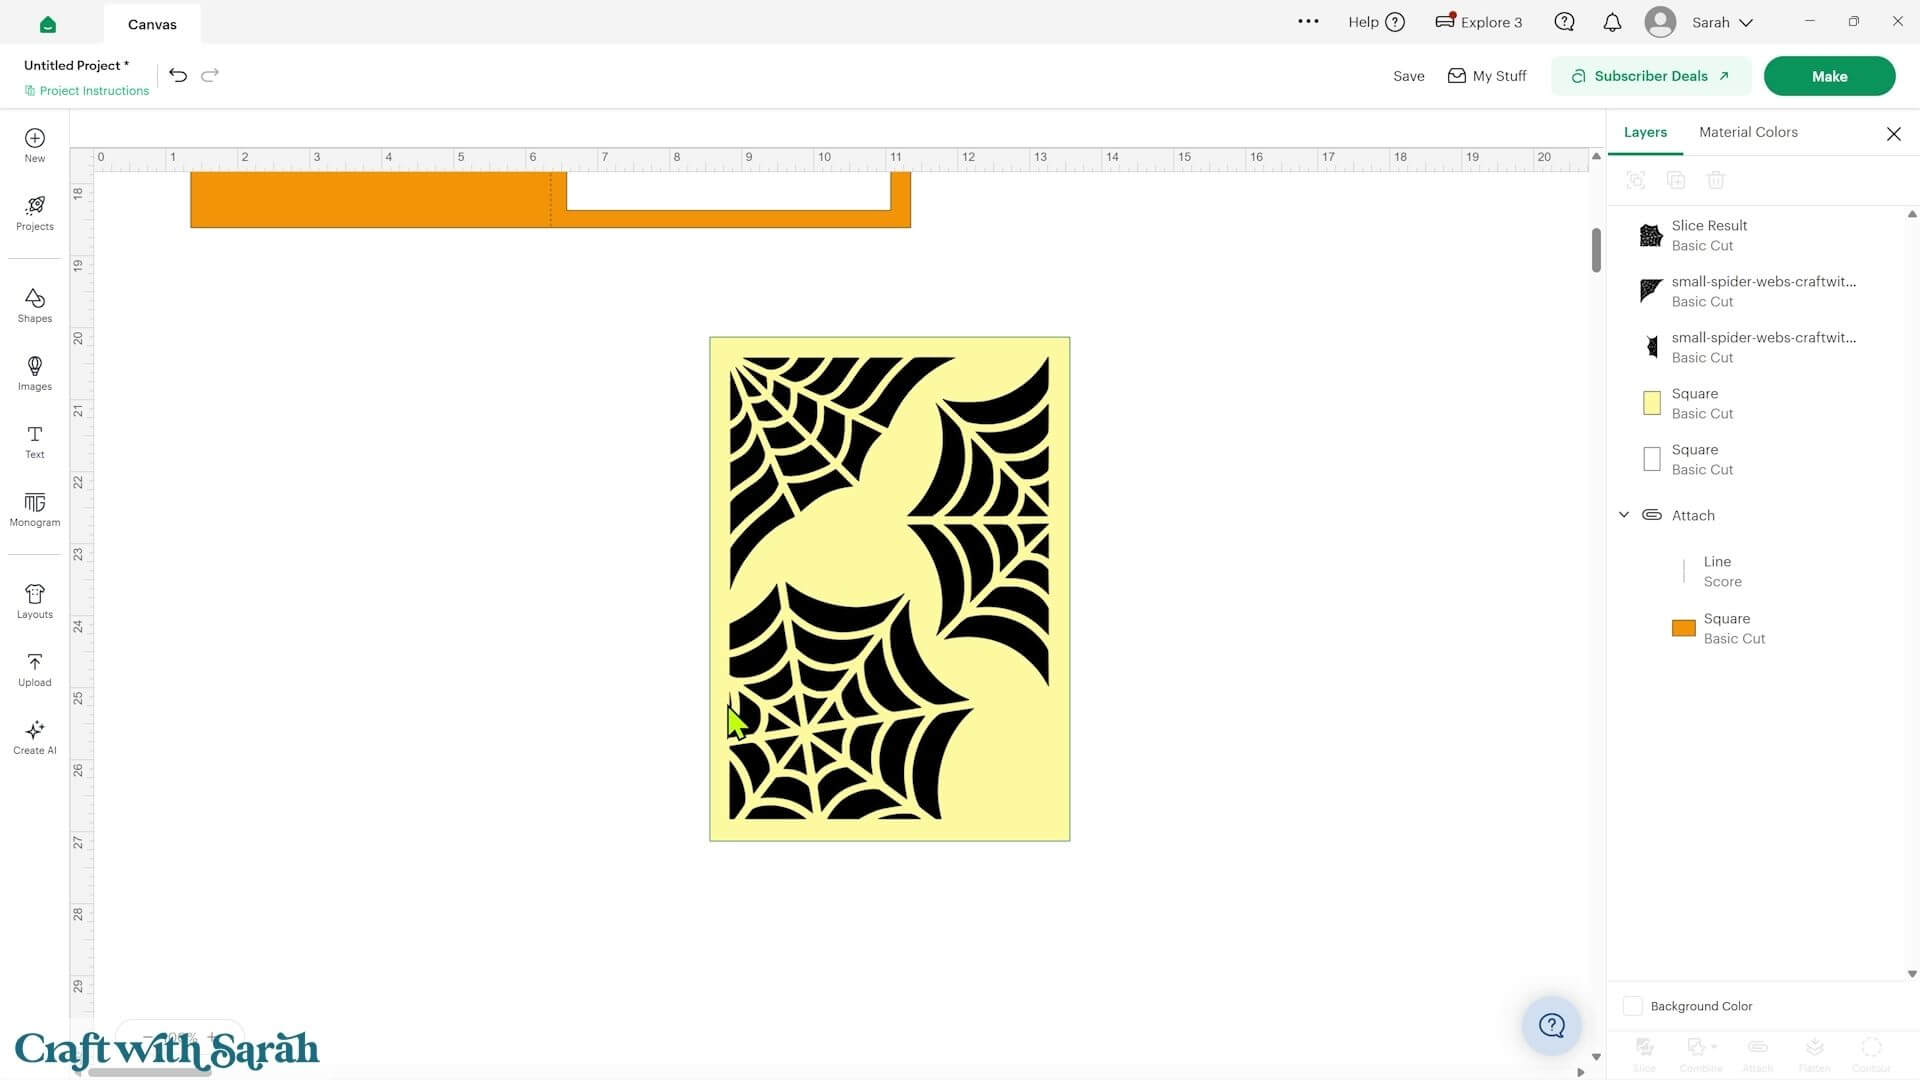
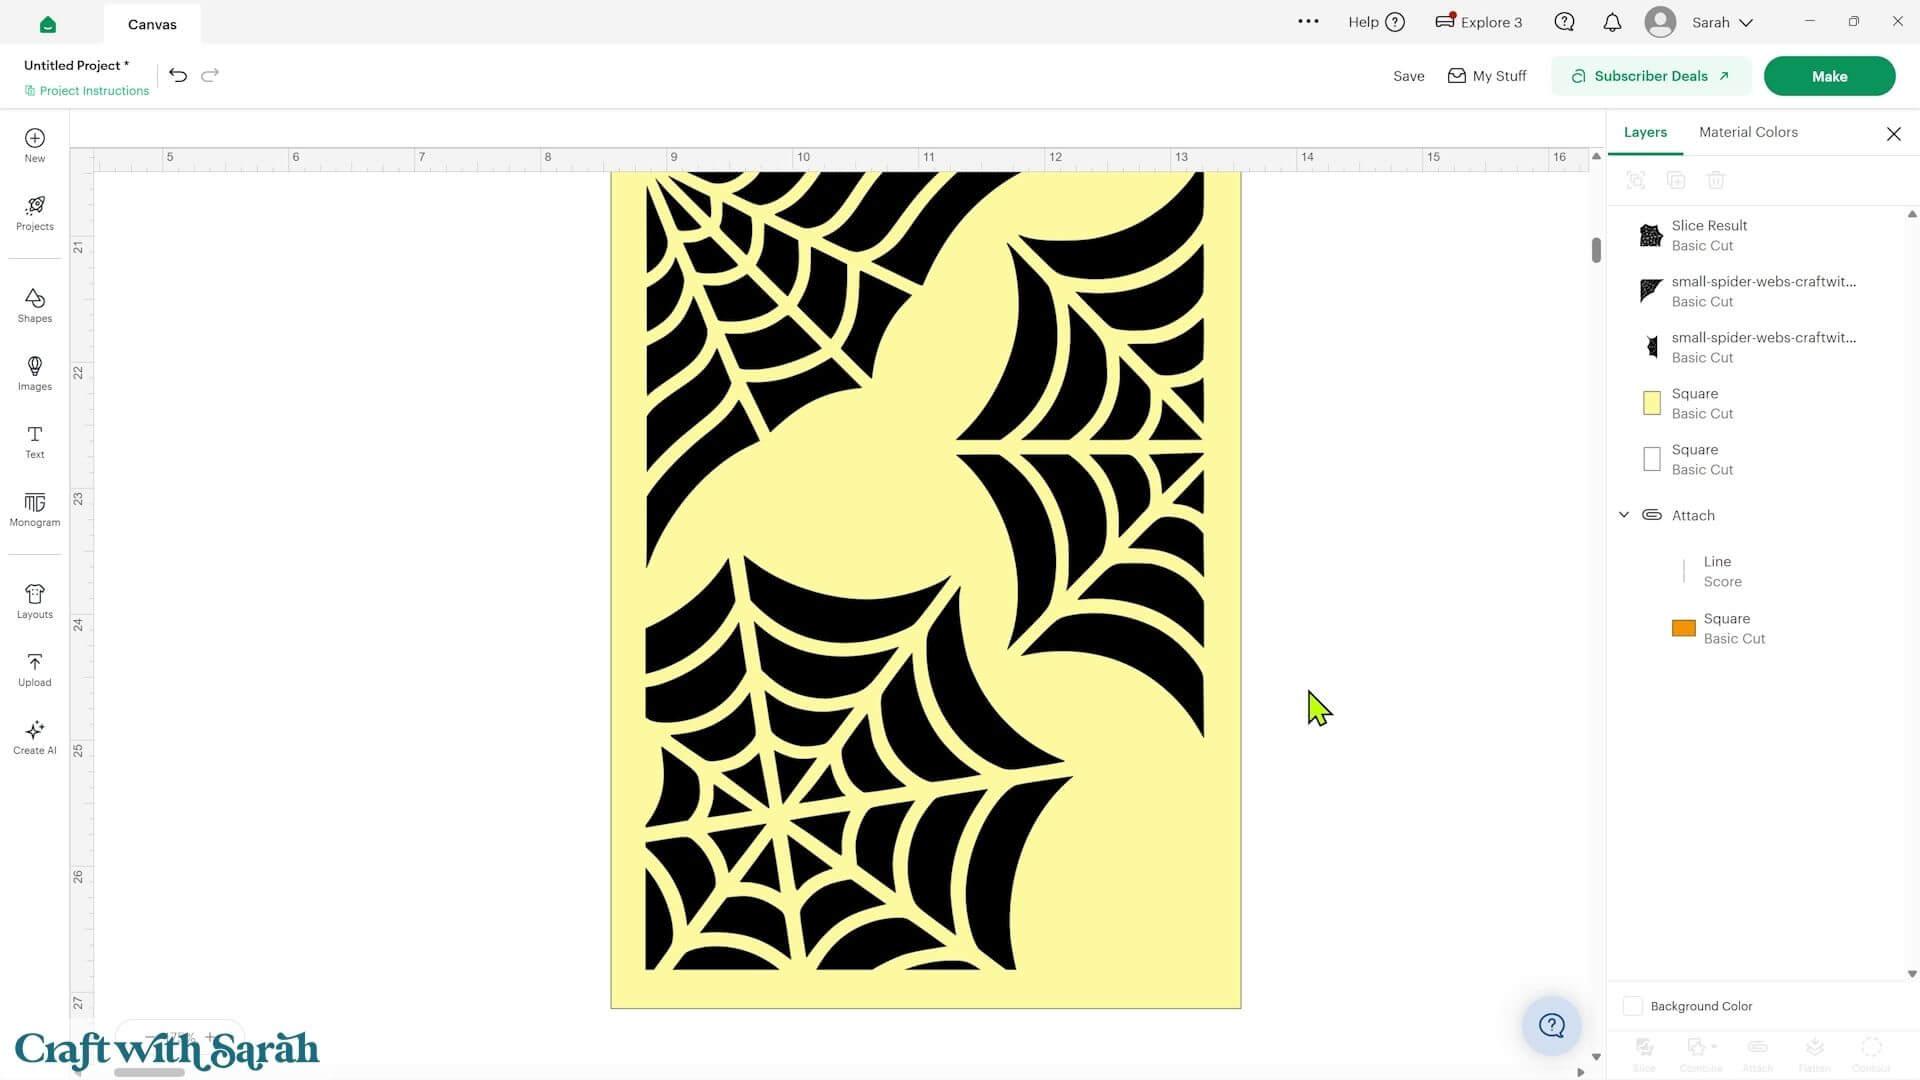
After slicing, check the design for any tiny sections that might be difficult for your Cricut to cut. If you find any, go into ‘Contour’ and hide them.
Finally, select all of the spider webs and the stencil rectangle and use ‘Combine’ and ‘Subtract’.
You should now have a solid rectangle with the spider web sections cut out of the middle.
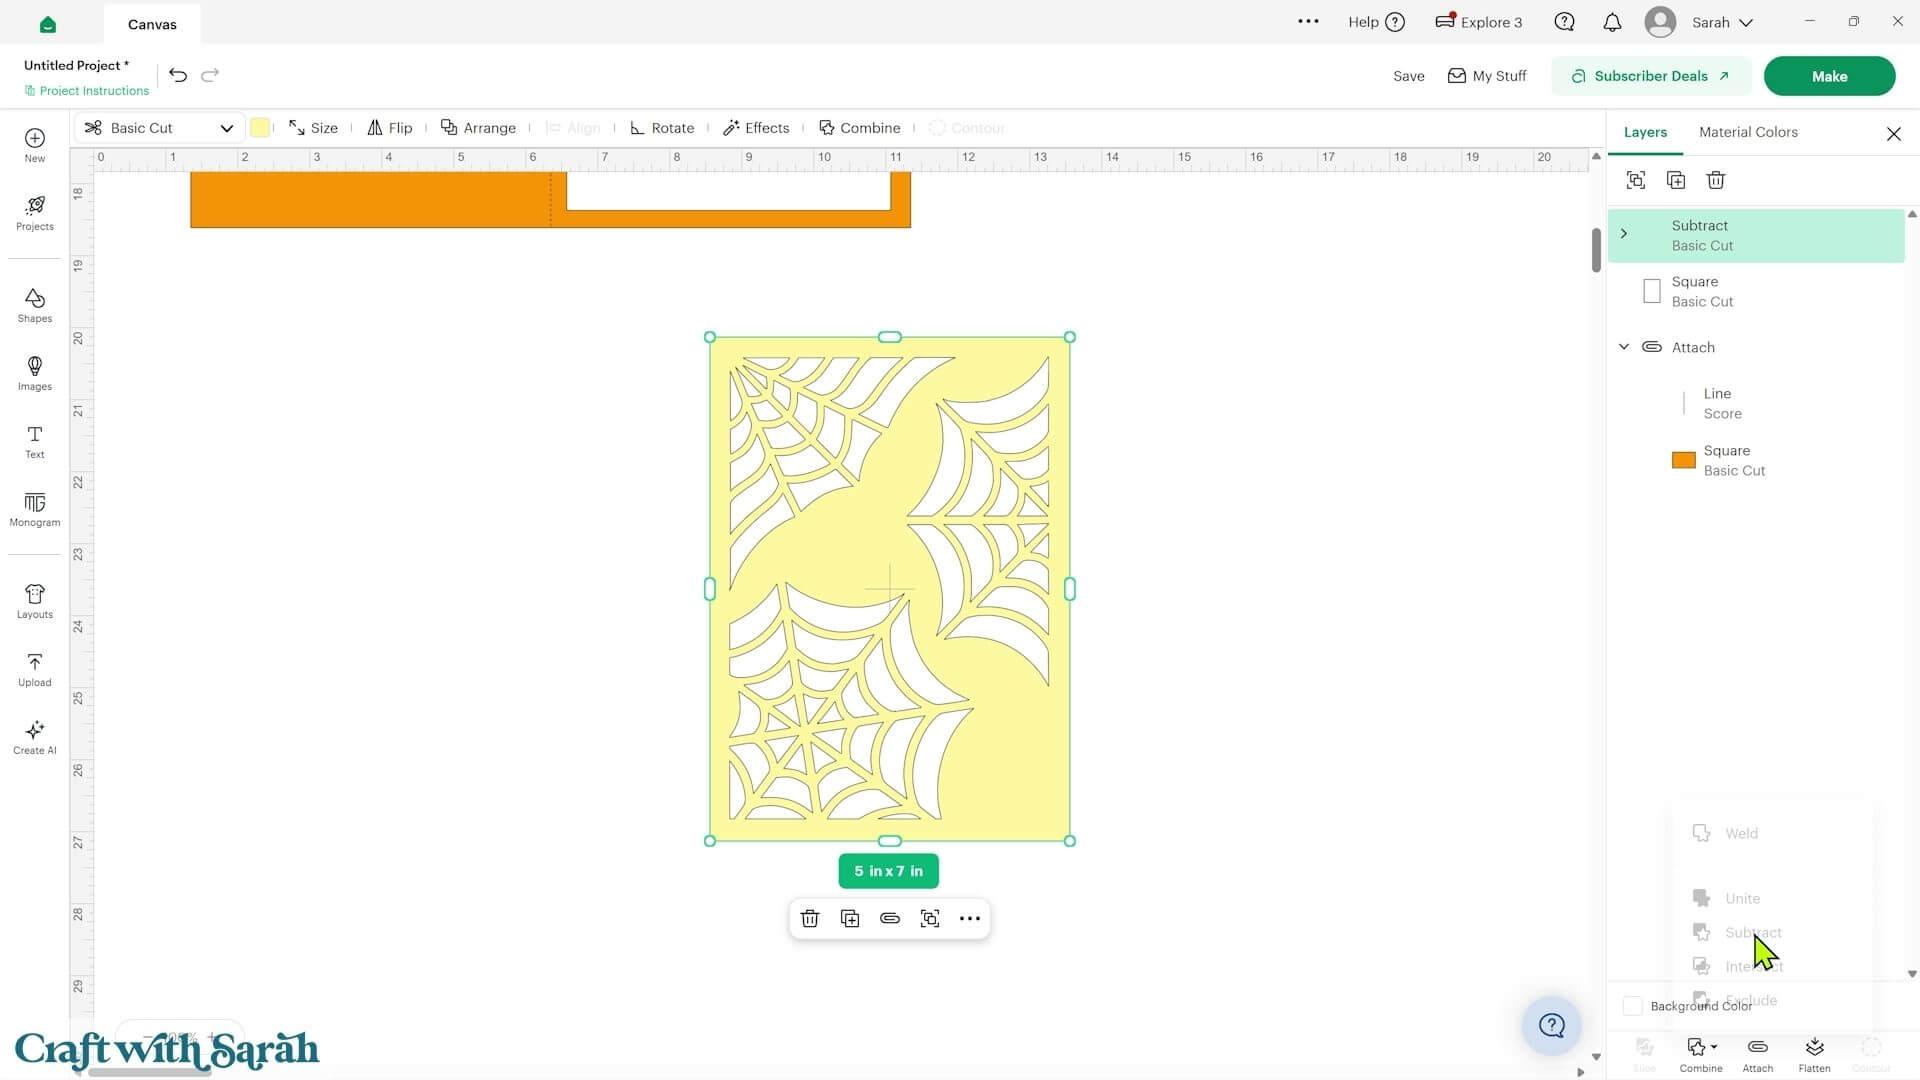
This is what we’ll cut from acetate to make our reusable stencil. Thin Mylar plastic or something similar could also work.
Step 3) Decorate the card
To finish the card, I’m going to make a Halloween topper using Print Then Cut.
Go into ‘Images’ and find a design that you like. I chose a ‘Happy Halloween’ design with a moon.
The image I selected was originally designed as a cuttable image with several different layers.
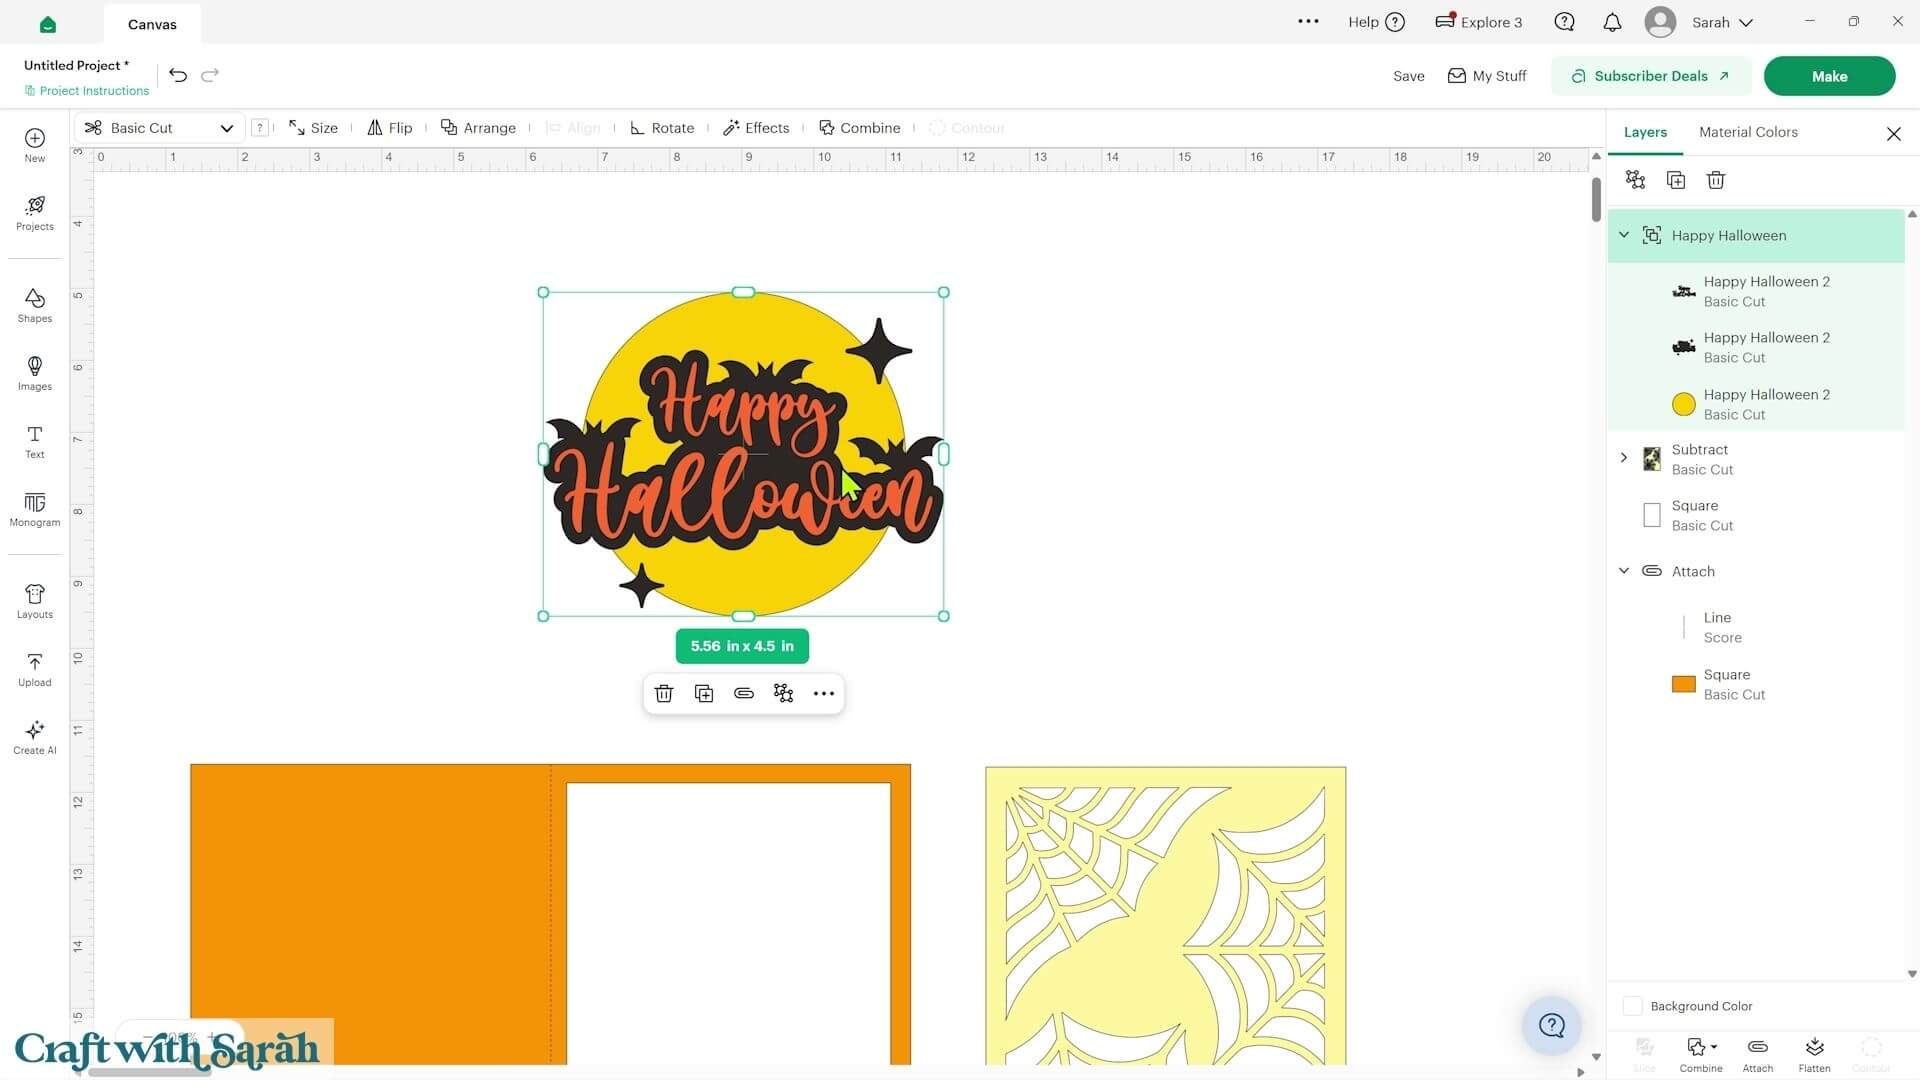
To change it into a Print Then Cut image, select it and press ‘Flatten’.
I wanted the topper to stand out more clearly against my colourful background, so I also added a white border.
Go into ‘Effects’ and ‘Offset’ and create an offset around the outside of the design. Press ‘Apply’ and change the offset to white.
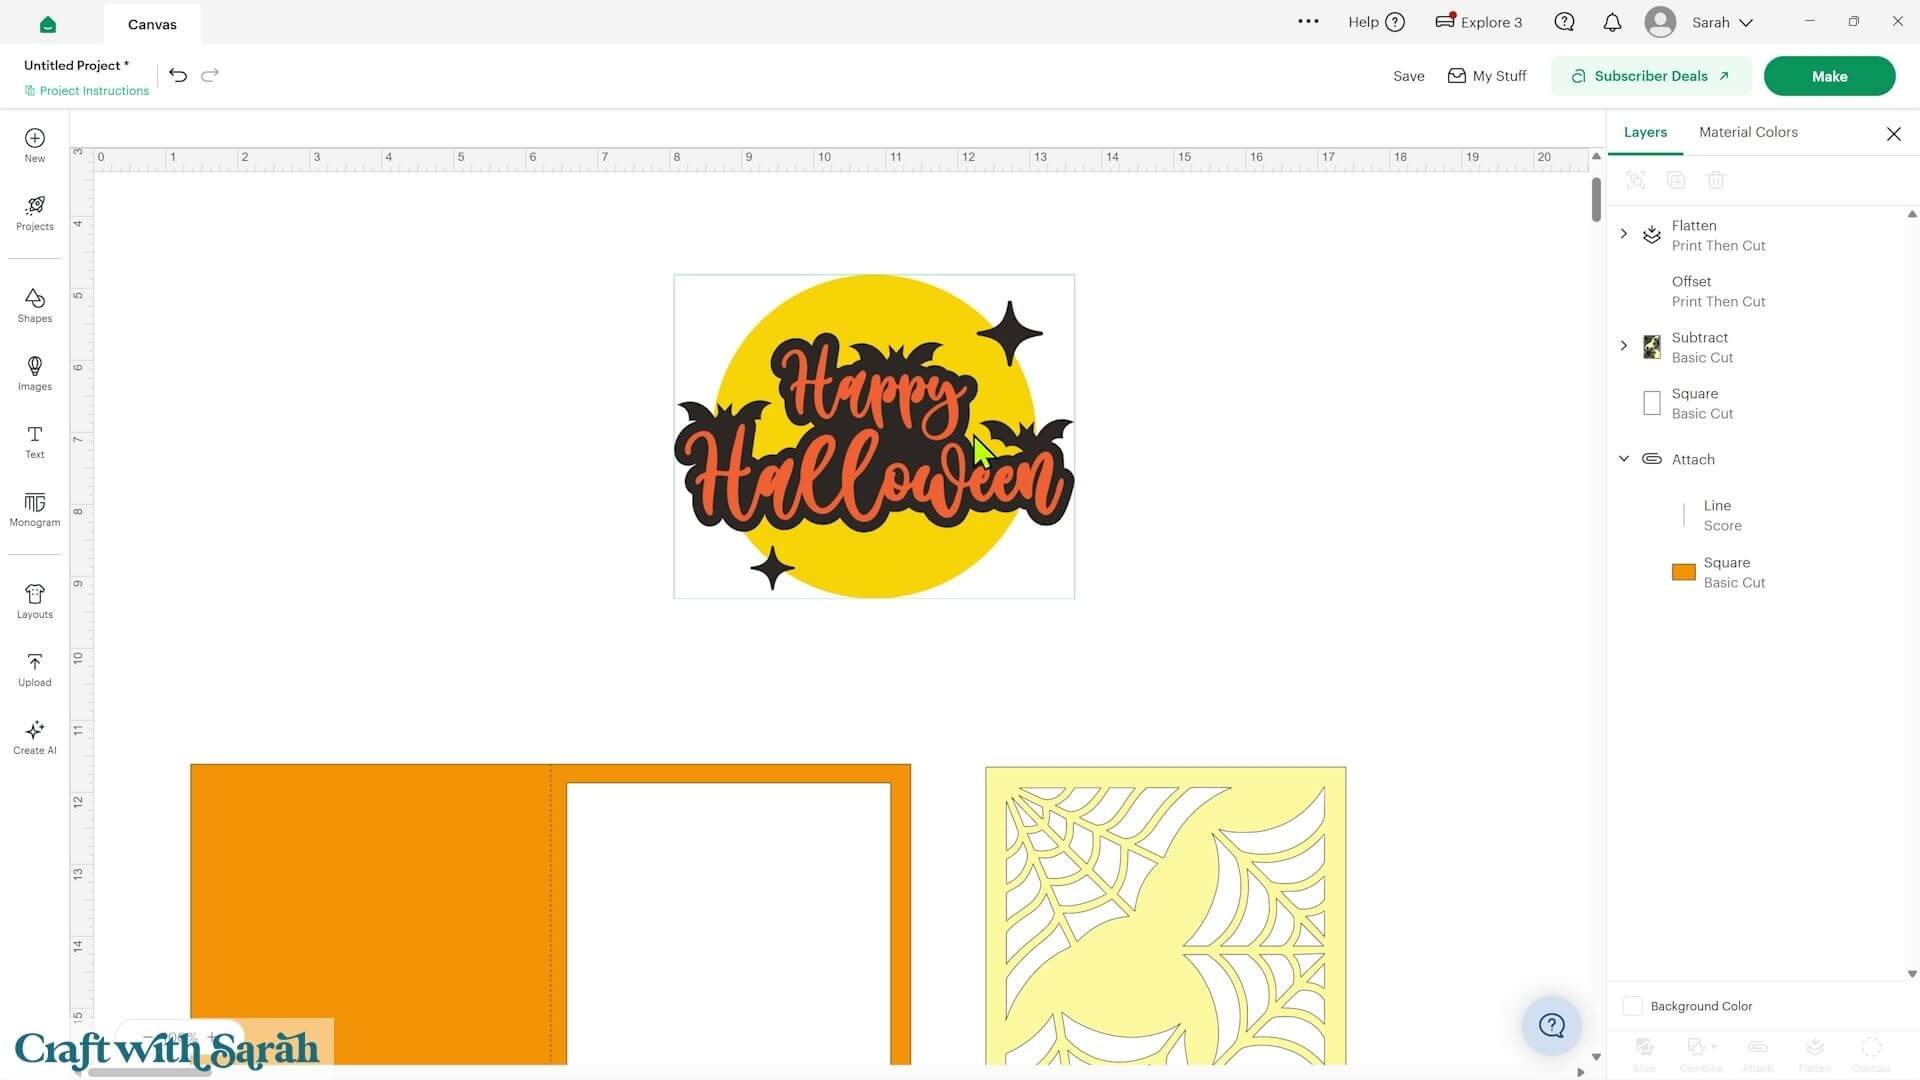
If you can’t see the white offset against the Design Space Canvas, change the background colour of your Canvas temporarily so that the white becomes visible.
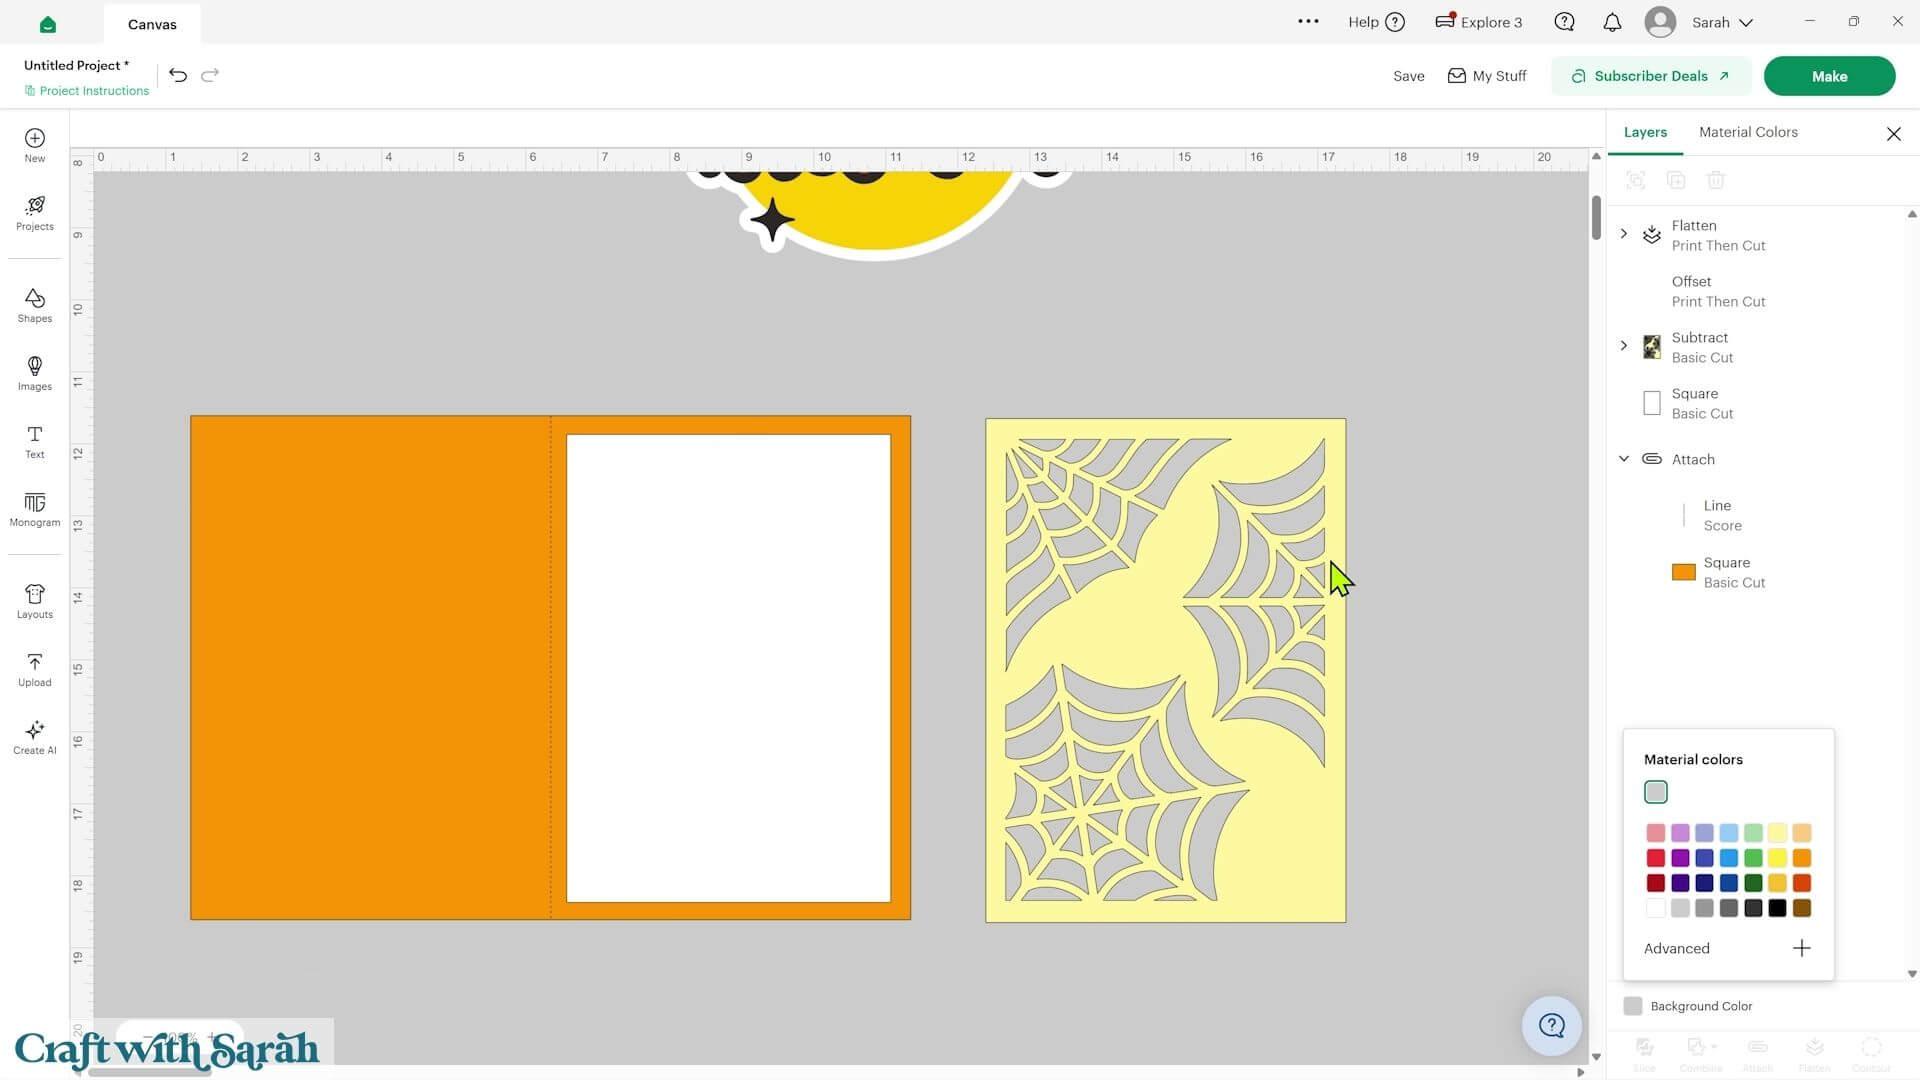
Unflatten the image if necessary, select the offset and picture together and press ‘Flatten’ again.
The complete design should now show as one Print Then Cut layer.
Your Cricut will print the complete image with your home printer and then cut around the outside of the white border.
If you’re doing this with a different image and there are any unwanted gaps in the white offset, use ‘Contour’ to remove them before flattening. Otherwise, your Cricut may try to cut around all of those little gaps too.
I usually make an extra copy of my Print Then Cut topper just in case something goes wrong with the first one.
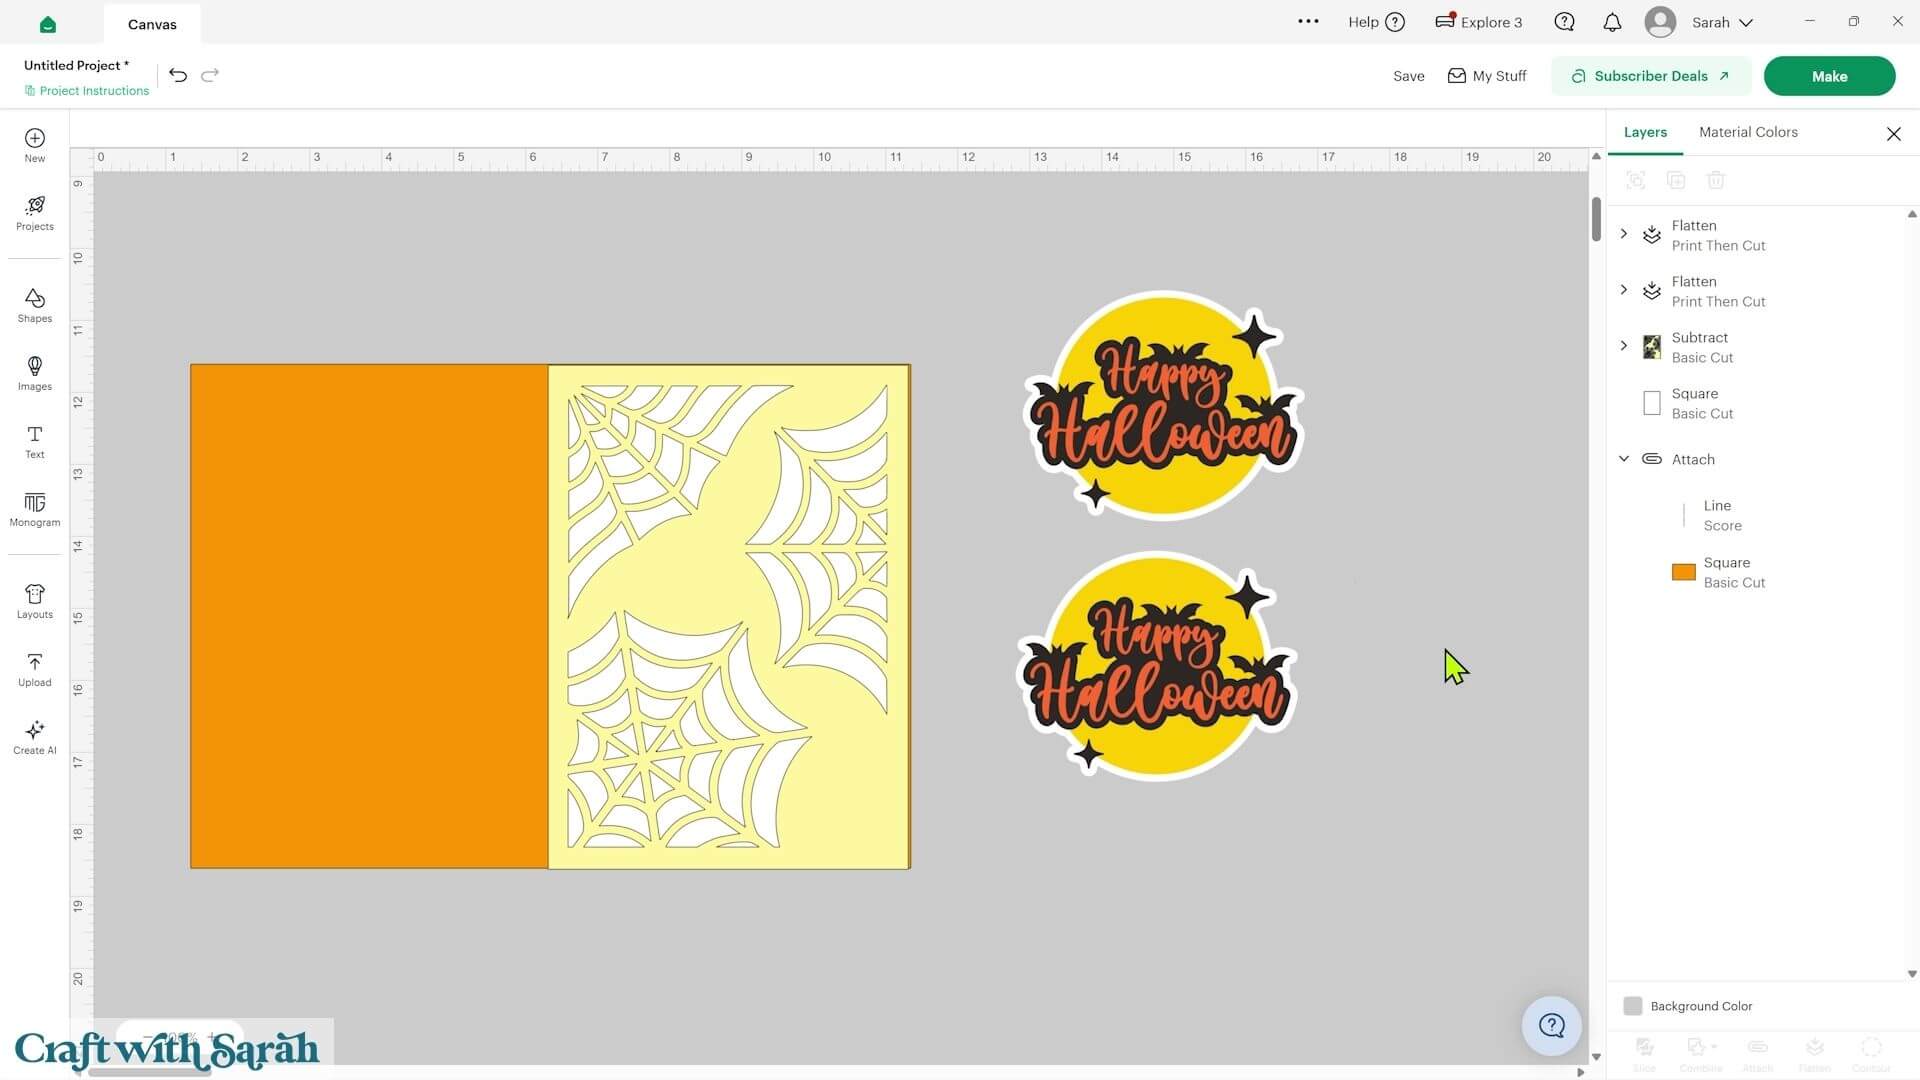
Step 4) Cut the stencil and card pieces
When everything is ready, press ‘Make’ and follow the on-screen instructions.
Cut the stencil from acetate. I find that the Acetate setting in Design Space doesn’t work particularly well for my acetate, so I use the Kraft Board setting instead.
Cut the smaller rectangle from watercolour paper and the other card pieces from your chosen cardstock.
Print and cut your Halloween topper too.
If you’re new to Print Then Cut, it’s worth making sure that your Cricut has been calibrated before you start so that it cuts accurately around the printed image.
Step 5) Create the spider web background
Now for the messy bit!
I’m using Nuvo Shimmer Powder to create my background. This is a pigmented powder that you sprinkle onto paper and then activate with water.
When the water hits the powder, all of the colours start to spread and come alive. The powders I used contain different colours within them and also create a lovely shimmery effect.
You don’t have to use shimmer powder. Paint, ink, chalks or other mixed-media supplies could all work with your stencil.
It’s a good idea to protect your work surface before you begin because the colours can spray around when you add the water and they may stain. I used Step of a cut-up delivery box to protect my table.
Position the acetate stencil over the watercolour paper and use masking tape around the edges to stop it from moving.
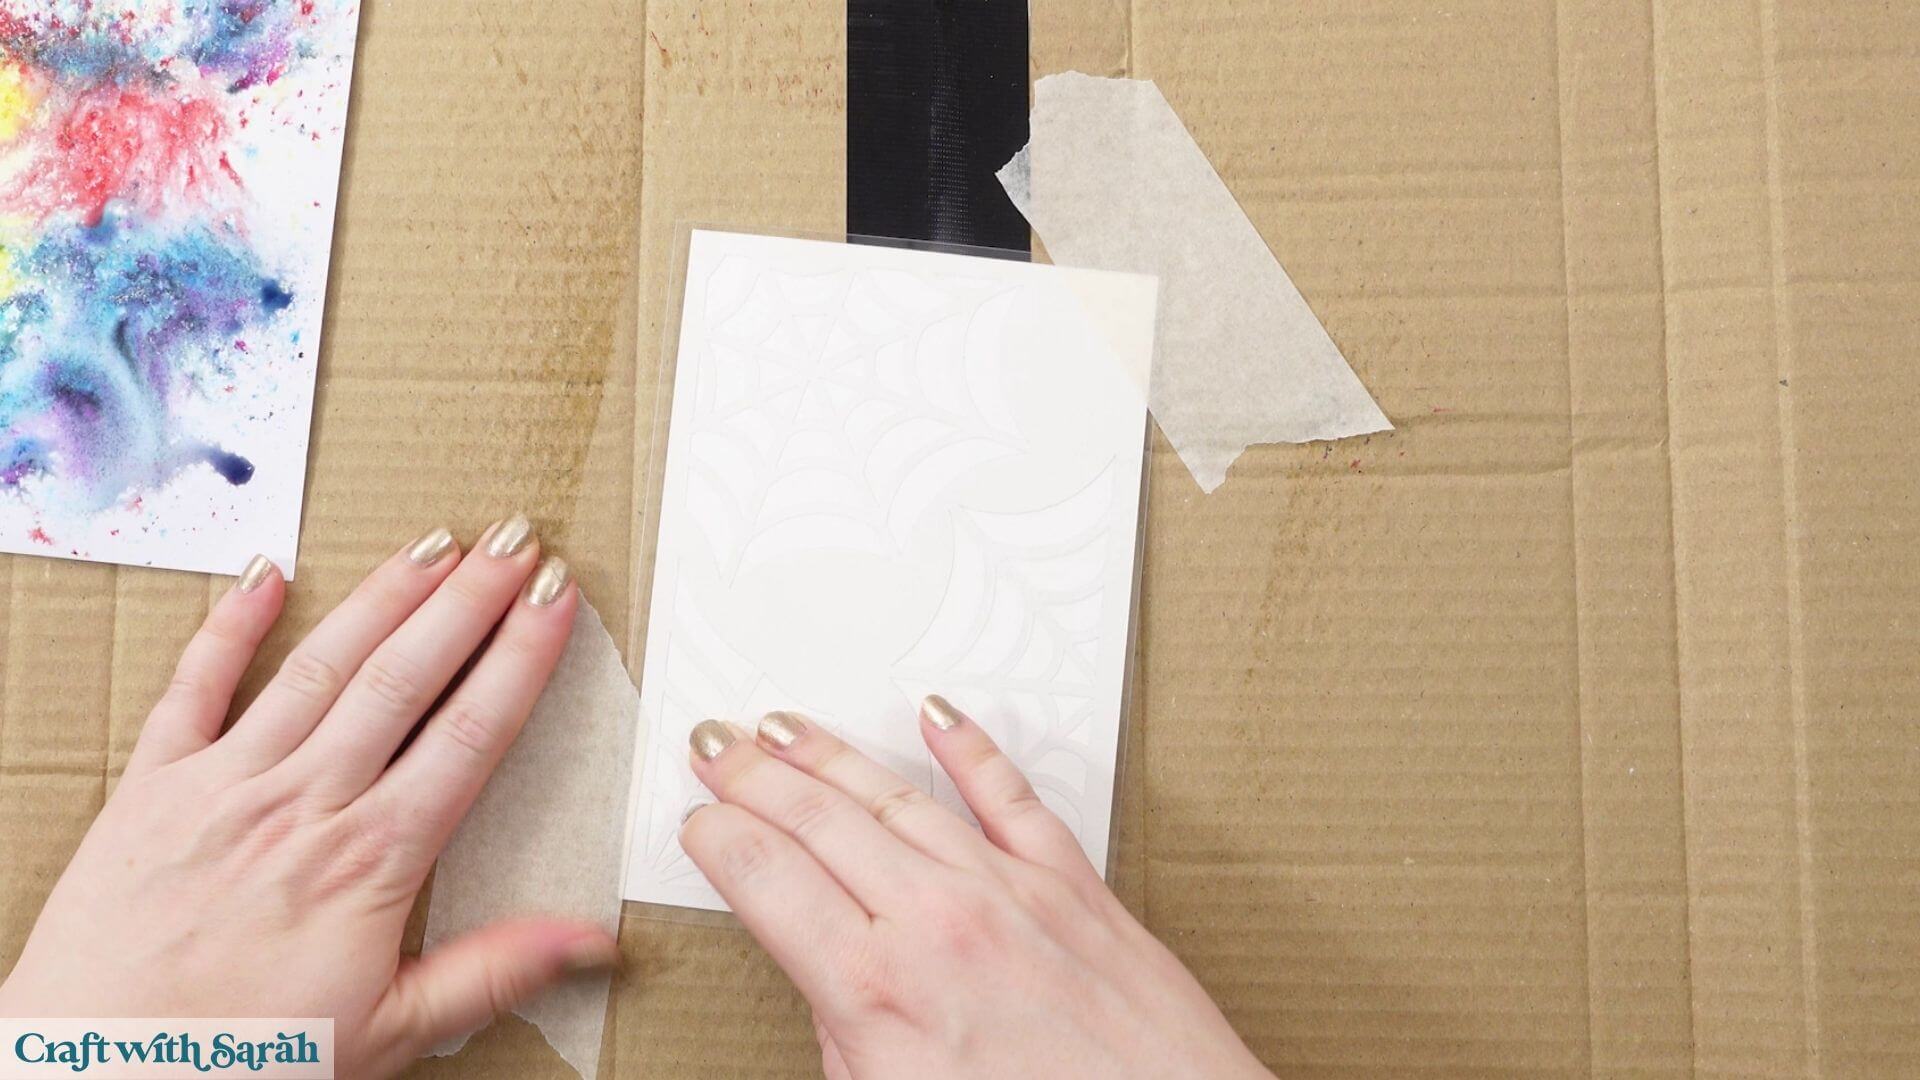
Sprinkle your chosen colours over the stencil. I used a mixture of red, yellow and black.
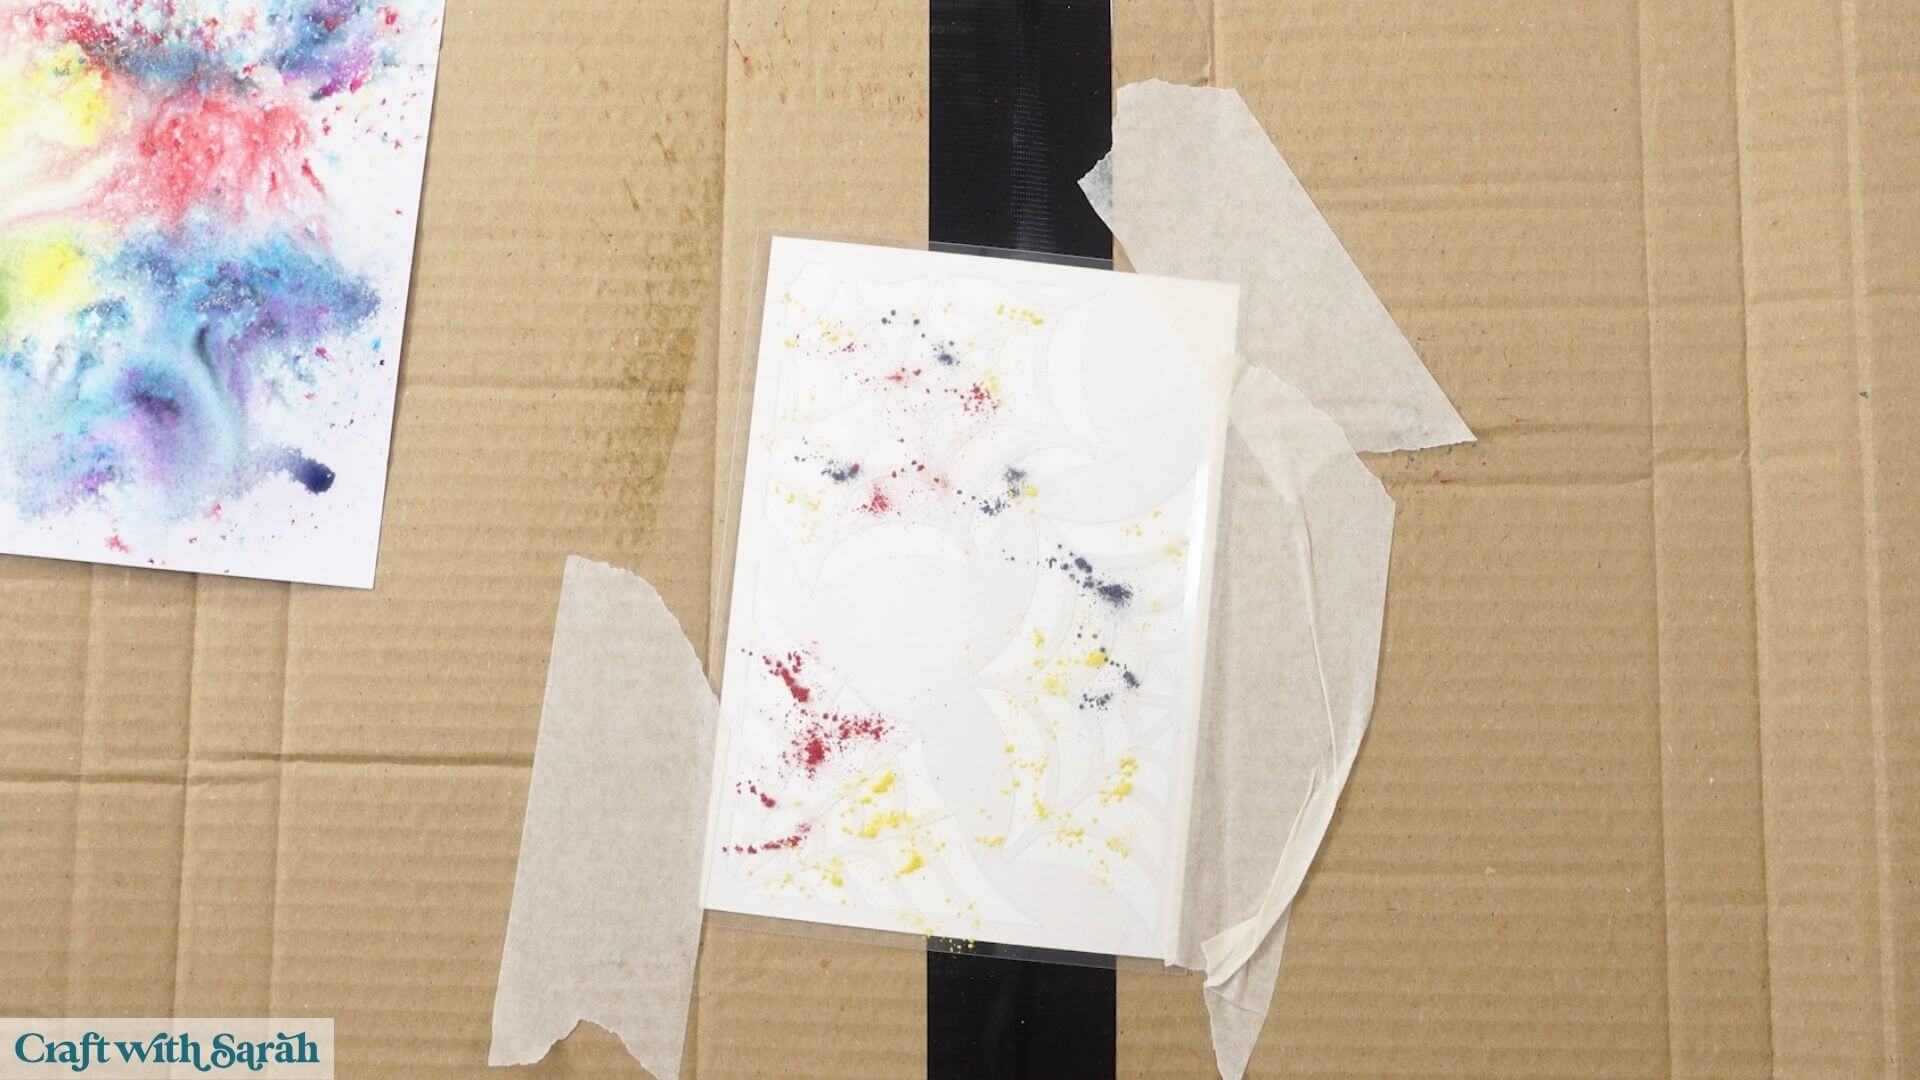
Fill a spray bottle with ordinary water and lightly spritz over the powder.
You’ll see the colours immediately start to activate and spread across the paper.
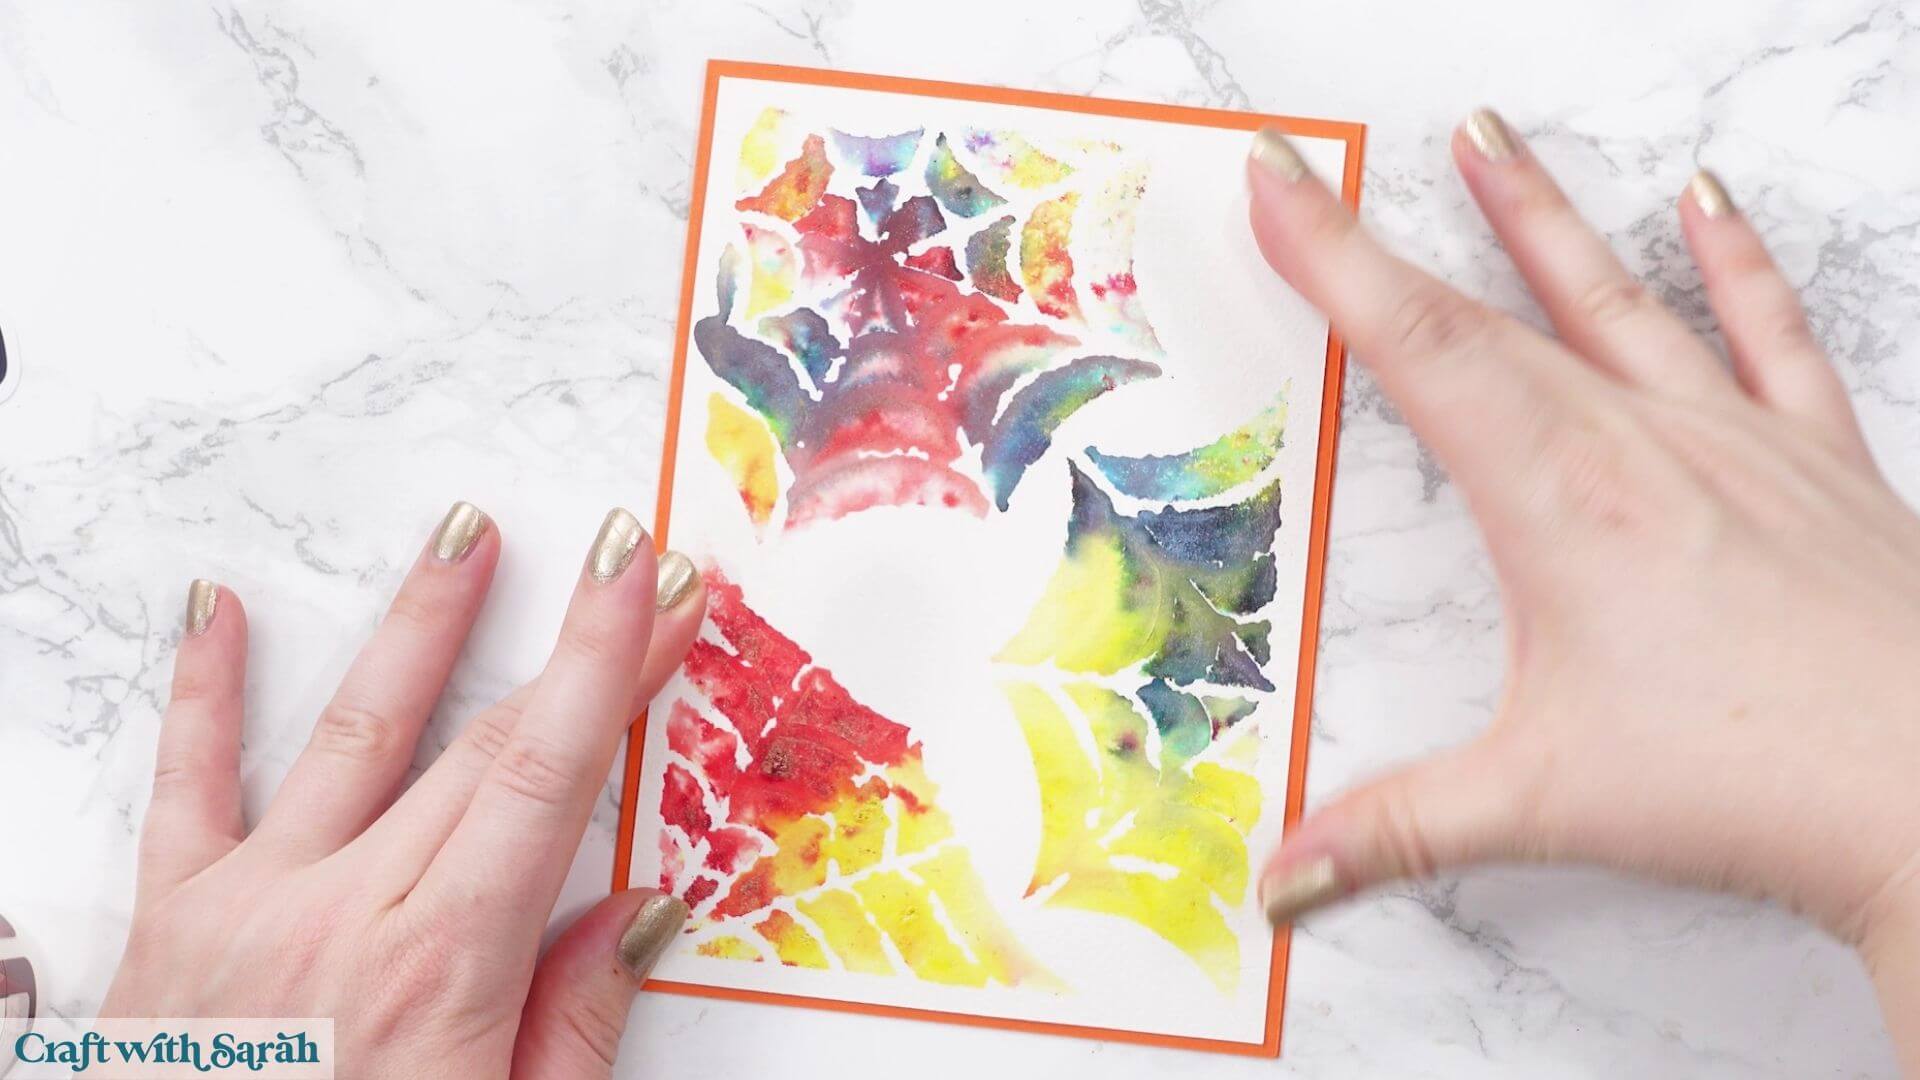
The more water you add, the more the colours will move and merge together. I wanted the spider web effect to be quite bold and abstract, so I didn’t mind if some of the colour bled underneath the stencil.
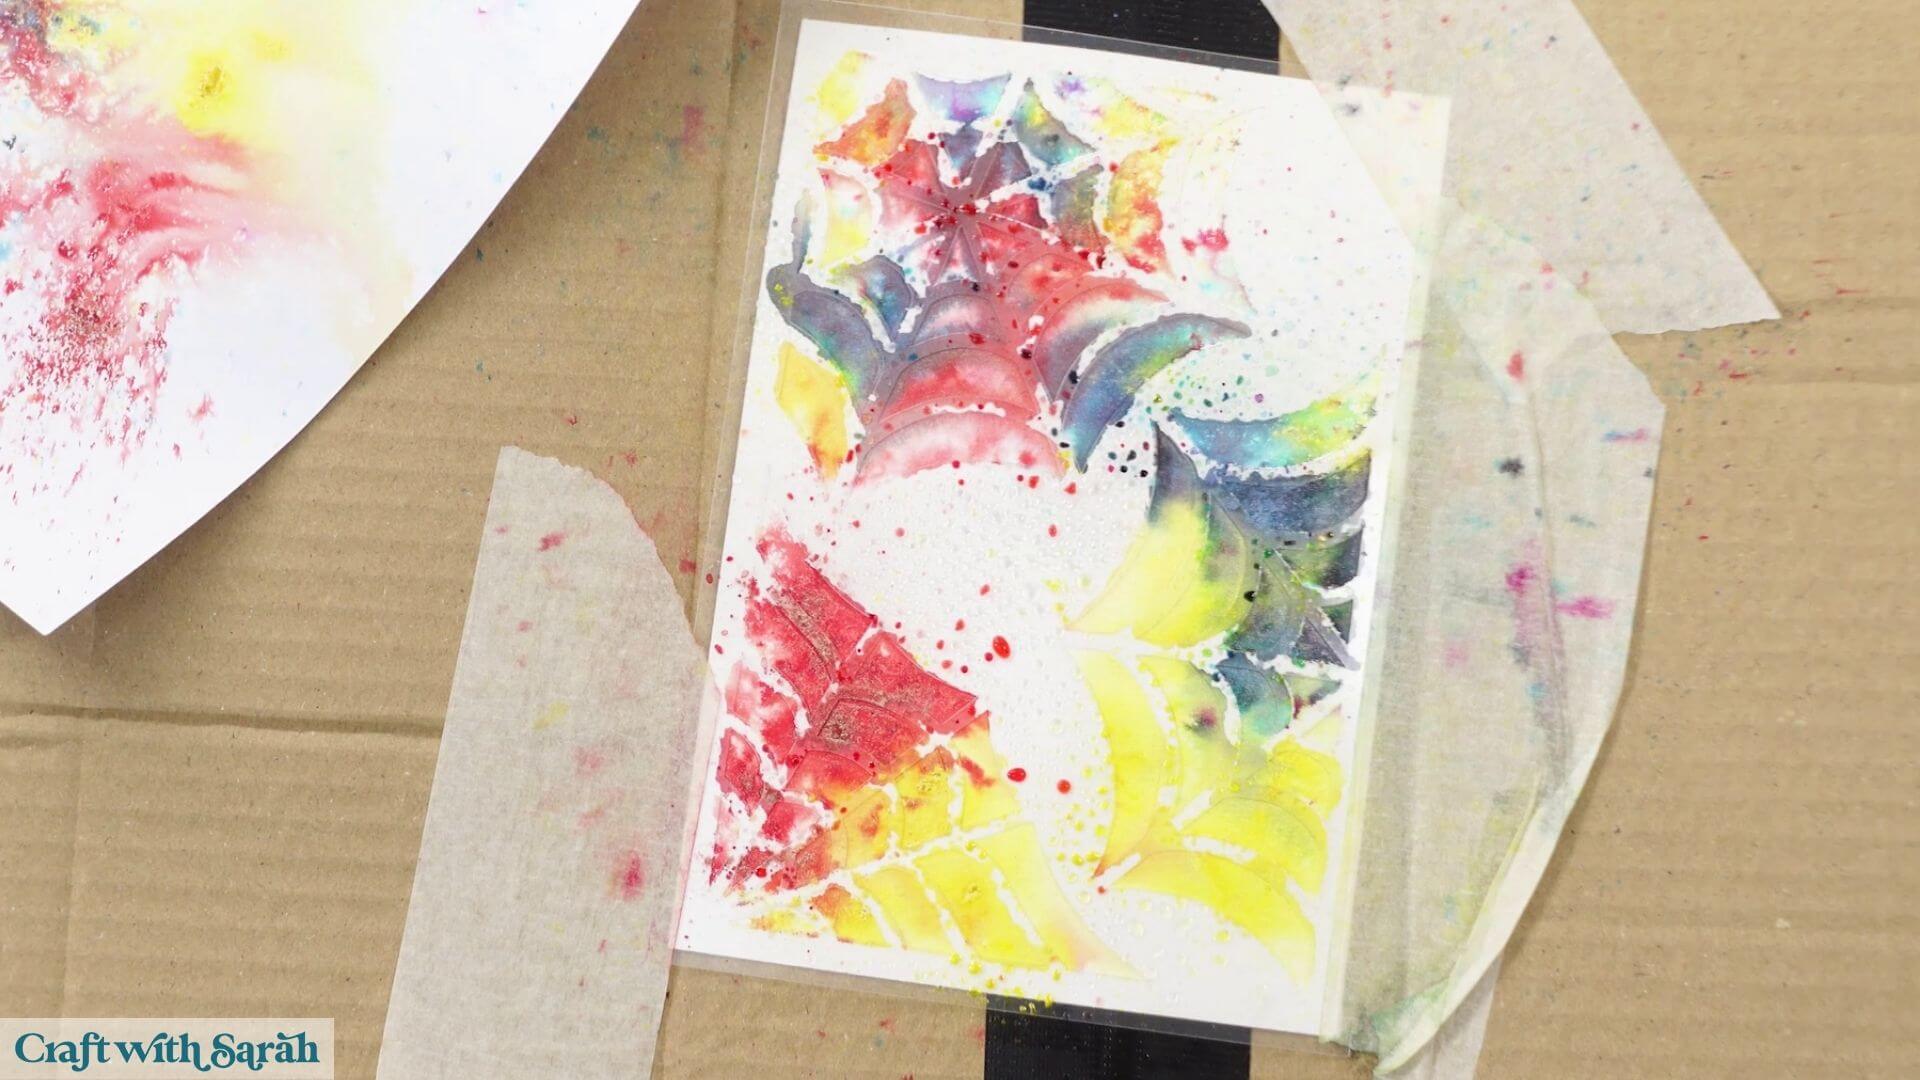
Leave the background to dry completely before removing the stencil.
I left mine for around 40 minutes. The watercolour paper had dried by then, although there were still water droplets sitting on top of the acetate. I carefully blotted those with some kitchen towel before removing the stencil.
And… spider webs!
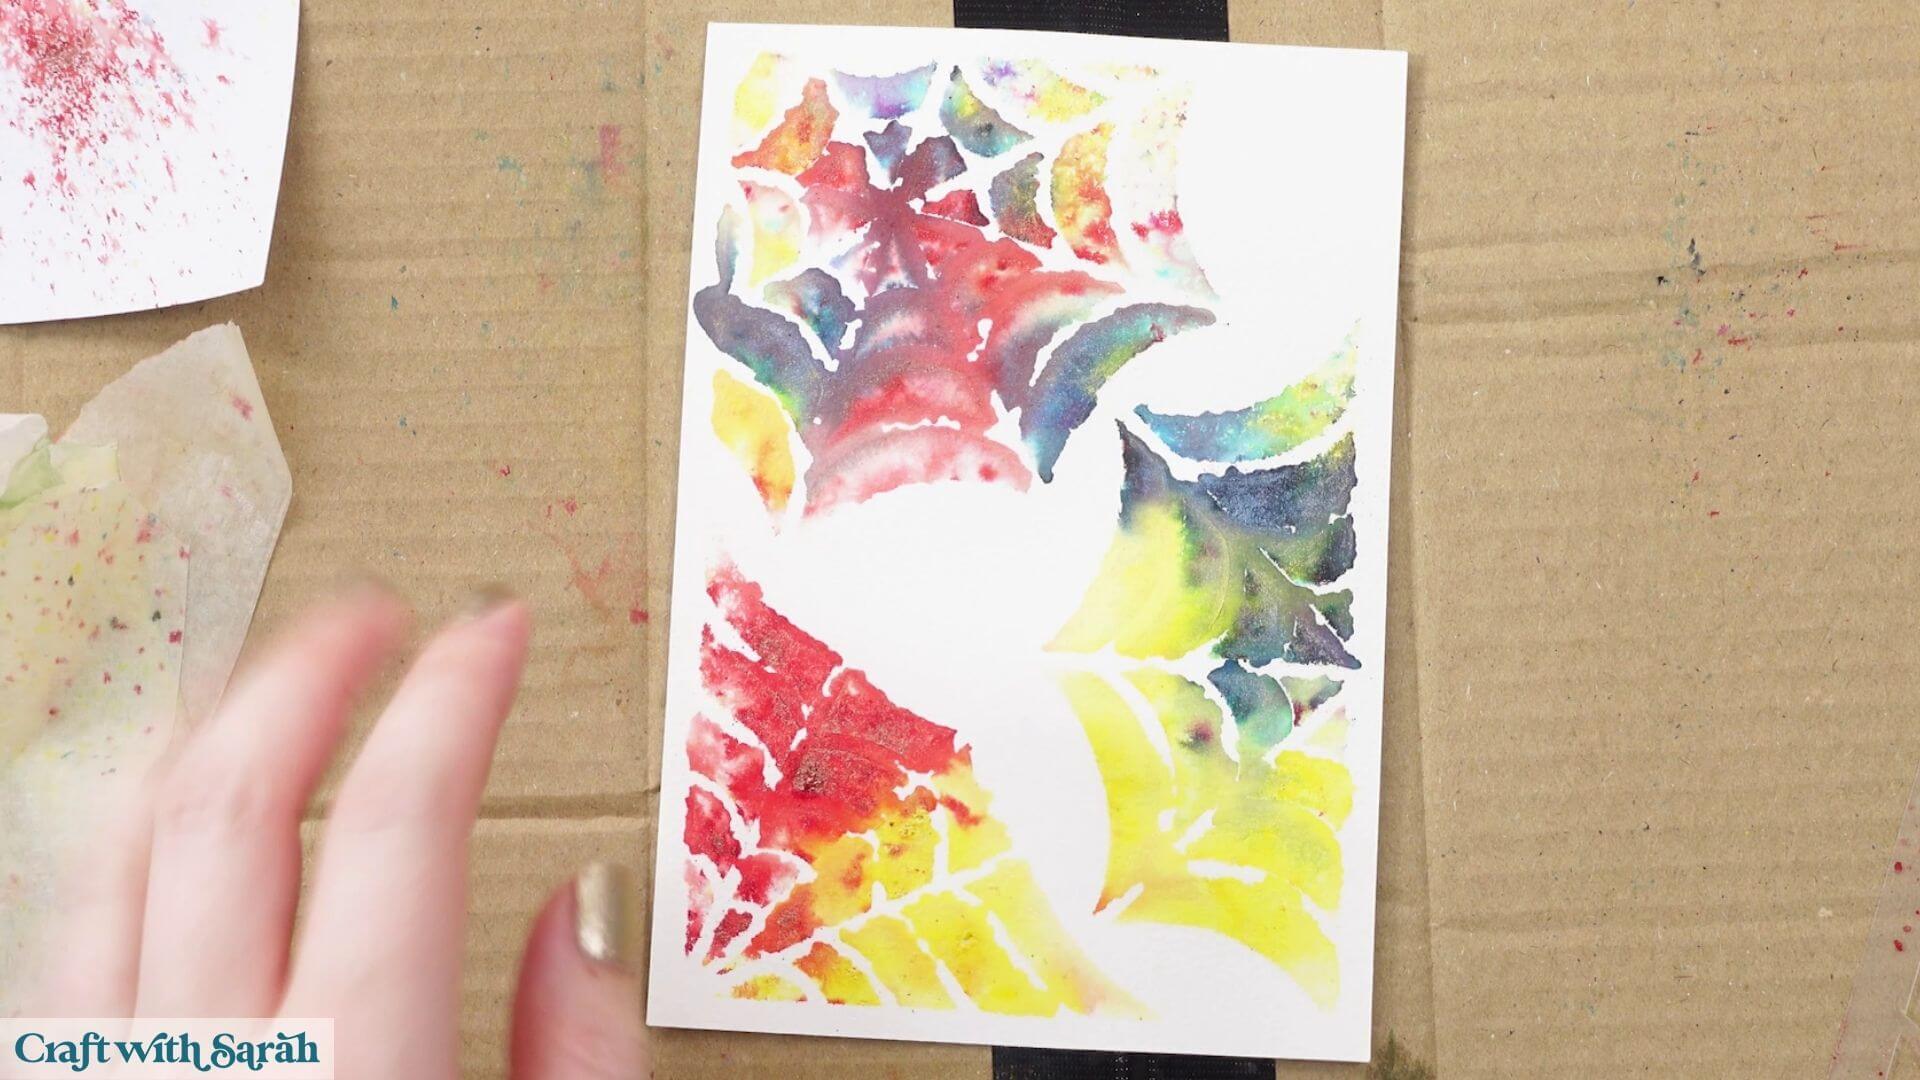
Mine bled a little bit more than I originally expected, but I really liked the abstract effect.
If your watercolour paper has warped from the moisture, you may need to flatten it under something heavy once it is completely dry before assembling the card.
Step 6) Assemble the card
Fold your base card in half along the score line.
Glue the finished spider web background onto the front.
Use foam squares to add your Print Then Cut ‘Happy Halloween’ topper.
The foam squares lift the topper away from the colourful background and give the finished card some extra dimension.
And that’s the second card finished!
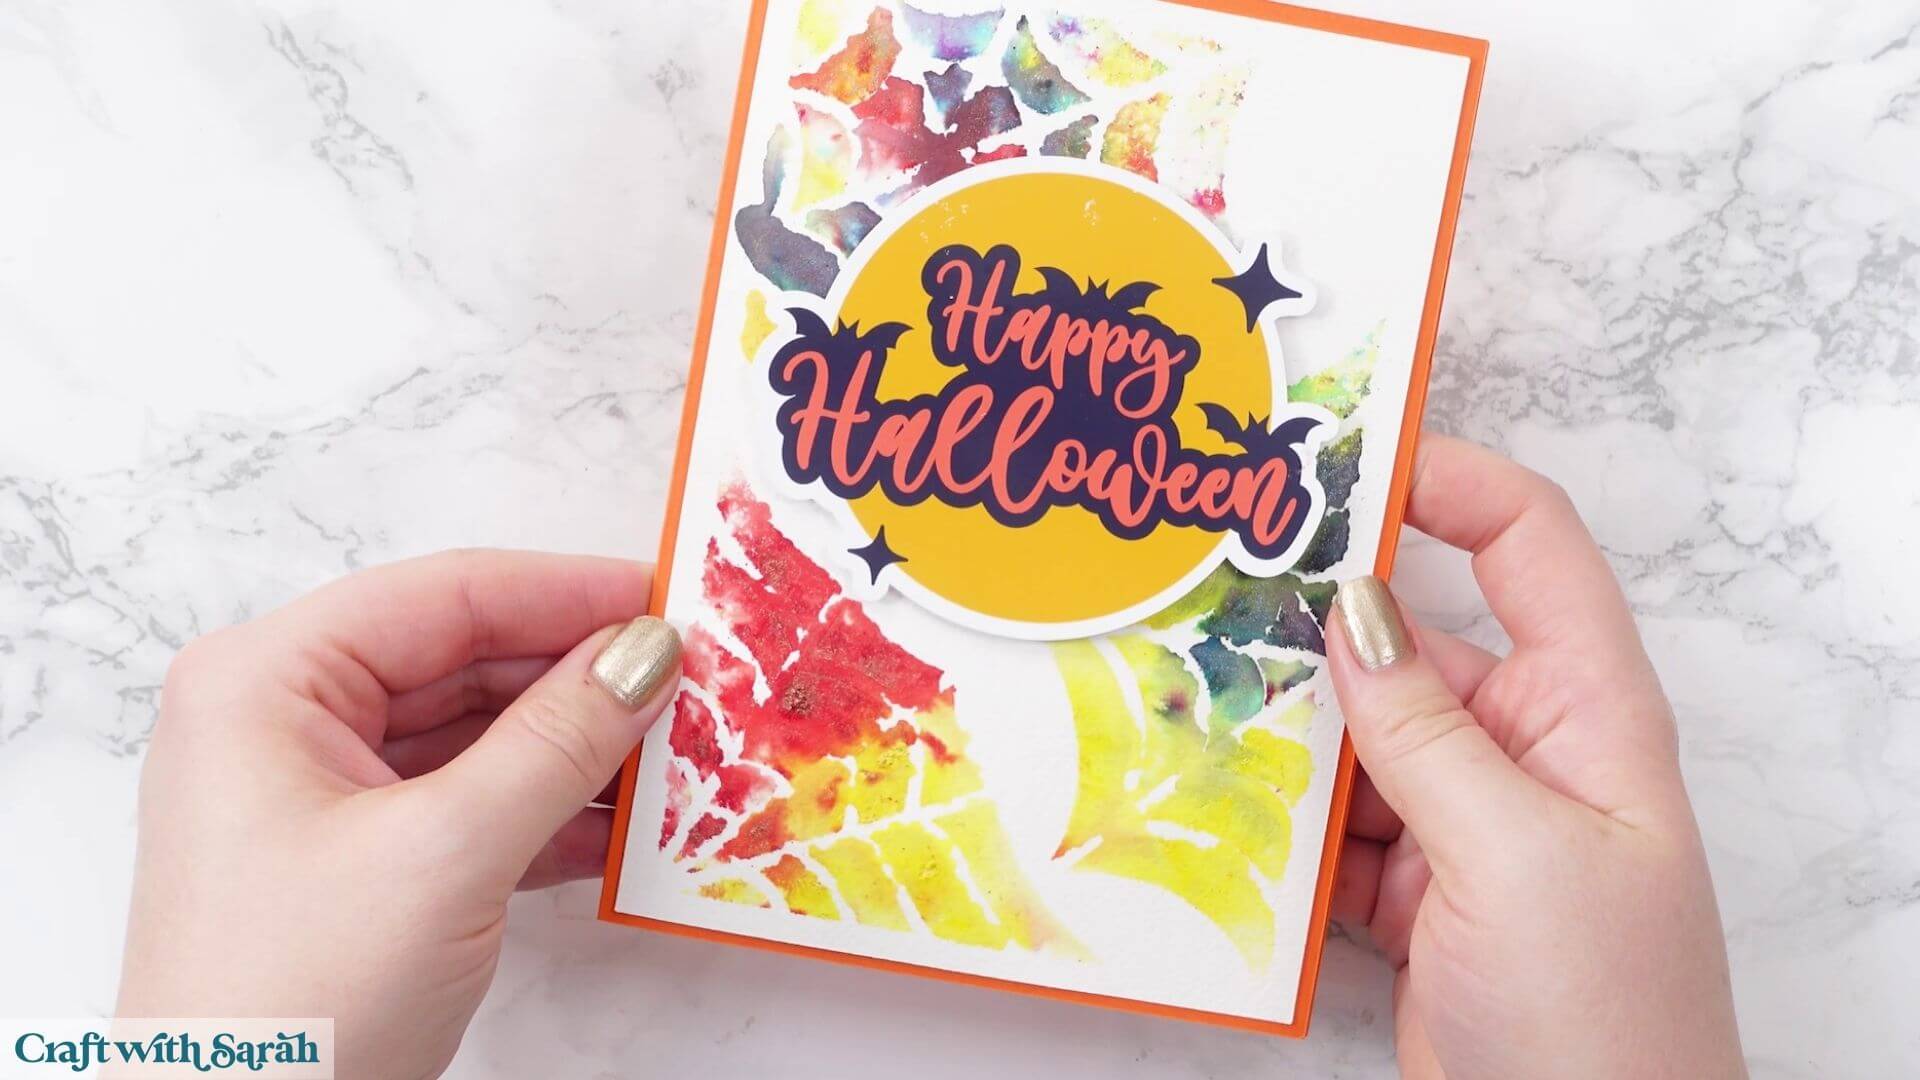
I don’t usually do much mixed-media crafting because I’m not particularly keen on anything that risks getting my fingers covered in paint, but I really like how this one turned out.
It’s a fun way to add colour and extra customisation to your cards, and because you’ve cut the stencil from acetate, you can keep it and use it again for future projects.
Spider web SVGs for your craft projects
I hope you’ve enjoyed seeing some of the different ways that you can use these spider web SVGs.
We’ve made giant window cling spider webs, enormous cardstock decorations for the wall, a custom spider web background for a greetings card and an acetate stencil for creating mixed-media effects.
These are only a few ideas, though. You can resize the spider webs and combine them with other Halloween designs to make all sorts of different projects.
Have fun experimenting with the different designs and techniques to see what you can create!
Happy crafting,
Sarah x