12 Tips for Cricut Design Space 😲 Design Space for Beginners
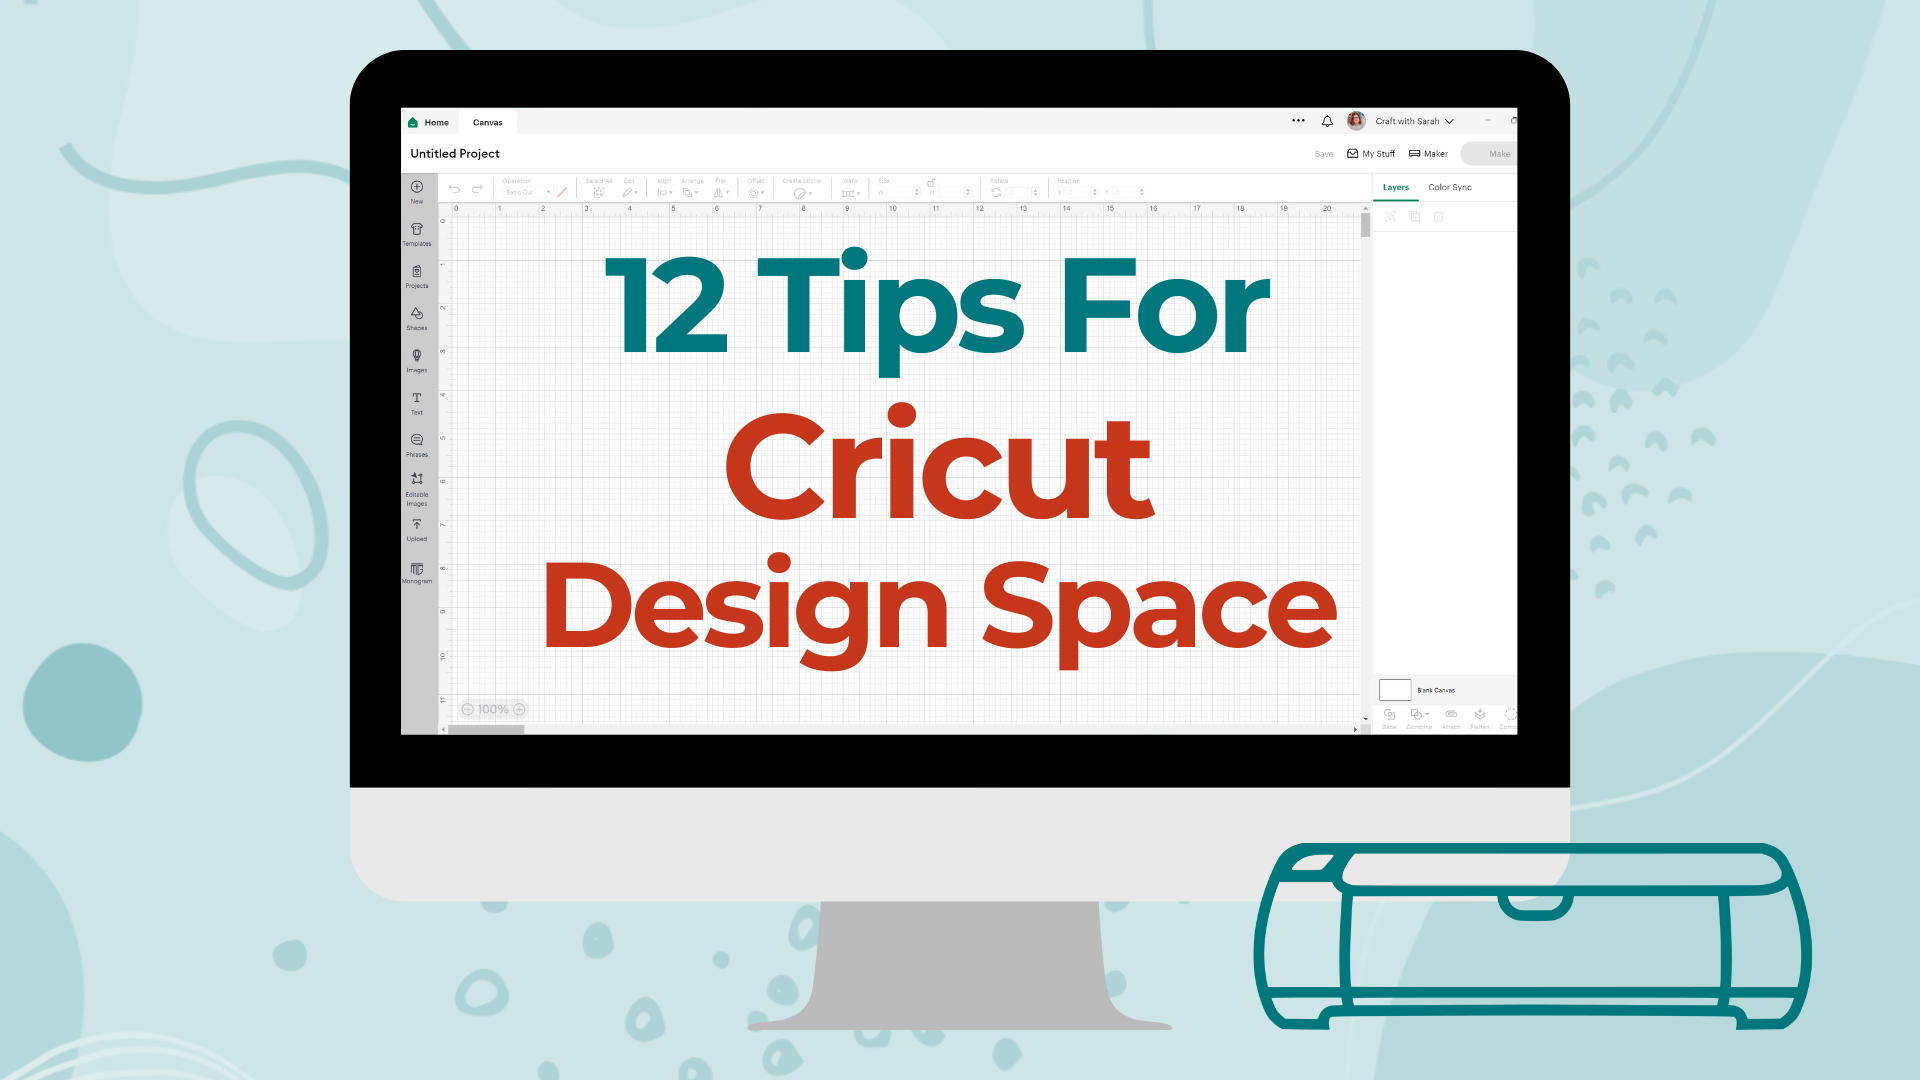
Learn my favorite software tips and tricks that make creating Cricut projects in Design Space much easier.
If you’ve ever thought that learning Cricut Design Space was trickier than you had thought it might be, or that you don’t know how to do certain things that other people make look so easy, this is the resource for you!
I’m here to make your Design Space experience easier with 12 quick tips to speed up your processes to make things go faster and maybe even show you a couple of things you didn’t know.
Watch me walk through all these software hints in the video below, or keep scrolling for a written version.
Tip 1) Show me the layers!
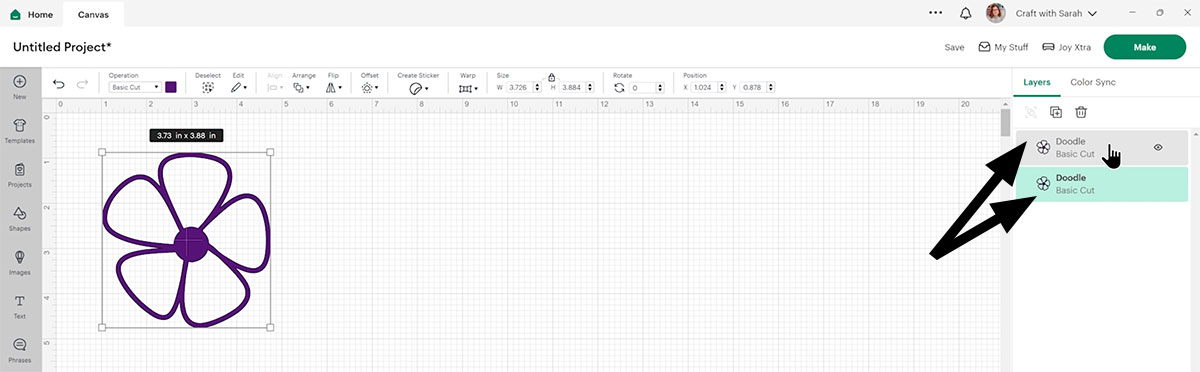
I’m not sure this really counts as a Design Space tip, but it’s something I’ve had so many comments and emails about since a recent Design Space update (April 2024).
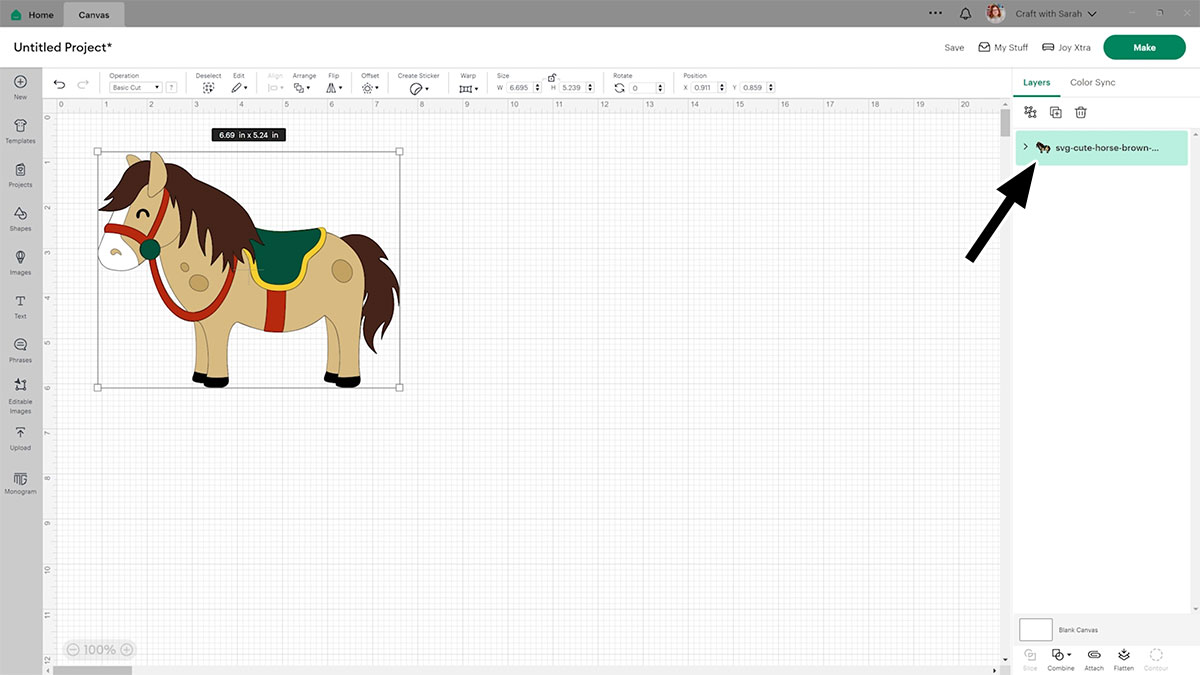
When you upload SVGs or put an image from Cricut Access onto your project, you might think there’s no layers any more, as they don’t appear all spread out in the layers panel like they used to.
Don’t worry – they are all still there!
The recent update has changed the layers panel so that layers now appear collapsed by default.
Click the little arrow next to the name of the image/SVG and then you can see all the individual pieces.
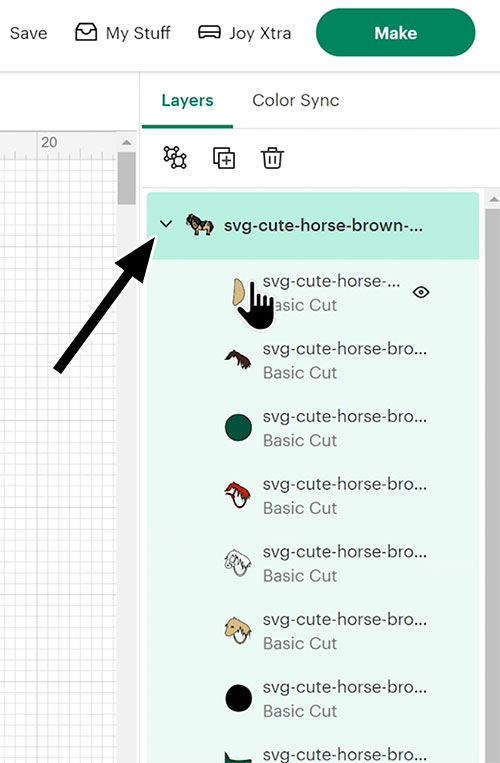
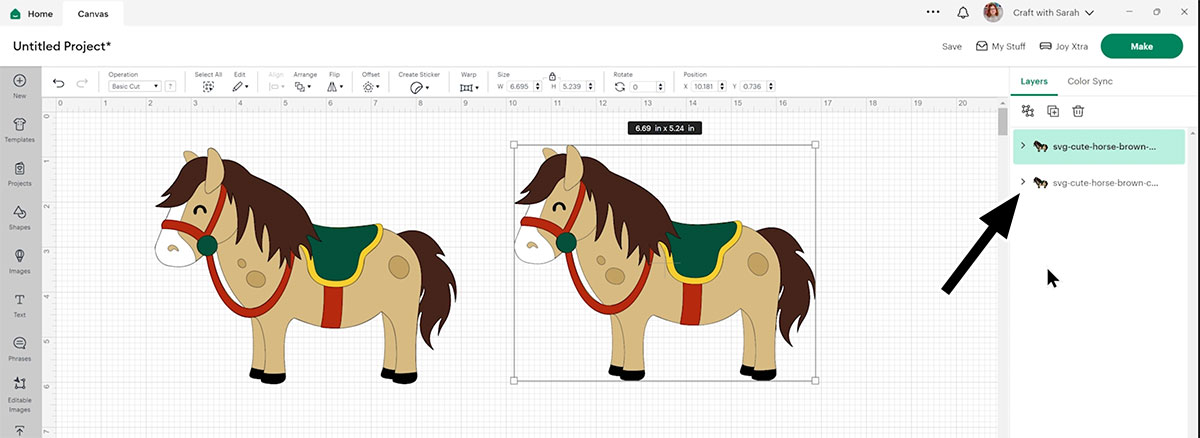
This “collapsed” view also takes place for any new groups/images that you add to your project. For example, if I duplicated my horse to make a second one, the second group has come collapsed by default whereas previously it would have been all open.
If you want to close them up again, just click the little arrows next to the group names.
Tip 2: Turn gridlines on or off
Do you find grid lines distracting when you’re trying to make the perfect project in Cricut Design Space?
Sometimes they can be really helpful for getting a better idea of how big your image is going to be or if you’ve lined things up… but sometimes you just want to get rid of them!
Did you know there’s a super quick and easy way to do this? All you need to do is click the little white square at the top of the screen, where the two zeros are on the rulers.
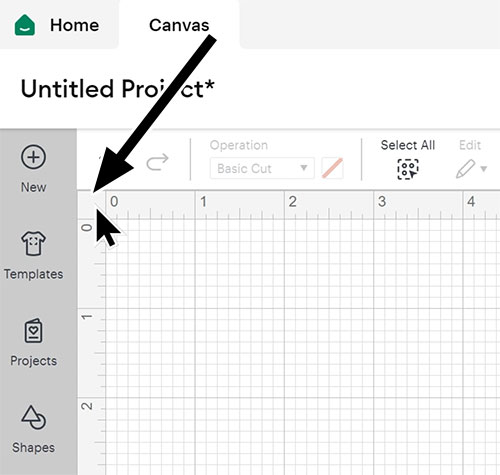
Click it once to hide your Design Space grid lines. Click again to get larger grid lines and click once more to go back to the original.
You can click as many times as you like to cycle through all of the different types of grid.
It’s so much quicker than going to your settings menu every time. Now you know that grid lines are one simple click away!
Tip 3: Switch between imperial and metric measurements
It’s really easy to change Design Space to centimetres instead of inches (or switch from cm to inches).
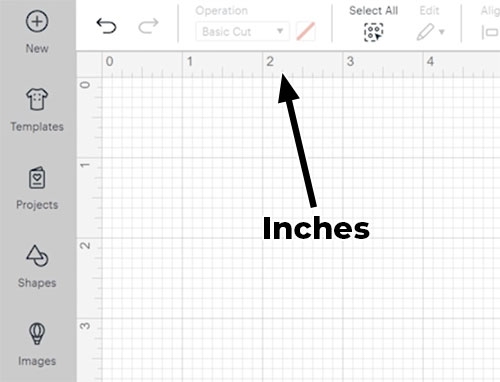
By default you’ll probably find that Design Space loads in inches. You can tell this by looking at the measurements across the top.
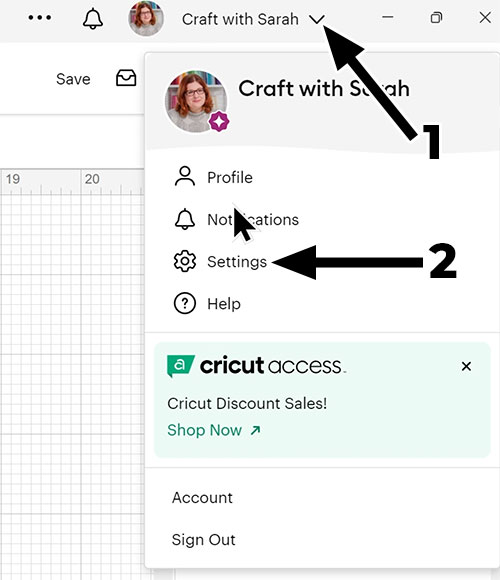
If you want to change this to centimetres, click the little arrow next to your profile at the top of the screen and go into “Settings”.
From there, you can click into “Canvas” and then you’ve got an option to change your units from imperial to metric.
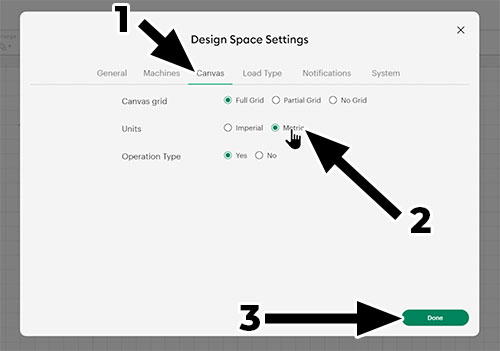
If I click on to metric and then press done it’s changed now so now my screen is showing in centimetres instead of inches.
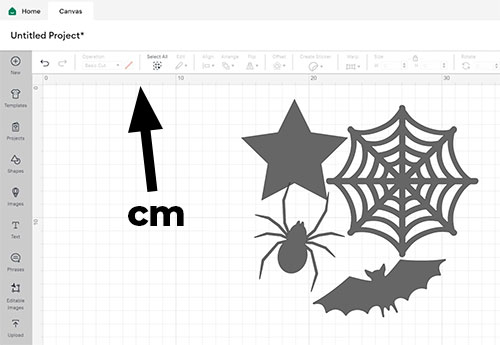
You can change back at any time by doing the same thing.
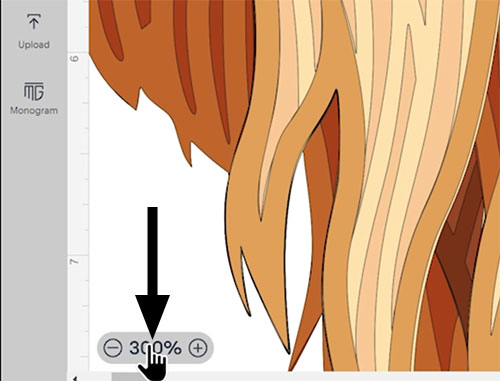
Tip 4: Zoom out in one click
Sometimes when you’re working on a project, you might zoom in quite a long way to help you see all of the details.
There is a one-click way to zoom out again to get back to 100%.
To zoom out, you don’t need to click the minus arrow loads of times to get back to 100; you can just click where it says the number (e.g. 300%), do a single click and it will immediately return to 100%.
Tip 5: Changing the canvas color
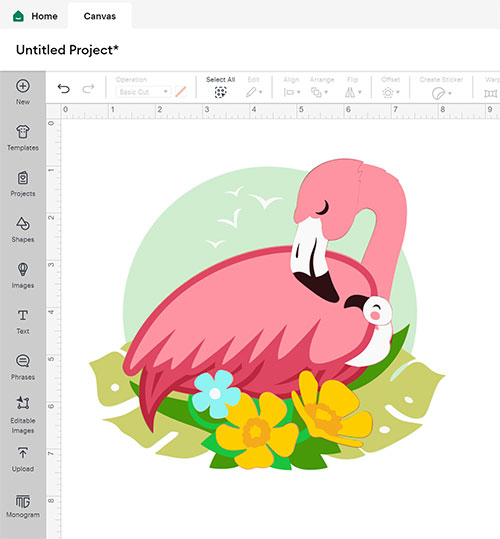
Sometimes when you’re working on a project in Cricut Design Space, you might find that it’s a little bit hard to see your design against the white background, especially if you’ve got lots of white on your design and you’re working with the grid lines off.
For example, if I add a white offset to my image and then “Flatten” it to turn it into a print-then-cut, the white border becomes invisible:
To make it easier to see, look down the bottom of the layers panel where it says “Blank Canvas” with a white rectangle next to it.
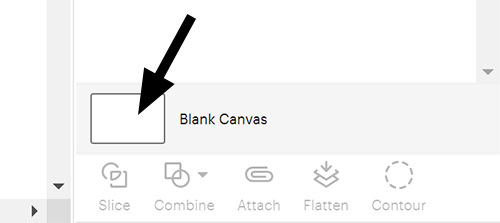
Click on that rectangle and then the very top of your screen in Design Space changes.
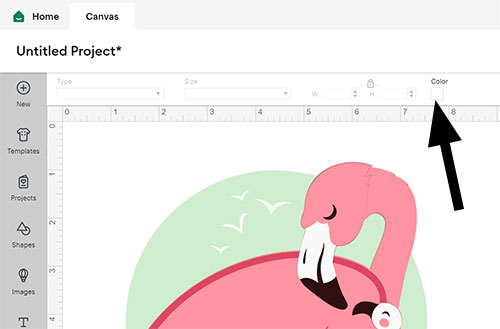
Click into the new color box and then you can change the background color to anything you want. It can take a few seconds to load, so be patient 😀
Now, I can see my white border!
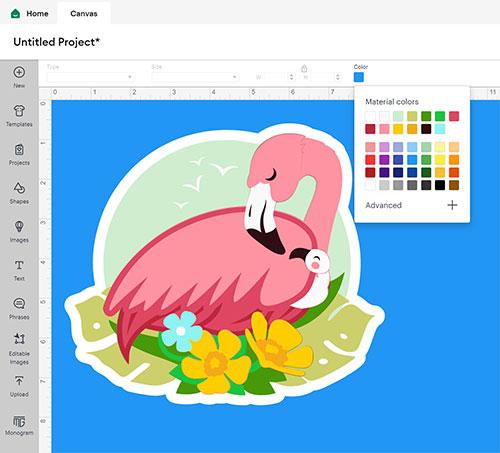
To change it back to white, repeat the same steps and choose white as the new colour.
Tip 6: Duplicate in place
This little trick in Cricut Design Space has made my life so much easier.
Sometimes when you’re creating a project you might want to duplicate a layer but have it in exactly the same place as the original.
Now, if you were just to click the “Duplicate” button at the top of the layers panel, it does indeed create a copy, but if shifts the position.
And okay; I could select both copies and go “Align > Center” to put one on top of the other in exactly the right place, but if you’re working on a complicated design with lots of different layers, groups, or elements, sometimes that doesn’t always work and it can cause more trouble than it solves.
There is a way to duplicate exactly in place without having to move things about.
Click on your layer (or Group) and then instead of clicking the Duplicate button, hold down the ALT key on your keyboard and then move your mouse ever so slightly and you can see your cursor changes and a little plus symbol (+) appears.
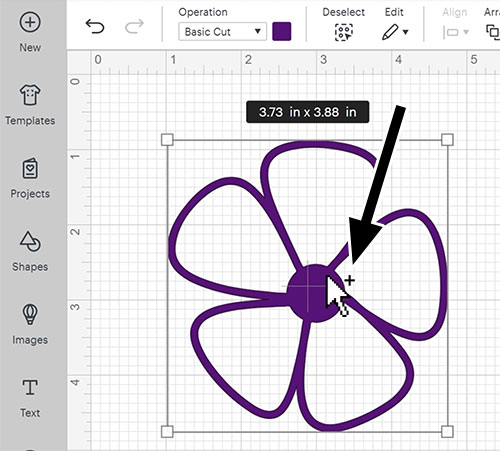
Now with the ALT key still pushed down, do a single click and that will duplicate directly on top.
I love love love love love this tip and I use it pretty much every single time I’m doing something in Design Space.
Tip 7: Keyboard shortcuts
You can use keyboard shortcuts in Design Space, just like you do in other programs such as your internet browser, Microsoft Word, Pages – or pretty much any other software you use!
For example, you can press CTRL and C on your keyboard to “copy” and then CTRL and V to “paste”.
This can help do things a little bit quicker than manually duplicating or right-clicking and copying/pasting using the mouse.
Other shortcuts that work in other programs work in Design Space too. For example, press CTRL and A to select everything all at once, or CTRL and S to bring up the “Save” menu.
There are some Design Space-specific keyboard shortcuts too, including CTRL and G to “Group” layers, or CTRL and D to “Duplicate”.
Tip 8: Naming layers and groups
When you’re making a project with lots of similar layers, it can be a bit tricky to see which one is which in the layers panel.
For instance, in this project I have a blue and a pink version of the word “Hello” and the rainbow underneath, but in the layers panel it doesn’t show which is pink and which is blue.

You can name layers (text and images) by double clicking on the title and typing out the name.
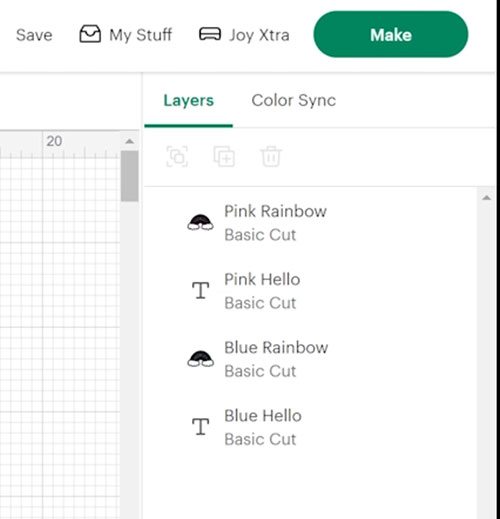
The same thing works on groups.
Let’s group my two pink ones together and then group the two blue ones together.
Now it’s just saying “Group” and that’s not very helpful!
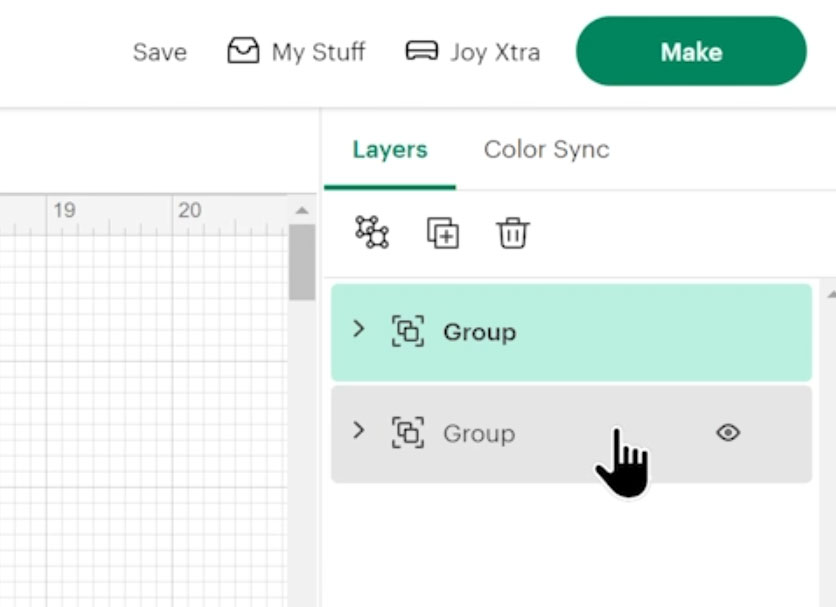
Double-click into the group heading and then call it whatever you want.
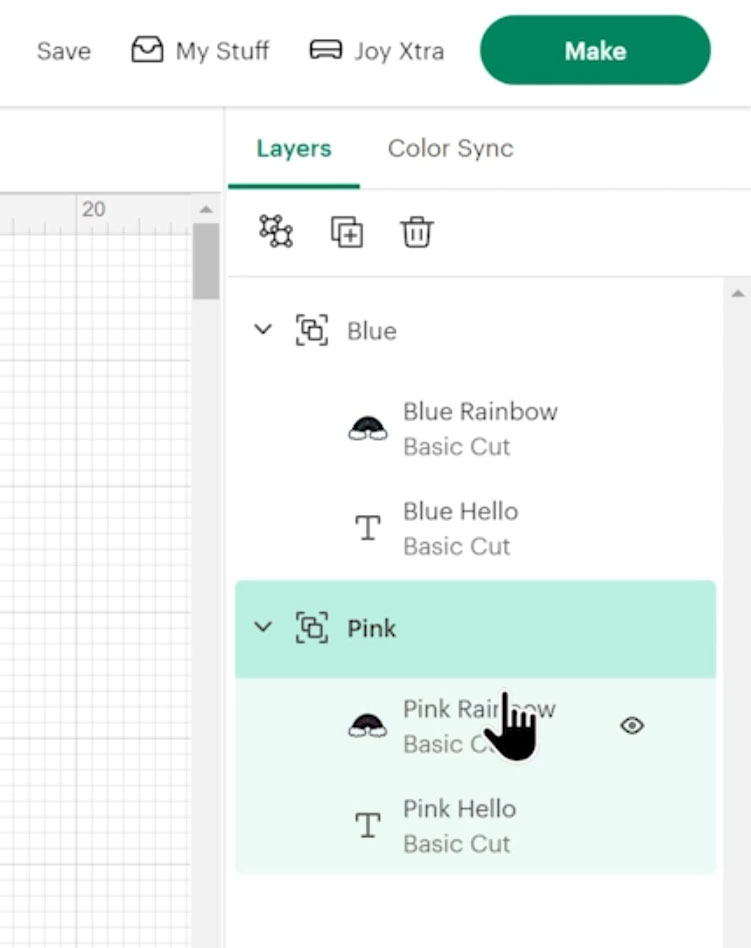
If you’re making a project that you’re going to be saving and coming back to another day, taking some time to name your groups and layers will make it easier for you to remember at what point you were at when you left it.
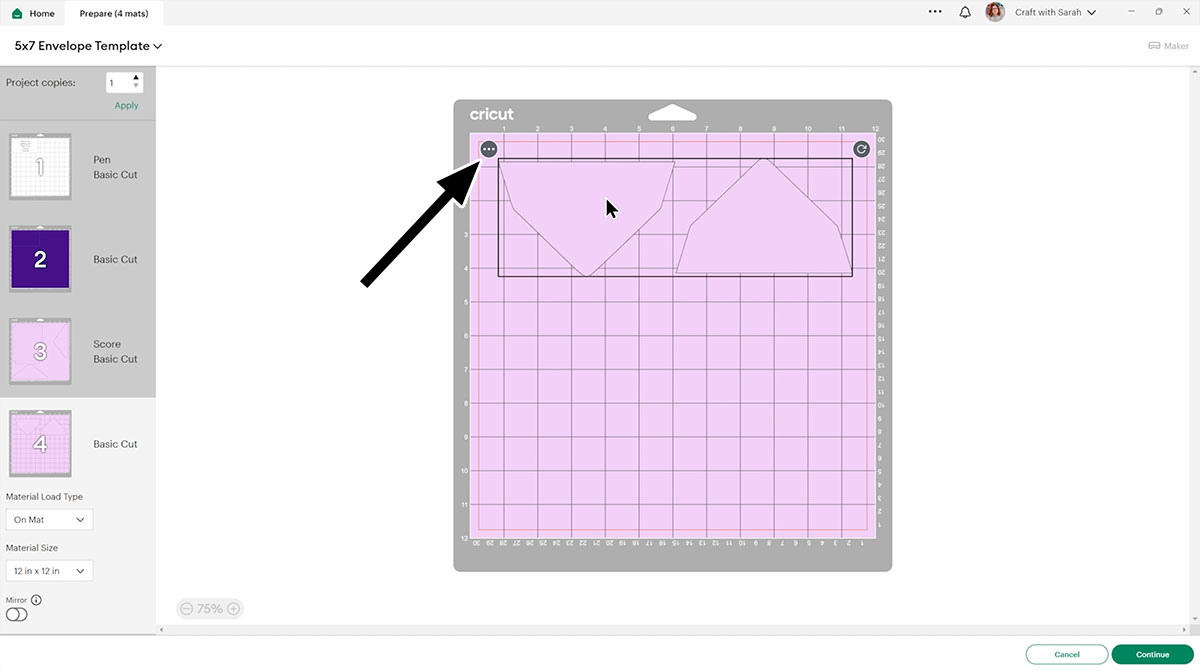
Tip 9: Moving mats to save space
After you’ve clicked “Make” to begin the cut process, you may find that Design Space splits up one of your materials into two different mats when you’re pretty sure you could fit it on one.
I never use two sheets when one would do the job – that is just a waste of my craft supplies!
Here is a way for you to combine the same color of card onto one sheet to see if you can get it to fit.
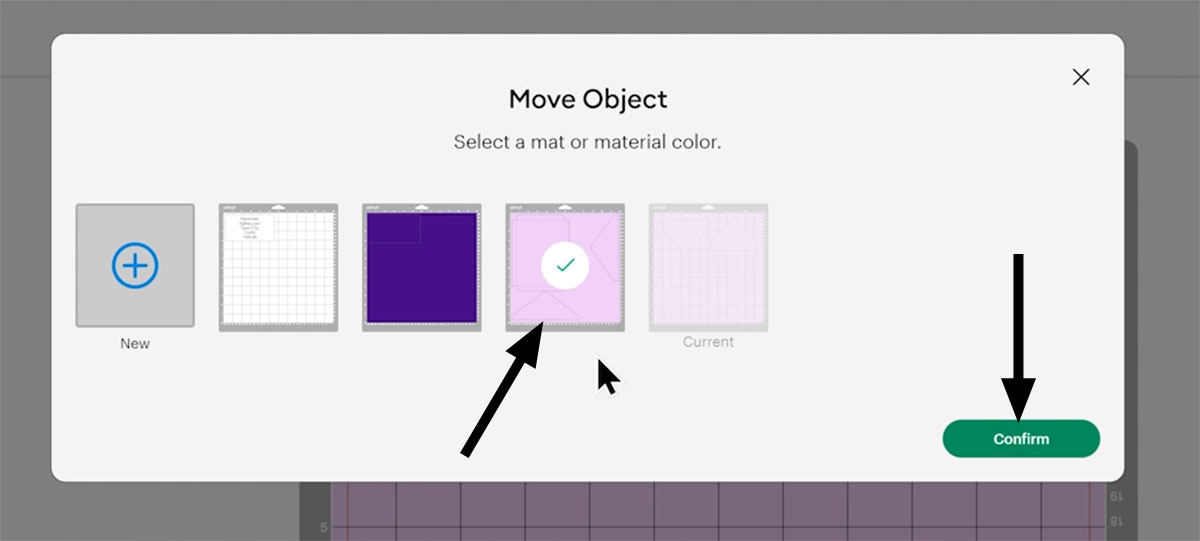
First, you can move things about by clicking and dragging with the mouse. Then, go to the second mat, click on one of the shapes, click the three little dots and then “Move Object”.
Select the other mat of the same color (remember, these will be cut from the same color of material, so it has to go on the same color on the screen).
Press “Confirm” and it will move over.
Or, move multiple pieces at the same time by click-and-dragging a box around all the pieces you want to move, then click the three little dots and “Move Object”.
The pieces will probably now be overlapping each other, so you need to fix that.
Move things about with your mouse so that nothing is touching. You can rotate them and press shift on your keyboard to rotate at exactly 90°.
Have a little play about and try and get them all to fit. Make sure nothing overlaps otherwise it won’t cut out properly.
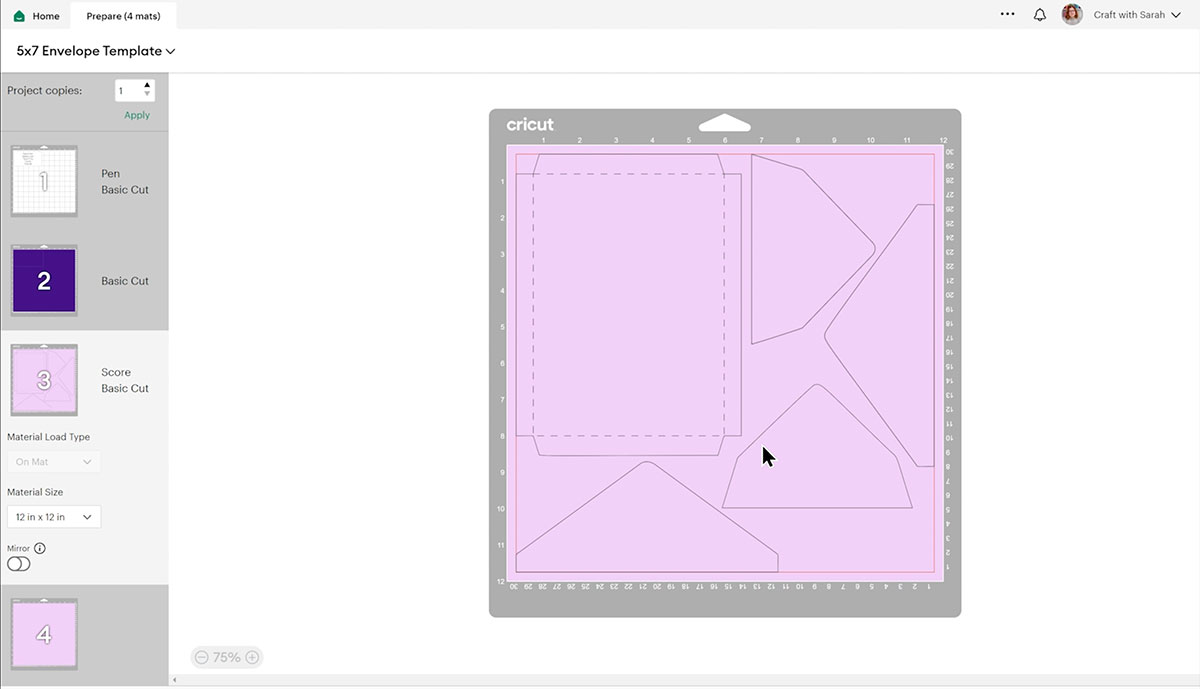
If you have empty mats, they will be removed once you progress to the next step in the “Make” process.
I am a huge fan of making the most of every single inch and cm of my cardstock count, so I use this tip quite a lot when I’m cutting things out with my Cricut.
Tip 10: Setting machine defaults
Whenever I used to use my Maker 3, I got quite annoyed that whenever I clicked “Make” and went to send something to my Cricut, it always tried to default to the “without a mat” setting.
That’s great if you’re always using Smart Materials, but I am pretty much always doing cardstock projects which means I use a mat all the time. It was frustrating having to constantly switch and tell it to put the card on a mat rather than try the matless setting.
Until… I discovered how to change the default settings!
To do that, click into the little arrow next to your name on the top of Design Space and then click Settings.
Click into “Load Type” and then you can choose your type of machine. If you’ve got multiple machines, you can go through and do them all one at a time.
For instance, let’s do a Cricut Maker 3. You can change the default load type and the default print then cut size. As I live in the UK, I don’t have any letter sized paper (we use A4) so that was another thing I was always having to remember to change.
Now, I’ve changed my defaults to A4 which means now when I do print then cut it already knows I’m using A4.
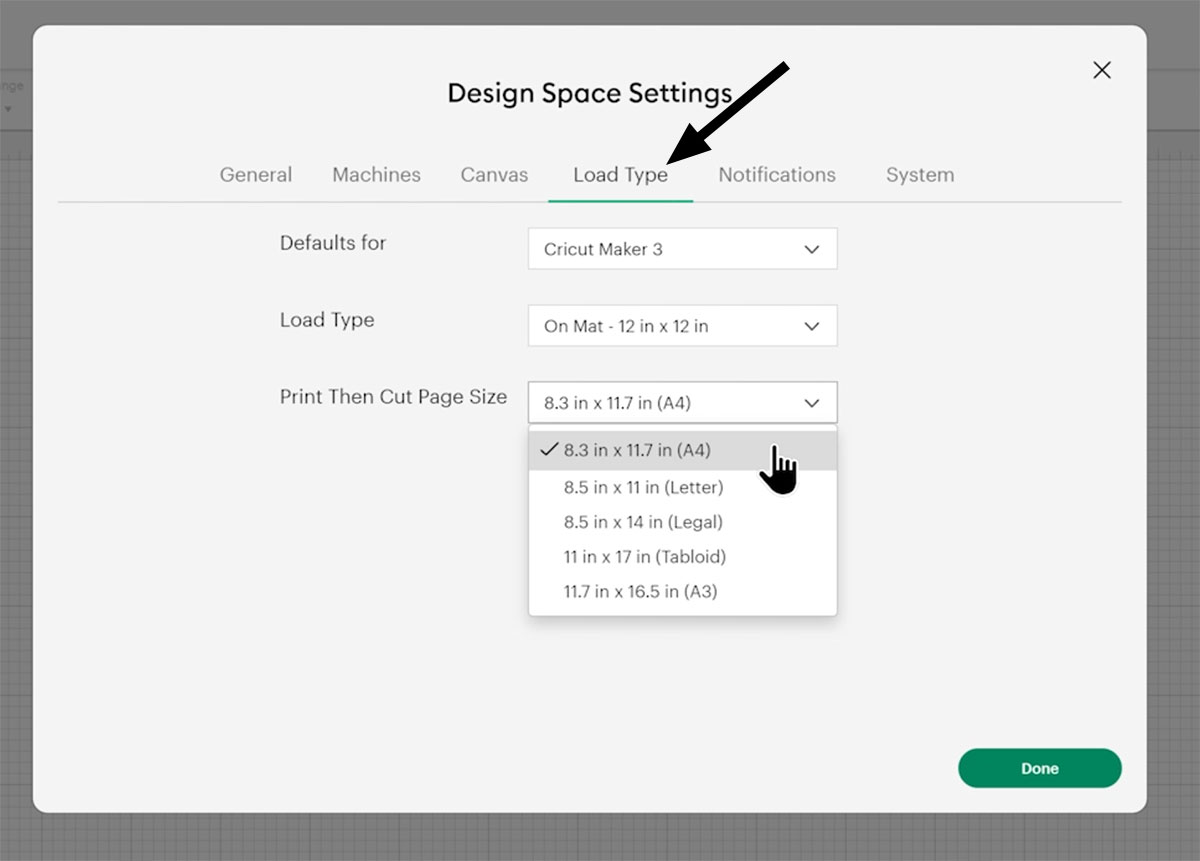
Okay, this only saves me about 5 seconds every time I do something, but those 5 seconds add up, especially when you’ve got a last-minute craft project that you’re trying to make.
Tip 11: Opening multiple projects
Work on more than one project in Cricut Design Space at the same time, in different windows!
This is great for it if you’re working on a project and then all of a sudden you have a spark of inspiration and you want to start something else. You don’t have to close down what you’re already doing.
This also works if you’re cutting something out – especially if you’re cutting a design that’s really detailed as it can seem to take forever, and you’re stuck sitting at your computer waiting for it to finish.
What are you going to do… just sit there and do nothing? Nope! You can start working on your next project while the machine is still cutting the first one.
Go to the top of the screen where you’ve got the three little dots next to the notification bell.
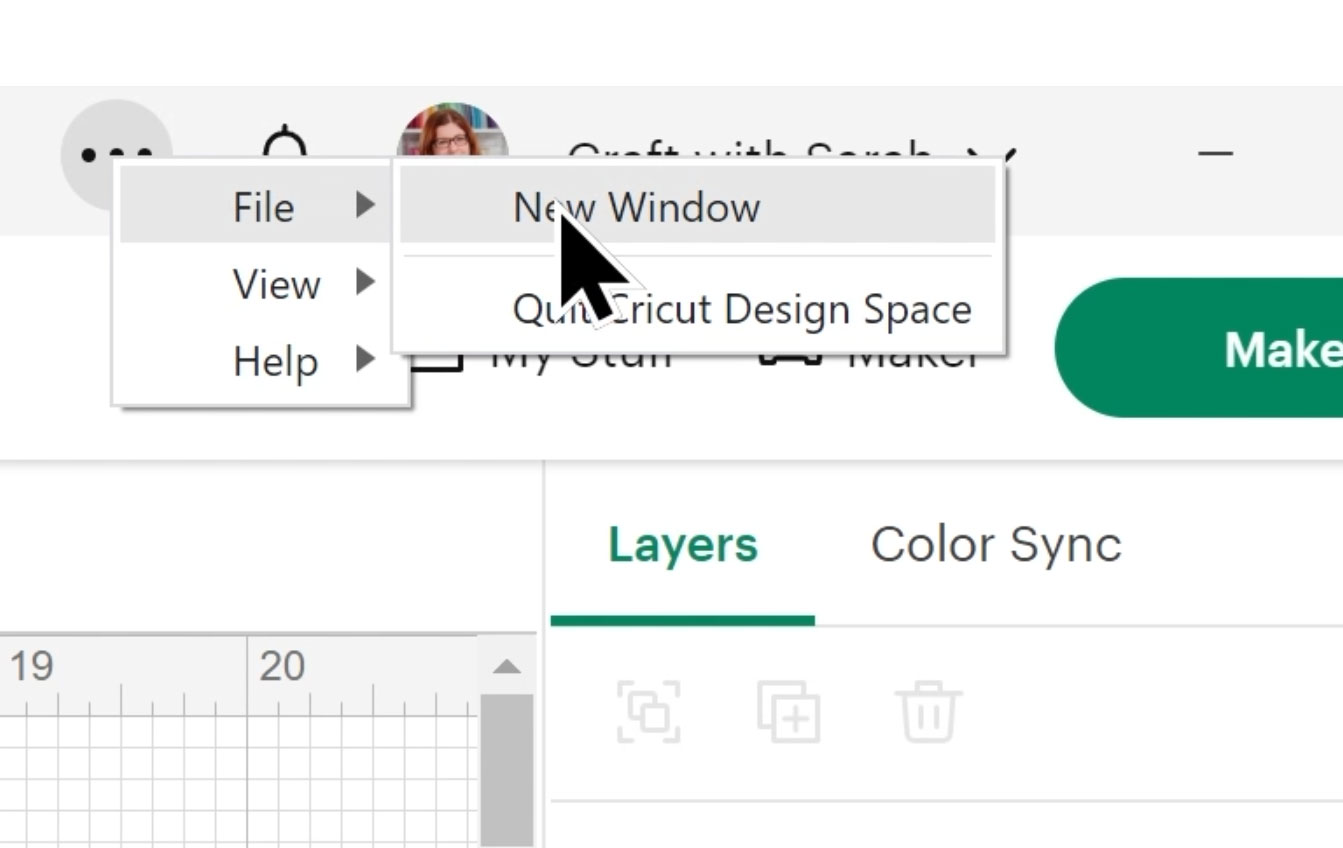
Click the dots and then press “File > New Window” and that will open a second copy of Design Space. You can do whatever you want to in this new window.
I’m just going to try and show you that this is a second window by making this one smaller.
There’s my original sunflower project still there in the background and here’s my new one.
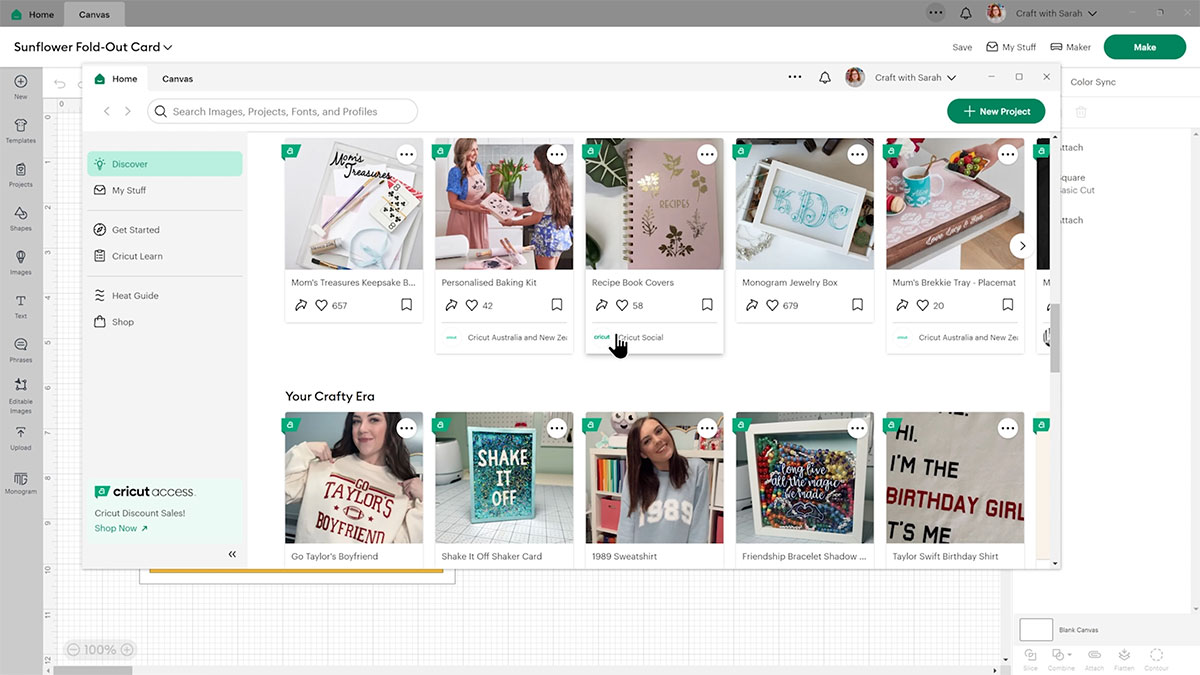
I can do whatever I want to. I could start a new project or I could find a project in Cricut Access and make it and customize it.
Obviously you wouldn’t be able to send this to your Cricut Machine whilst the first one is cutting because… it’s already cutting (ha!) but you can definitely get the next project ready, make any customizations you want to and get it all saved.
One thing I’ve never actually tried is if you had more than one machine if you could get both those machines cutting different projects at the same time.
For instance I’ve got a Maker and I have a Cricut Joy Xtra. Maybe I could have my Maker cutting one project and the Joy Xtra cutting the second at the same time.
Have you ever tried that before? Does it work? I think I’m going to have to give it a go and see.
Tip 12: Copy and paste between projects
Sometimes you might want to move all of (or part of) a project that you’ve already saved into a different project.
Maybe you’re making something new, but you want a little bit from something you’ve done before in that new project without overwriting or modifying the original.
You can do that by creating a new window for your new project and then copying and pasting between projects.
Open your new project and then create a new window following the steps in Tip 11 and open your older project.
I want to frame my stained glass cross in a shadow box instead of using it on a card, but I don’t want to get rid of that original card project.
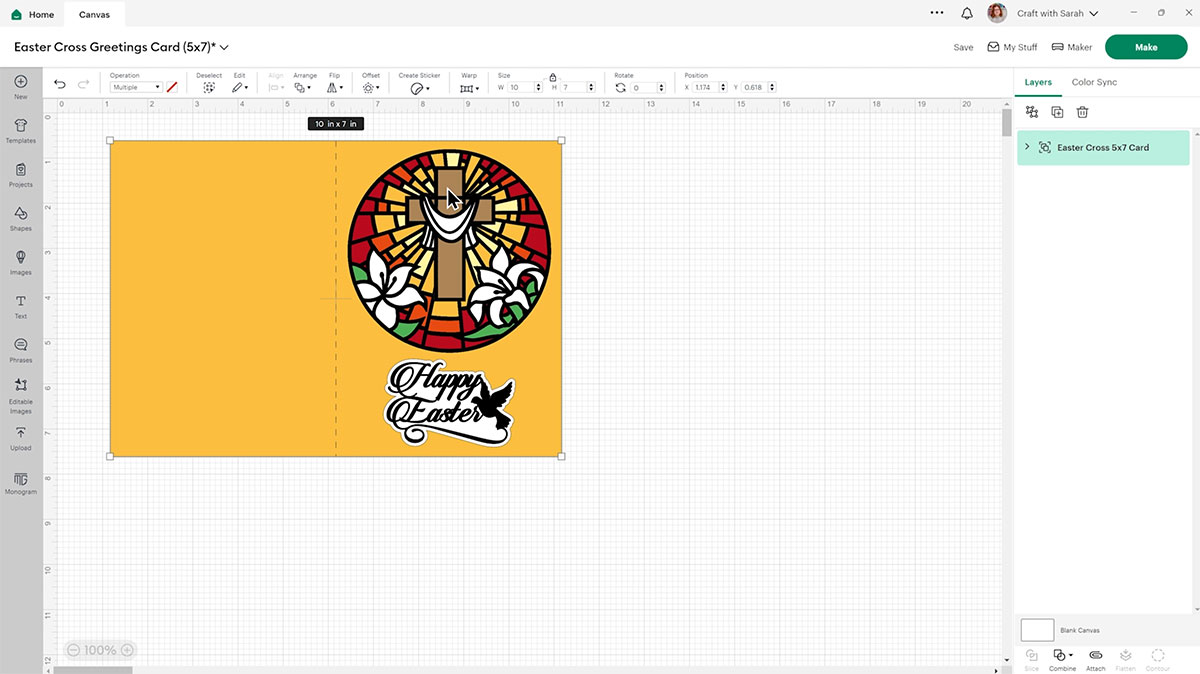
So what I can do is click to my original project, find the cross, right-click on it and press “Copy”, click into the Design Space window with my new project, then right-click and press “Paste”.
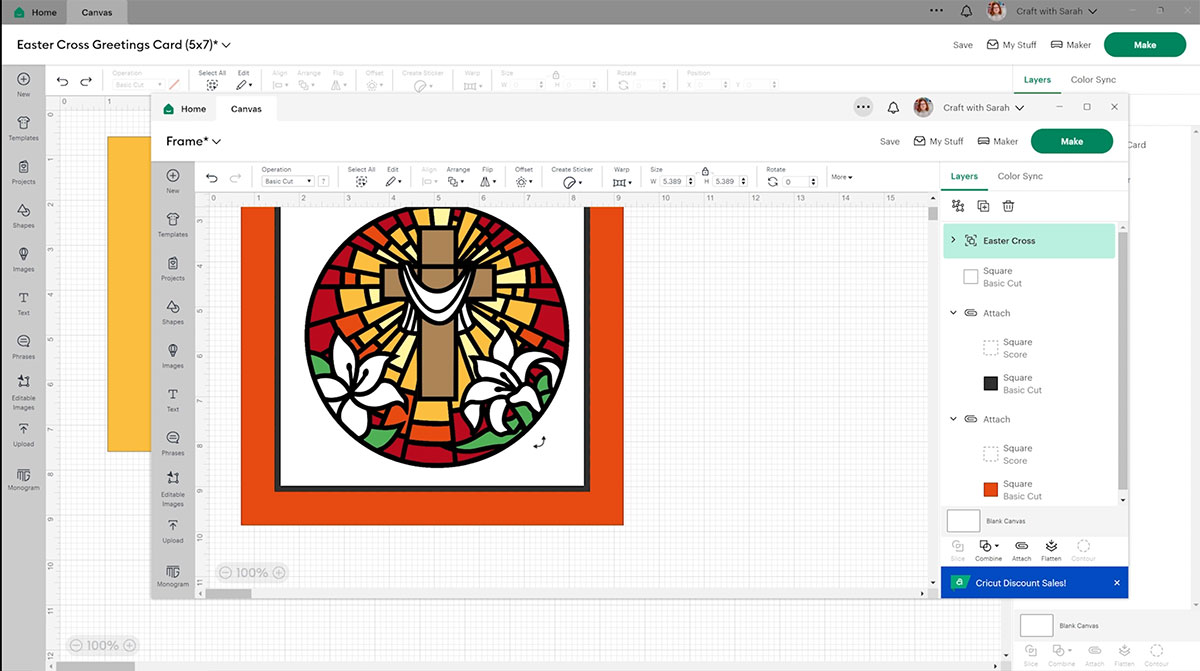
There’s my cross put onto my new shadow box project and it’s still on that original one. It hasn’t gone anywhere.
So yes you can reuse your projects in something new and it’s as easy as copy and paste.
Cricut Design Space software tips
So there you have it: 12 quick tips for making Design Space that little bit easier.
Were any of these new to you? I hope that some of these will help you out!
If creating your own projects in Design Space is something that you’re maybe struggling with a little bit, I’ve got something which could make your Cricut crafting that little bit easier: my Lovely Layering Design Space course.
ON SALE NOW – ONLY $37 UNTIL 1ST MAY (usually $67)
Lovely Layering is my step-by-step video course where you’ll learn everything you need to know about creating gorgeous layered designs, right within Cricut Design Space.
It’s time to learn how to make your own layered projects that look exactly how you want them to with 18 different types of layered cardstock projects covered!
Happy crafting,
Sarah x

