Nativity Over-the-Edge Card ❄️ CCC 2026 Day 02
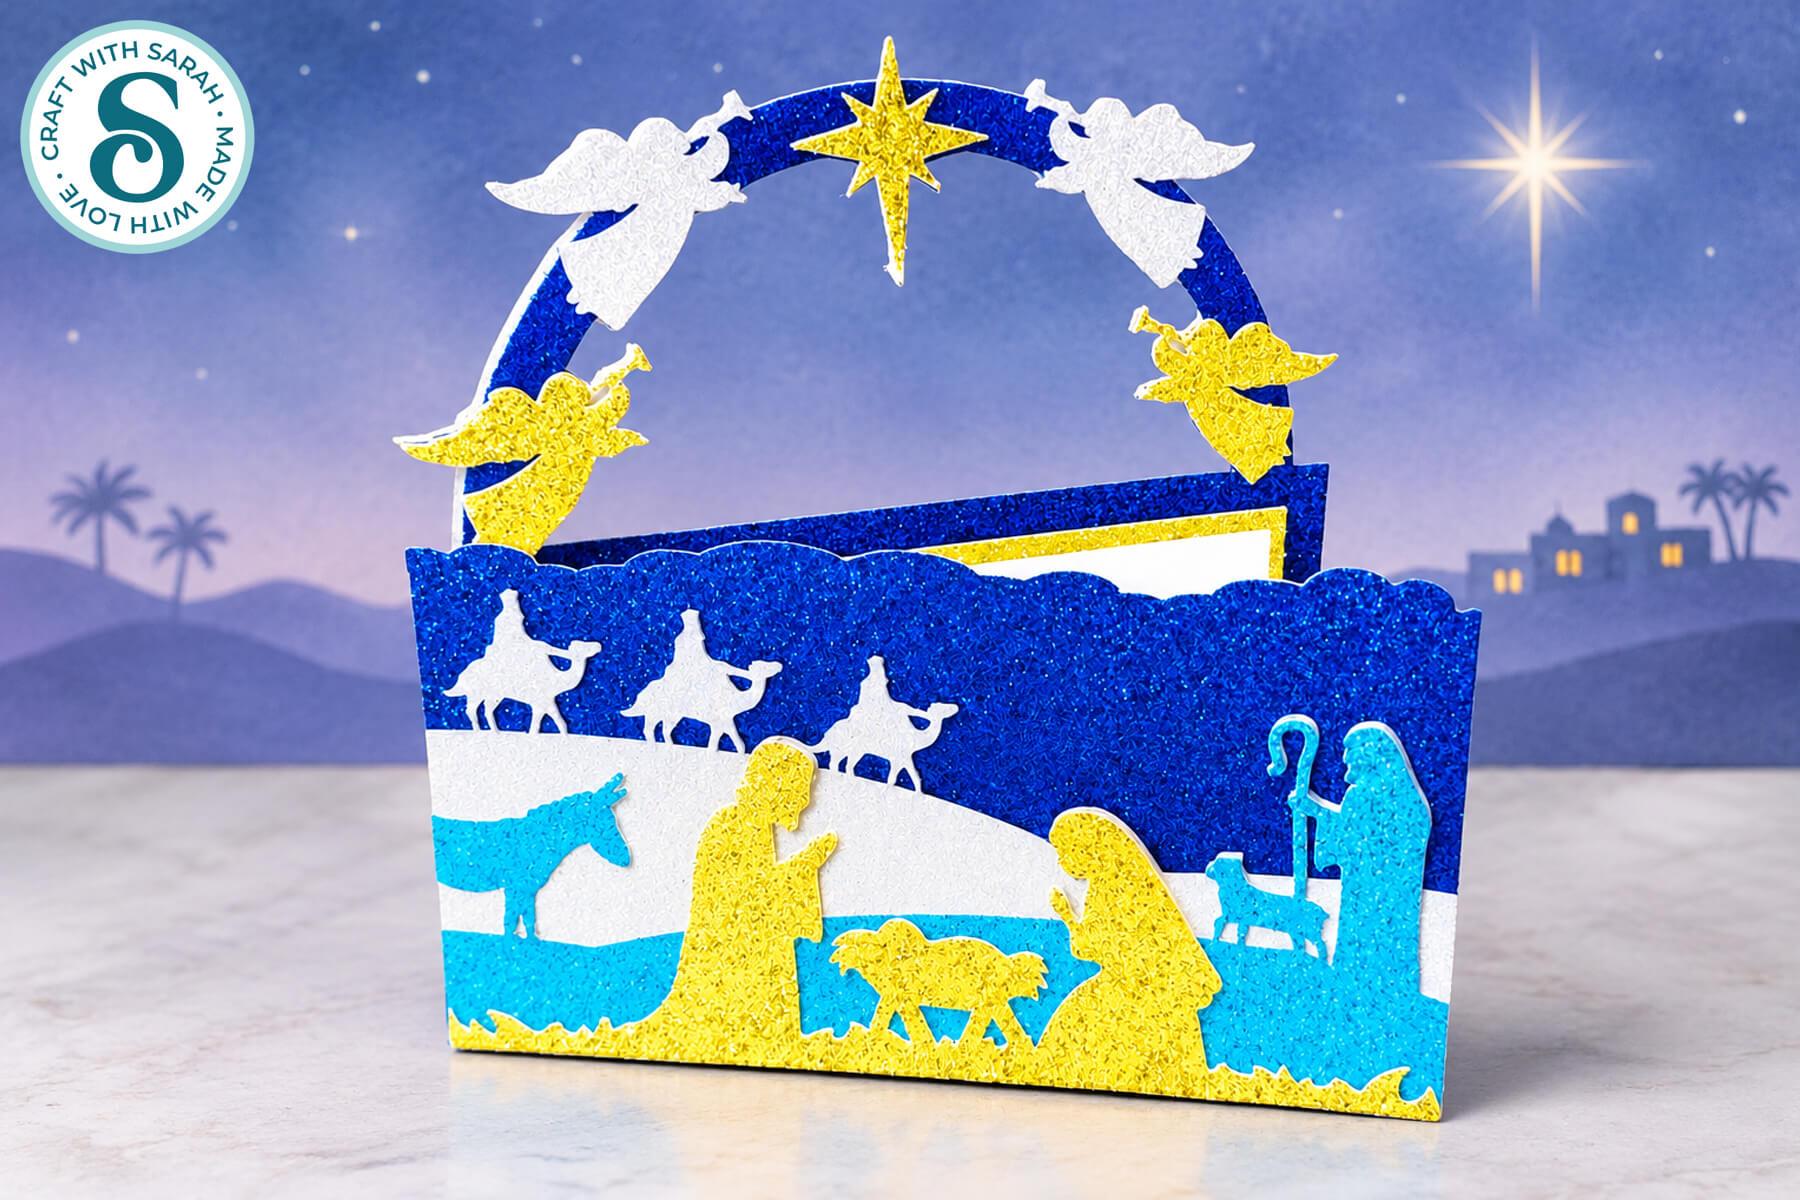
Make a beautiful, sparkly nativity Christmas card with your Cricut machine.
This isn’t just an ordinary greetings card. It’s an ‘over-the-edge’ card, which means that part of the design extends above the fold at the top to create a lovely shaped finish.
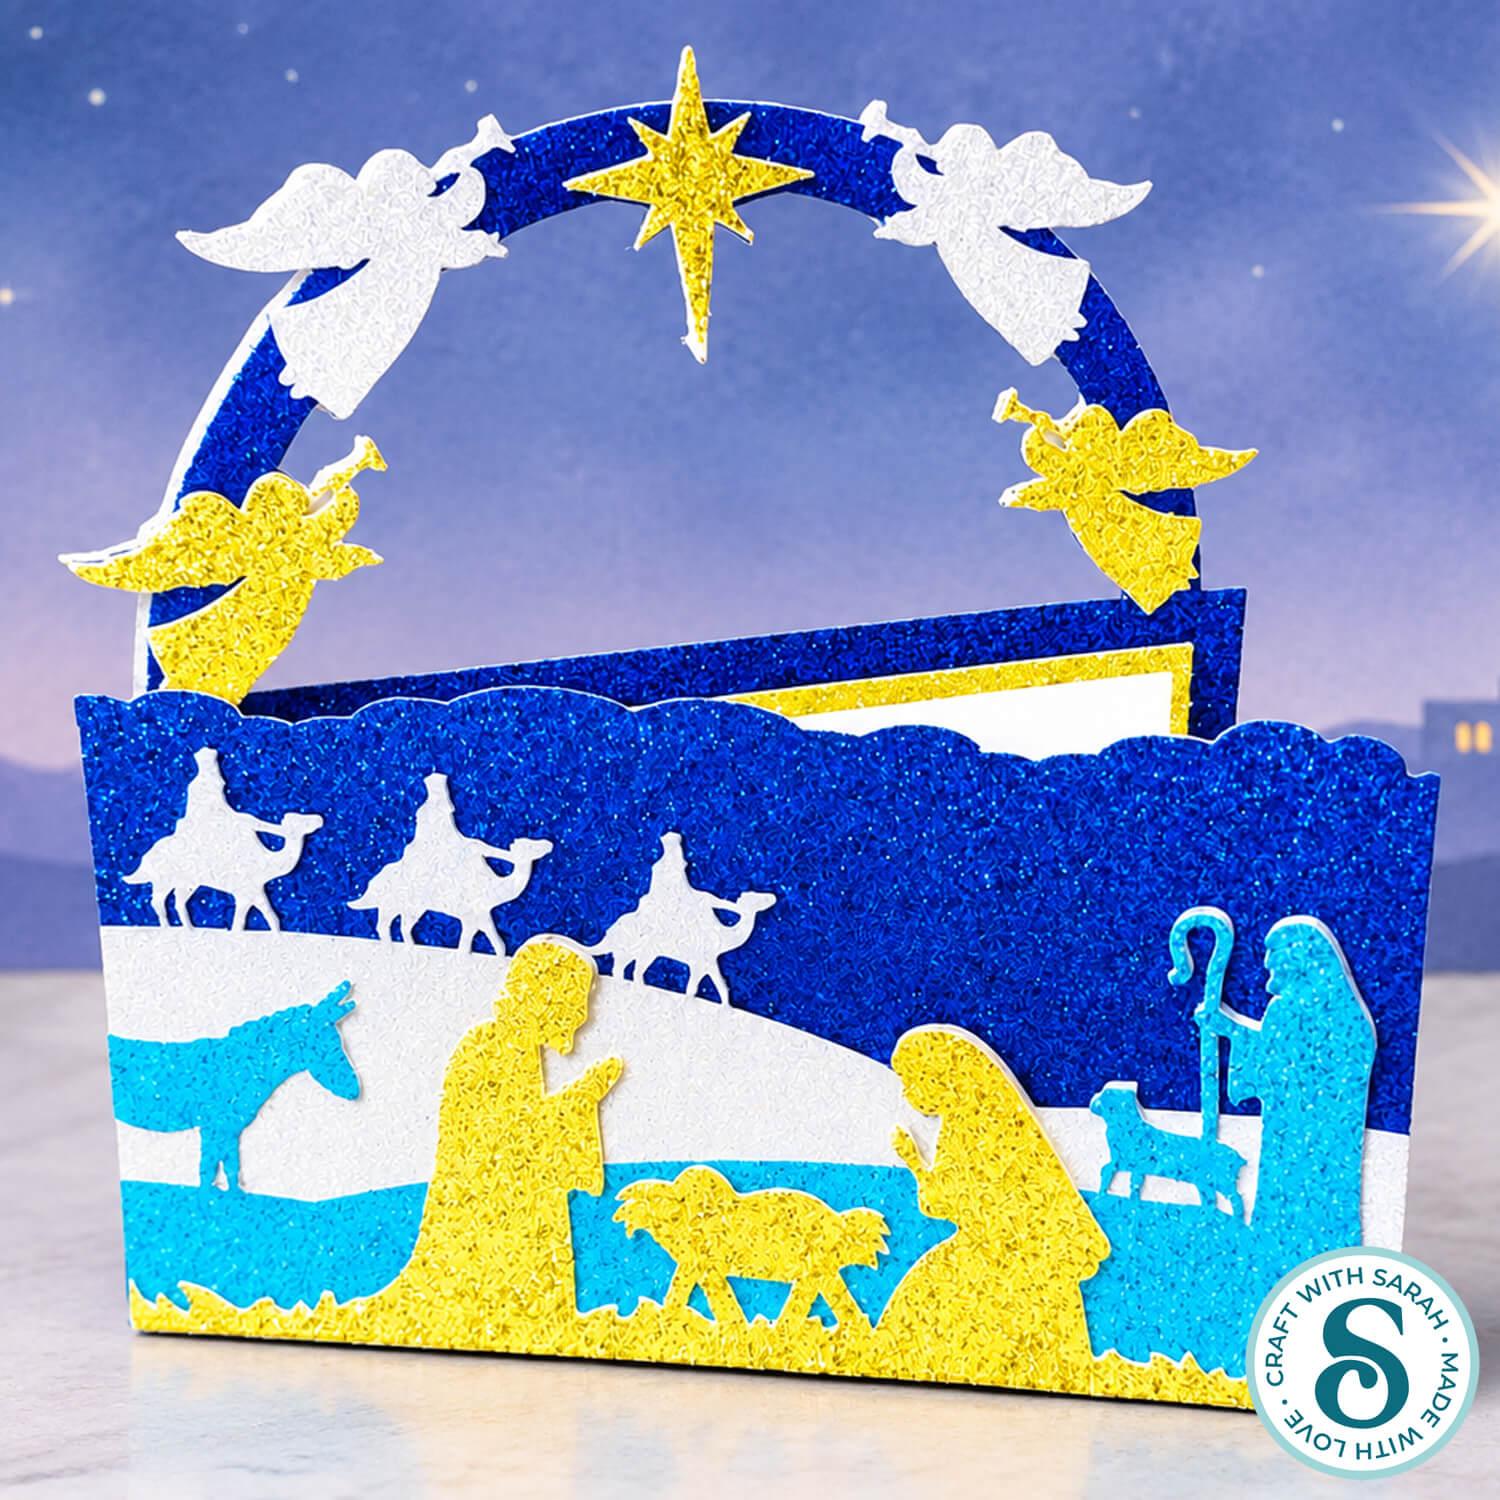
The nativity scene features the three wise men, a shepherd with his lamb, a donkey, and Mary and Joseph with baby Jesus in the manger.
Above them, four angels and a star complete the scene.
And because it’s Christmas, I thought we’d go all out with the glitter!
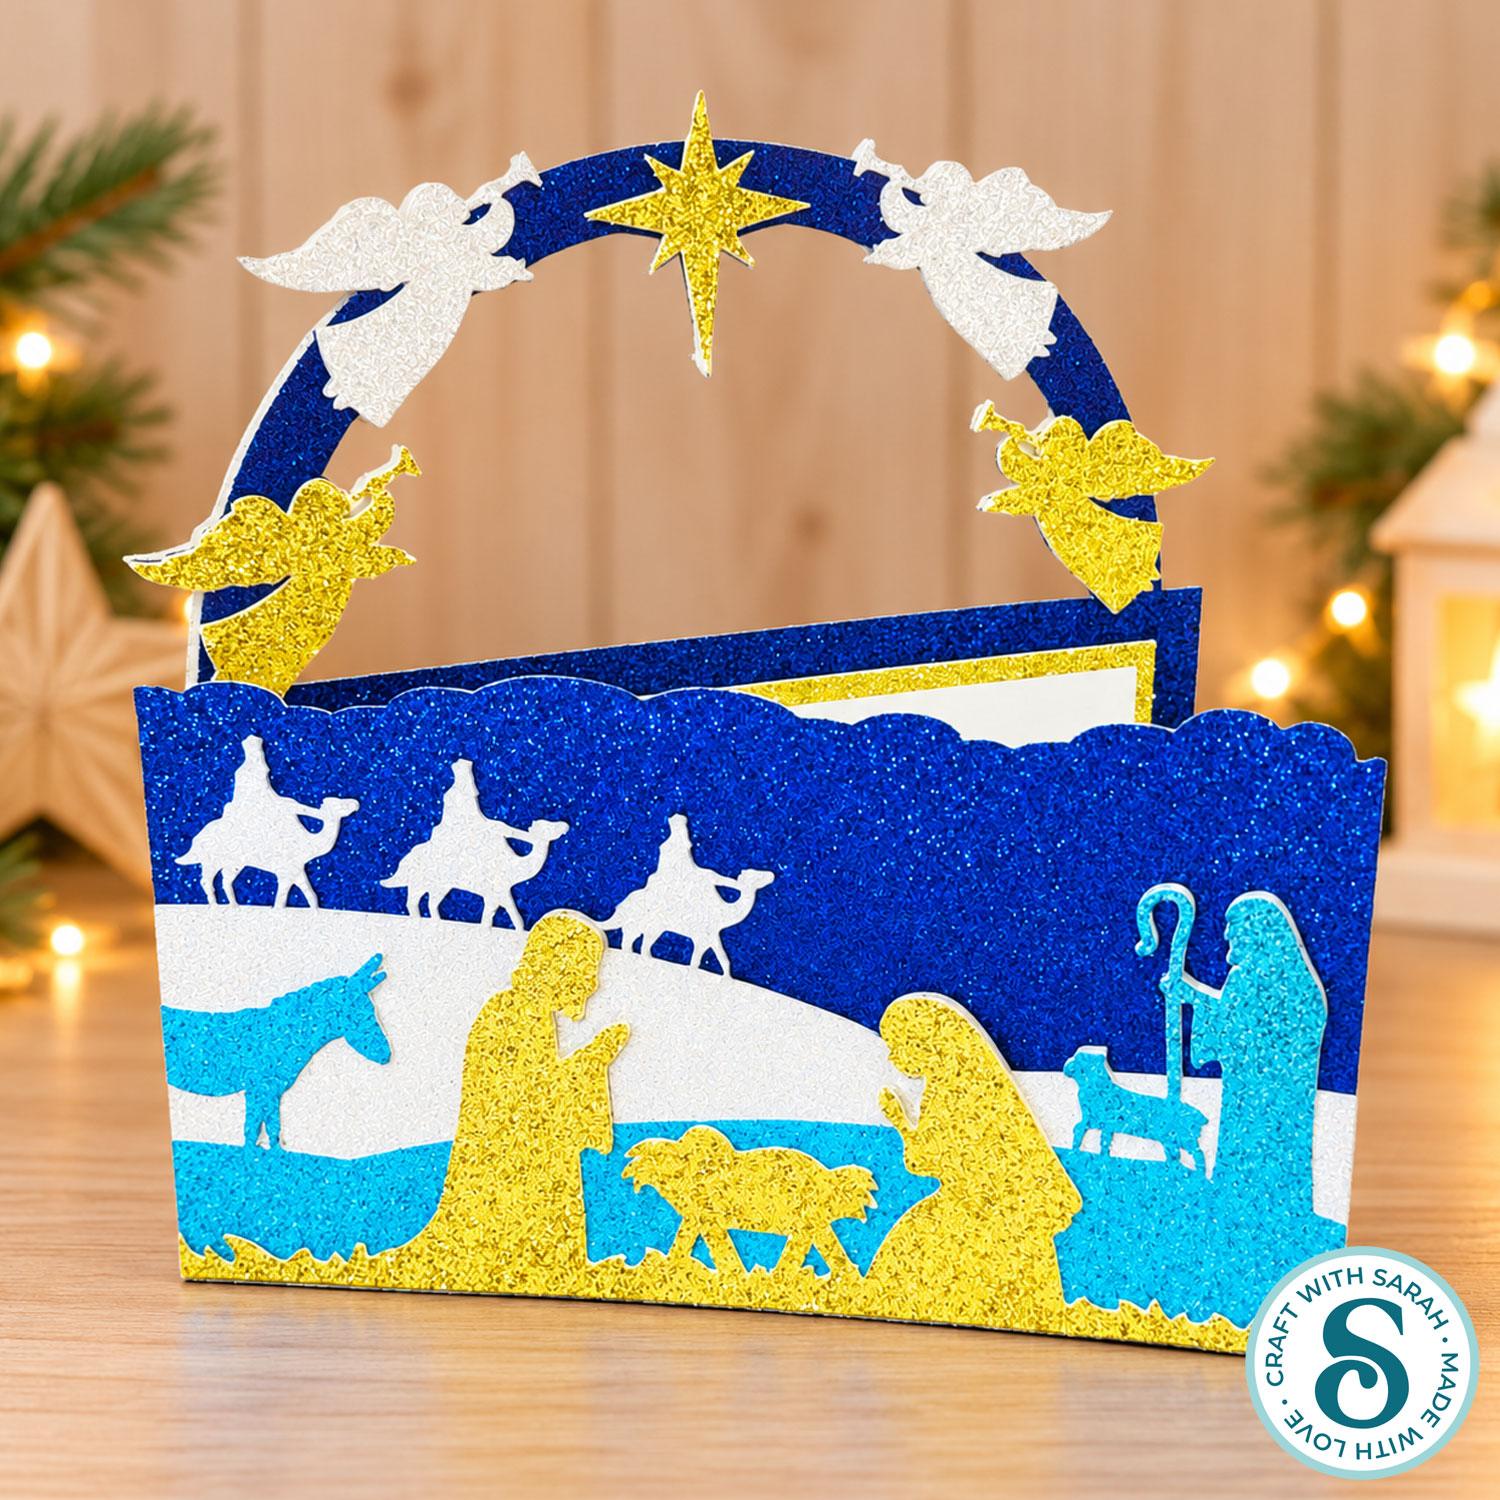
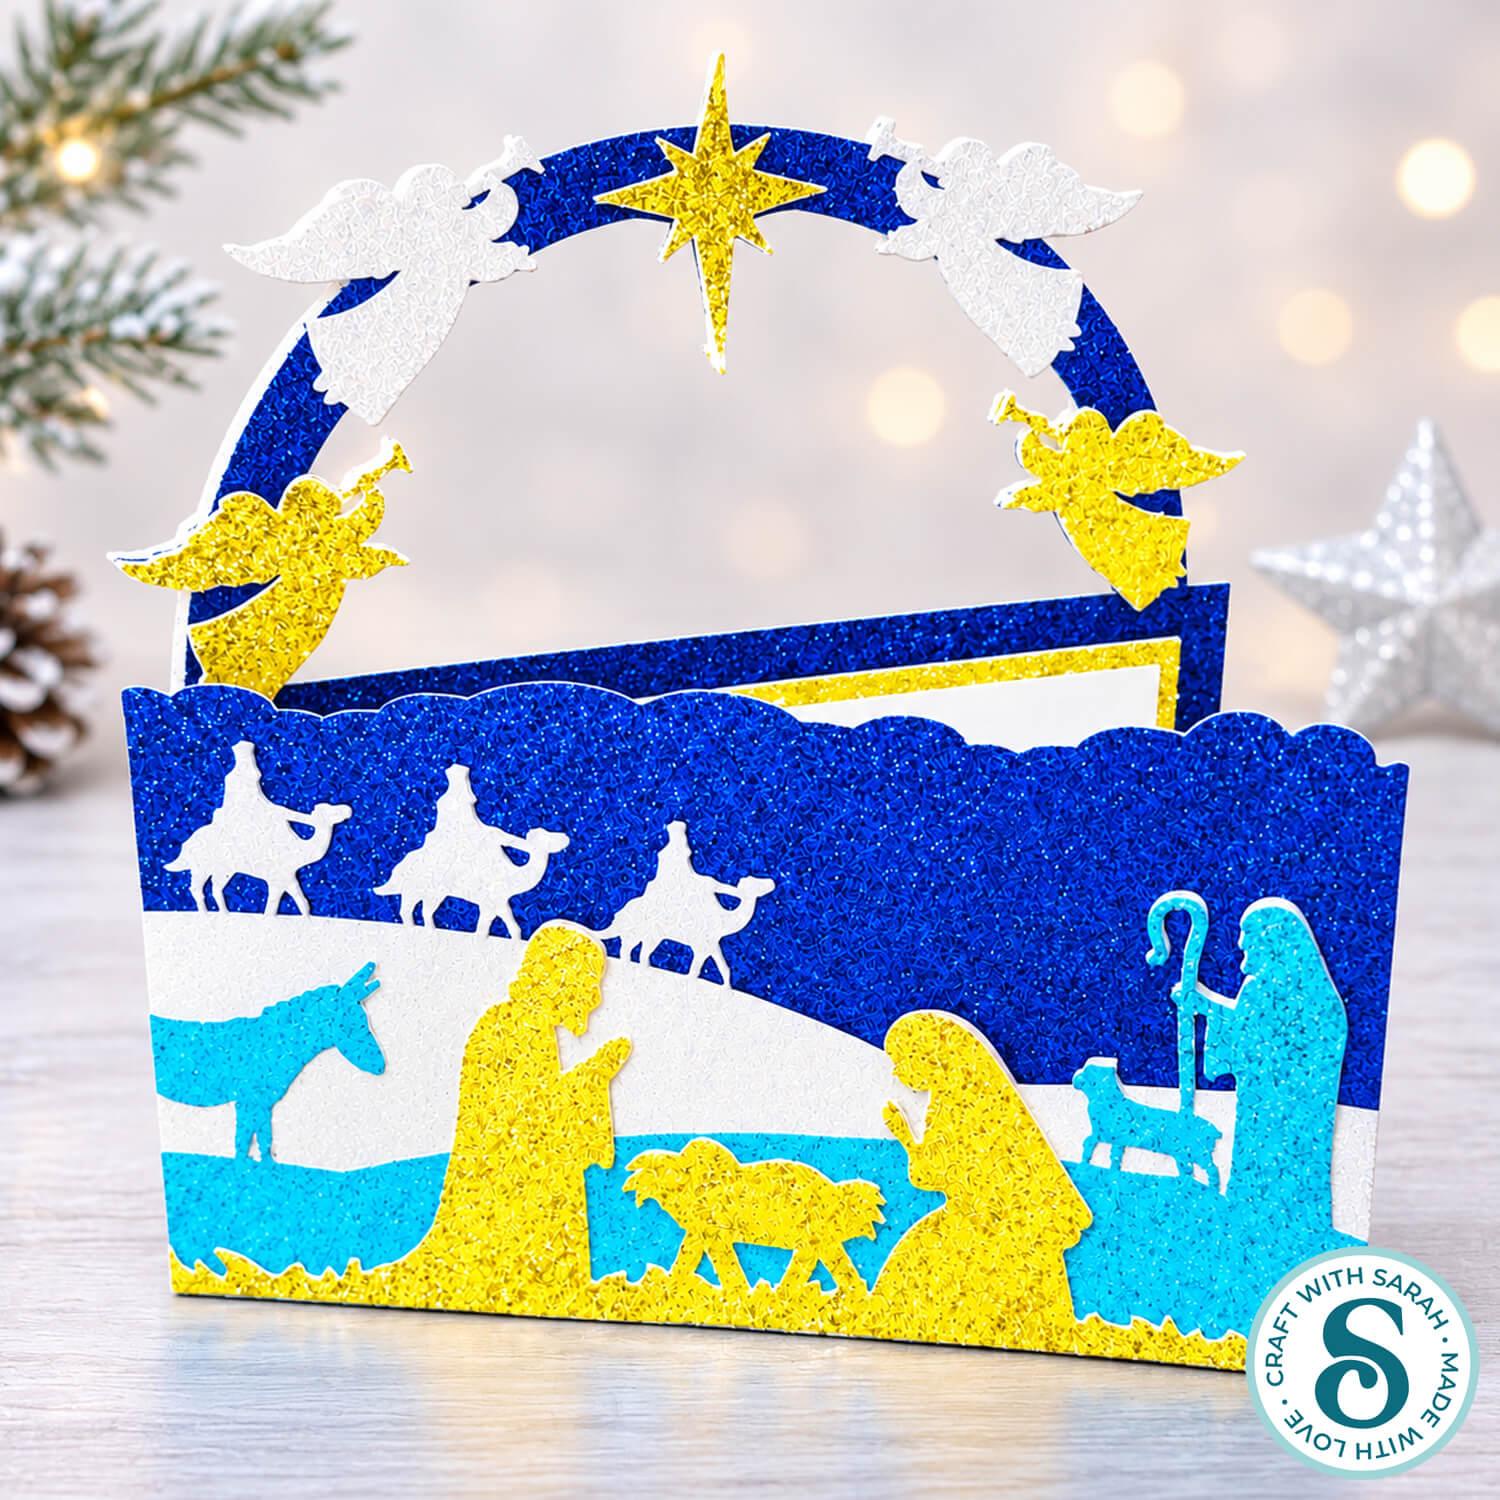
I’ve made my card almost entirely from glitter cardstock, so it sparkles beautifully from every angle. The inside is decorated too, with a matching glittery arch and a space for writing your Christmas message.
Don’t worry if you don’t have glitter cardstock in all the colours I’ve used. You can make this design from regular cardstock instead, or mix and match the two.
In this tutorial, I’ll show you how to prepare the SVG in Cricut Design Space, cut the pieces and assemble your over-the-edge nativity card.
This project is part of the 2026 Christmas Craft Countdown
Nativity card supply list
Here is a list of the materials used to make this project.
Please note that some of the links included in this article are affiliate links, which means that if you click through and make a purchase I may receive a commission (at no additional cost to you). You can read my full disclosure at the bottom of the page.
- Cricut machine
- Light blue Cricut cutting mat
- Glitter cardstock in various colours
- White cardstock (any thickness)
- Glue (I like Bearly Art Glue and Collall)
This project is suitable for the following types of Cricut machines: Explore series, Maker series and Joy Xtra. You will need to make the design smaller to cut on the Joy Xtra. It is too large to cut on the Cricut Joy or Joy 2.
Foundation learning
If you're new to making papercrafts with your cutting machine, check out these links to get you started.
They include videos on topics such as: which file to use with your type of cutting machine, how to load the files into your cutting machine's software, how to cut cardstock with your type of cutting machine, how to recolor and modify/customize the cut files and tips for displaying your projects.
- How to use zip folder downloads
- Help guides for Cricut machines
- Help guides for Silhouette machines
- Help guides for ScanNCut machines
The following tutorials are Cricut-specific, but many of the ideas will work similarly with a Silhouette or ScanNCut machine and any cut files that are shared in them are compatible with all types of cutting machine.
- How to score with a Cricut (even without scoring tools)
- Print then cut tutorial
- Design Space tools (Combine, Attach, Slice, Weld, Flatten, etc.)
- Pattern fill tutorial (for making backgrounds & cutting images to a specific shape/size)
- Free envelope SVGs that can be sized to fit any card
- Presentation boxes for handmade cards
- How to write inside cards with Cricut pens
- How to cut layered designs at a small size
- Design Space tips & tricks
- Cricut pens tutorial
- How to mount multiple designs in the same frame with magic guides
Nativity glitter card craft video tutorial
Watch the video below to see how to make this project. Keep scrolling for a written tutorial.
Written tutorial (with photos!)
Here’s how to make this Christmas Nativity greetings card using a Cricut machine.
Step 1) Download the cutting file & upload to Design Space
Get the files using the box below.

Before you upload the SVGs to Design Space, you need to unzip the download folder that they come in.
Not sure how to do this? Click here for a tutorial that covers all the following types of computer and device:
- How to unzip a folder on a Windows computer
- How to unzip a folder on a Mac
- How to unzip a folder on an iPad
- How to unzip a folder on an iPhone
- How to unzip a folder on an Android device
After unzipping, upload the SVG file(s) into your cutting machine software.
Not sure how to use cut files with your type of machine? The following links lead to tutorials on how to use cut files in:
- Cricut Design Space
- Silhouette Studio
- CanvasWorkspace (for ScanNCut machines)
If you are using Cricut Design Space, start a new project and then click the “Upload” button on the left of the screen.
You can then either click “Browse” to find the file on your computer, or drag-and-drop it.
Select the file in the “01 Cricut Version” subfolder called svg-01-over-edge-nativity-craftwithsarah.svg
Press “Upload” on the next screen.
After uploading, the design should be automatically inserted onto your Canvas.
Hide the left sidebar to give you more space on the screen by clicking the arrow that’s about half way down the page.
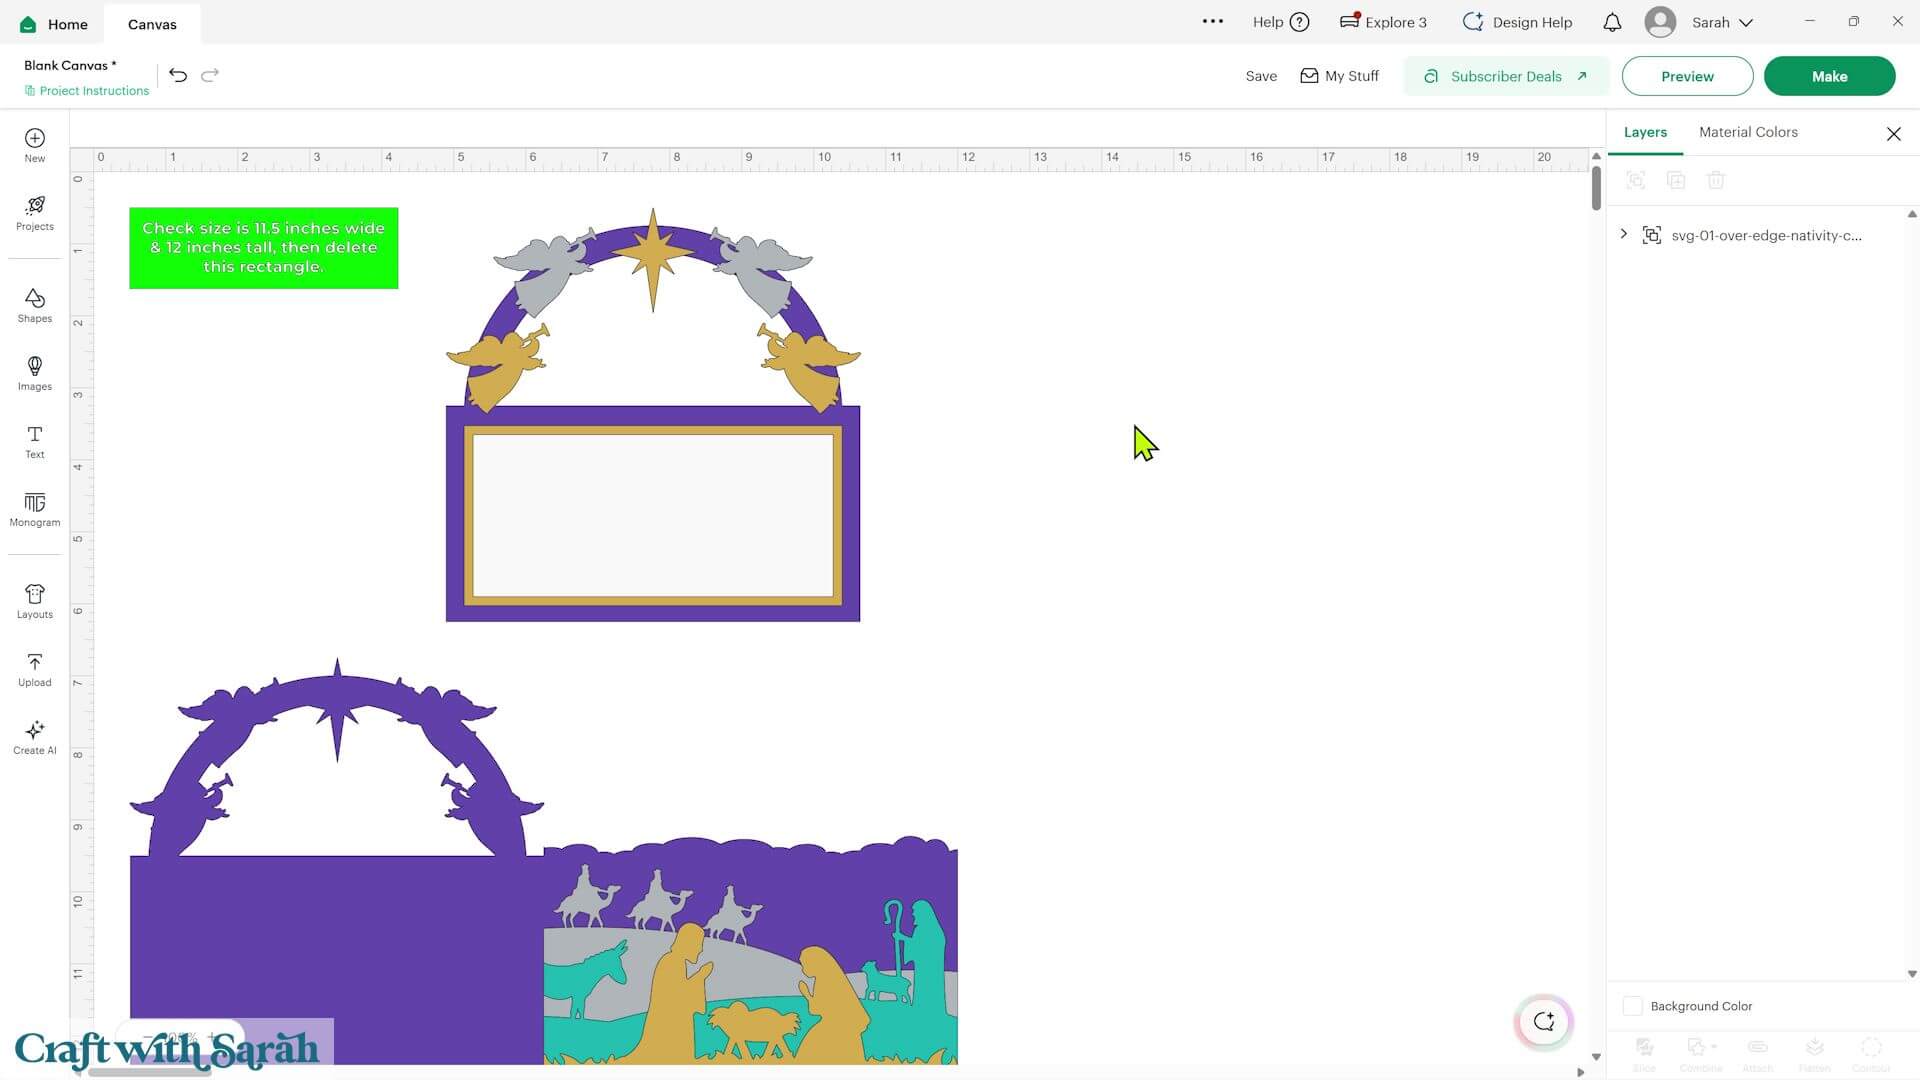
If the design doesn’t get inserted onto your Canvas, it will show under “Uploads” in your “Recently Uploaded Images”. Click on it and then press “Add to Canvas” to put it onto your Project.
Need help uploading SVGs? Get step-by-step instructions here in our detailed help guides for Cricut, Silhouette and ScanNCut.
Step 2) Prepare the design
Before making any changes to the design, check that it has loaded at the correct size.
You’ll see a green size guide towards the top-left of the design.
The complete SVG should measure 11.5 inches wide by 12 inches tall.
Click on the whole design and check the measurements in the ‘Size’ boxes along the top of the screen.
If yours are different, change them to match.
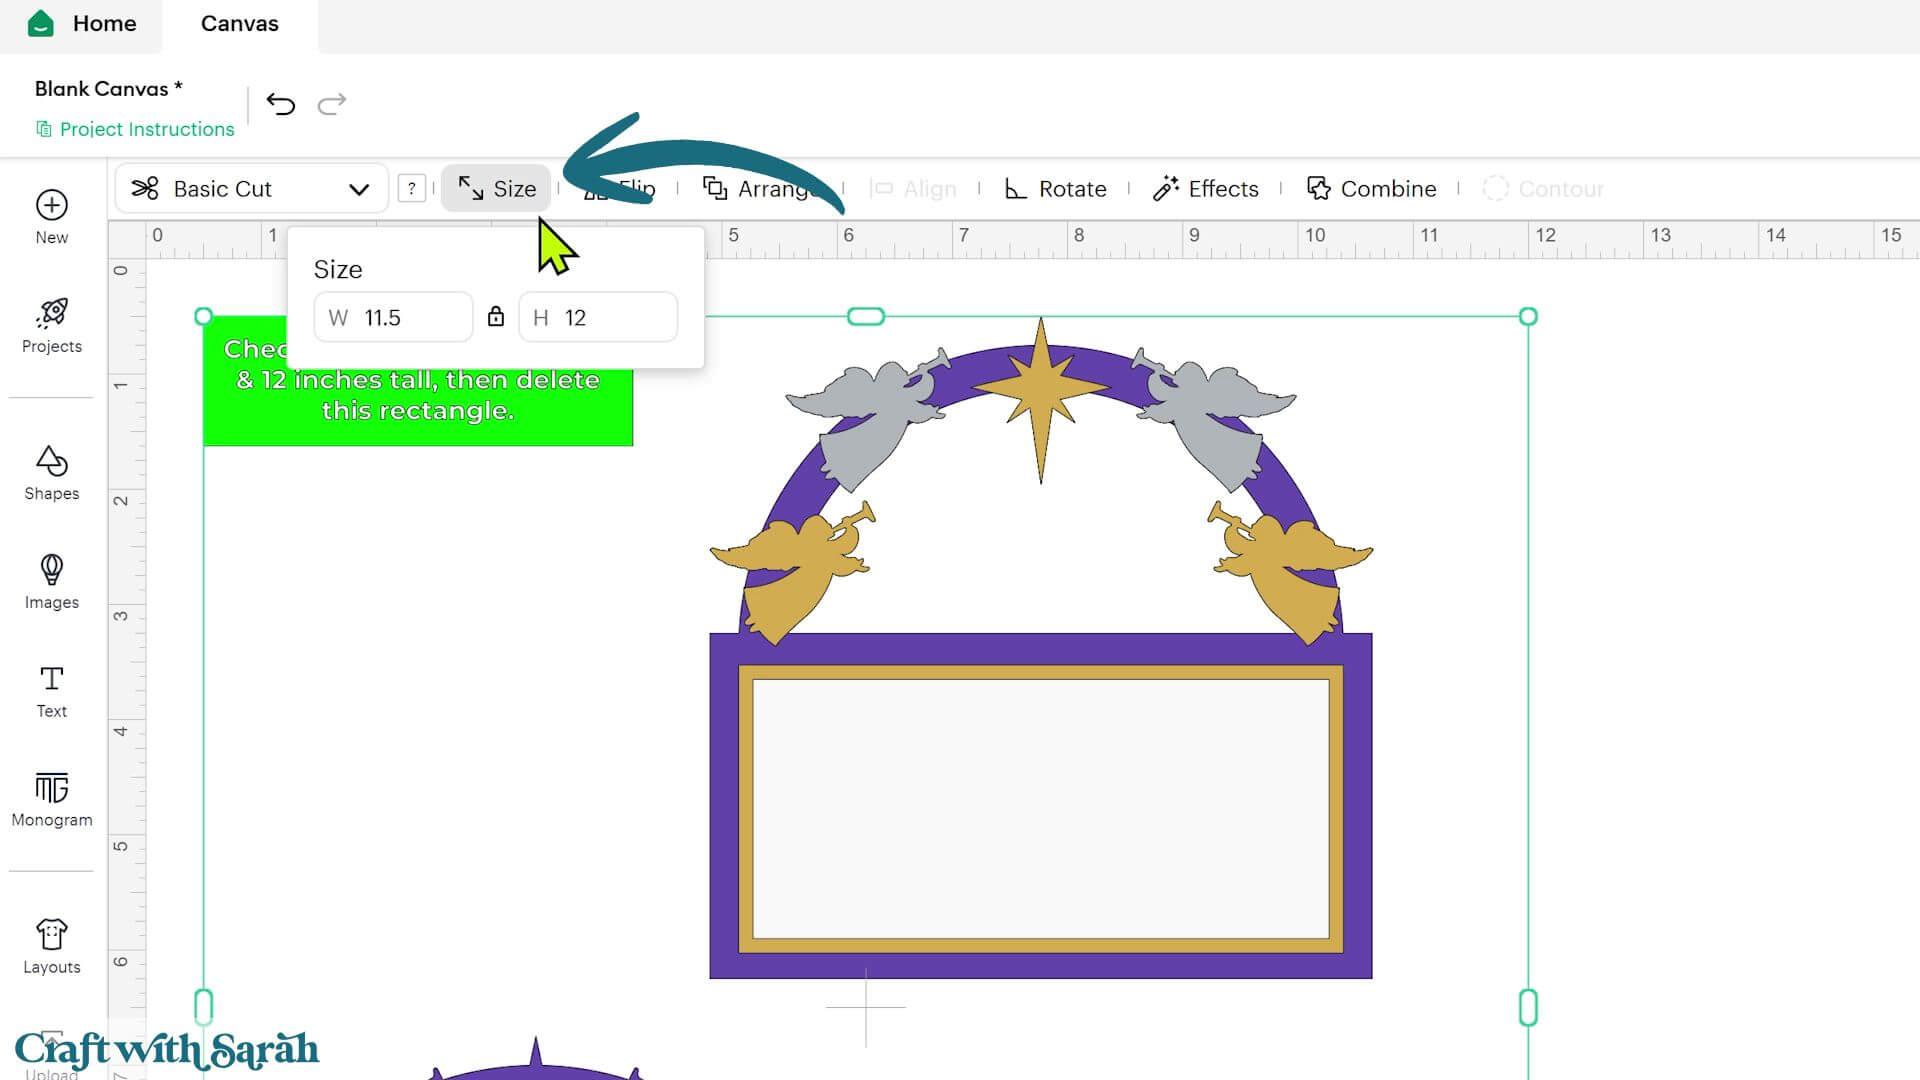
If you are cutting this design on a Cricut Joy Xtra then you will need to resize it smaller to fit on A4 or US Letter cardstock.
Next, select the whole design and click ‘Ungroup’ at the top of the Layers panel.
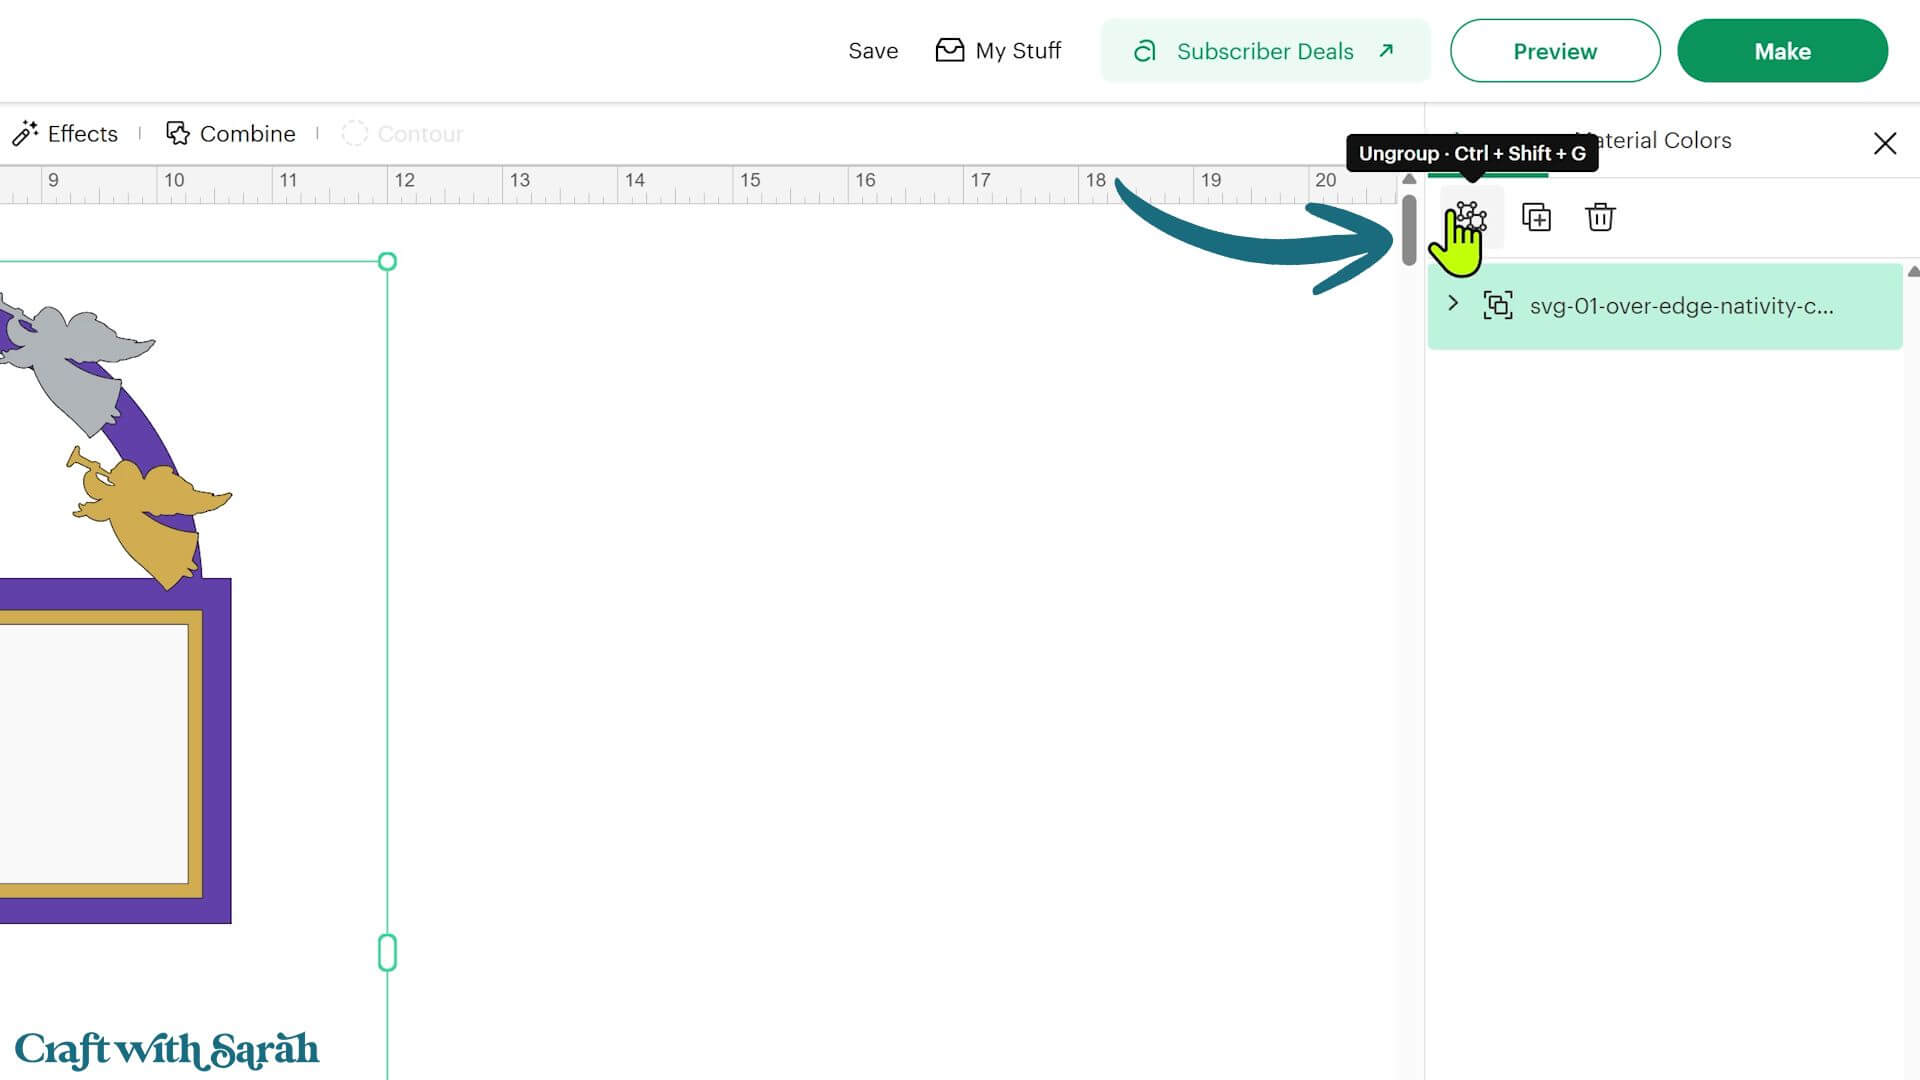
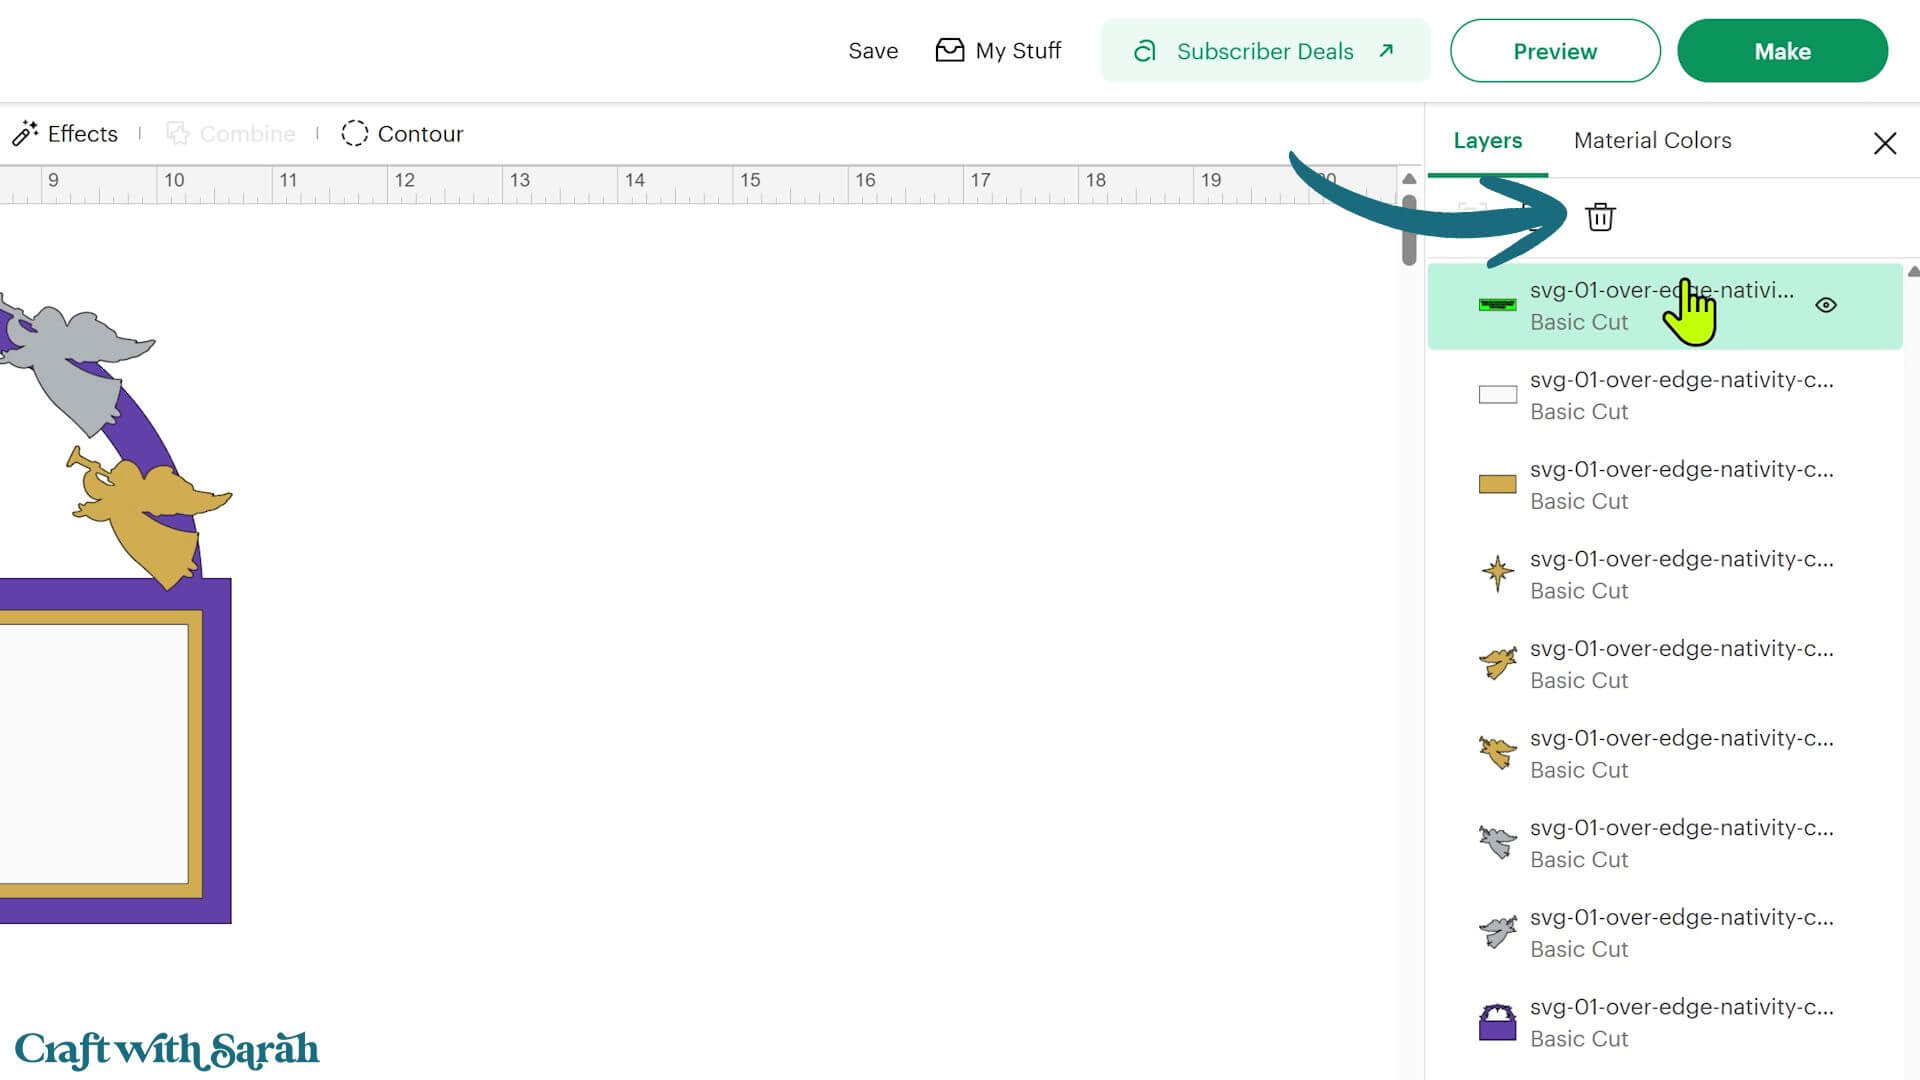
Find the green size guide at the top of the Layers panel and delete it using the trash can icon or the Delete key on your keyboard.
We don’t want to accidentally cut that piece from cardstock.
Before cutting the card, there are a couple of optional pieces to consider.
I’ve designed this card to be made from glitter cardstock, but most of the glitter card I use is only glittery on one side.
The reverse is usually white.
This creates a small problem with an over-the-edge card because part of the inside of the card will be visible above the fold.
If we only cut the base card, the outside would be beautifully glittery, but the arch above the angels would be white when viewed from the inside.
To solve this, I’ve included an extra copy of that arch-shaped section.
We’ll glue this onto the inside of the card later so that the visible arch is glittery on both sides.
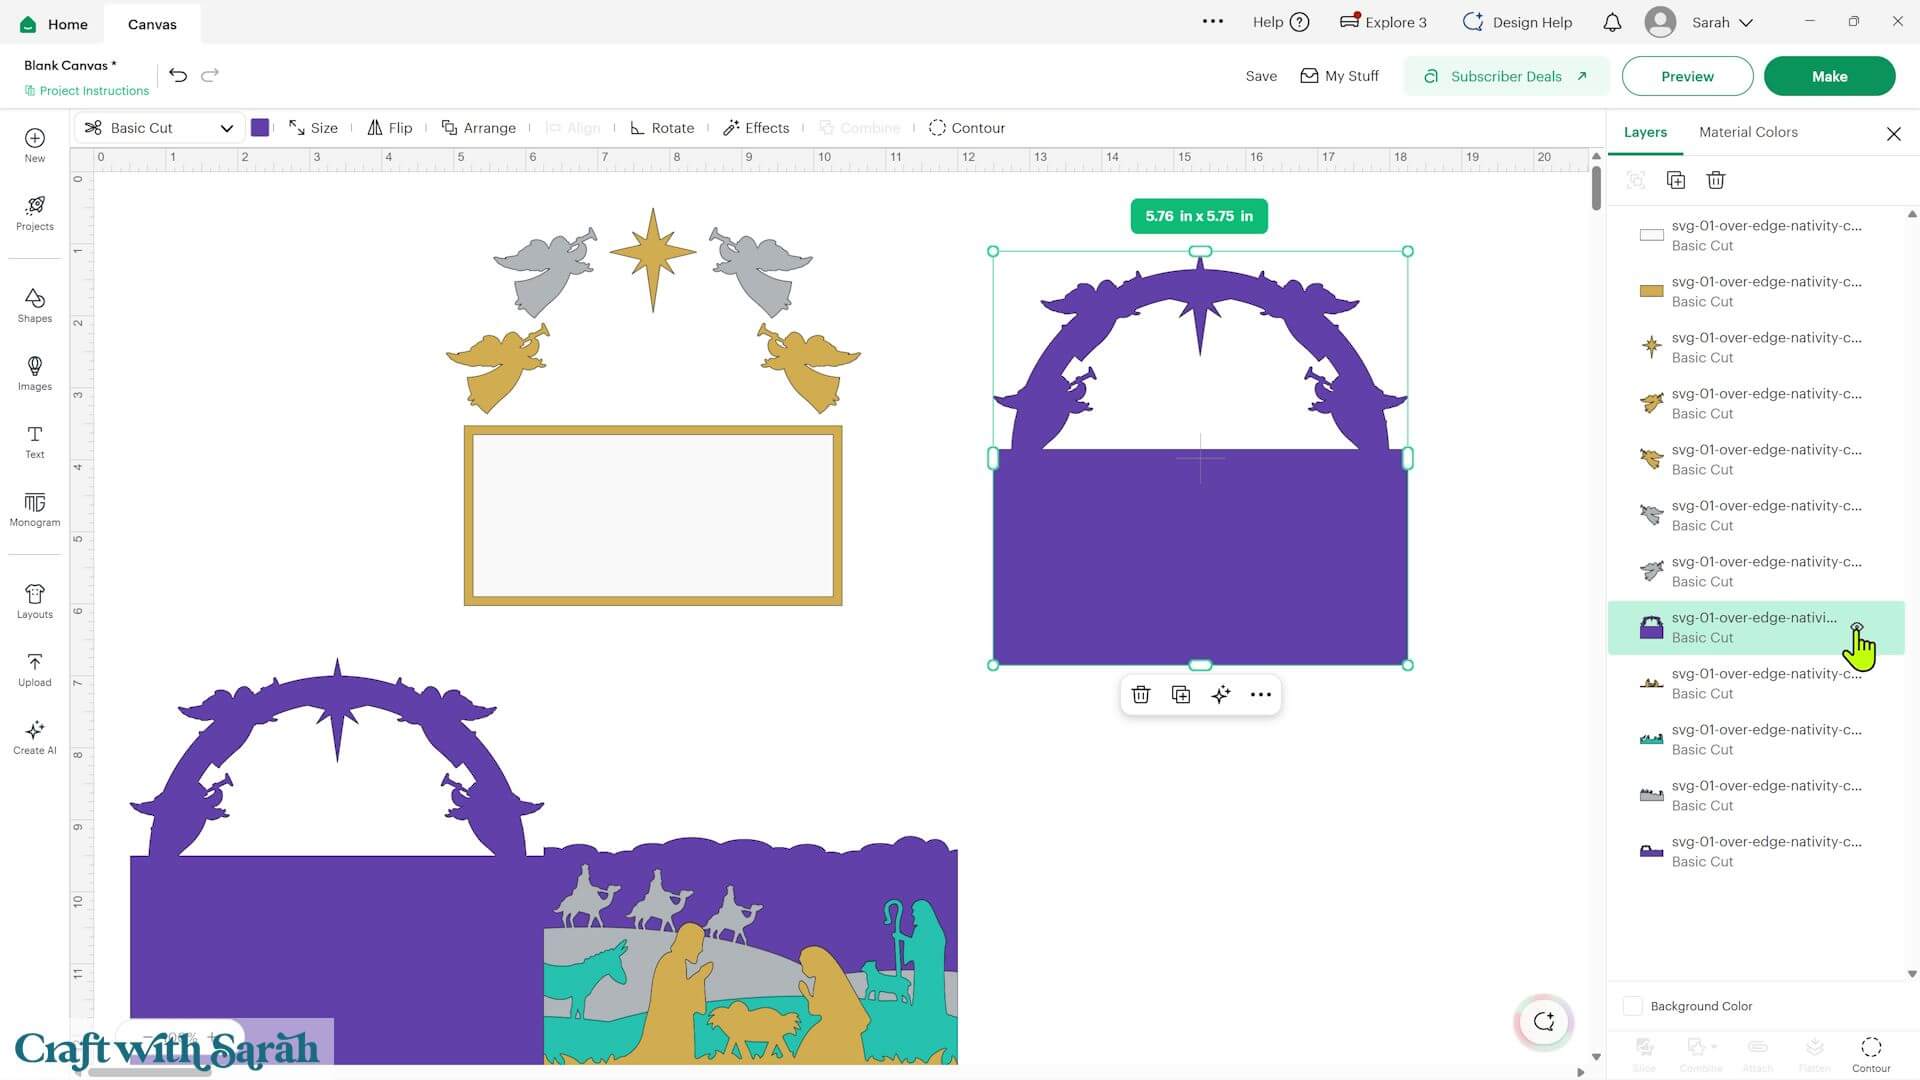
If you’re using double-sided cardstock that’s already coloured on both sides, you might not need this extra piece.
You can hide it using the eye icon in the Layers panel or delete it if you don’t want to cut it.
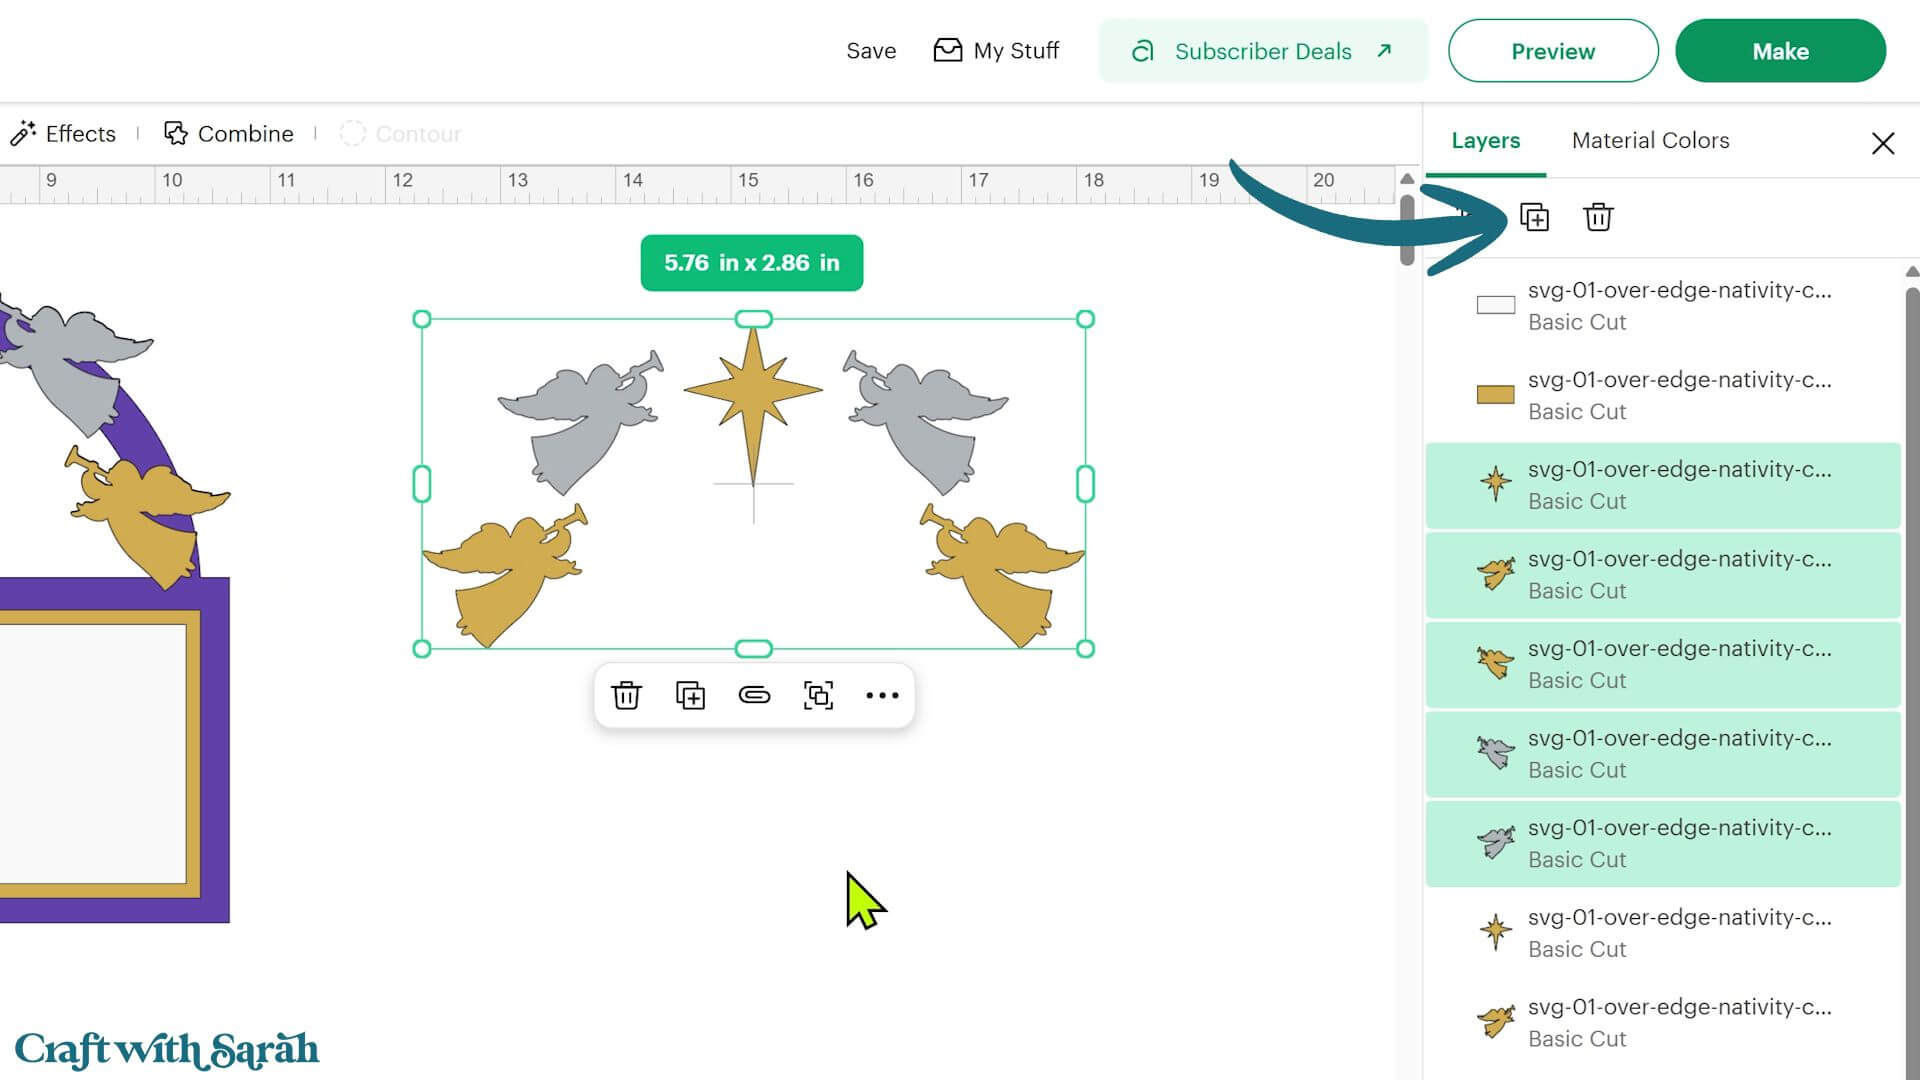
Another optional extra is to decorate the back of the card with the angels and star.
I haven’t done this on mine because the back of a greetings card isn’t usually seen very much, but you can add these decorations if you want.
To make the extra pieces, hold down the Shift key and select the angels and star in the Layers panel.
Click ‘Duplicate’ to create another copy.
These can then be glued onto the back of the finished card.
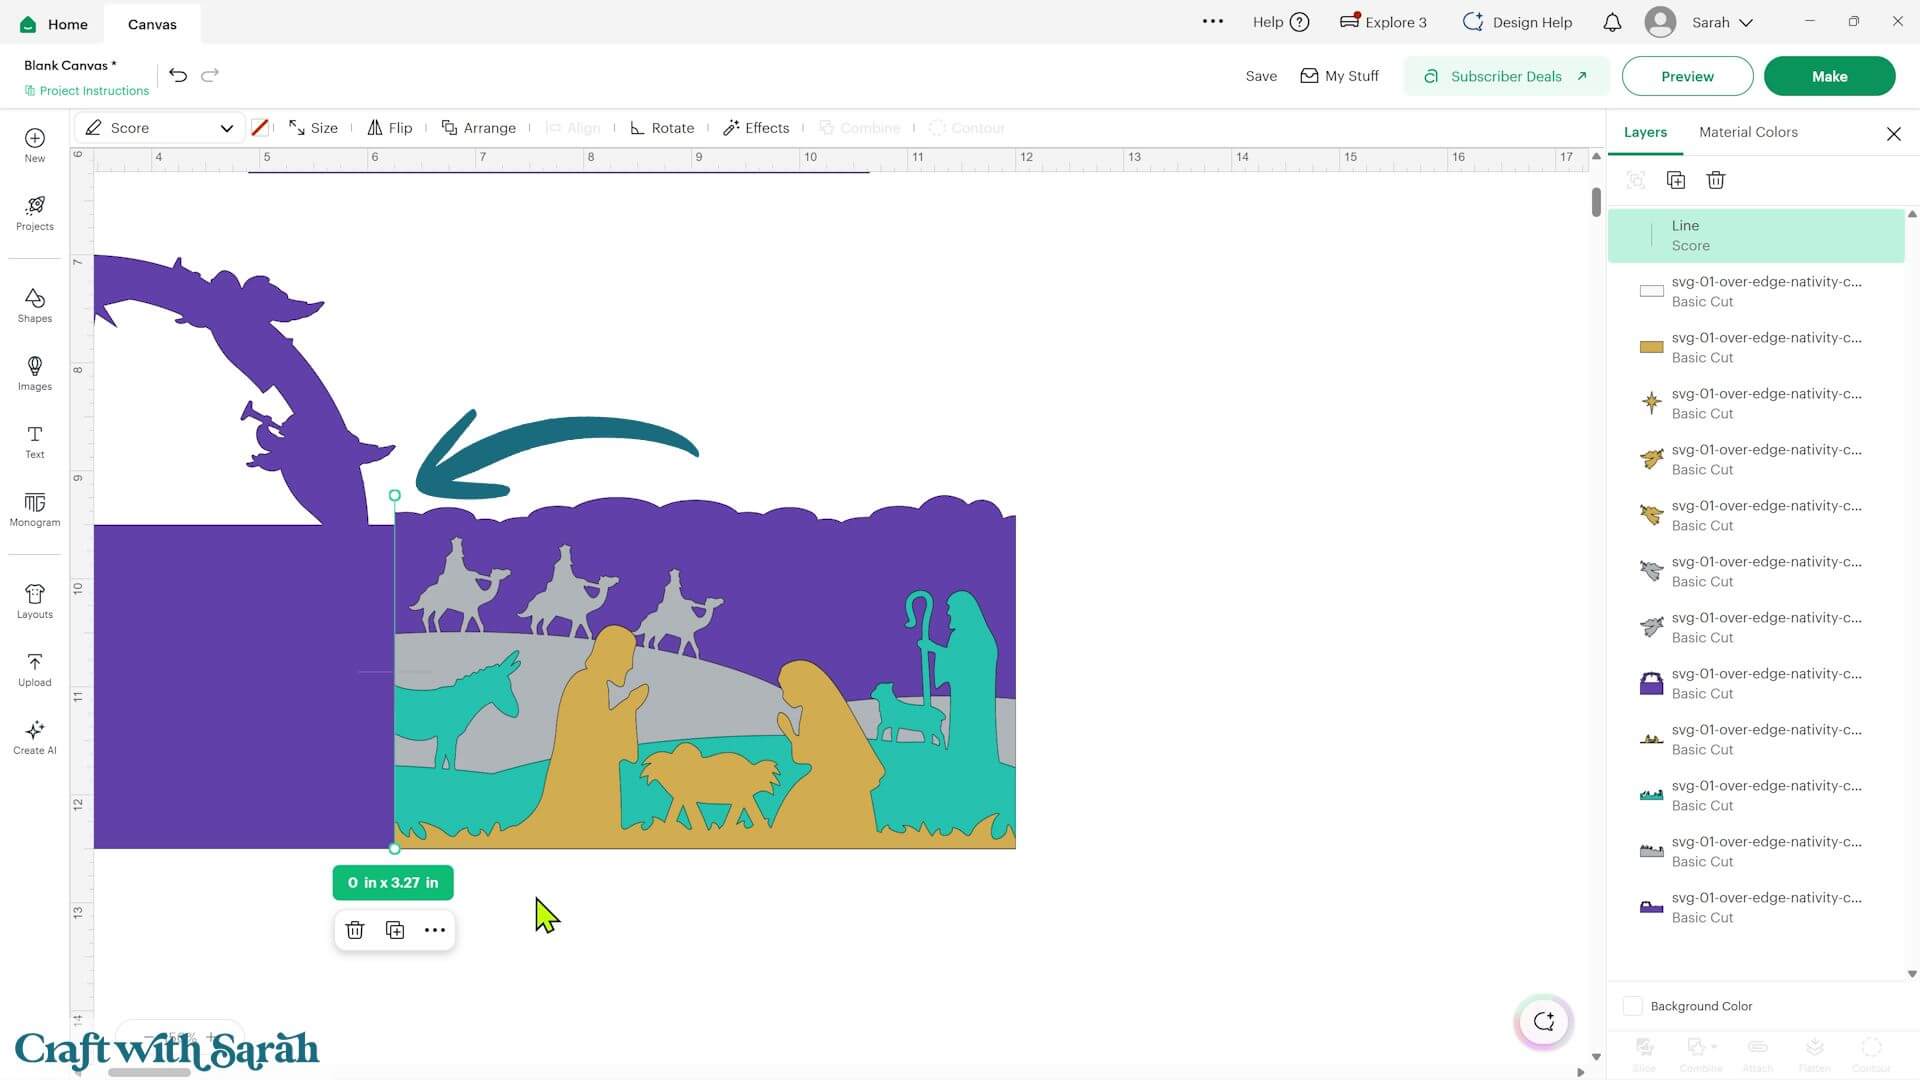
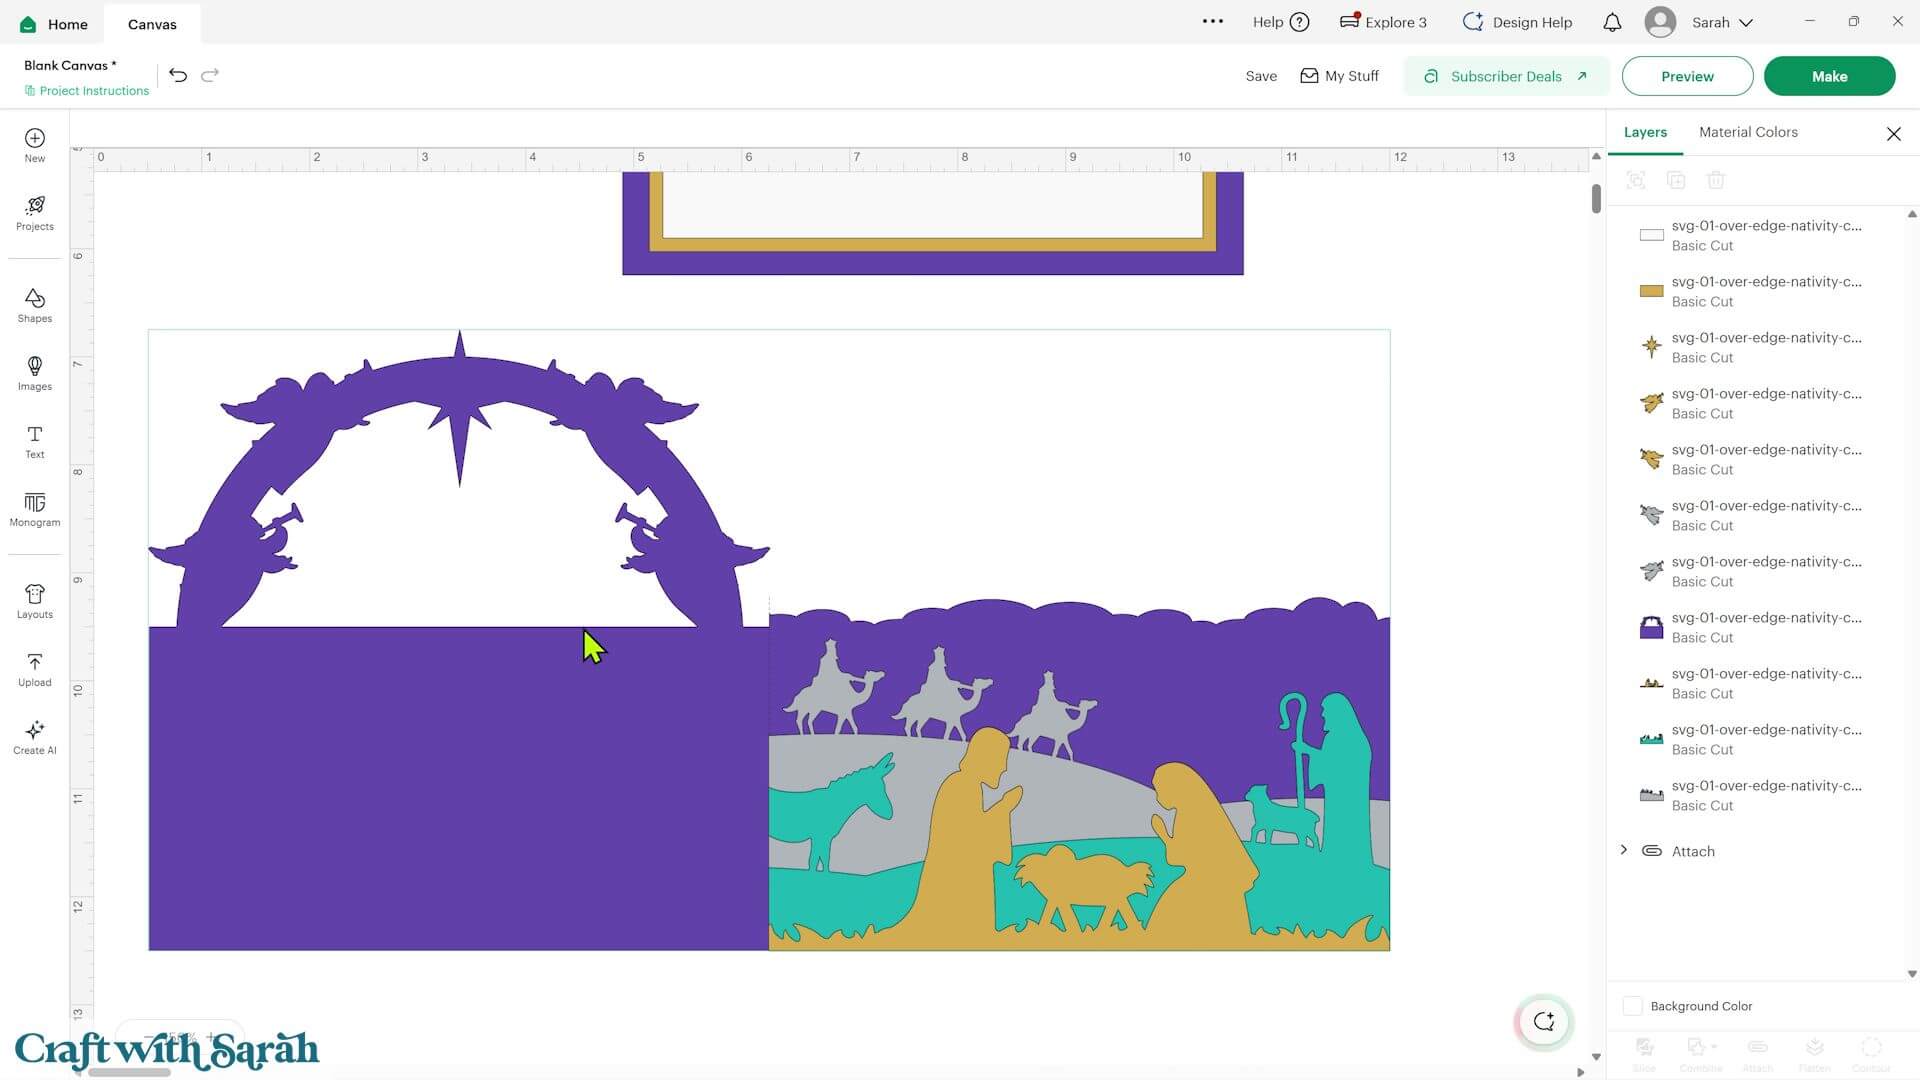
The SVG is ready to cut as is, but I recommend adding a score line to make the base card easier to fold.
This is particularly helpful when using thick glitter cardstock.
Go into ‘Shapes’ and choose a score line.
Move the score line over to the base card.
Resize it so that it’s slightly longer than the section where the front and back of the card meet.
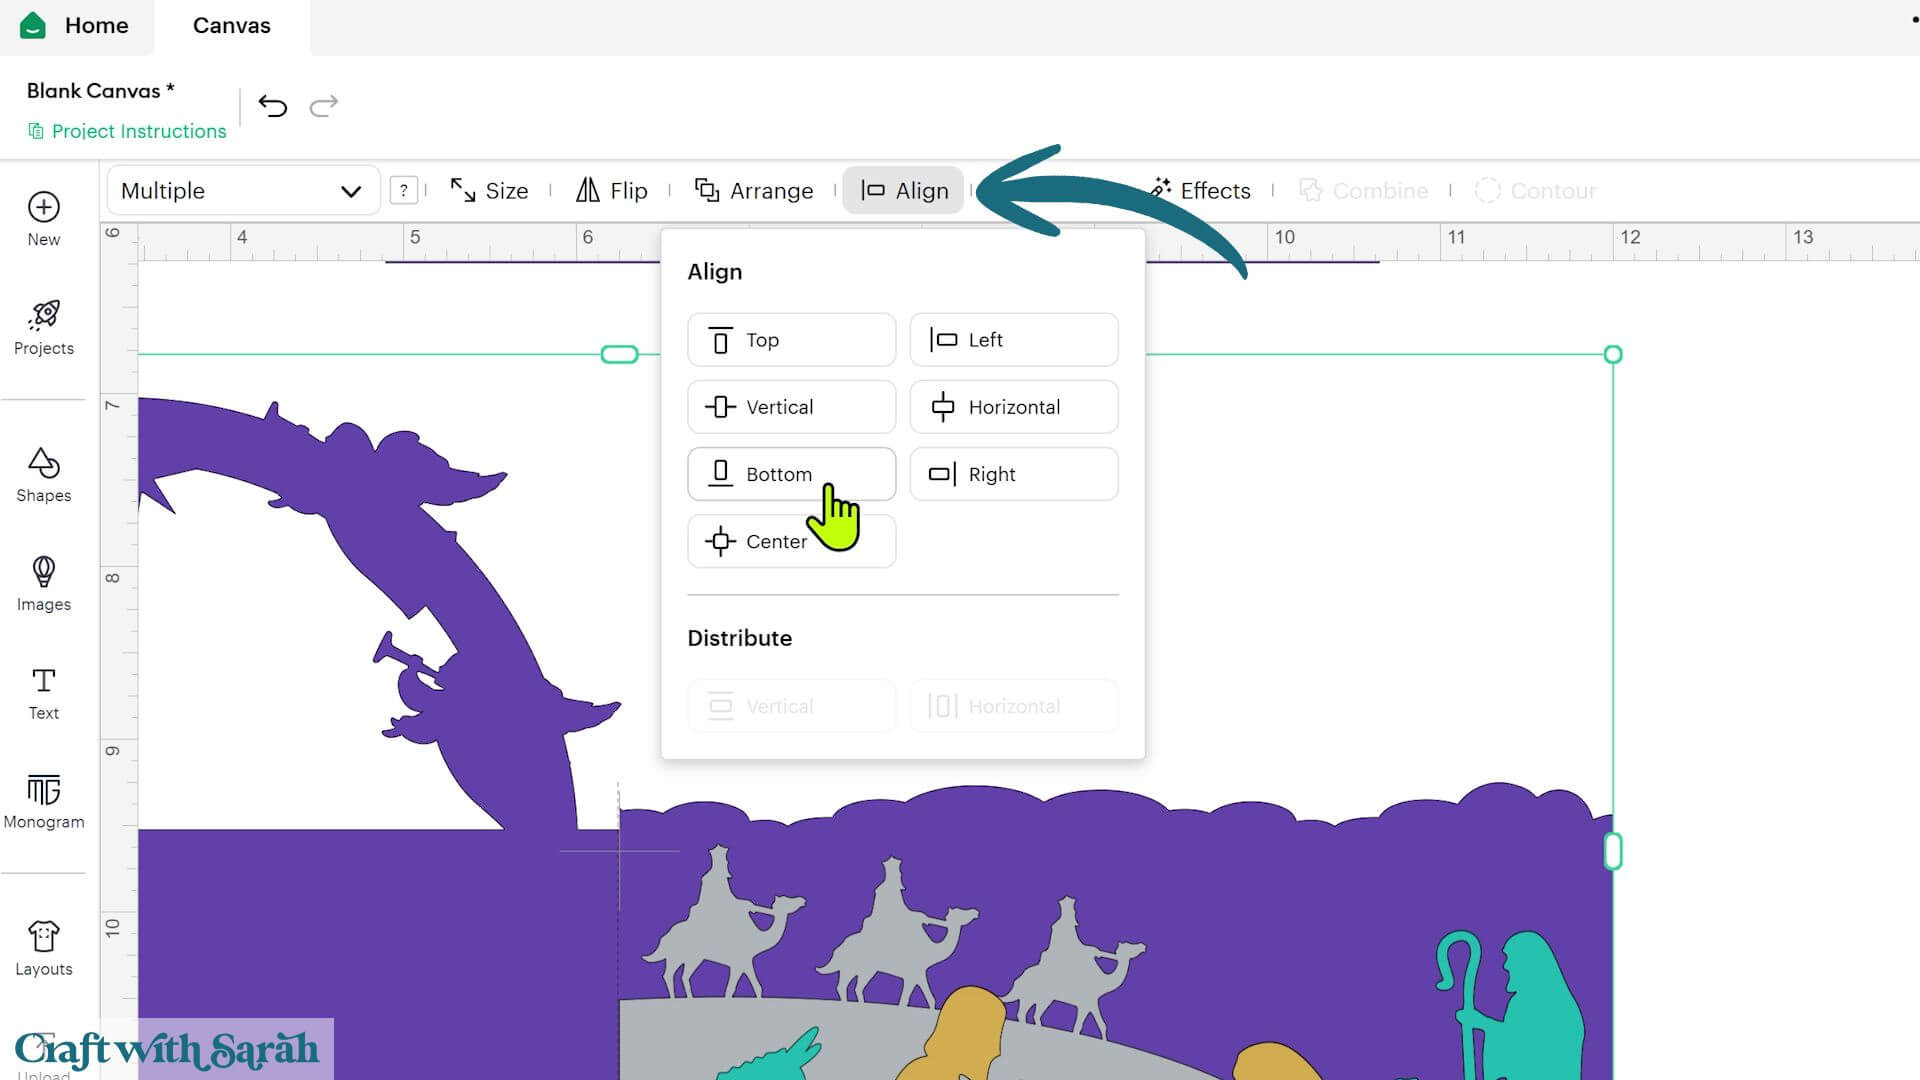
Select the back of the base card and the score line, holding down the Shift key to select both pieces.
Go into ‘Align’ and choose ‘Bottom’.
Then use ‘Align Horizontal’ to position the score line exactly in the middle.
Don’t worry if the score line extends slightly beyond the edge of the card. This won’t affect how the design cuts.
With the score line and base card still selected, click ‘Attach’ at the bottom of the Layers panel.
‘Attach’ tells your Cricut exactly where to make the score line.
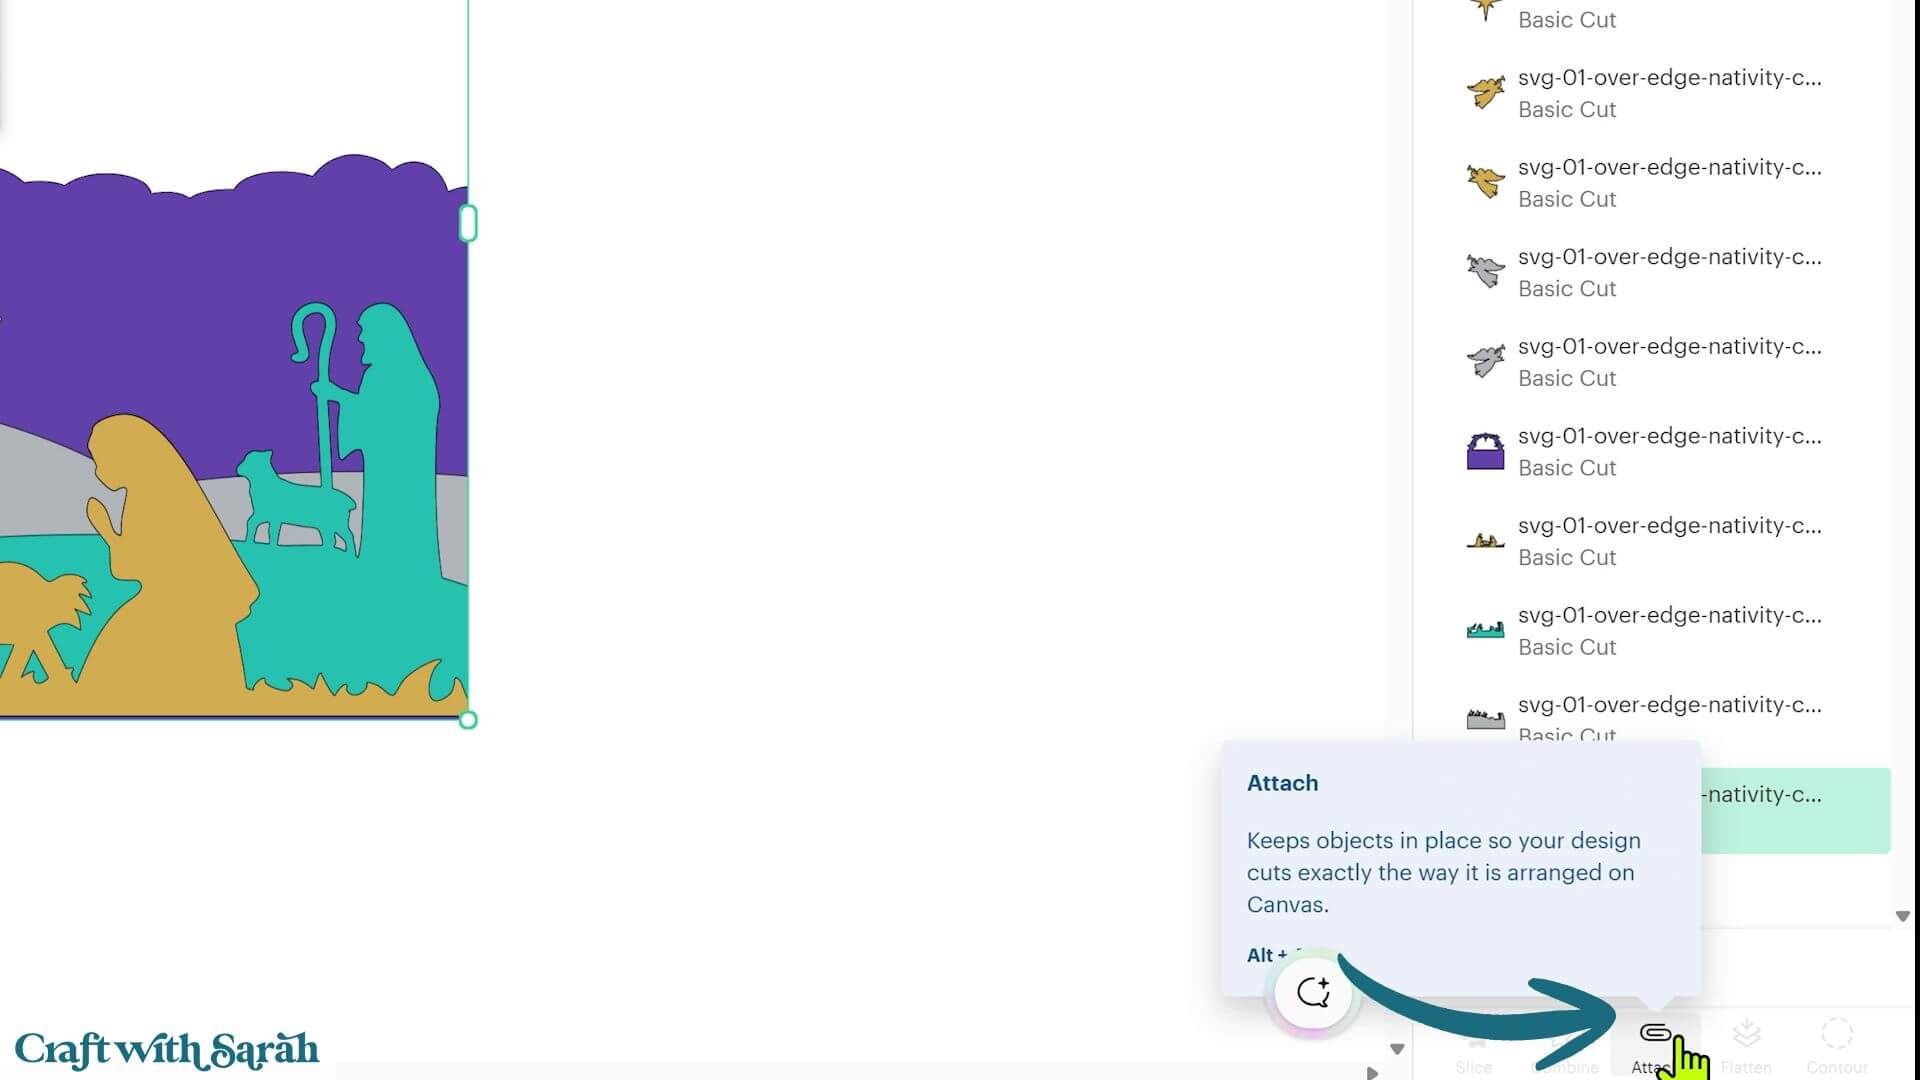
You may find that the attached base card moves to the top of the Layers panel and covers the other pieces on your Canvas.
You can move it back down in the Layers panel if you want, but its position on the Canvas doesn’t matter when you’re cutting the project.
Step 3) Cut out all the layers
Once you’re happy with your design, save the project so that you can return to it later without needing to make the same changes again.
Connect to your Cricut machine and click ‘Make’.
Design Space will separate the pieces onto different cutting mats according to their colours.
I’m cutting everything from glitter cardstock apart from the white rectangle that goes inside the card for writing a message.
That piece will be cut from regular white cardstock.
You’ll need 12 x 12 inch cardstock for the base card because it’s 11.5 inches wide.
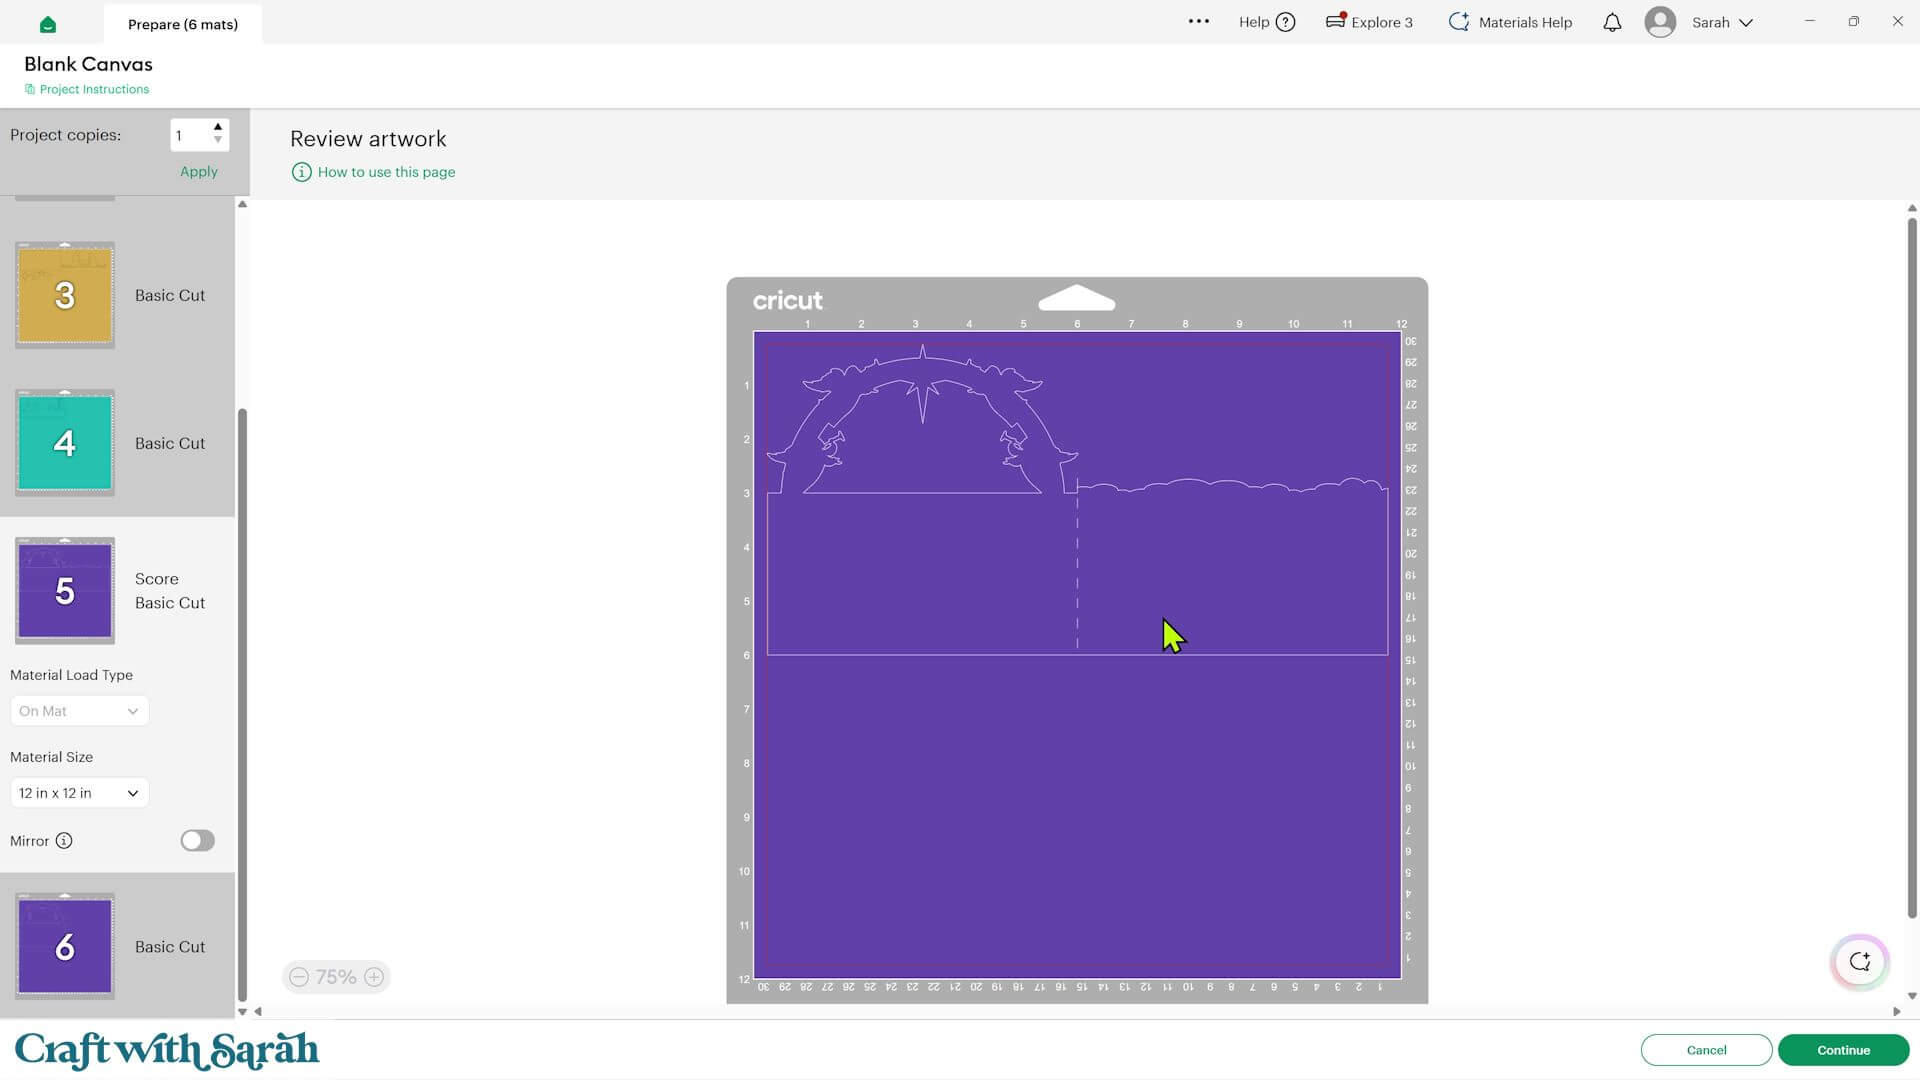
The other pieces can be cut from smaller sheets or scraps of cardstock.
You can change the paper size using the dropdown menu on the cutting mat screen.
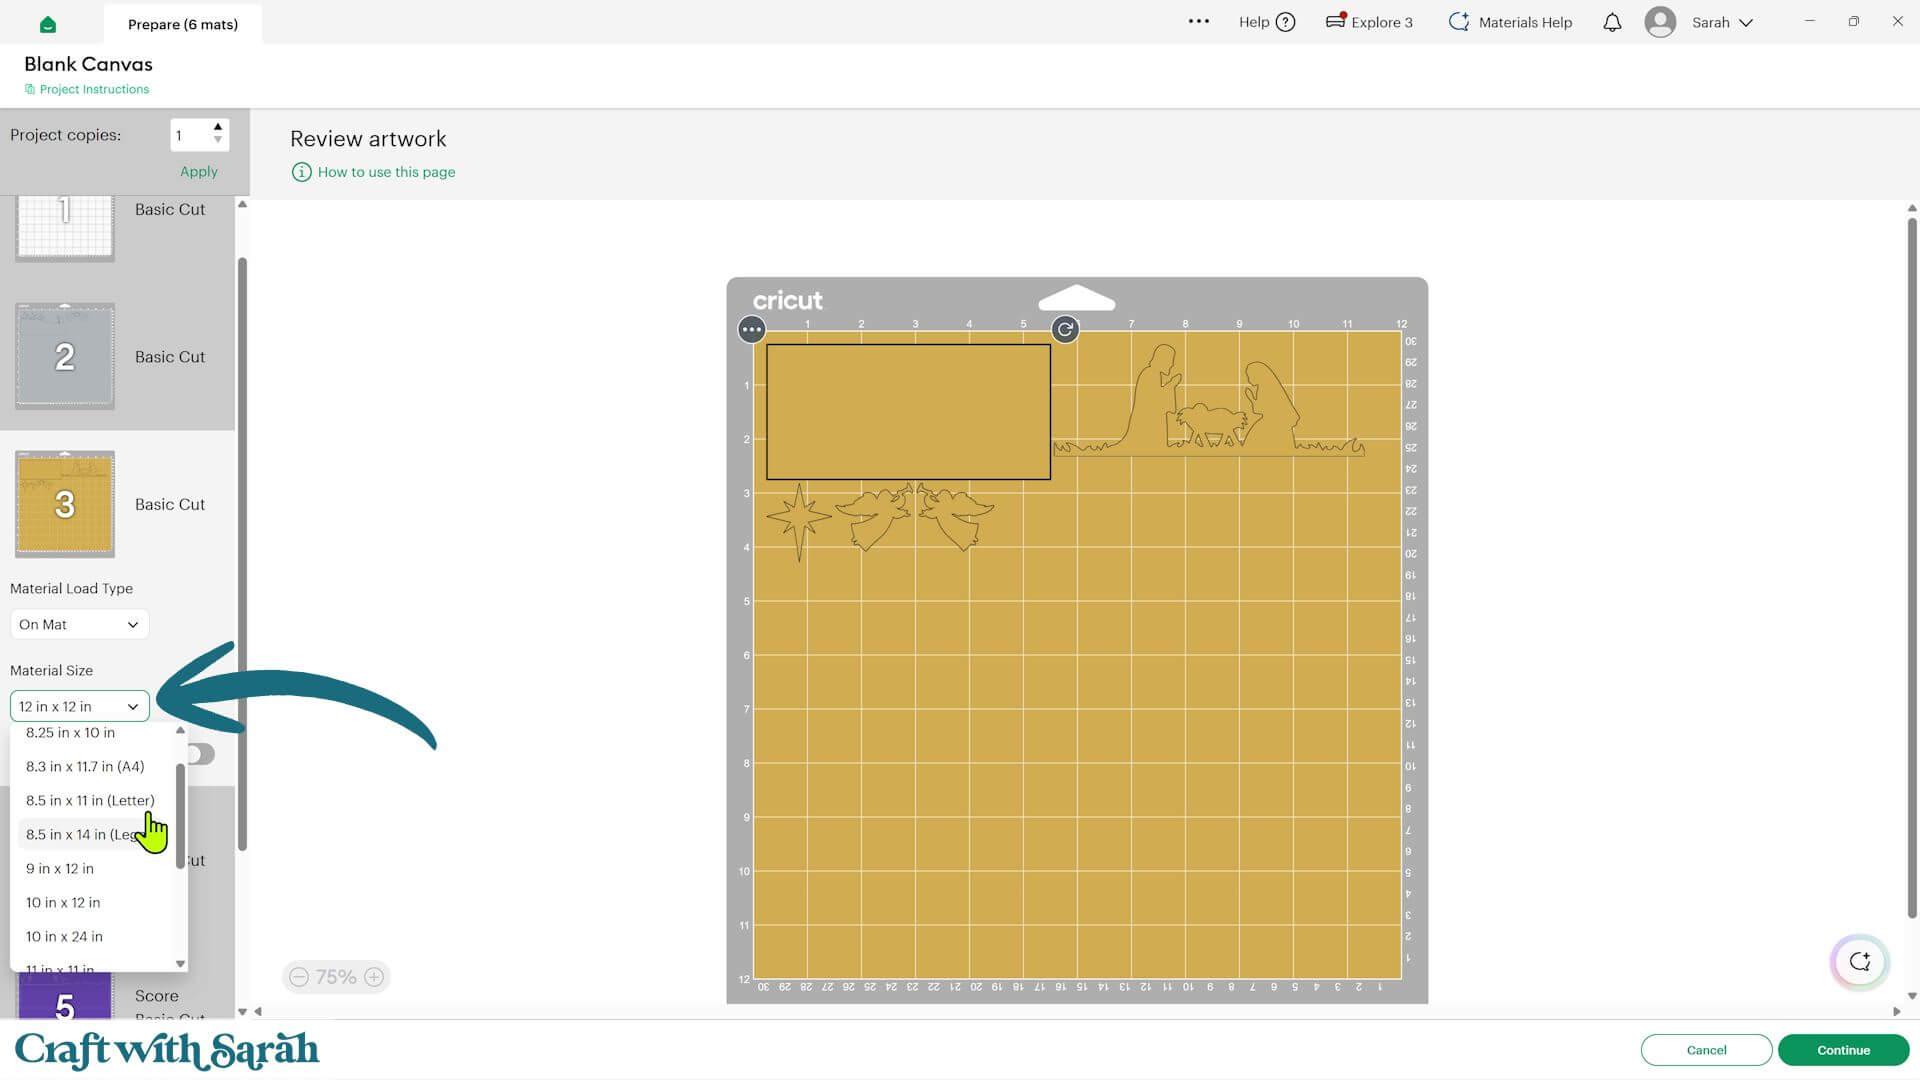
If you want to save material, you can also move the pieces around to make better use of the cardstock.
Just make sure none of the pieces overlap, otherwise they won’t cut correctly.
When you’re happy with the arrangement, click ‘Continue’ and follow
TIP: New to using cardstock with your cutting machine? Check out these machine help guides for Cricut, Silhouette and ScanNCut that go through every step of the process, including tips for getting the best quality cuts from your machine.
Glitter cardstock can sometimes be a little tricky to cut because it’s thicker and tougher than regular cardstock.
I find that the ‘Kraft Board’ setting works particularly well for the glitter cardstock I use.
It’s a deep-cut setting that makes two passes over the same cut lines to help the blade get through thicker materials.
If you use this setting and notice your Cricut cutting the same lines twice, don’t worry. That’s intentional.
You may need to experiment with the settings depending on the exact glitter cardstock you’re using.
Step 4) Stick the front of the card together
Once everything is cut, start by folding the base card in half along the score line.
If you’re using glitter cardstock, you might find that it takes a little more effort to fold neatly because the material is quite thick.
Use a brayer, scraper tool or something similar to go along the fold and make the crease nice and crisp.
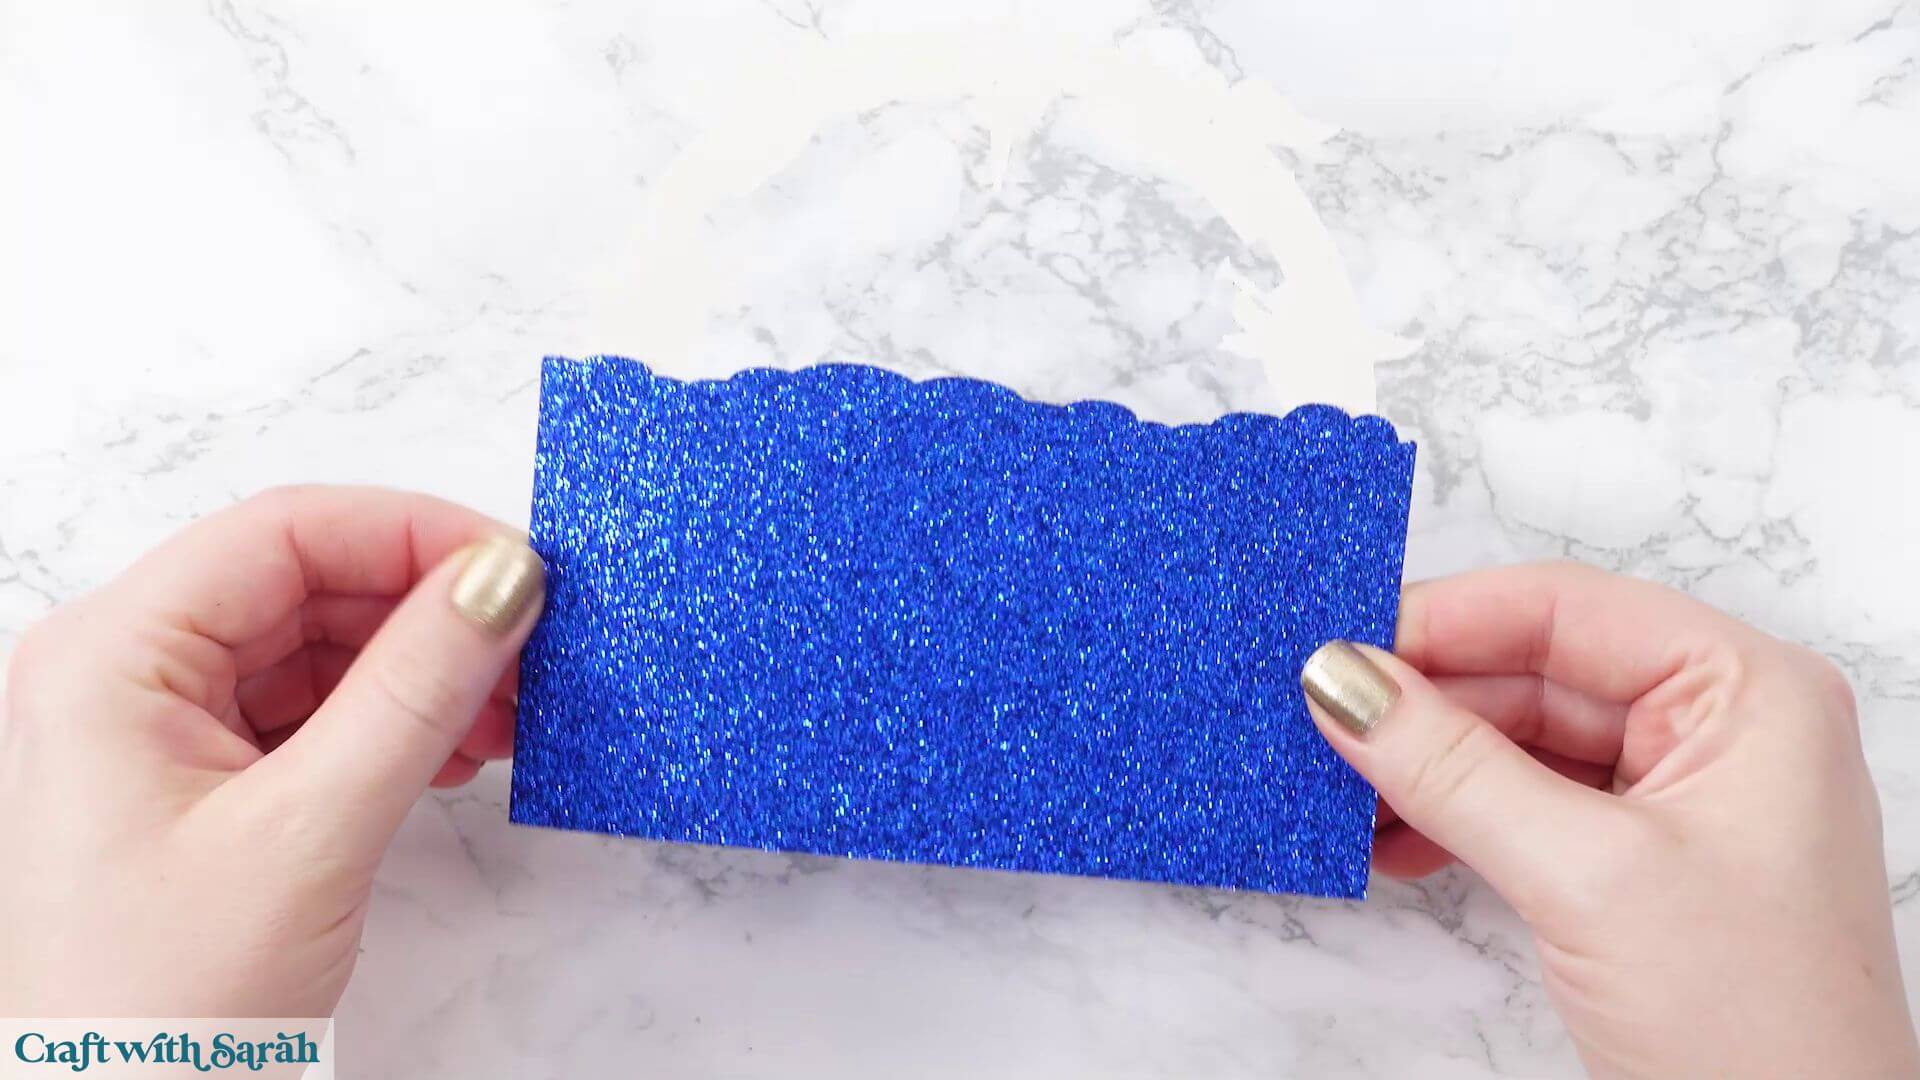
When the card is folded, you should have the glittery colour on the front and back, with the white reverse of the cardstock showing inside.
We’ll cover the visible arch on the inside later so that the design looks beautifully finished from both directions.
For my card, I’m using glue rather than foam squares to assemble the layers.
Glitter cardstock is already quite thick, and I don’t want the finished card to become so bulky that it’s difficult or expensive to post.
However, if you’re using regular cardstock or you’d like a little more dimension, you can use foam squares between some of the layers instead.
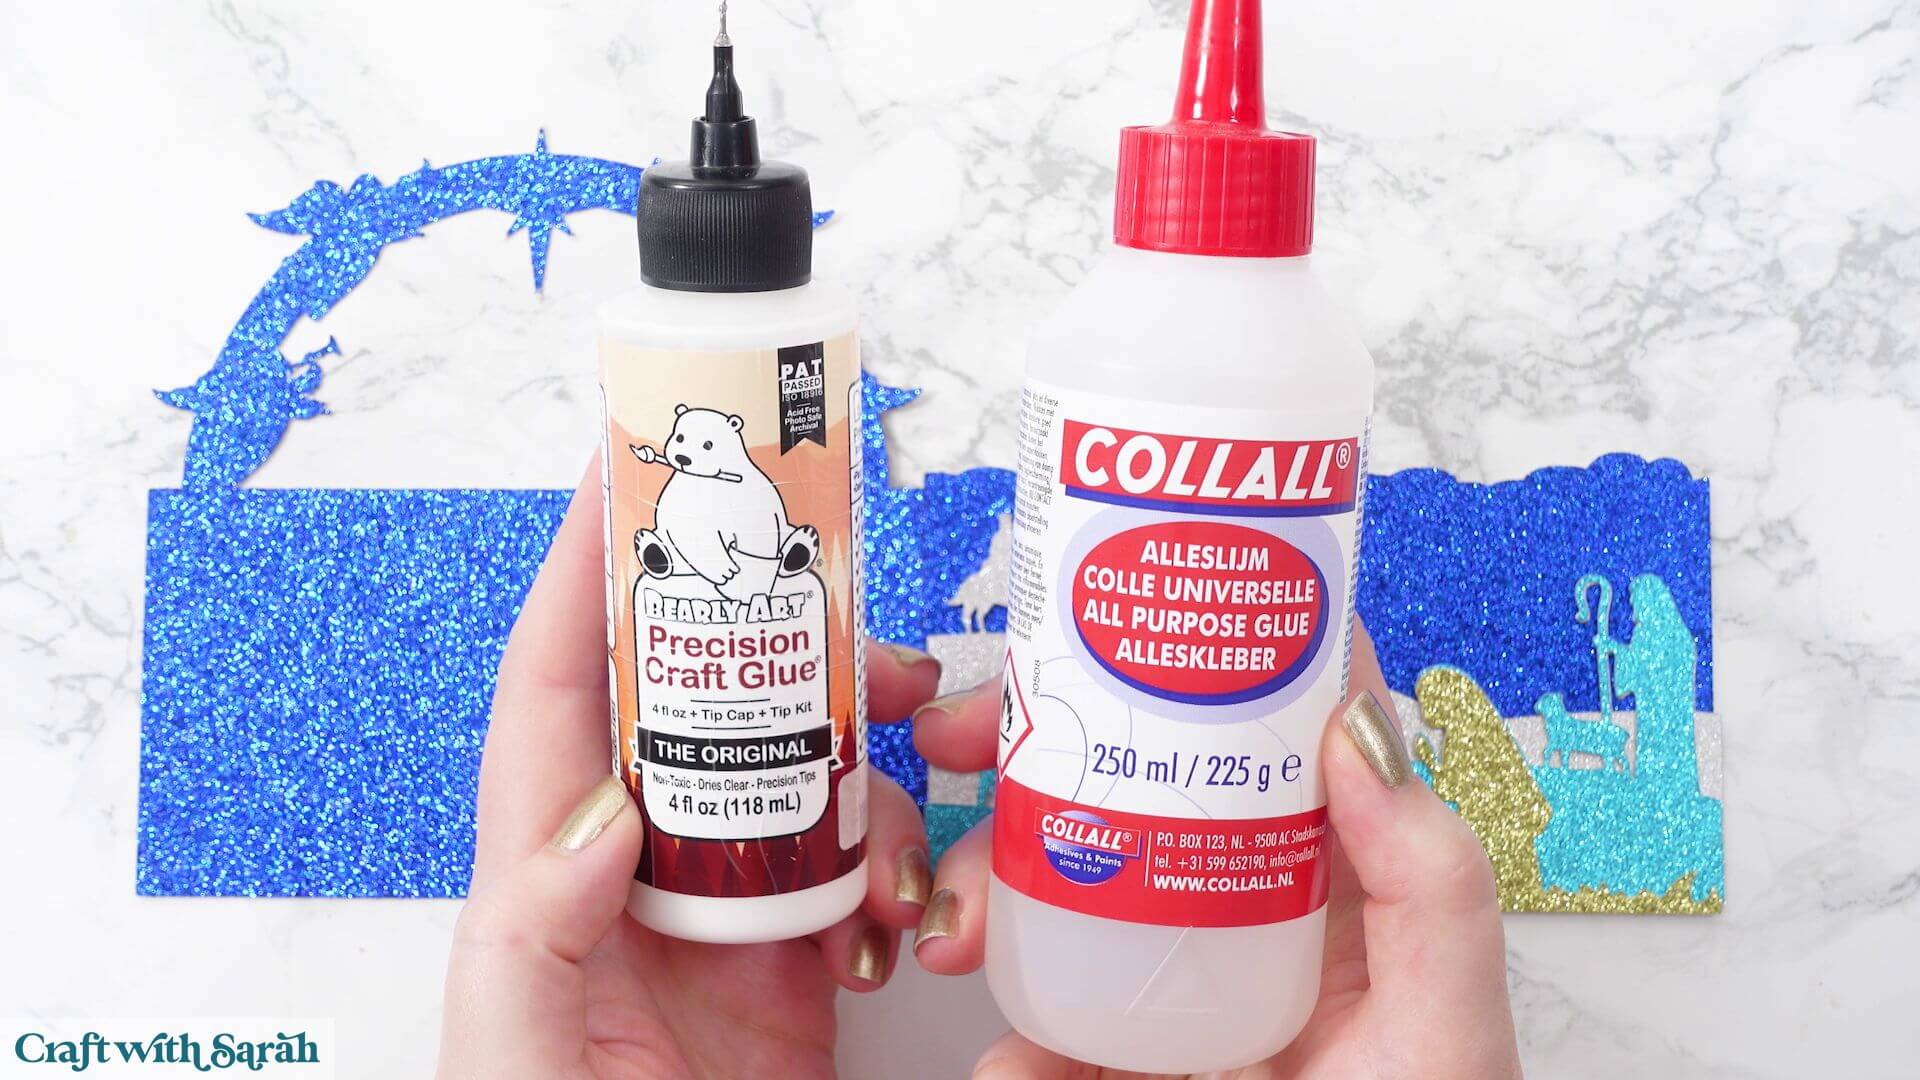
My favourite glues to use on papercraft projects are Bearly Art Glue and Collall All Purpose Glue.
These are great because they don’t “warp” or bend the cardstock like some glues do. You can use as much of it as you want and the card stays perfect – and it dries perfectly clear too!
Bearly Art Glue comes with a tiny nozzle to make it easy to apply glue to small pieces of card. Collall glue doesn’t come with this, so it’s best to decant it into needle tip applicator bottles so that you have more control.
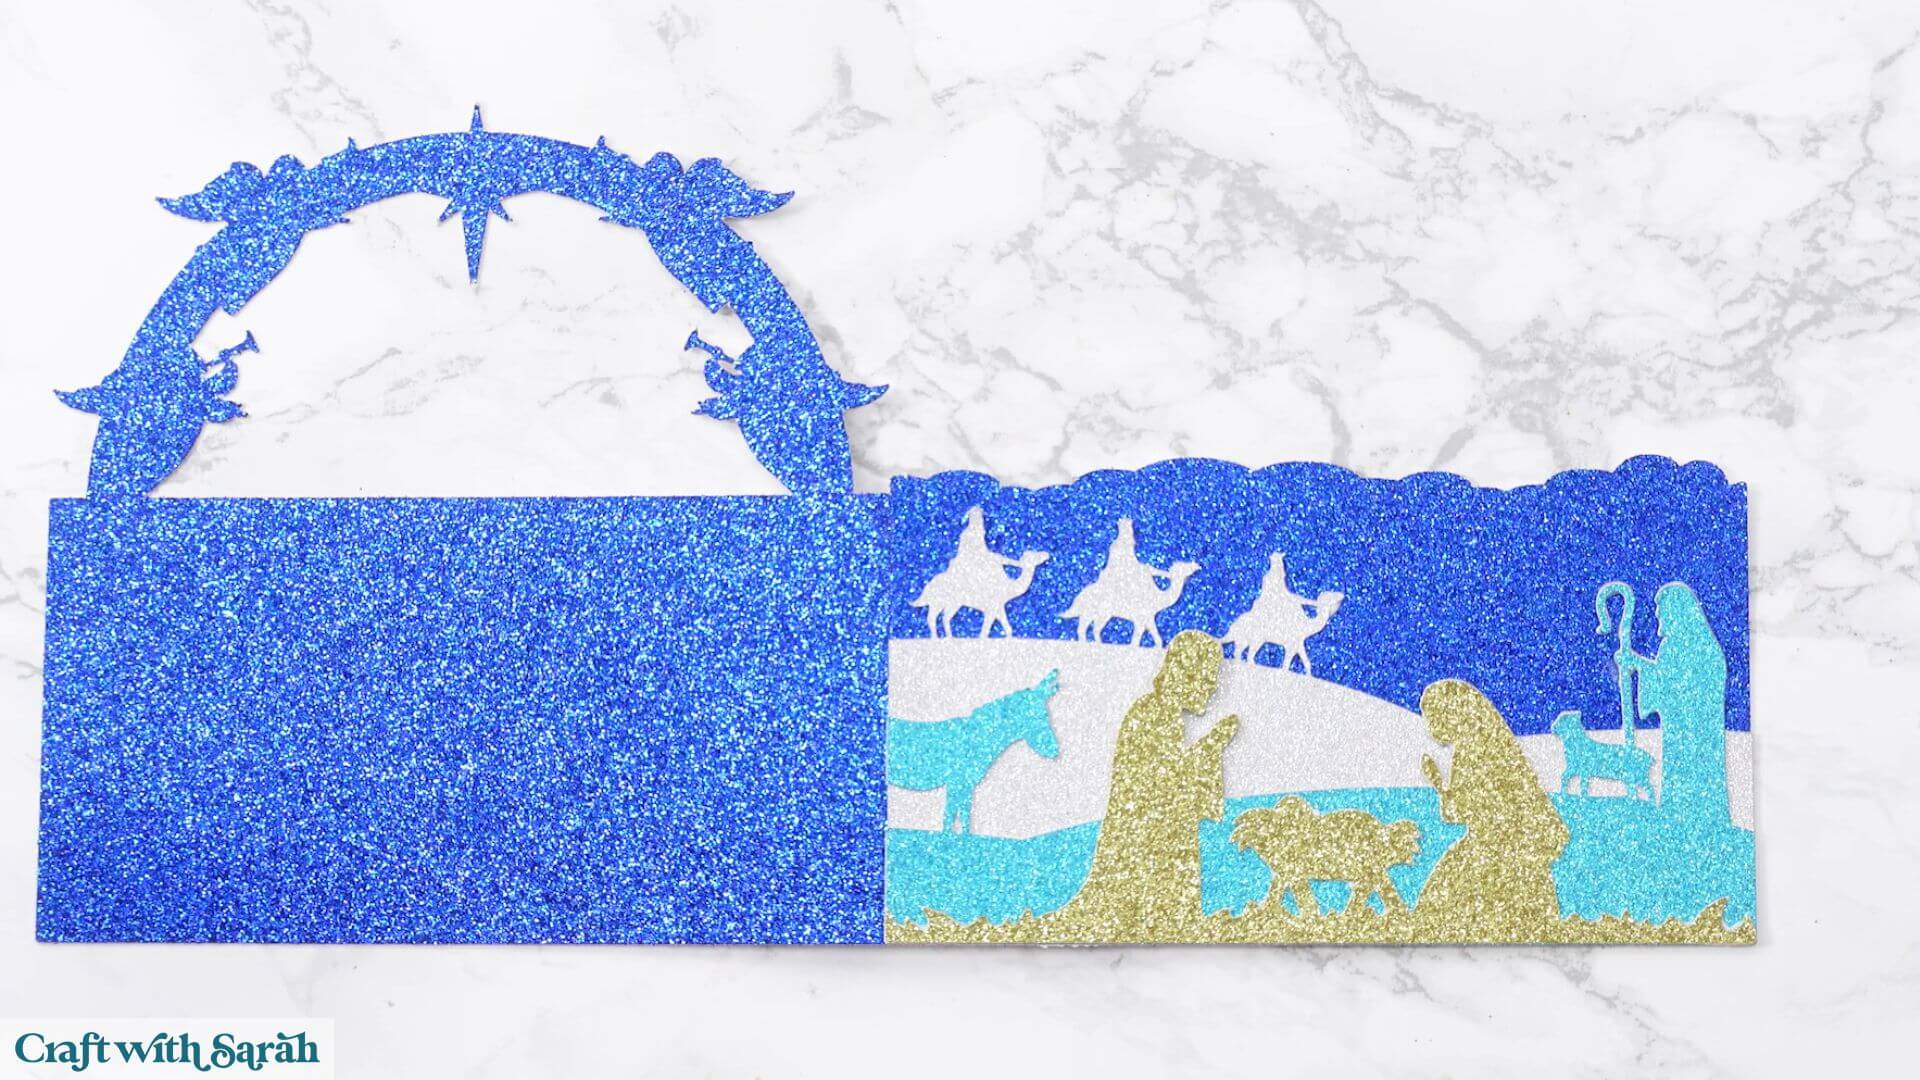
Glue the piece with the Three Wise Men onto the front of the card base.
Next, glue on the shepherd layer, and finally the Mary, Joseph and Jesus layer.
Step 5) Stick the inside of the card together
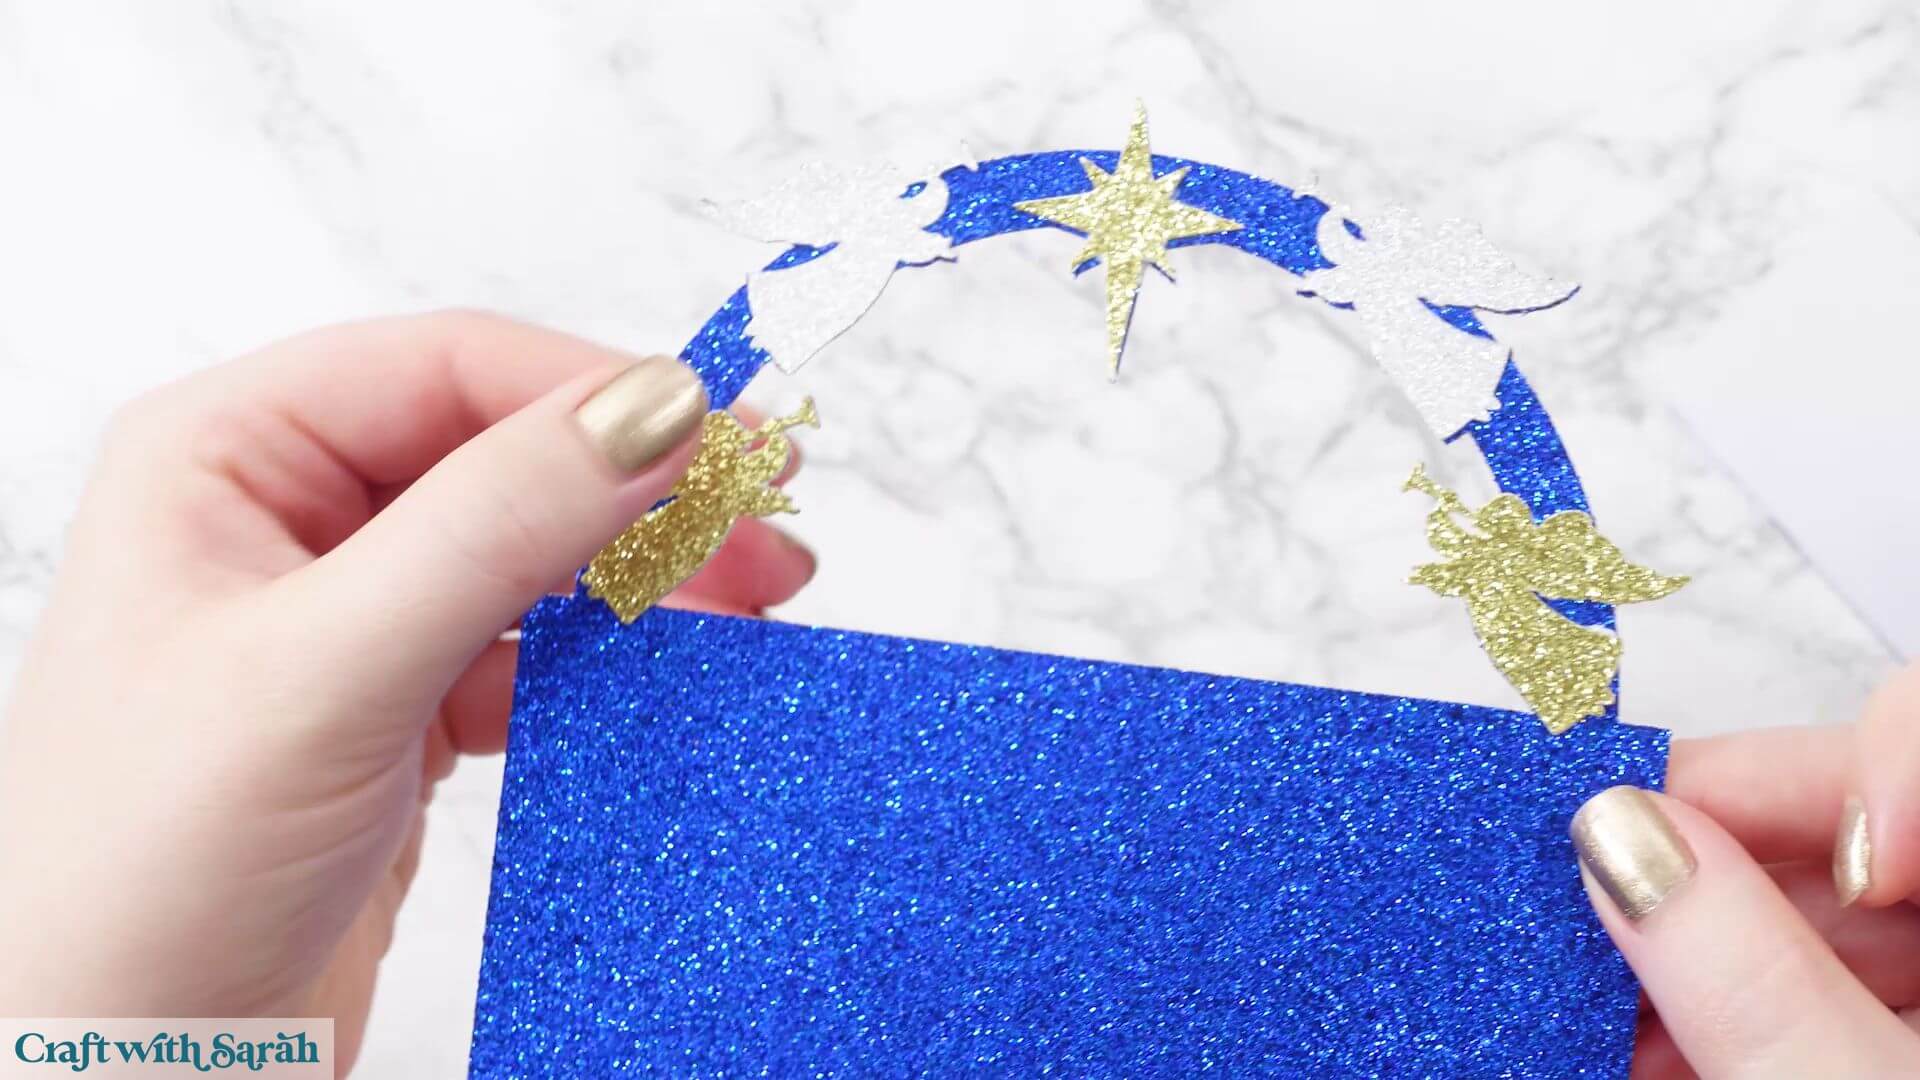
For the inside of the card, you’ll need the additional arch-shaped piece, the angels, the star, the gold border and the white message panel.
Start with the arch-shaped piece that matches the top of the base card.
This is the extra layer we included so that the inside of the arch will be glittery rather than showing the white reverse of the cardstock.
Before attaching it to the card, we’ll add the decorative pieces.
Glue the angels and star onto the arch, using the outlines on the cardstock underneath to help with their positioning.
You can use foam squares if you’d like these decorations to stand out more, but I’m gluing mine flat to keep the card thinner.
If you’re using glitter cardstock, keep an eye on the decorations while the glue dries.
Glitter-on-glitter can be a little difficult to stick, and you might find that some of the edges try to lift.
If that happens, gently press them back down and hold them until the glue starts to dry.
It’s worth taking a little extra time here to make sure everything is securely attached.
Next, take the gold border piece and glue it onto the middle of the decorated arch.
Try to leave an even amount of the background colour showing all the way around.
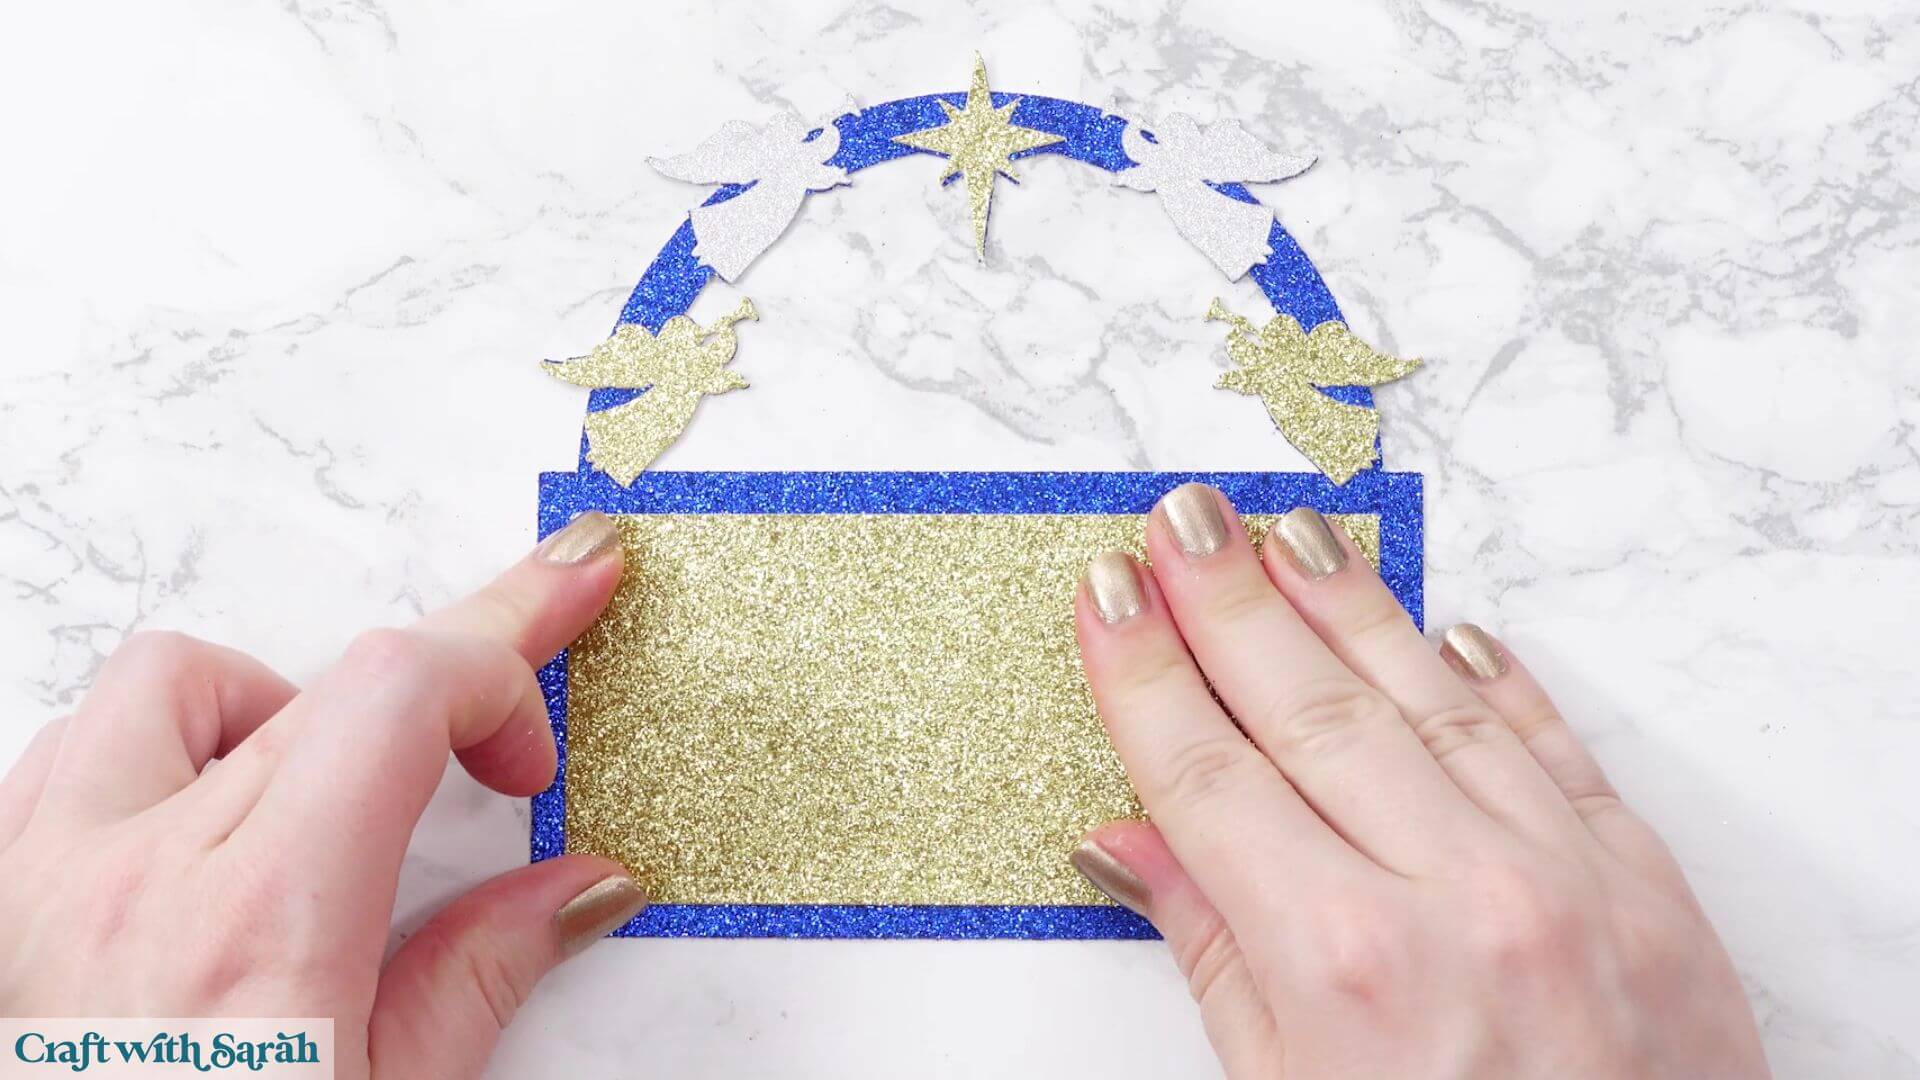
Then take the white rectangle that will be used for writing your Christmas message.
Glue this into the middle of the gold border.
Once again, try to keep the border as even as possible.
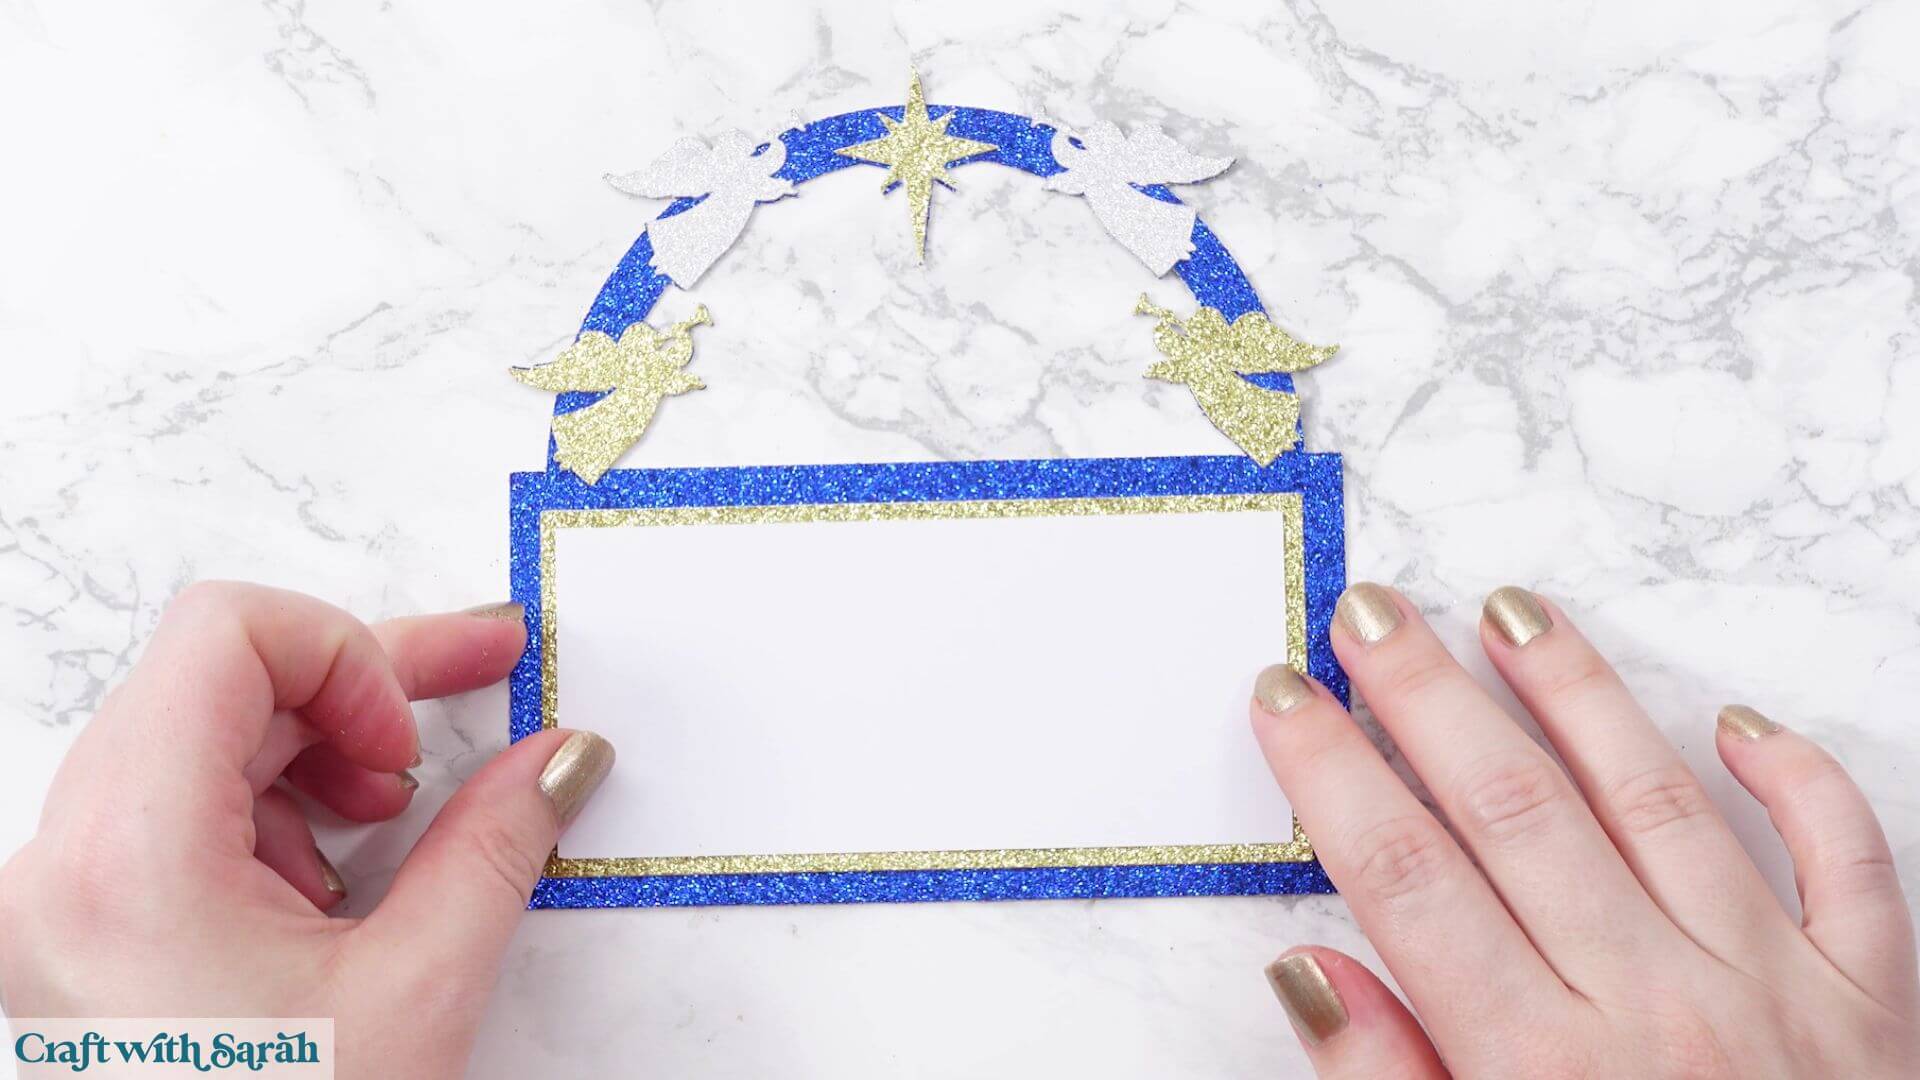
This gives you a lovely decorated message area inside the card, with the gold glitter adding a little extra sparkle around the white cardstock.
Now that the inside decorations are assembled, open up your base card.
Position the completed panel on the inside so that the arch-shaped section lines up with the top of the card.
Glue it into place, taking your time to make sure everything is neatly aligned.
This covers the white reverse of the glitter cardstock and makes the arch look glittery from both sides.
When the card is closed, you’ll see the layered nativity scene extending above the fold.
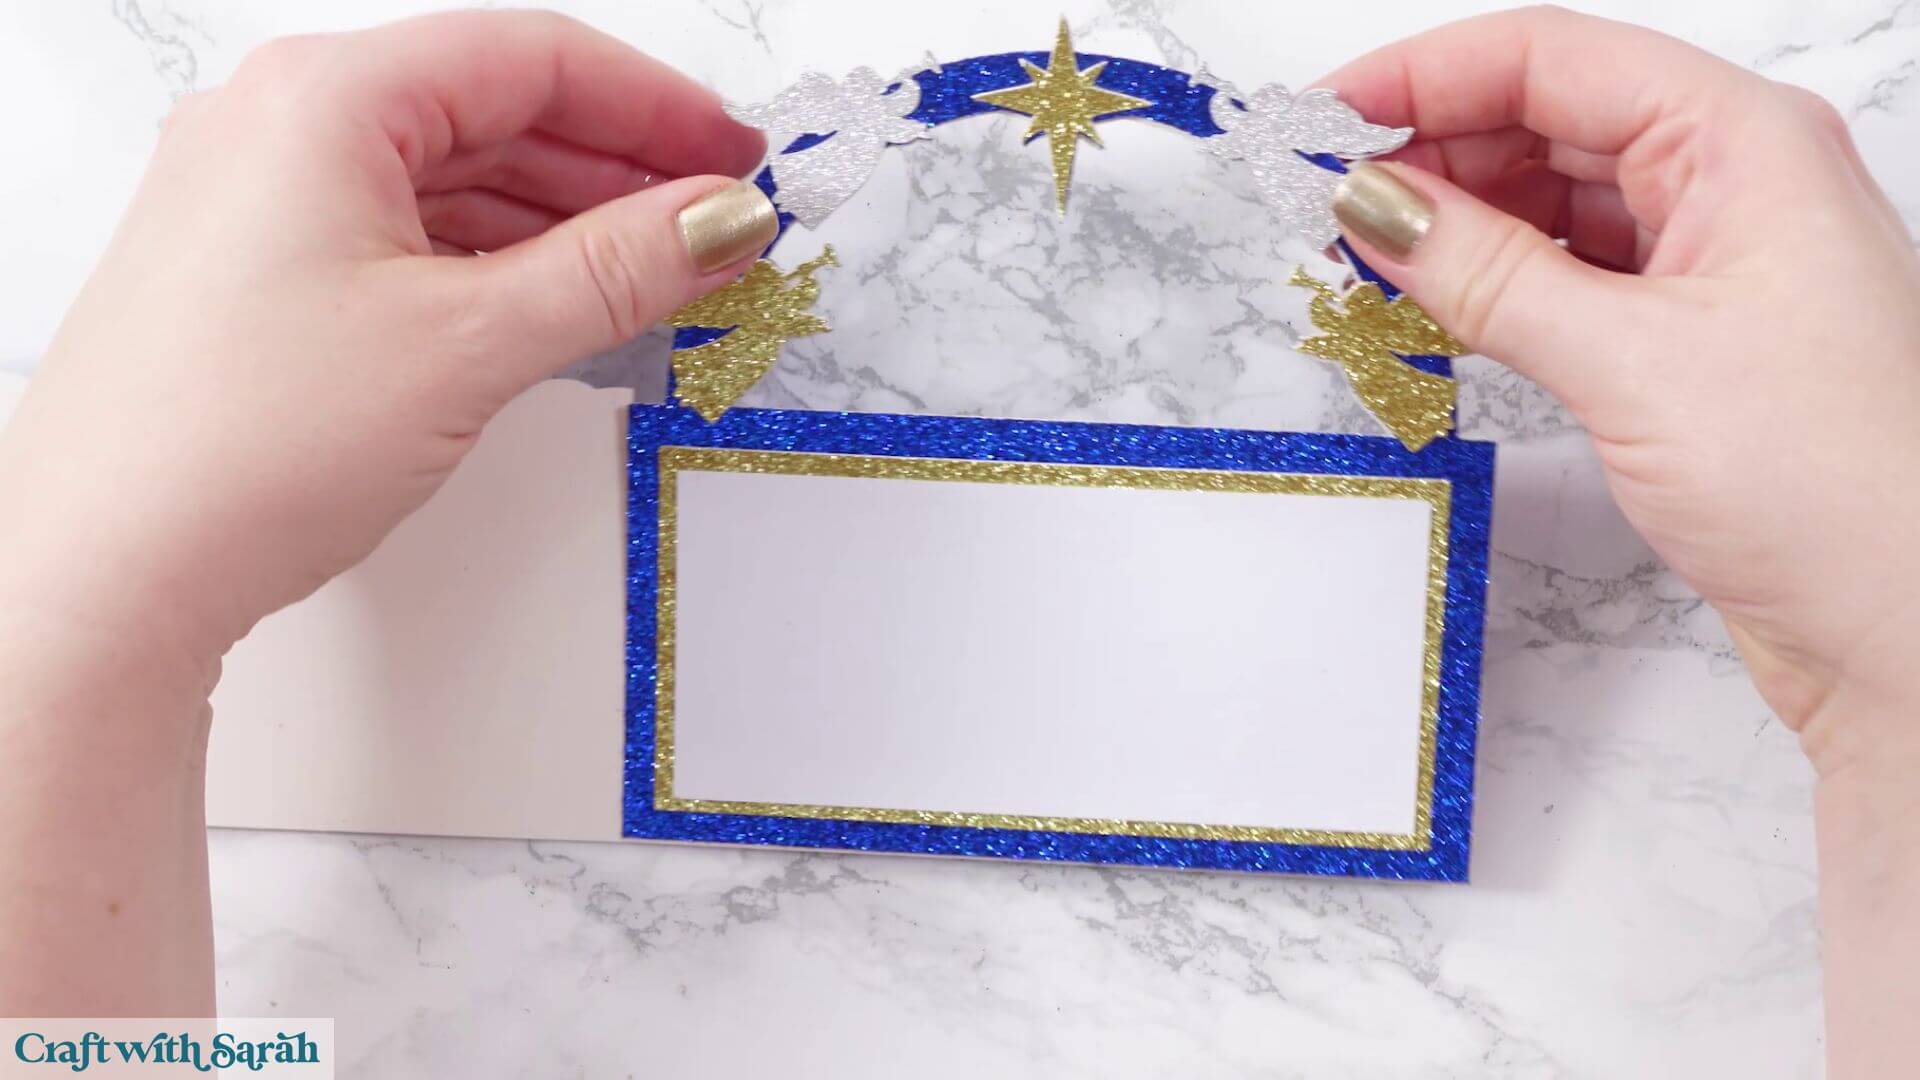
When it’s opened, you’ll have the matching angels and star, along with the decorated message panel.
If you decided to cut extra angels and a star for the back of the card, you can glue those into position now too.
And that’s your over-the-edge nativity Christmas card finished!
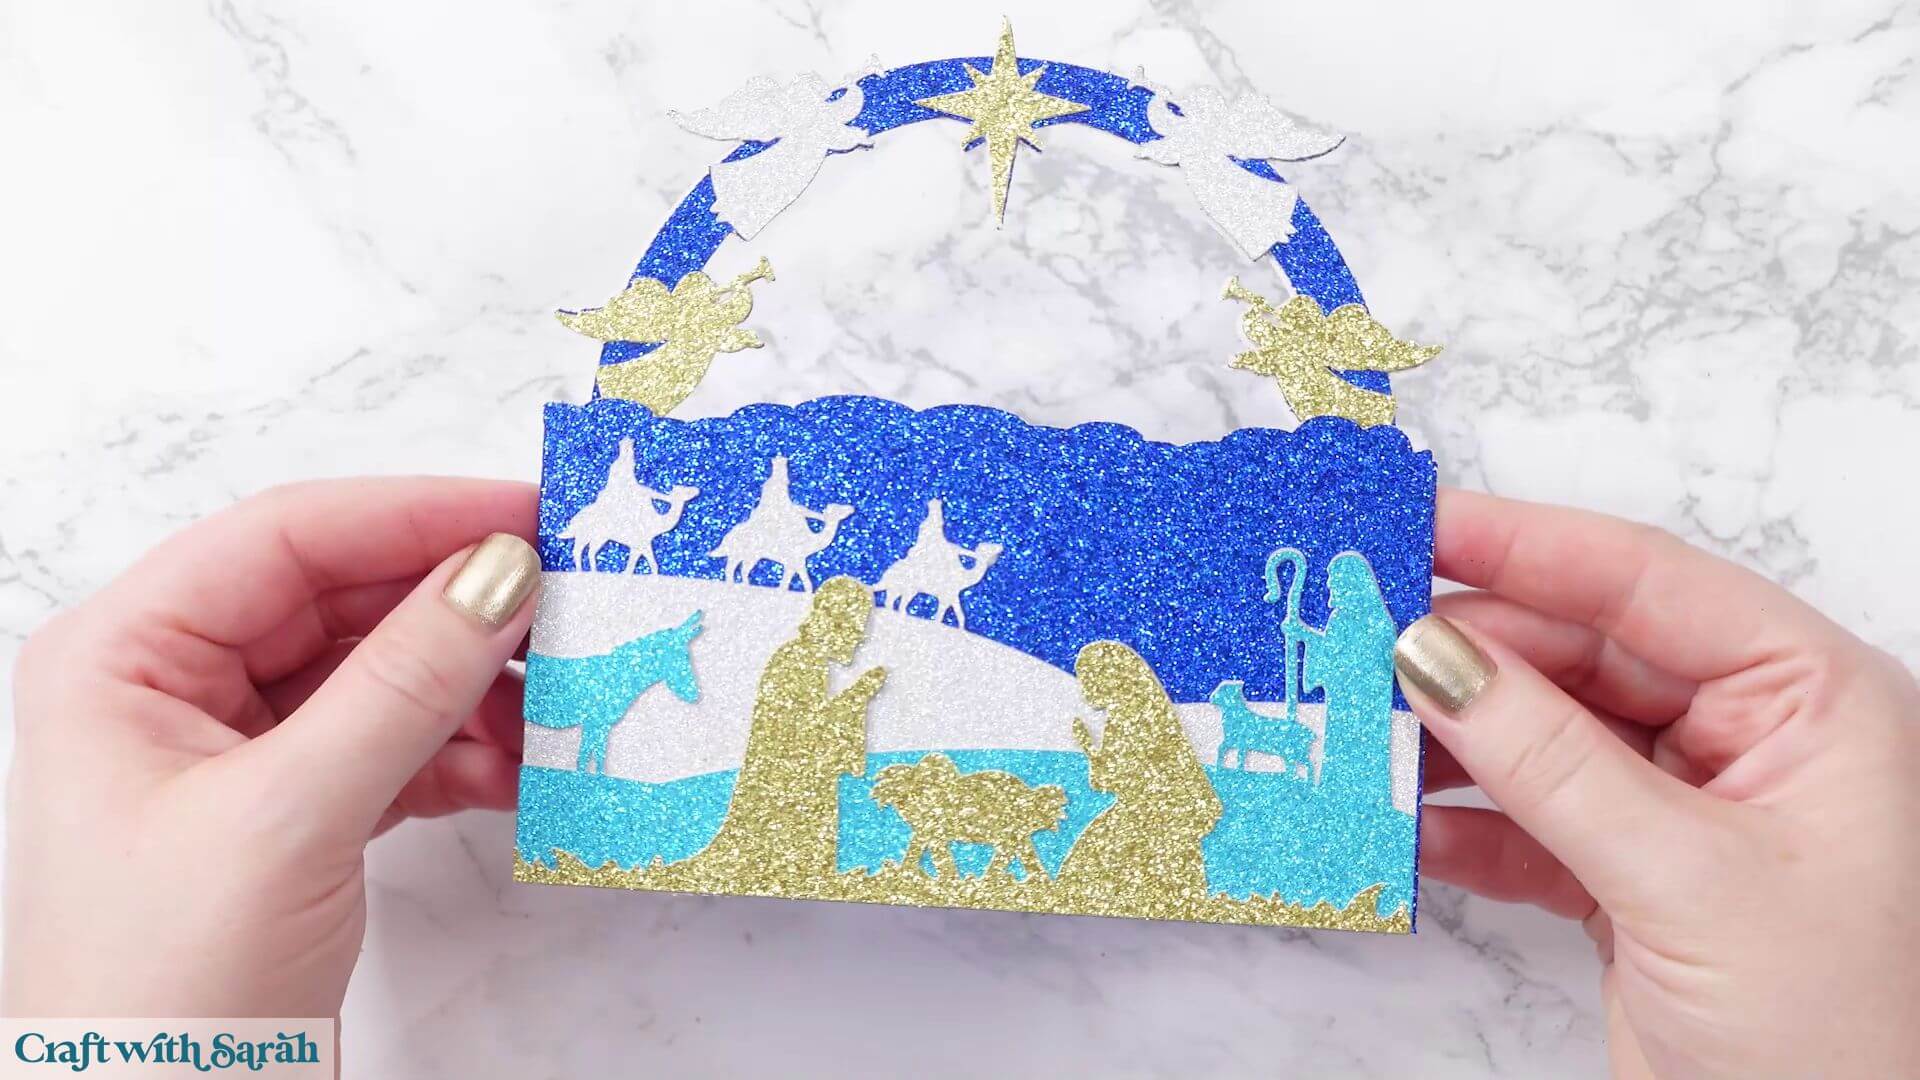
Easy-to-Make Nativity Card with Glitter
I love how this card has turned out with all that glitter!
The over-the-edge shape makes it a little different from a traditional Christmas card, while the layers create a lovely nativity scene with all the familiar characters.
Decorating the inside arch is a nice finishing touch too, especially when you’re using single-sided glitter cardstock.
You can make the card entirely from glitter for maximum sparkle, or choose regular cardstock for a simpler finish.
Either way, the shaped design makes it a beautiful card to display over Christmas.
Love Christmas Nativity craft projects?
Check out these other Nativity SVGs for even more crafting fun!
- Mandala Nativity (free!)
- Nativity giant wall sign
- Stained glass shadow box
- Stand-up Nativity windows
- Star-shaped light-up shadow box
- Mary & Joseph card
- Easel card
Happy crafting,
Sarah x