Circular Advent Calendar with Chocolates ❄️ CCC 2026 Day 01
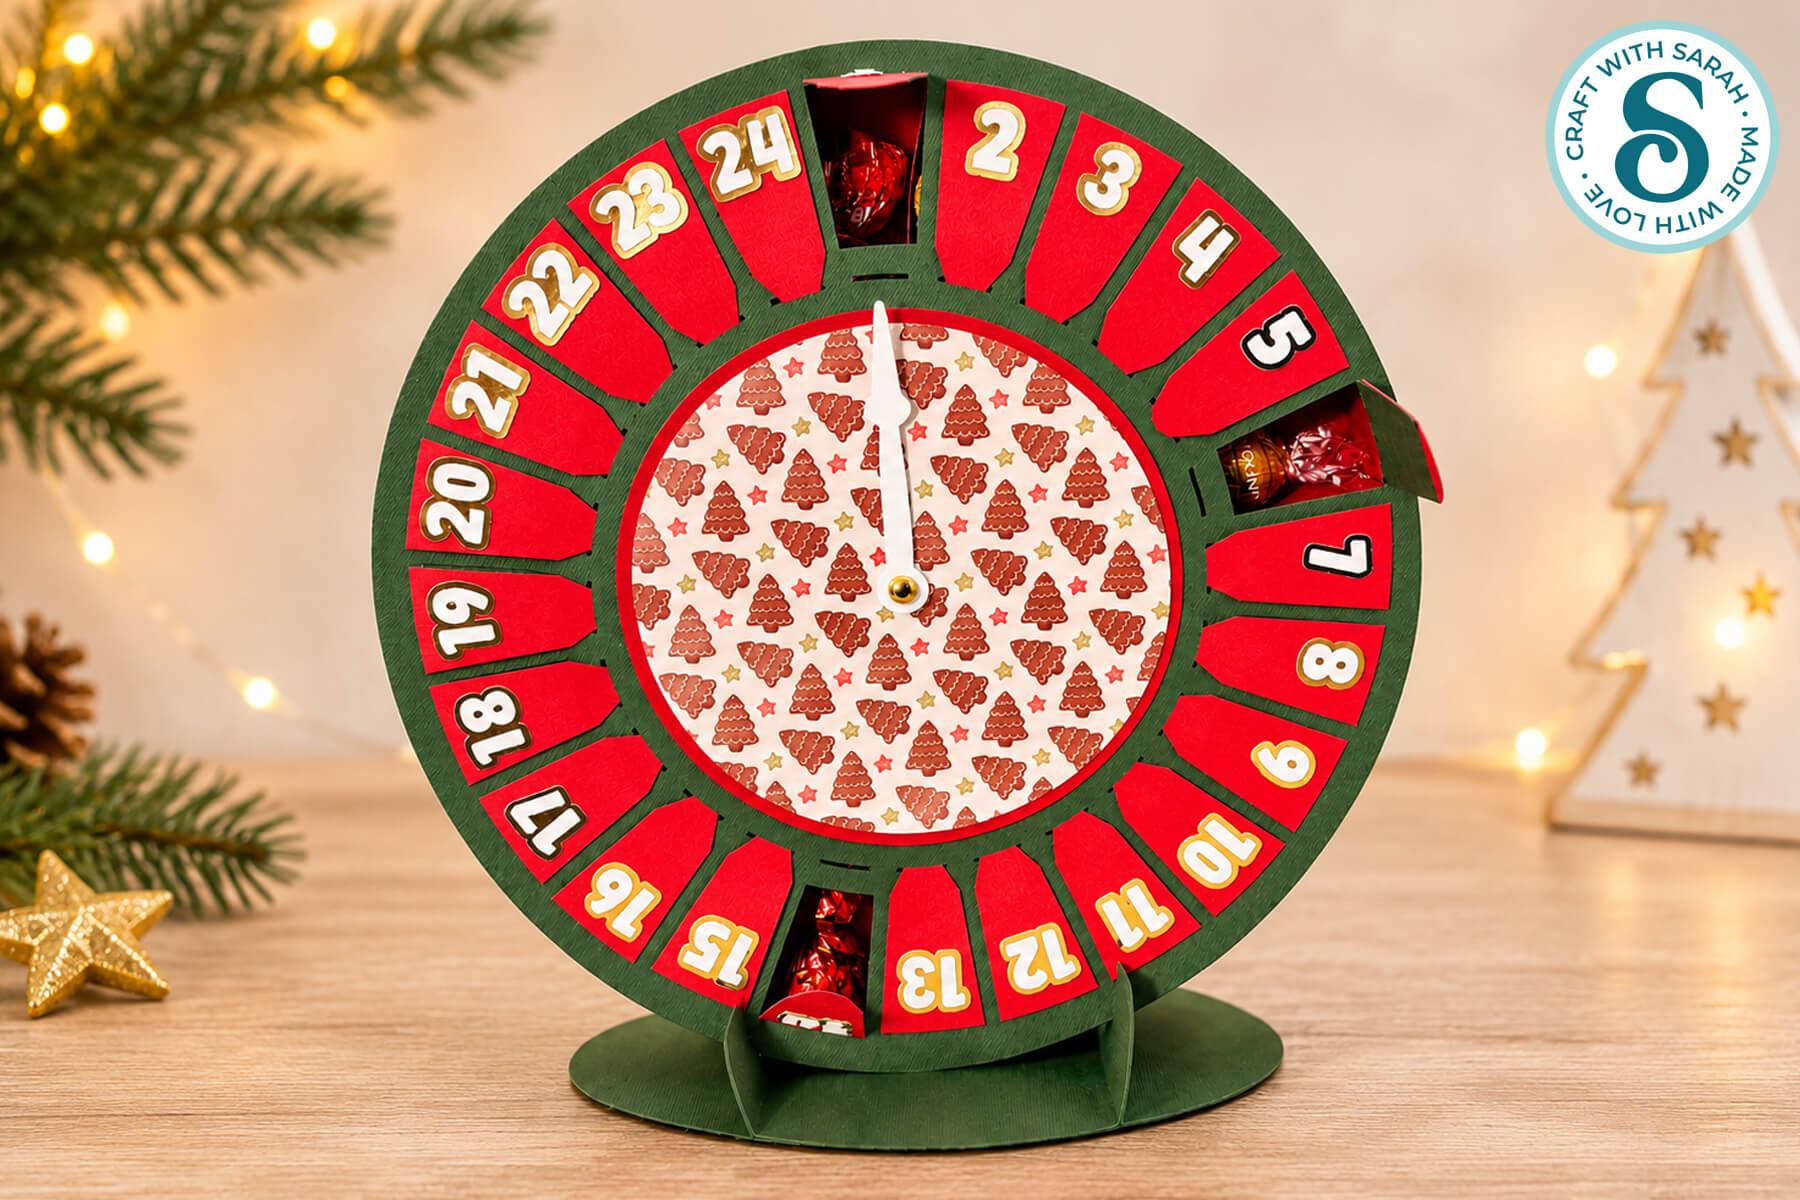
Make Christmas extra special with this fun chocolate-filled advent calendar made entirely from cardstock.
This circular advent calendar has 24 little compartments, each with a door that opens to reveal a tasty treat inside.
The numbers go all the way around the edge, with a rotating arrow in the middle to point to the day you’re on.
It’s a lovely alternative to a shop-bought advent calendar, and you can fill it with your favourite chocolates or other little treats.
I’ve used a selection of chocolates in mine so that there’s a surprise behind every door, but you could use the same type of chocolate for all 24 days if you prefer.
The design also includes a matching cardstock stand to keep the calendar upright on a shelf, mantelpiece or countertop.
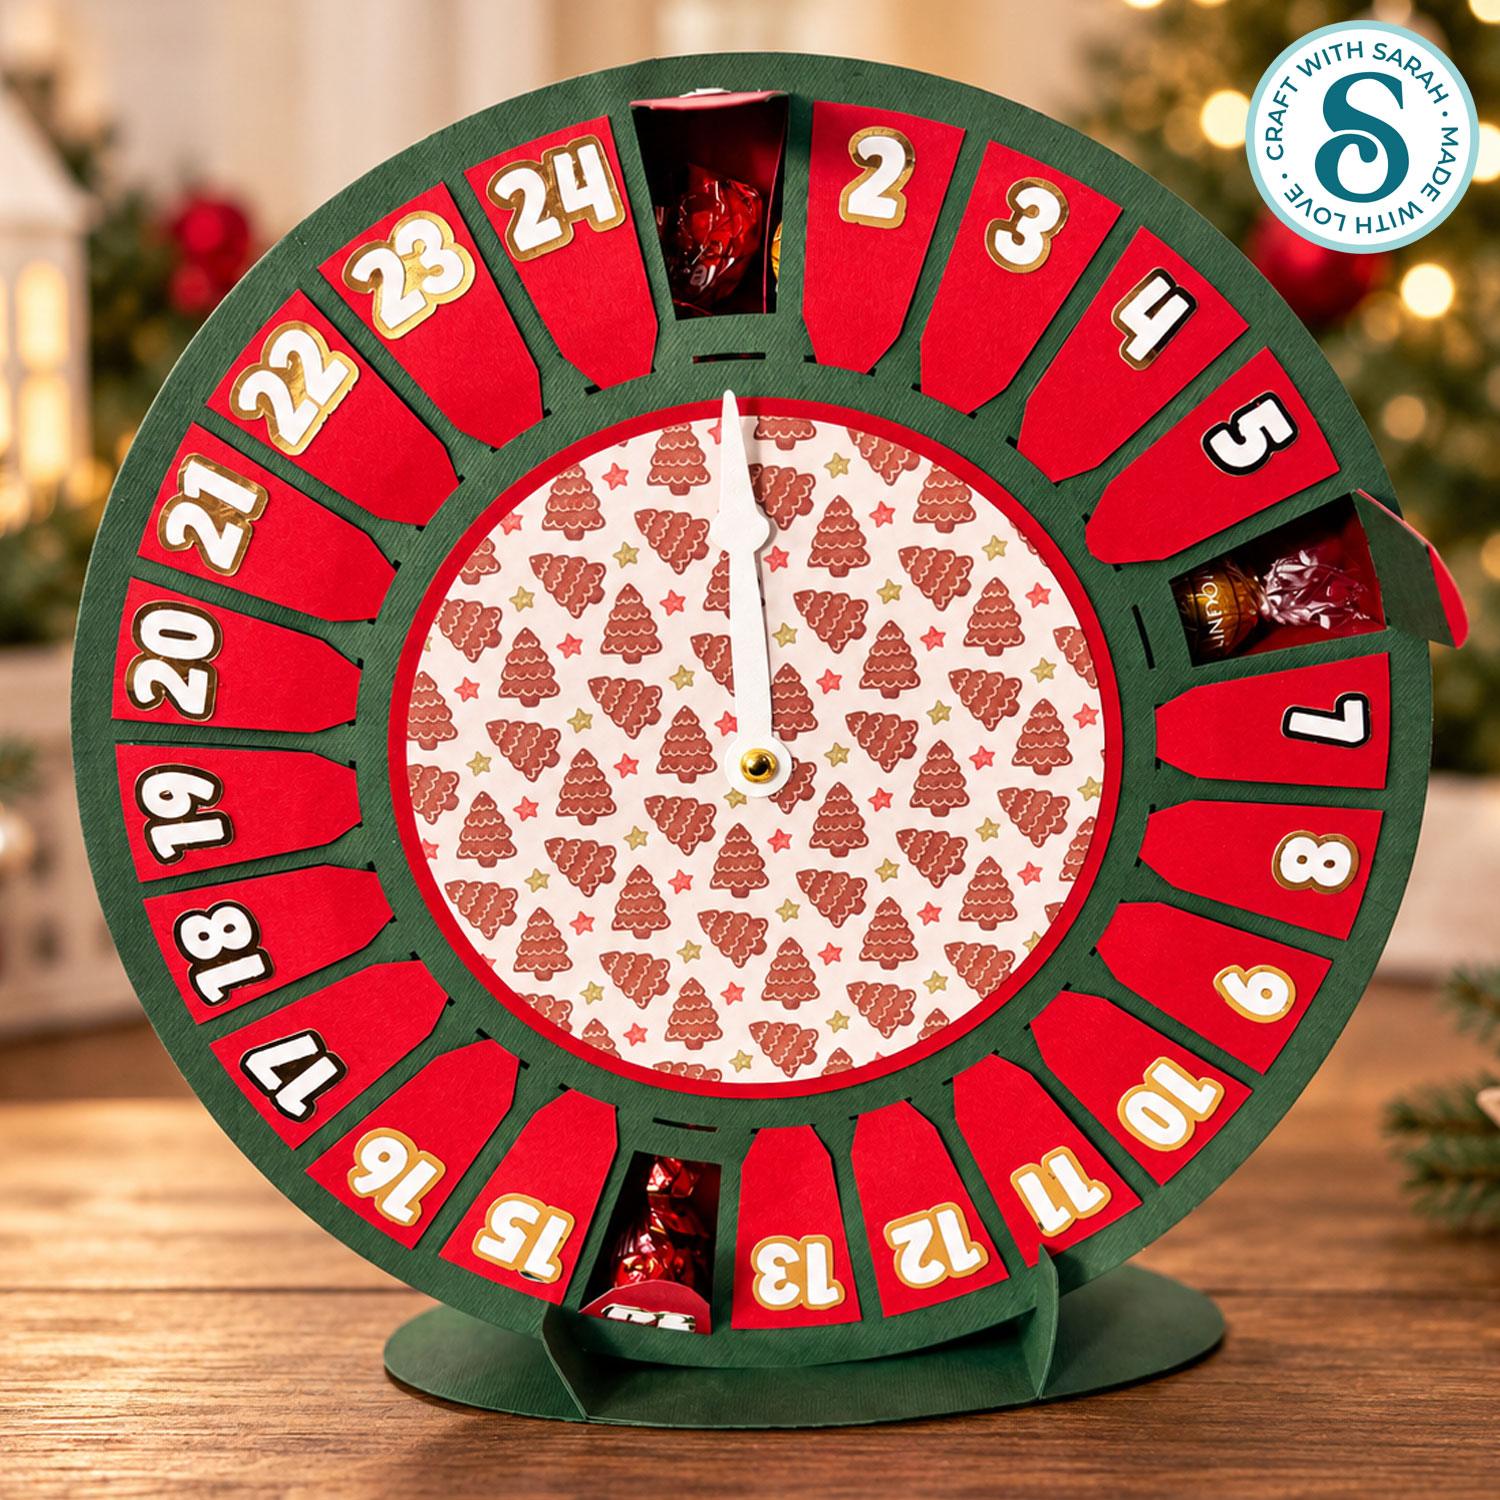
It’s quite a detailed papercraft project with lots of little pieces to put together, but the construction is fairly repetitive once you get started.
And the finished calendar is wonderfully sturdy, especially once it’s filled with chocolates!
Best of all, you can reuse it year after year by opening the little doors and refilling the compartments.
In this tutorial, I’ll show you how to prepare the SVG in Cricut Design Space, build the circular compartments, attach the numbered doors and make the matching display stand.
Note: This project is only suitable for making with digital cutting machines (e.g. a Cricut), therefore it does not come with a hand-cutting version.
This project is part of the 2026 Christmas Craft Countdown
Advent calendar supply list
Here is a list of the materials used to make this project.
Please note that some of the links included in this article are affiliate links, which means that if you click through and make a purchase I may receive a commission (at no additional cost to you). You can read my full disclosure at the bottom of the page.
- Cricut machine
- Light blue Cricut cutting mat
- Cricut scoring wheel or scoring stylus
- Coloured Card (any thickness) – you will need 12×12 inch cardstock for the largest pieces
- Glue (I like Bearly Art Glue and Collall)
- Patterned paper
- Cricut pen (any colour)
- Brad/split pin to make the arrow rotate
- 24 chocolates or other small fillers
This project is suitable for the following types of Cricut machines: Explore series and Maker series. It is too large to cut on the Joy Xtra, Joy or Joy 2.
Foundation learning
If you're new to making papercrafts with your cutting machine, check out these links to get you started.
They include videos on topics such as: which file to use with your type of cutting machine, how to load the files into your cutting machine's software, how to cut cardstock with your type of cutting machine, how to recolor and modify/customize the cut files and tips for displaying your projects.
- How to use zip folder downloads
- Help guides for Cricut machines
- Help guides for Silhouette machines
- Help guides for ScanNCut machines
The following tutorials are Cricut-specific, but many of the ideas will work similarly with a Silhouette or ScanNCut machine and any cut files that are shared in them are compatible with all types of cutting machine.
- How to score with a Cricut (even without scoring tools)
- Print then cut tutorial
- Design Space tools (Combine, Attach, Slice, Weld, Flatten, etc.)
- Pattern fill tutorial (for making backgrounds & cutting images to a specific shape/size)
- Free envelope SVGs that can be sized to fit any card
- Presentation boxes for handmade cards
- How to write inside cards with Cricut pens
- How to cut layered designs at a small size
- Design Space tips & tricks
- Cricut pens tutorial
- How to mount multiple designs in the same frame with magic guides
DIY advent calendar craft video tutorial
Watch the video below to see how to make this project. Keep scrolling for a written tutorial.
Written tutorial (with photos!)
Here’s how to make this Christmas advent calendar project using a Cricut machine.
Step 1) Download the cutting file & upload to Design Space
Get the files using the box below.

Before you upload the SVGs to Design Space, you need to unzip the download folder that they come in.
Not sure how to do this? Click here for a tutorial that covers all the following types of computer and device:
- How to unzip a folder on a Windows computer
- How to unzip a folder on a Mac
- How to unzip a folder on an iPad
- How to unzip a folder on an iPhone
- How to unzip a folder on an Android device
After unzipping, upload the SVG file(s) into your cutting machine software.
Not sure how to use cut files with your type of machine? The following links lead to tutorials on how to use cut files in:
- Cricut Design Space
- Silhouette Studio
- CanvasWorkspace (for ScanNCut machines)
If you are using Cricut Design Space, start a new project and then click the “Upload” button on the left of the screen.
You can then either click “Browse” to find the file on your computer, or drag-and-drop it.
Select the file in the “01 Cricut Version” subfolder called svg-circular-advent-calendar-craftwithsarah.svg
Press “Upload” on the next screen.
After uploading, the design should be automatically inserted onto your Canvas.
Hide the left sidebar to give you more space on the screen by clicking the arrow that’s about half way down the page.
If the design doesn’t get inserted onto your Canvas, it will show under “Uploads” in your “Recently Uploaded Images”. Click on it and then press “Add to Canvas” to put it onto your Project.
Need help uploading SVGs? Get step-by-step instructions here in our detailed help guides for Cricut, Silhouette and ScanNCut.
Step 2) Prepare the project for cutting
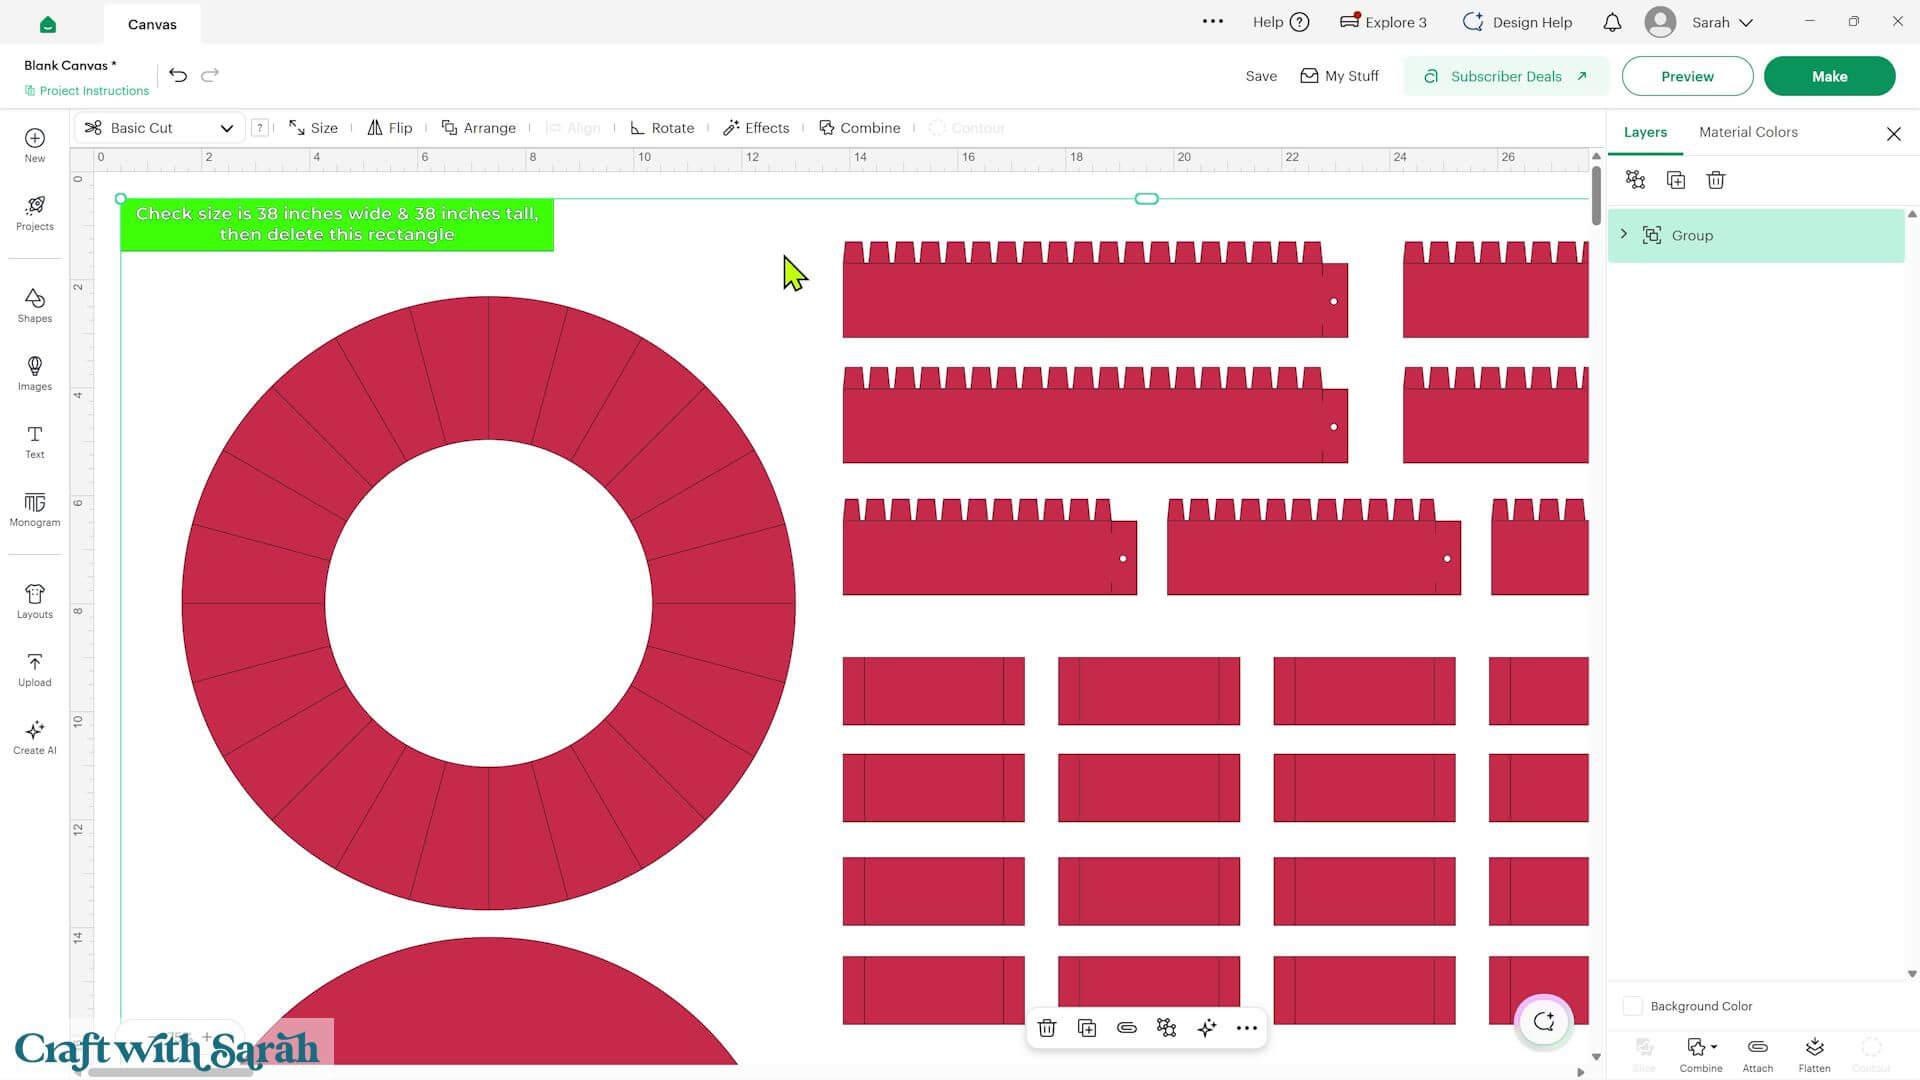
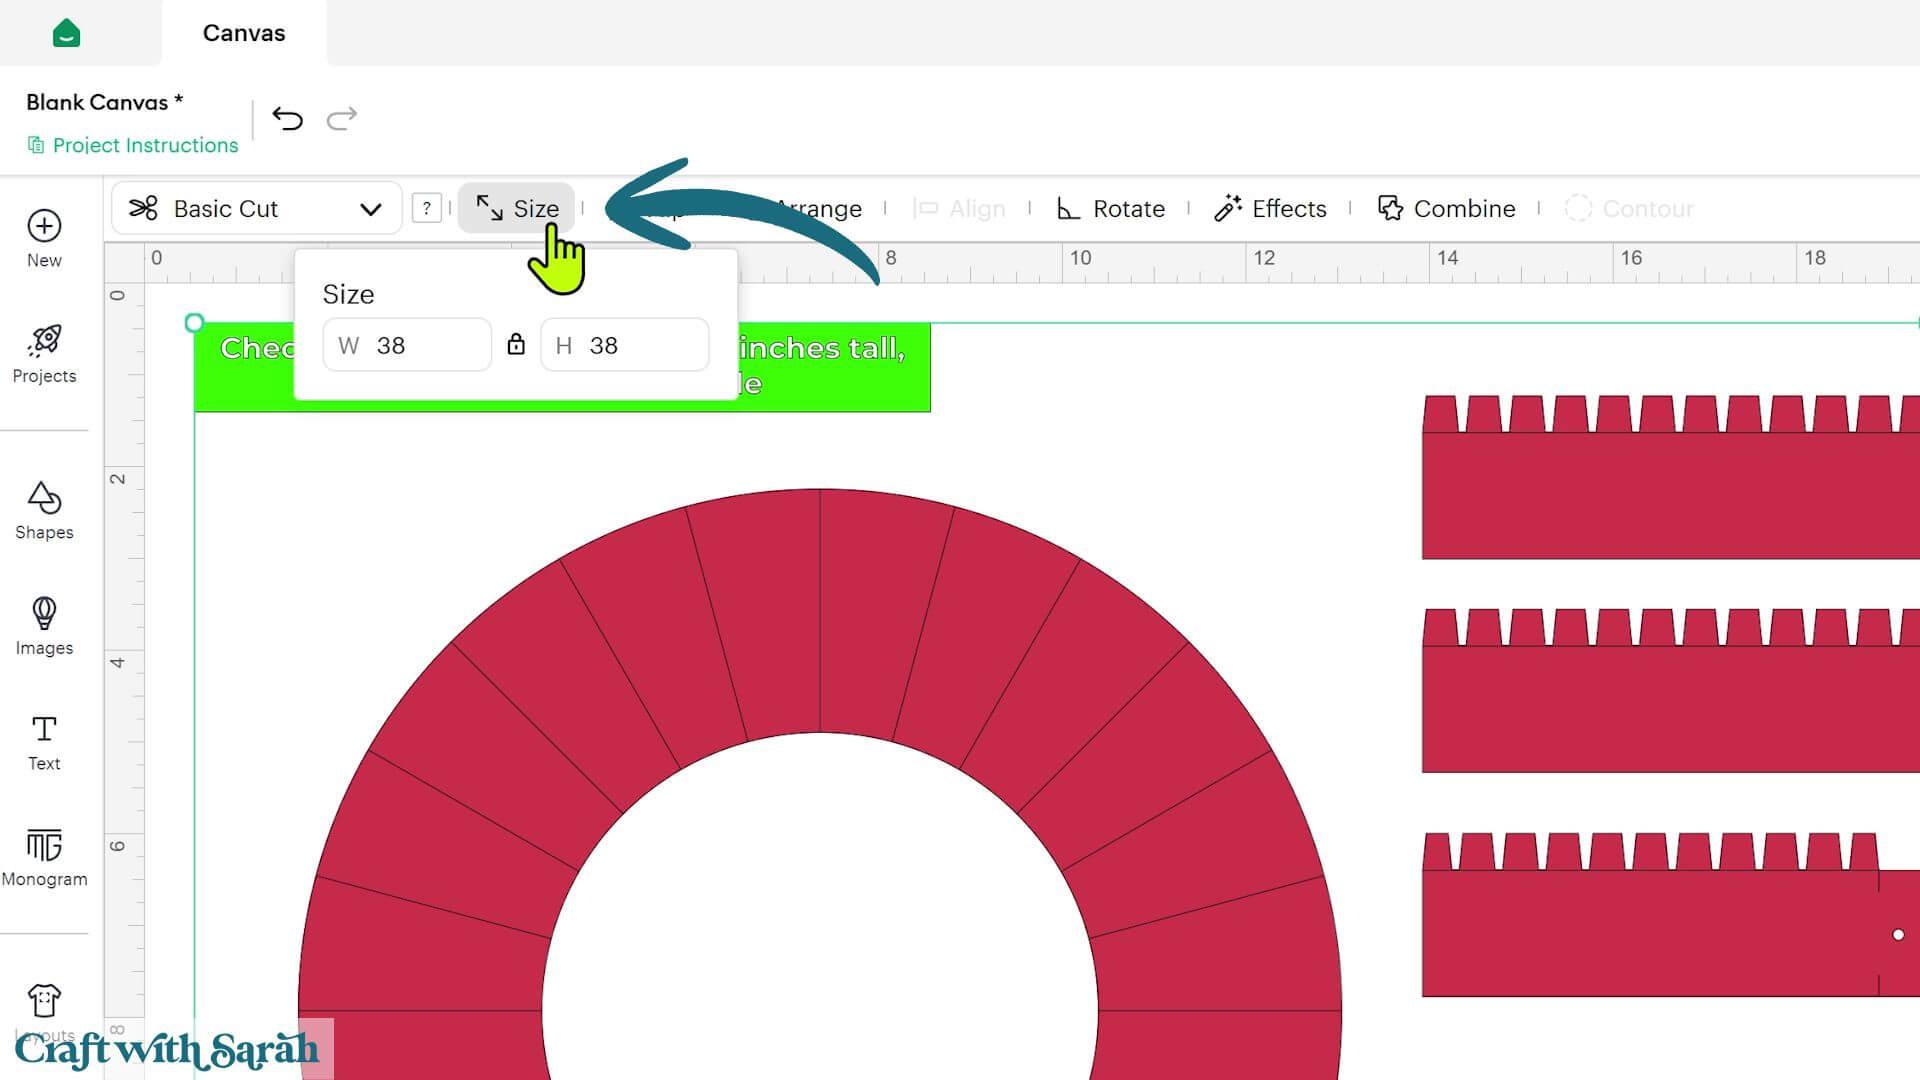
The complete SVG should load into Cricut Design Space at 38 inches wide by 38 inches tall.
You’ll see these measurements in the green size guide towards the top-left of the design.
Click on the whole design and check the measurements in the ‘Size’ boxes along the top of the screen.
If yours are different, change them to match.
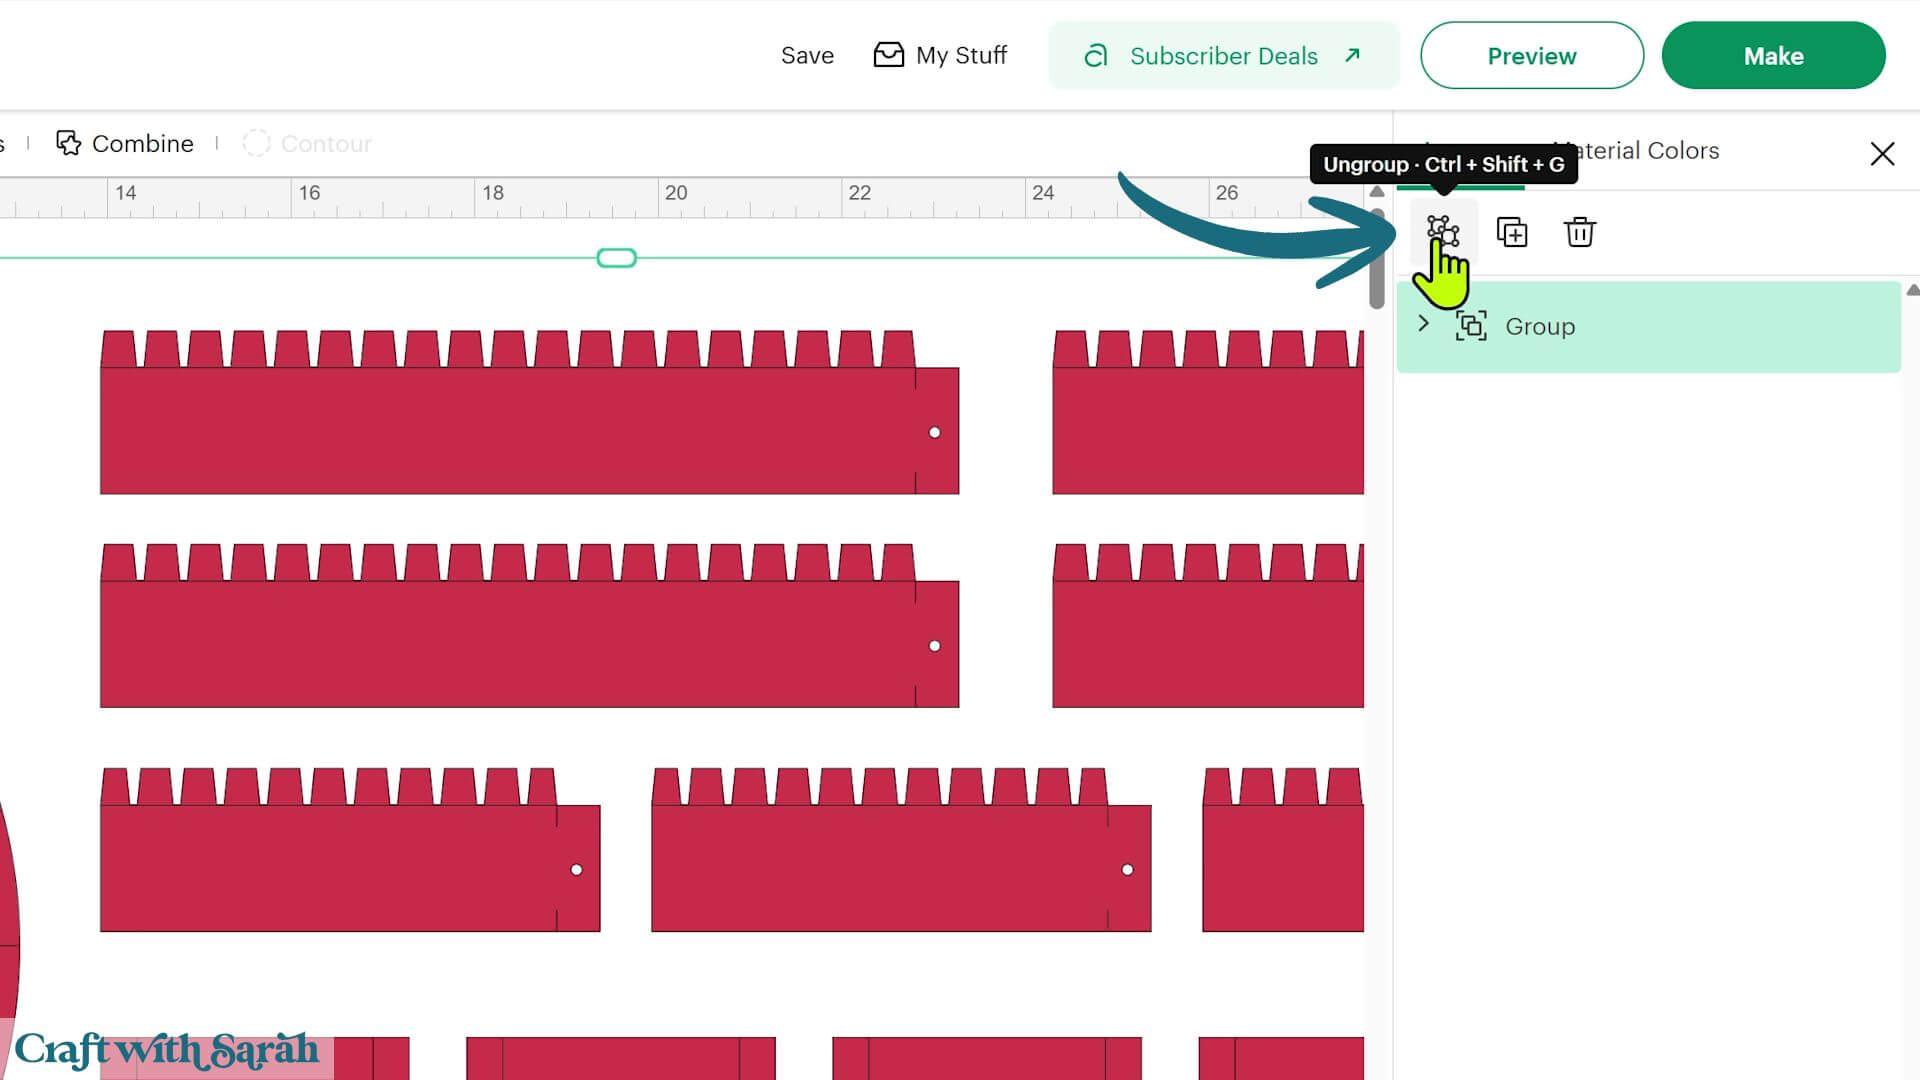
Next, click ‘Ungroup’ at the top of the Layers panel to separate the pieces.
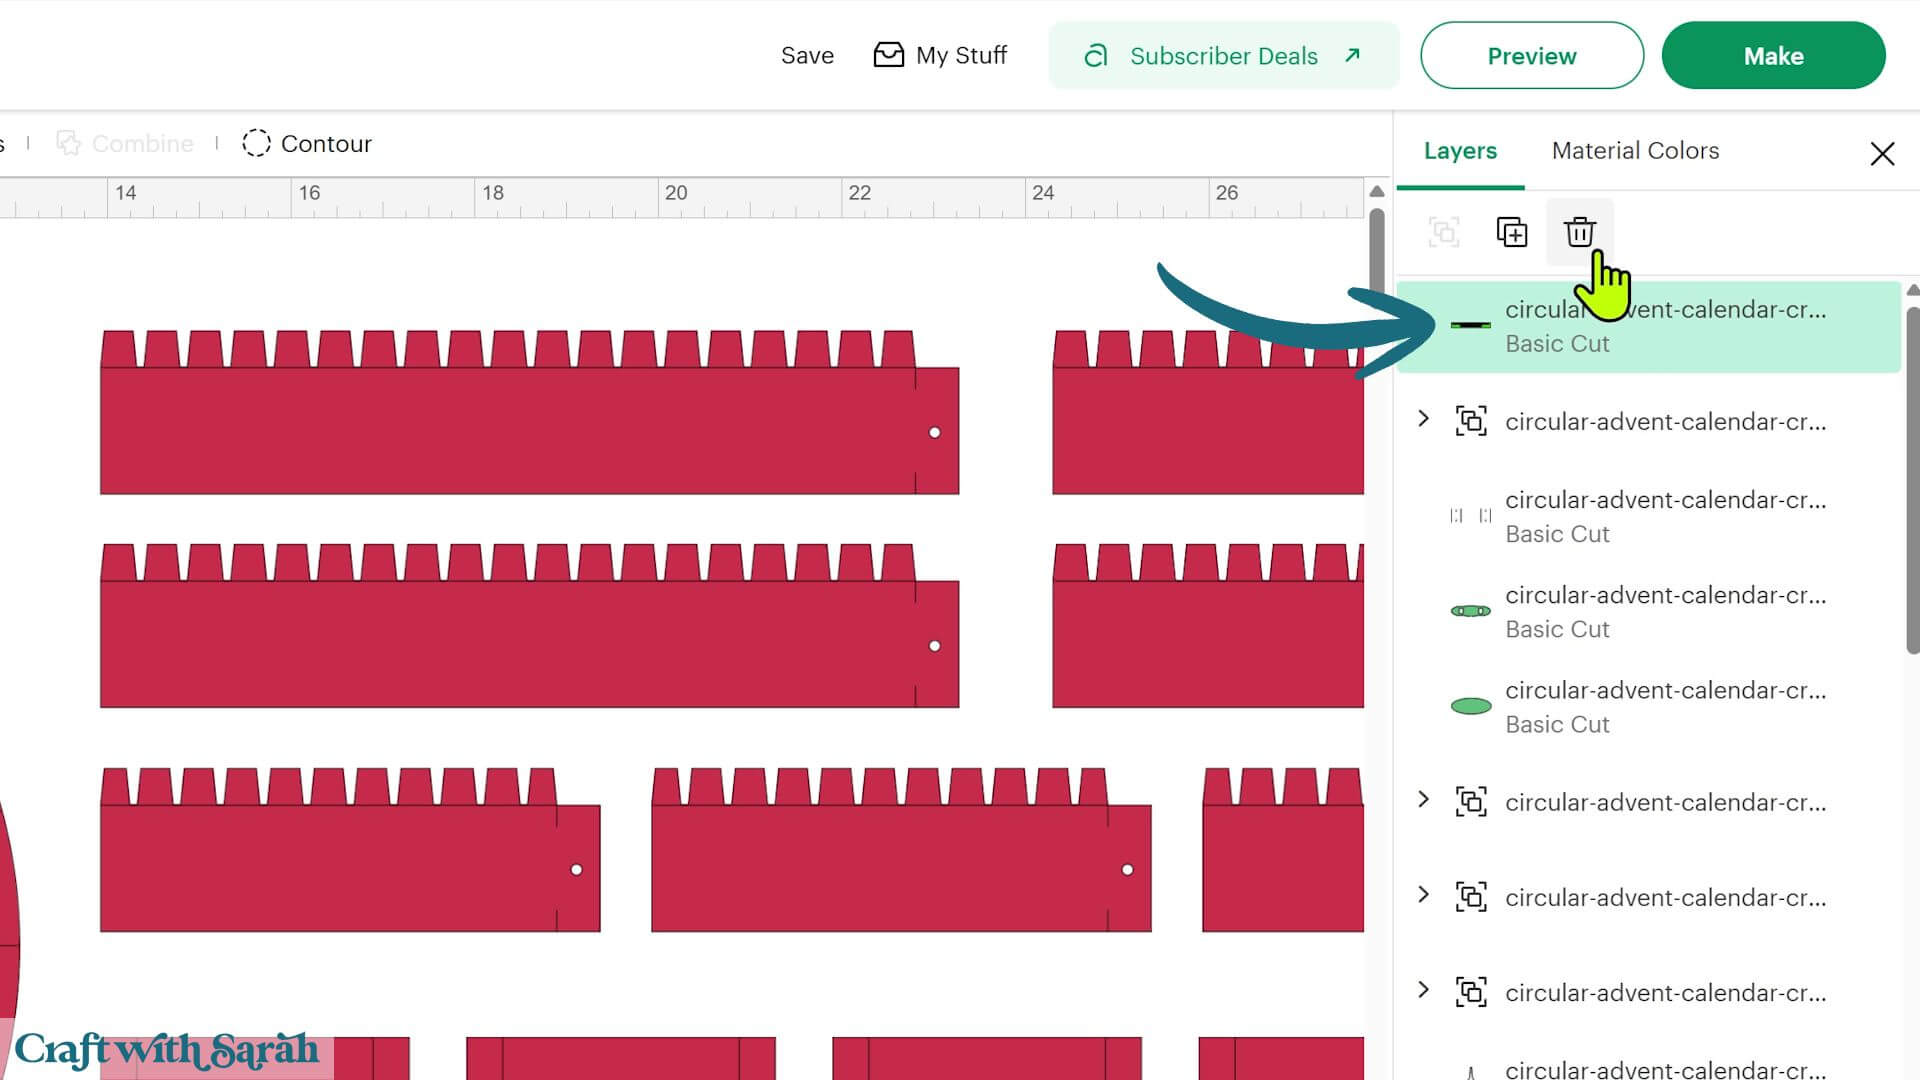
Find the green size guide at the top of the Layers panel and delete it.
We don’t want to accidentally cut that piece from cardstock.
Now we’re ready to format the drawing and score lines.
Start with the large red circle on the left-hand side of the design.
You’ll see lots of thin lines running around the circle.
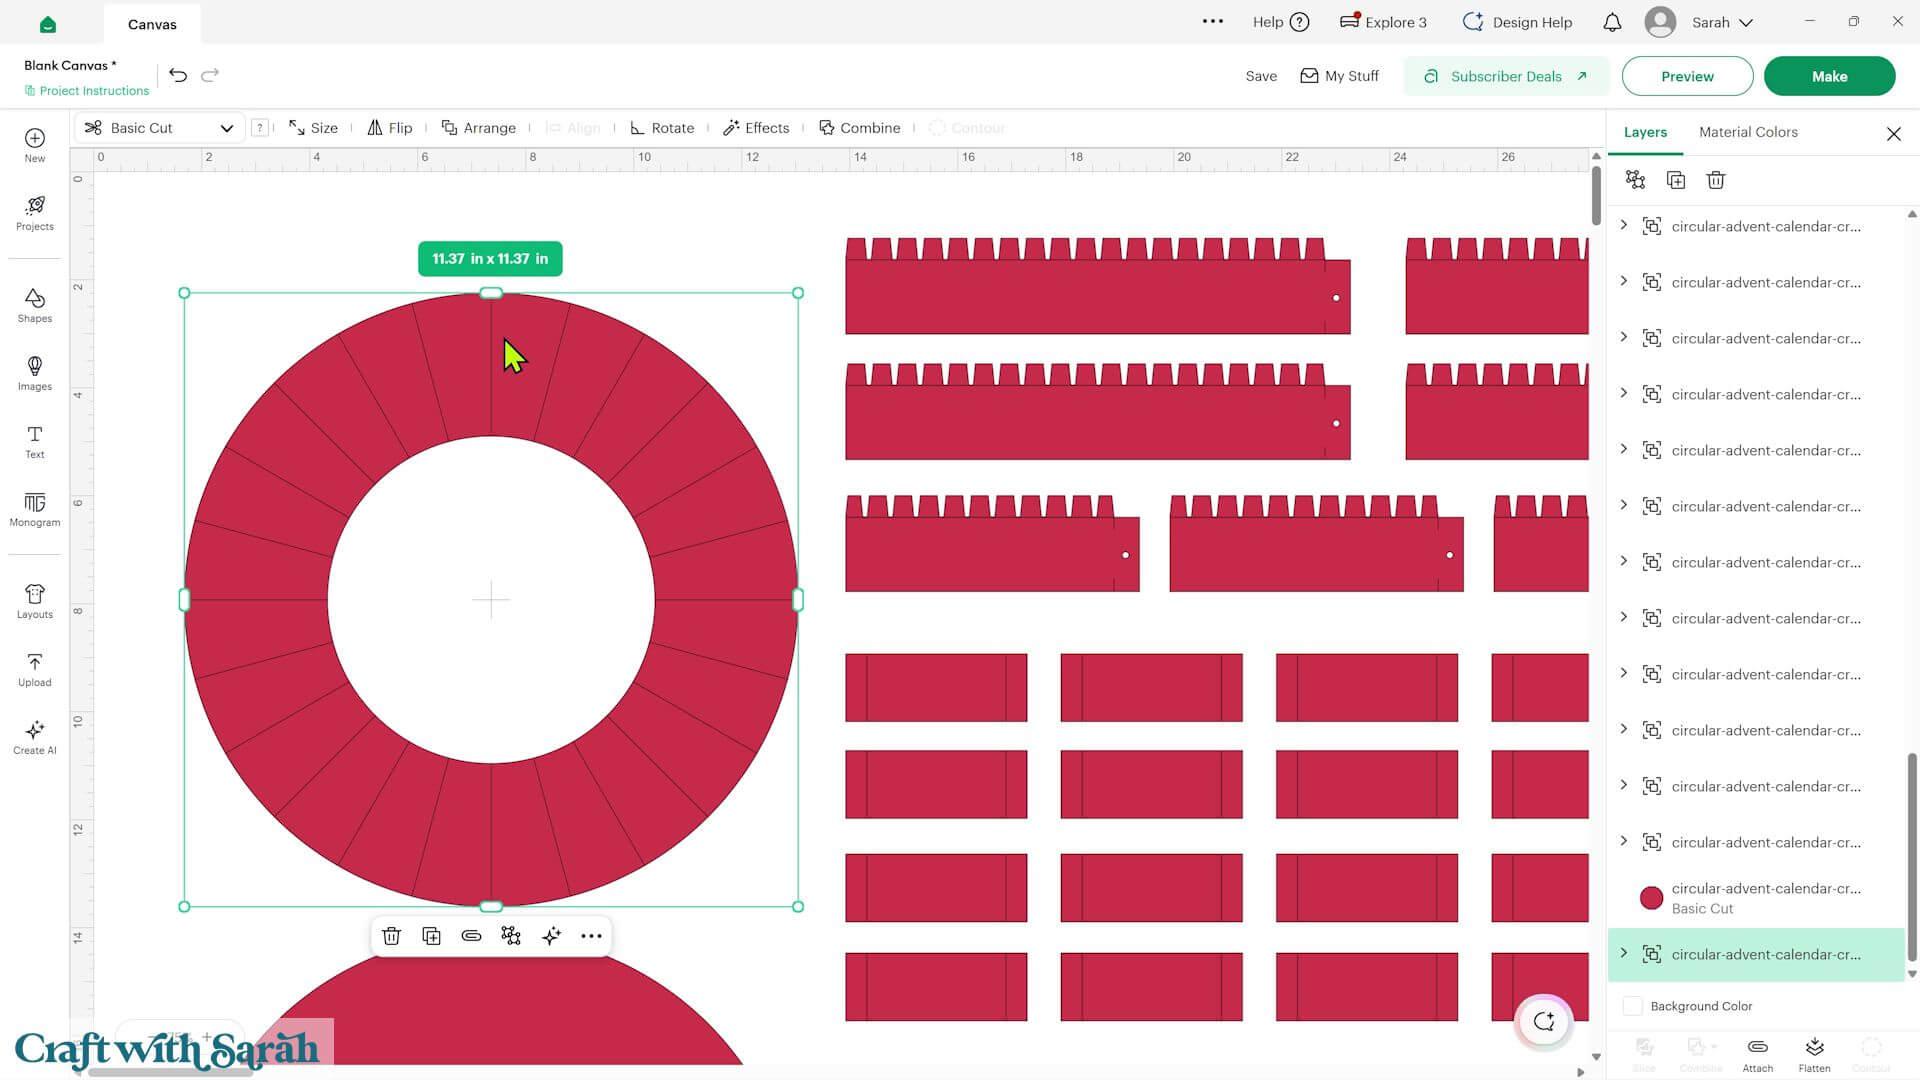
These are the guidelines that will show us where to position the 24 dividers inside the calendar.
Click on the circle and find its group in the Layers panel.
Click the chevron arrow to open the group.
Inside, you’ll see the red circle and a separate layer containing all the lines.
Select just the layer with the lines.
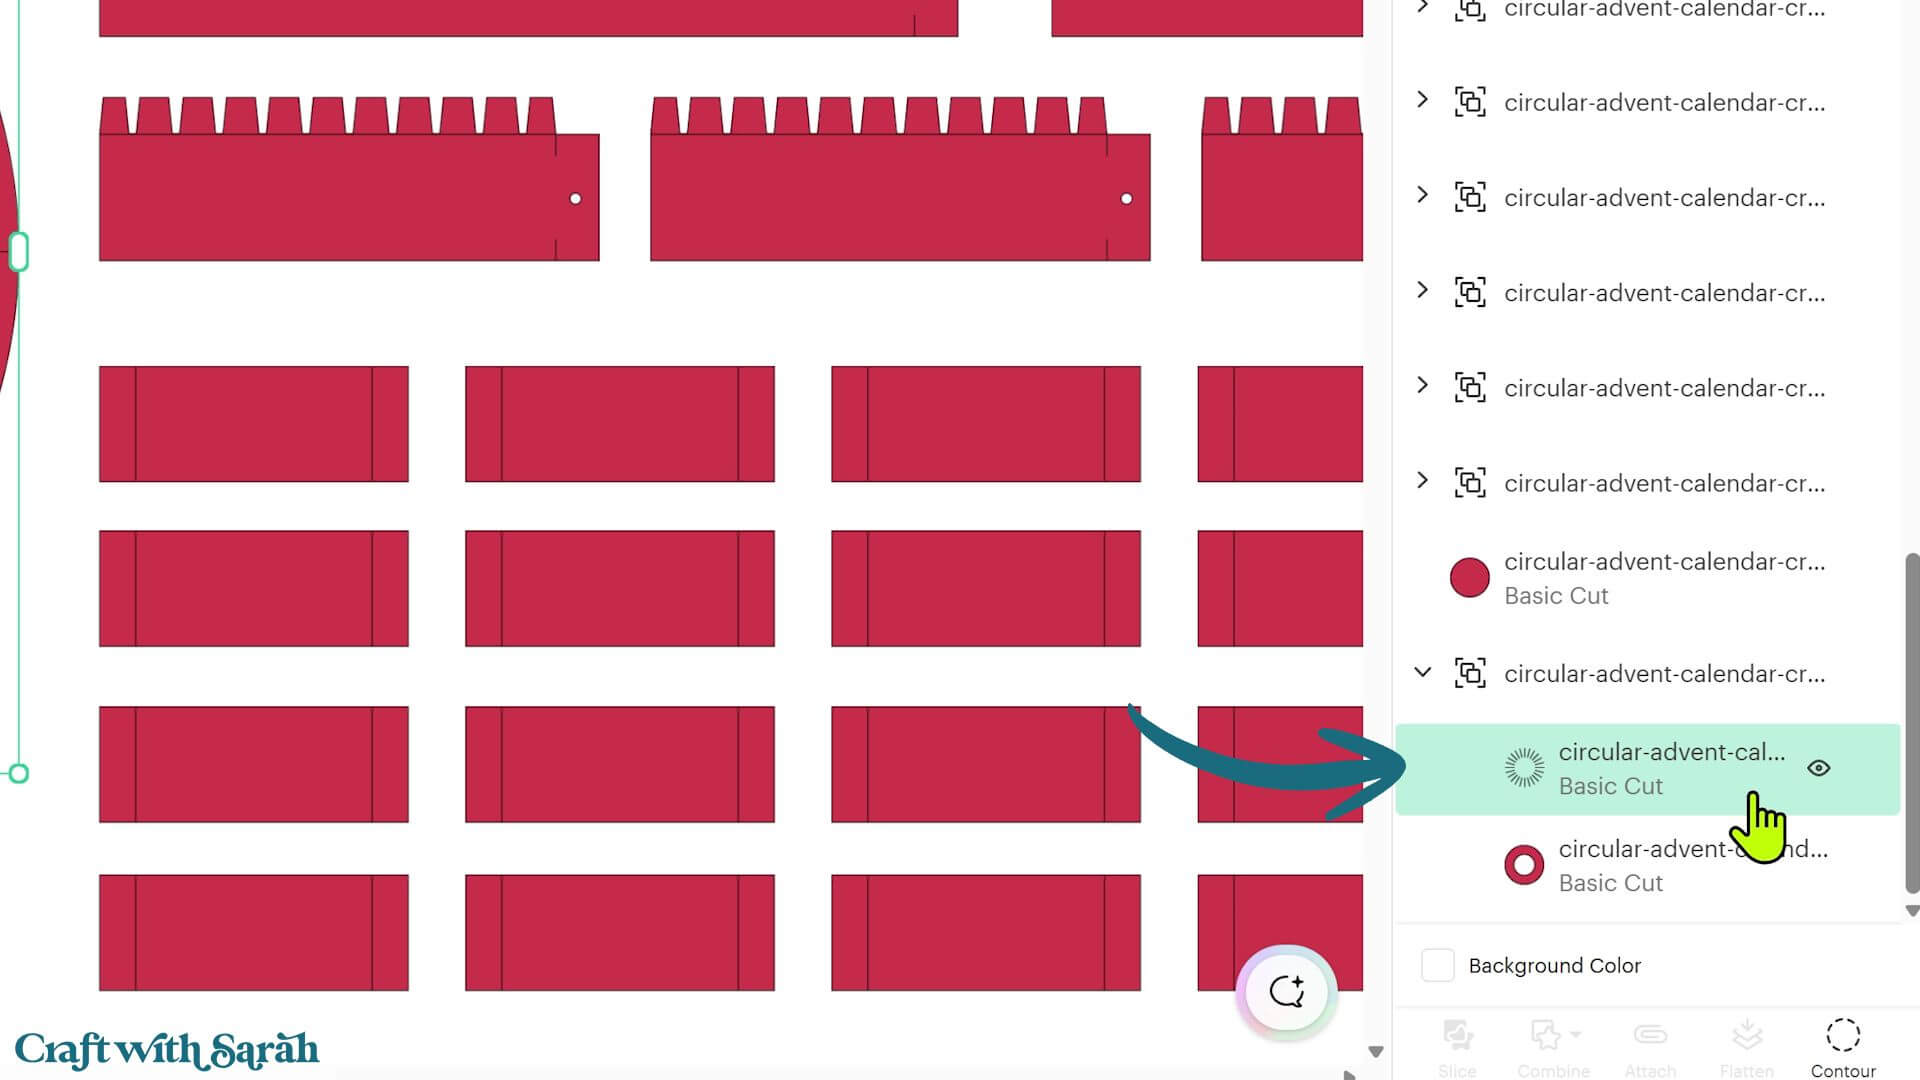
Go into the ‘Operations’ dropdown along the top of the screen and change it to ‘Pen’.
You can choose whichever Cricut pen you have available. The colour doesn’t matter because these lines will be hidden inside the finished project.
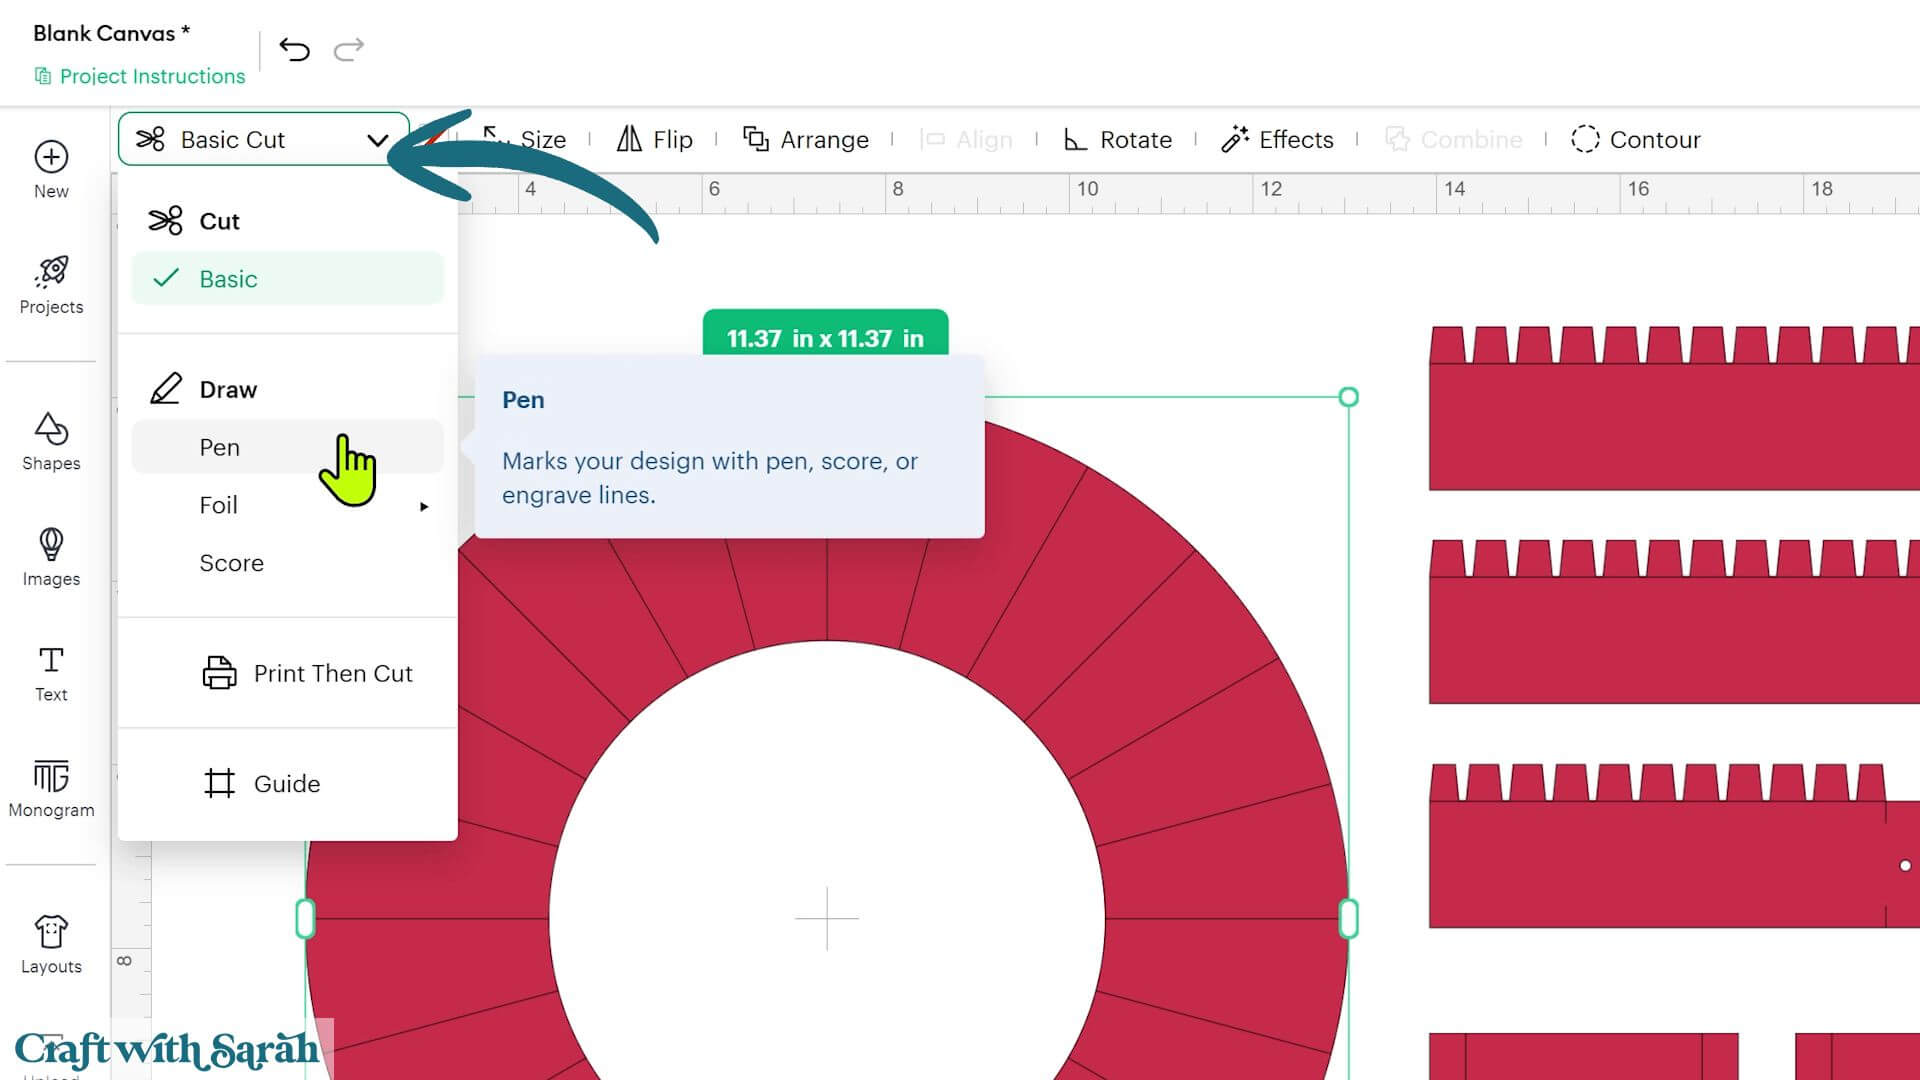
If you don’t have a pen, you could change the lines to ‘Score’ instead.
However, I prefer using a pen because it doesn’t leave an indentation in the cardstock underneath.
Next, select the whole group so that both the red circle and the drawing lines are selected.
Click ‘Attach’ at the bottom of the Layers panel.
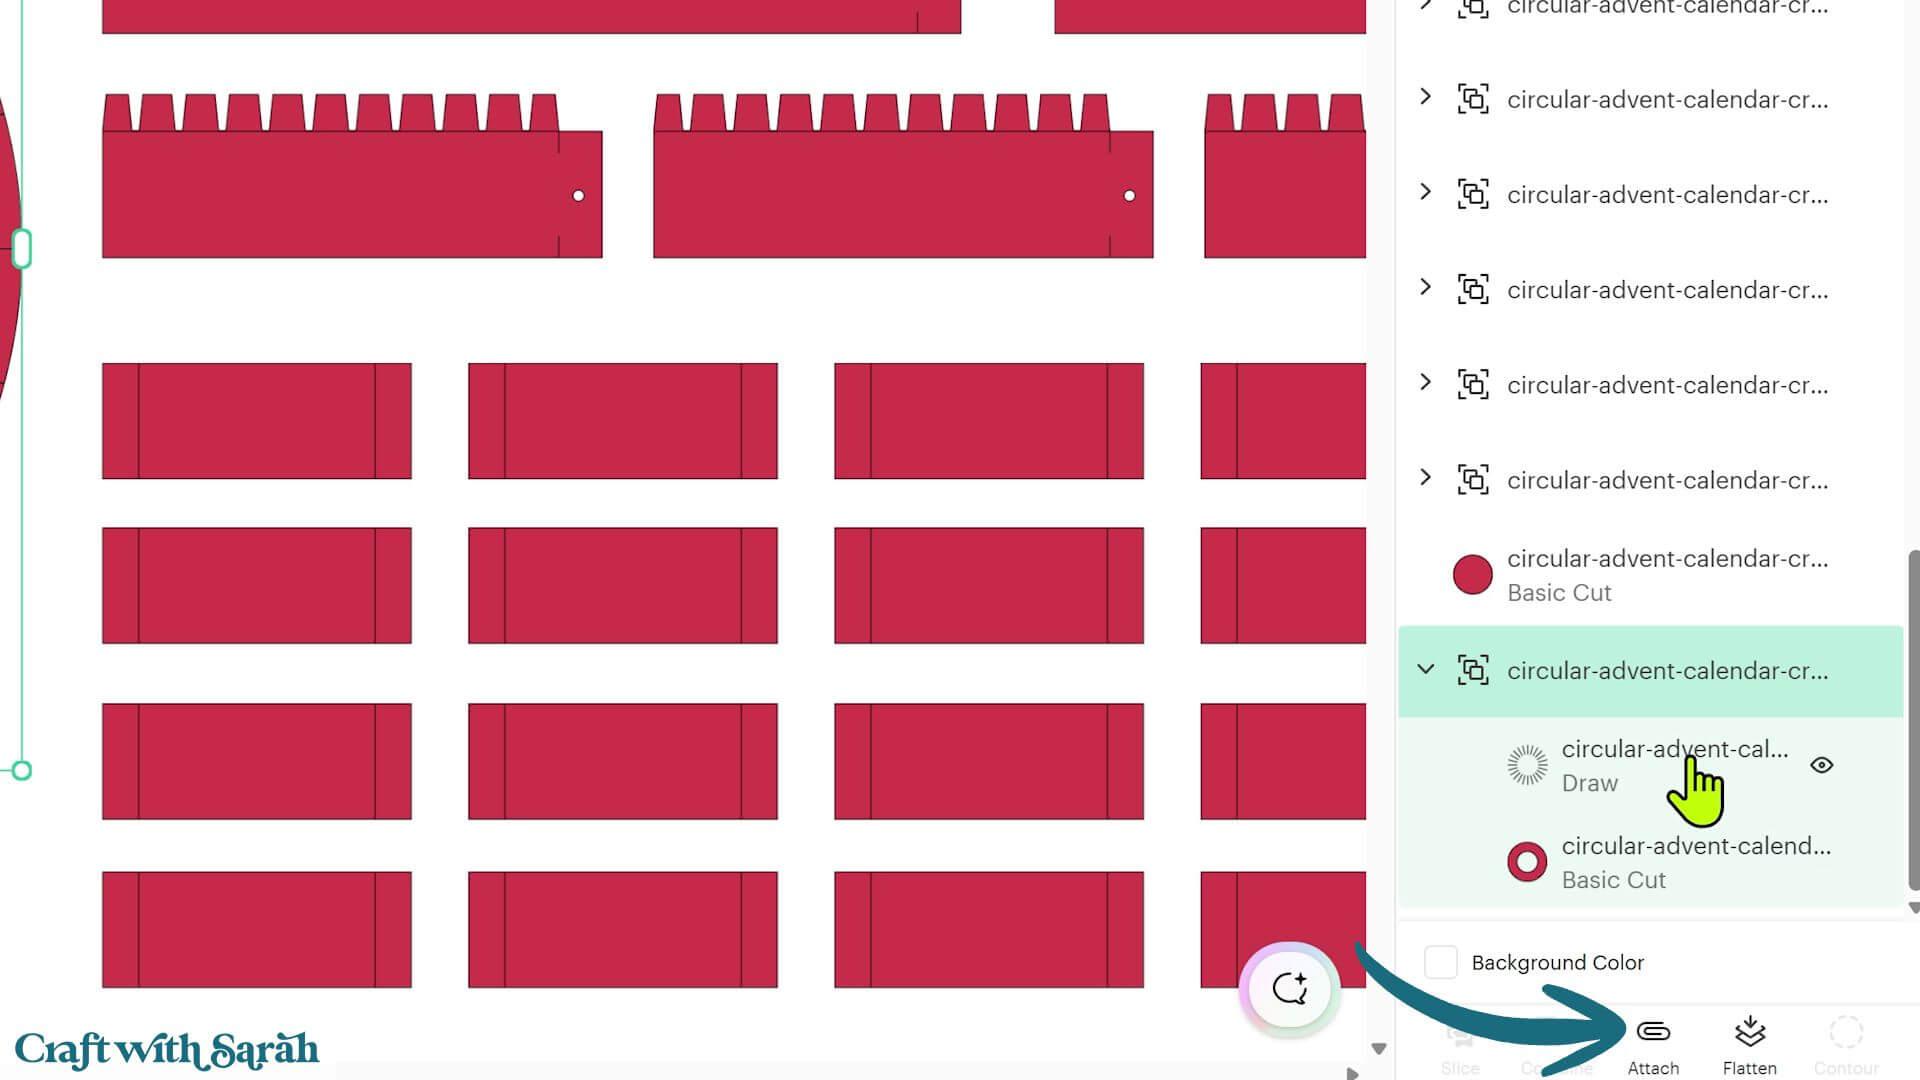
‘Attach’ tells your Cricut to draw those lines in exactly the correct positions on the circle.
There are quite a few score lines in this project, so we’ll work through them in sections.
Start with the red strips near the top-right of the design.
These have lots of small “crocodile teeth” tabs along one edge.
Click on one of the strips and find its group in the Layers panel.
Open the group using the chevron arrow.
Inside, you’ll see the main red cardstock shape and a line layer on top.
Select just the line layer.
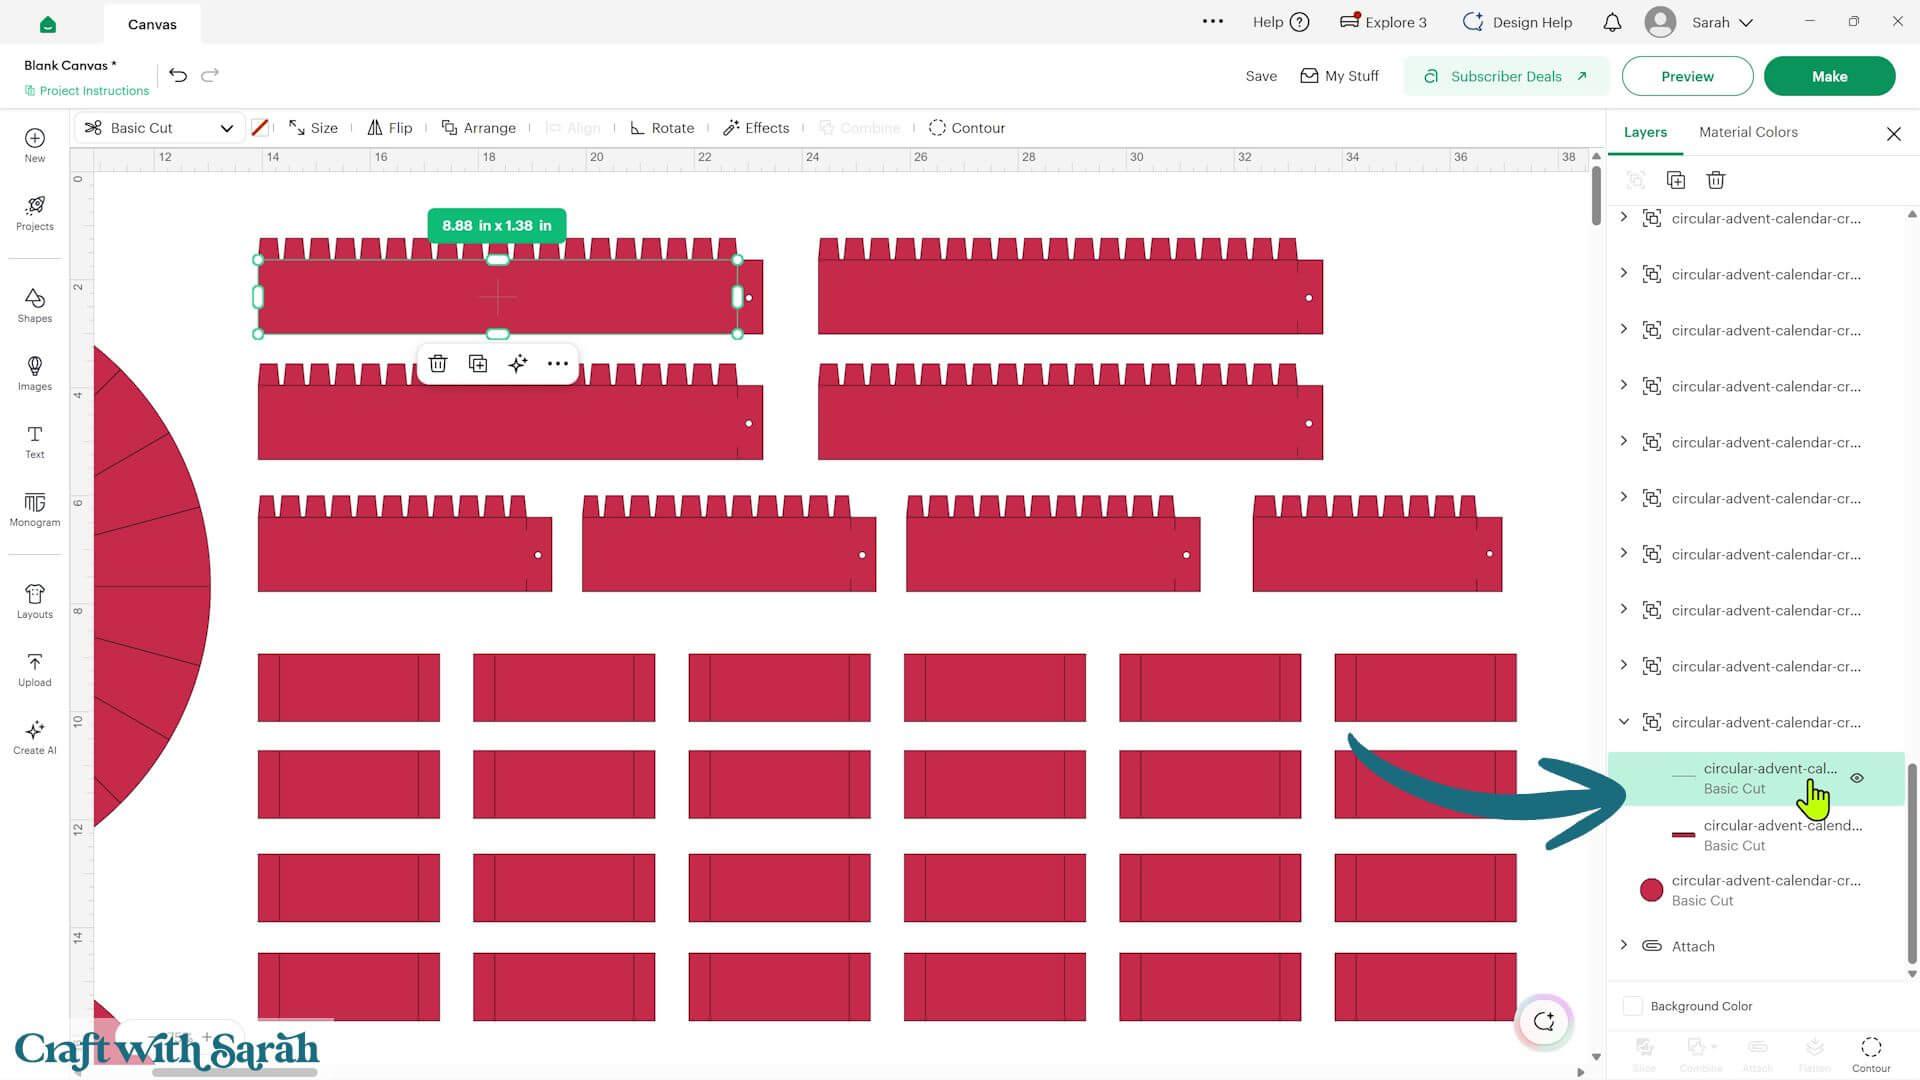
Go into the ‘Operations’ dropdown and change it to ‘Score’.
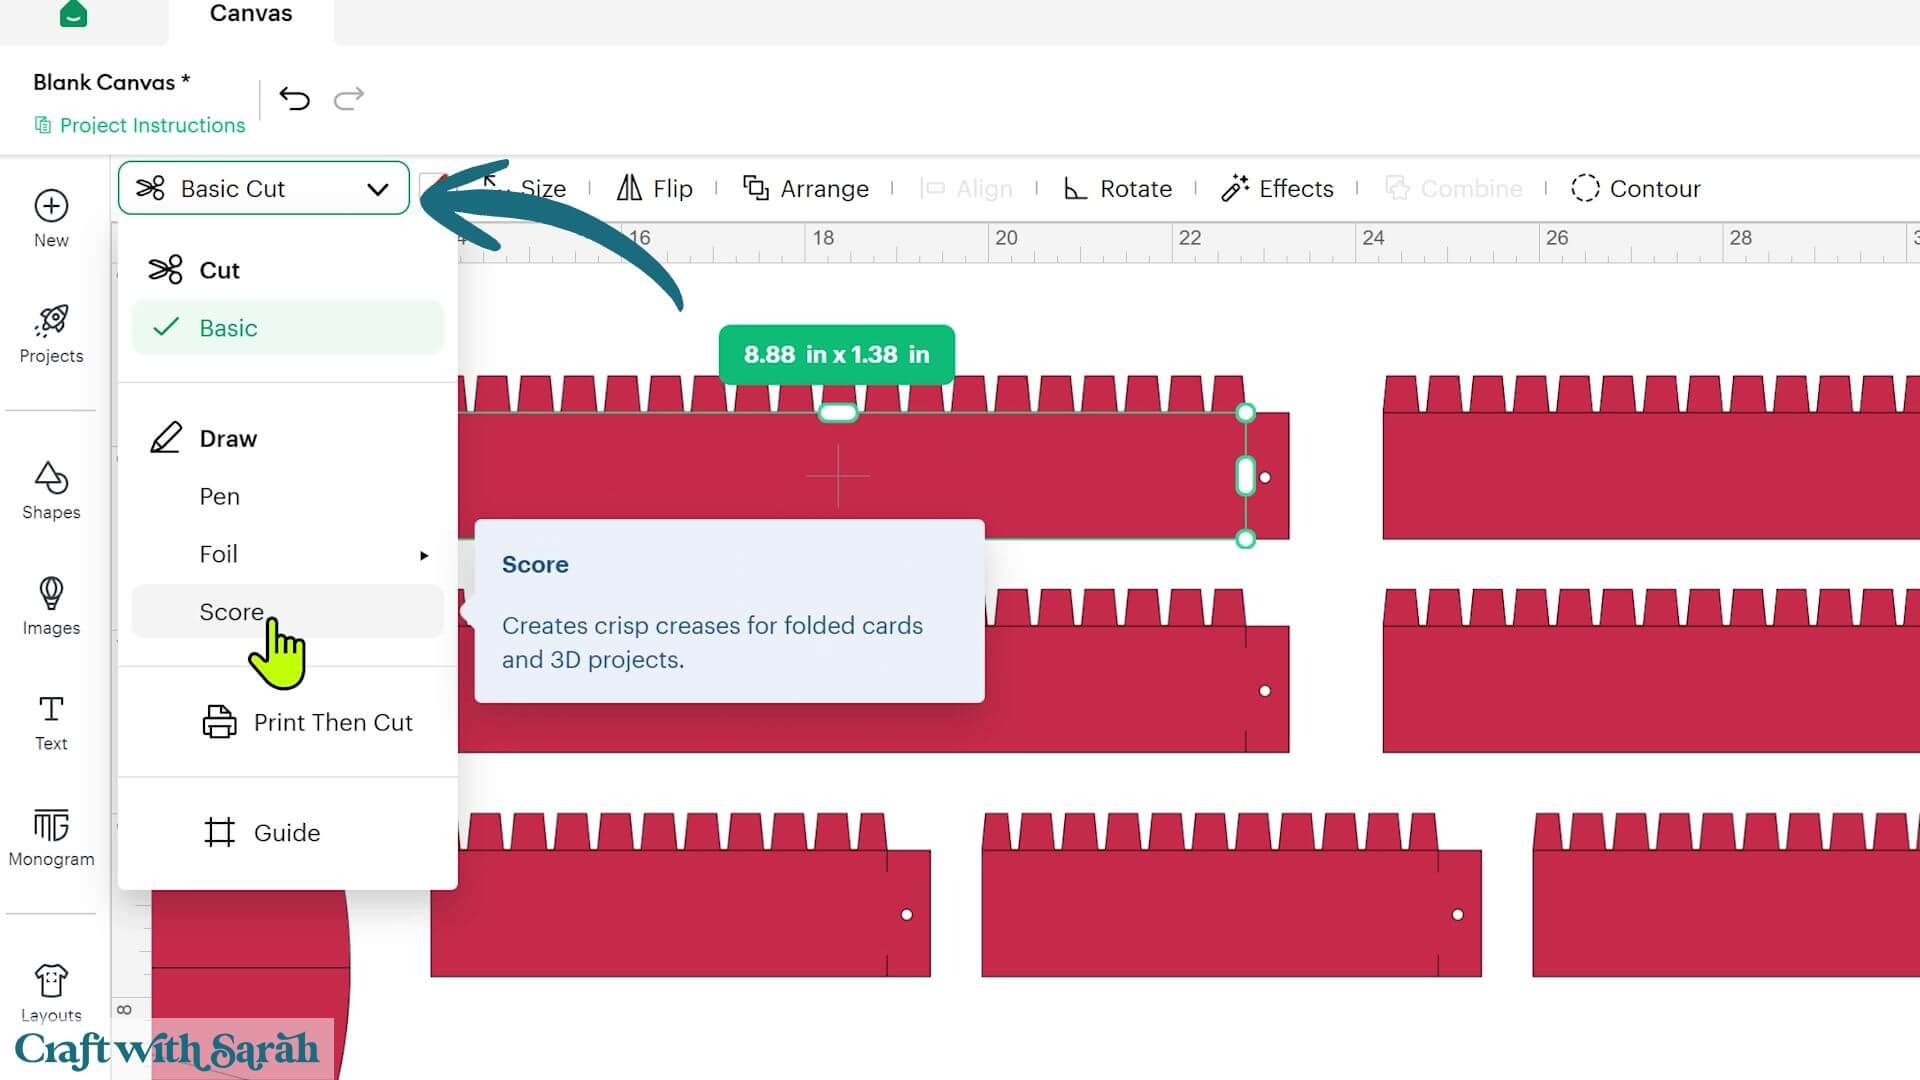
Then select the whole group and click ‘Attach’.
Repeat this process for all the other red strips.
These pieces will form the inner and outer walls of the advent calendar base.
Underneath the red strips, you’ll see 24 identical pieces.
These will become the dividers between the chocolates.
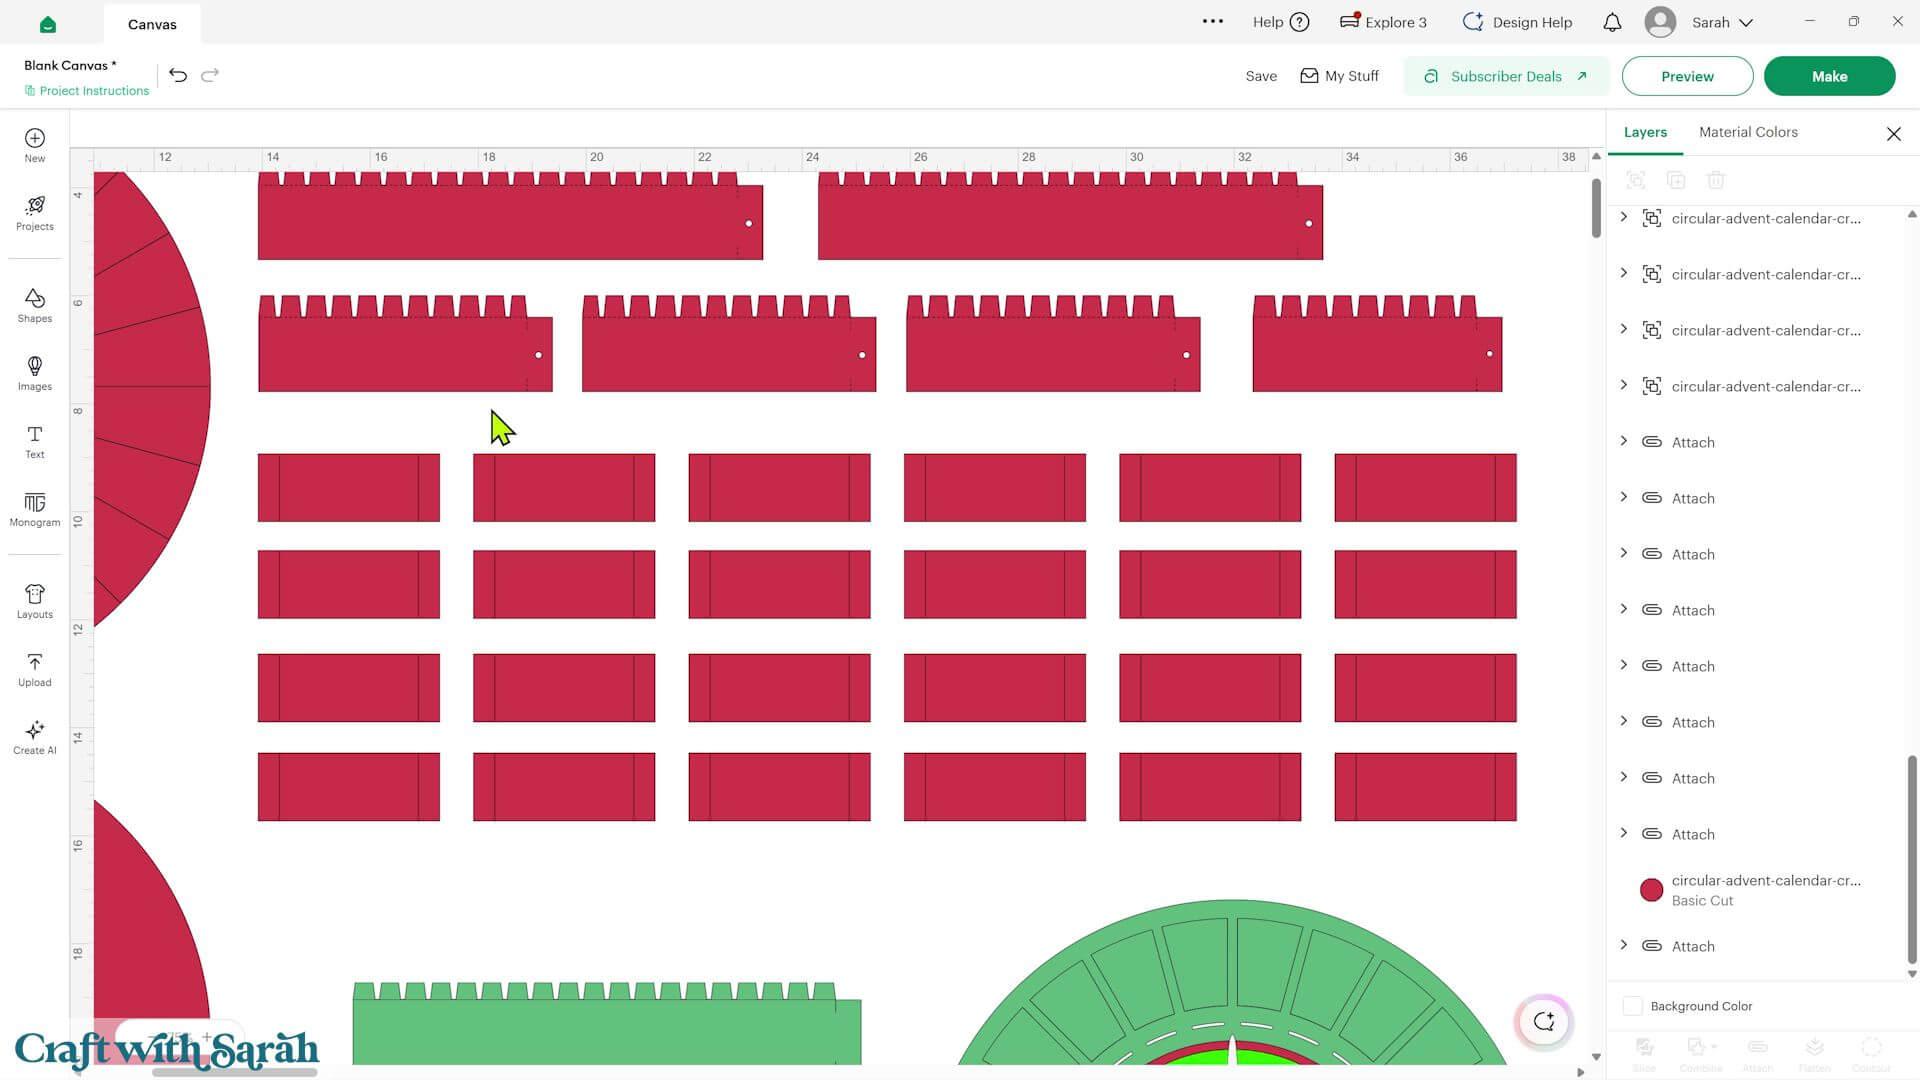
Each one needs score lines so that the tabs can fold in opposite directions.
You could format all 24 individually, but there’s a much quicker way.
Delete all but one of the divider pieces.
Click on the remaining piece and open its group in the Layers panel.
Select the score line layer and change its operation to ‘Score’.
Then select the whole group and click ‘Attach’.
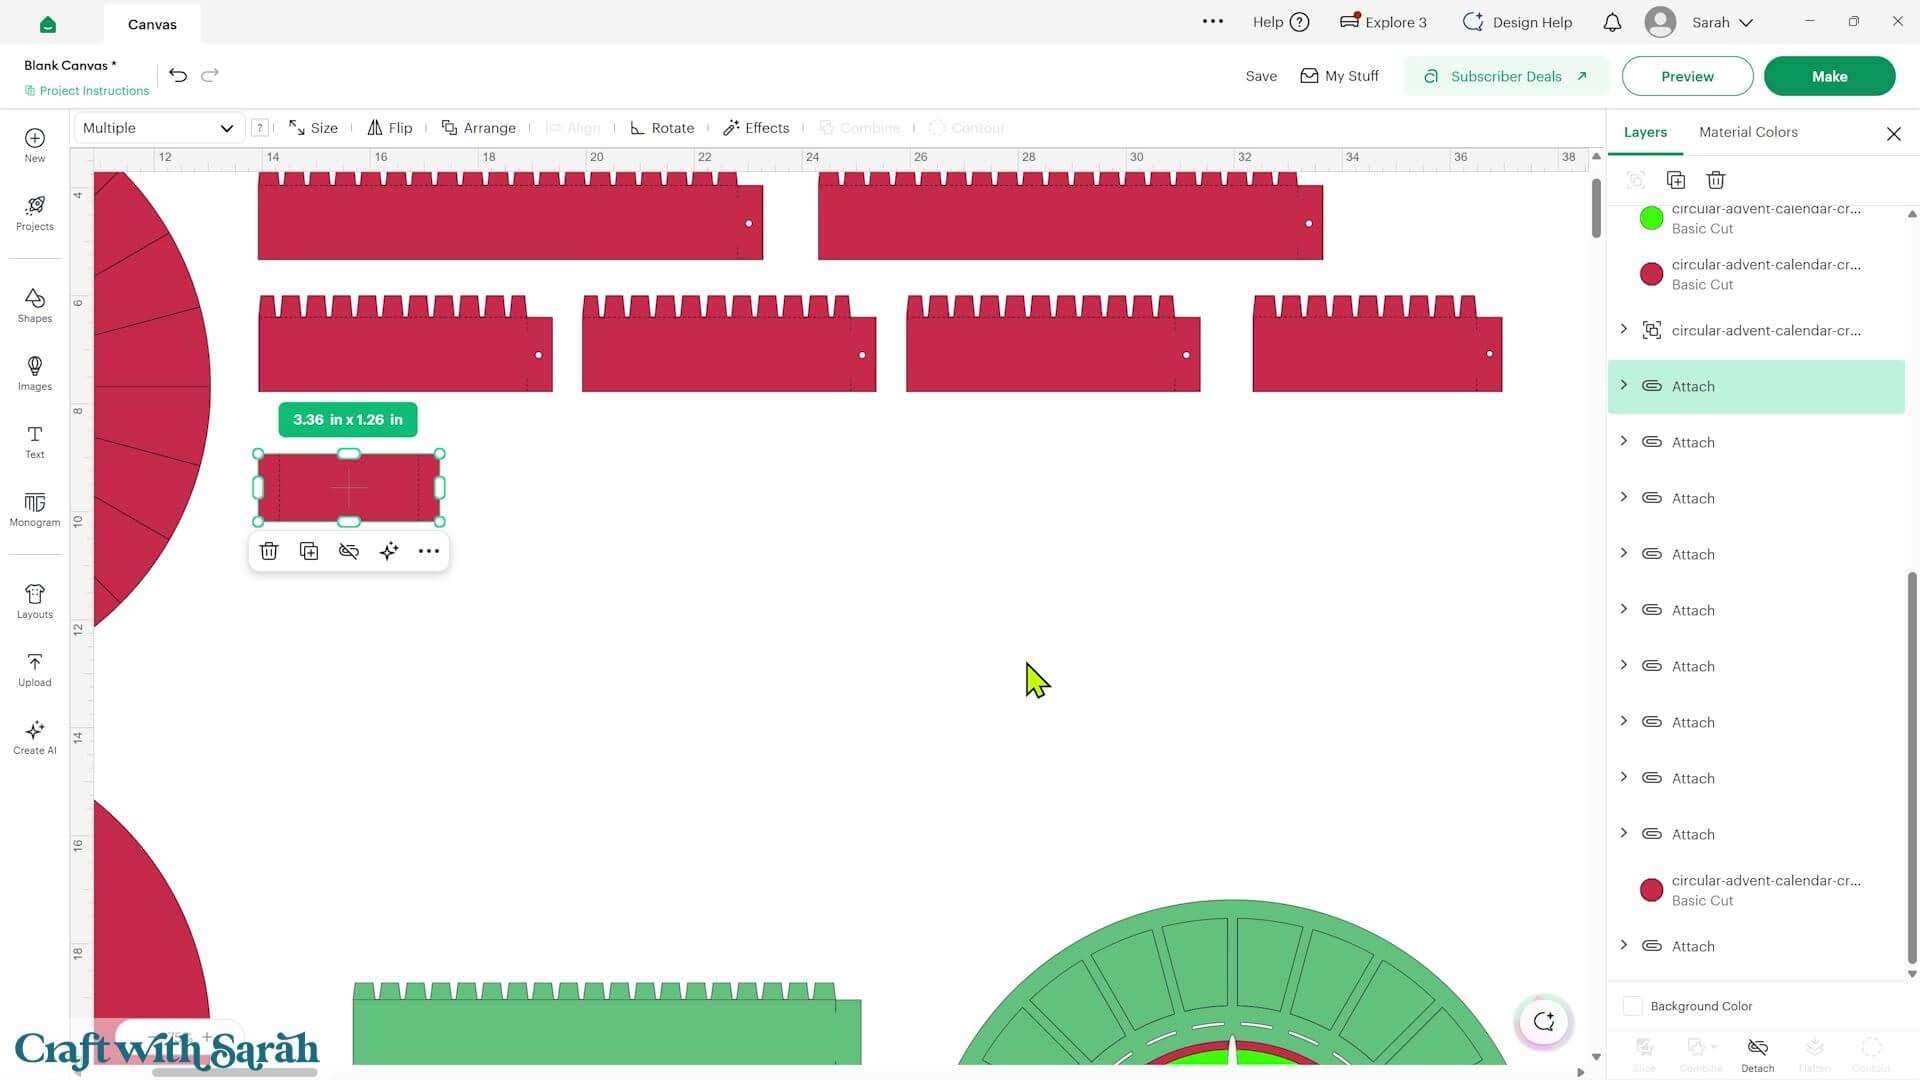
Now use the ‘Duplicate’ button at the top of the Layers panel until you have 24 copies.
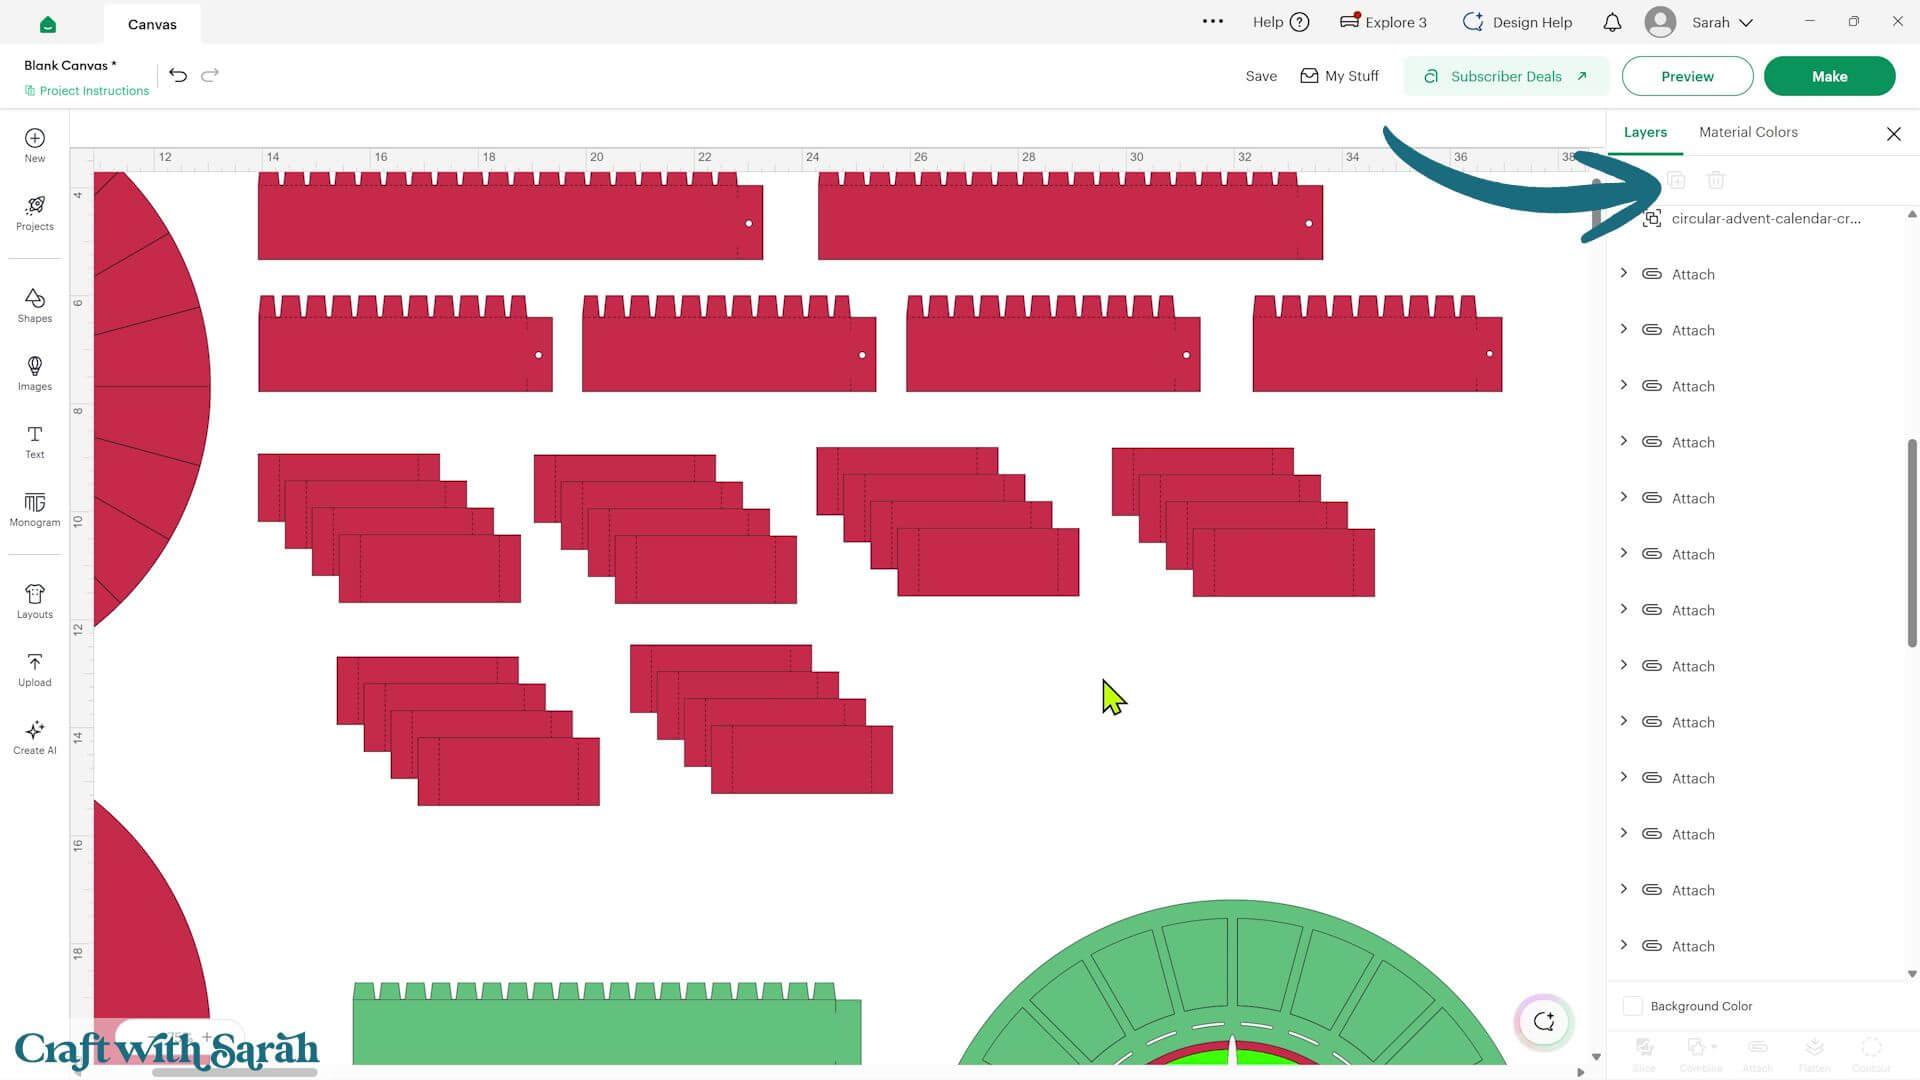
You might even want to make a couple of extras in case any get lost or damaged during assembly.
Next, scroll down to the green pieces that make up the front of the advent calendar.
These include four strips with tabs along their edges.
Just as we did with the red strips, open each group, select the score line layer, change it to ‘Score’, then select the whole group and click ‘Attach’.
Repeat for all four pieces.
There’s also a large green circle that needs its score line formatting in the same way.
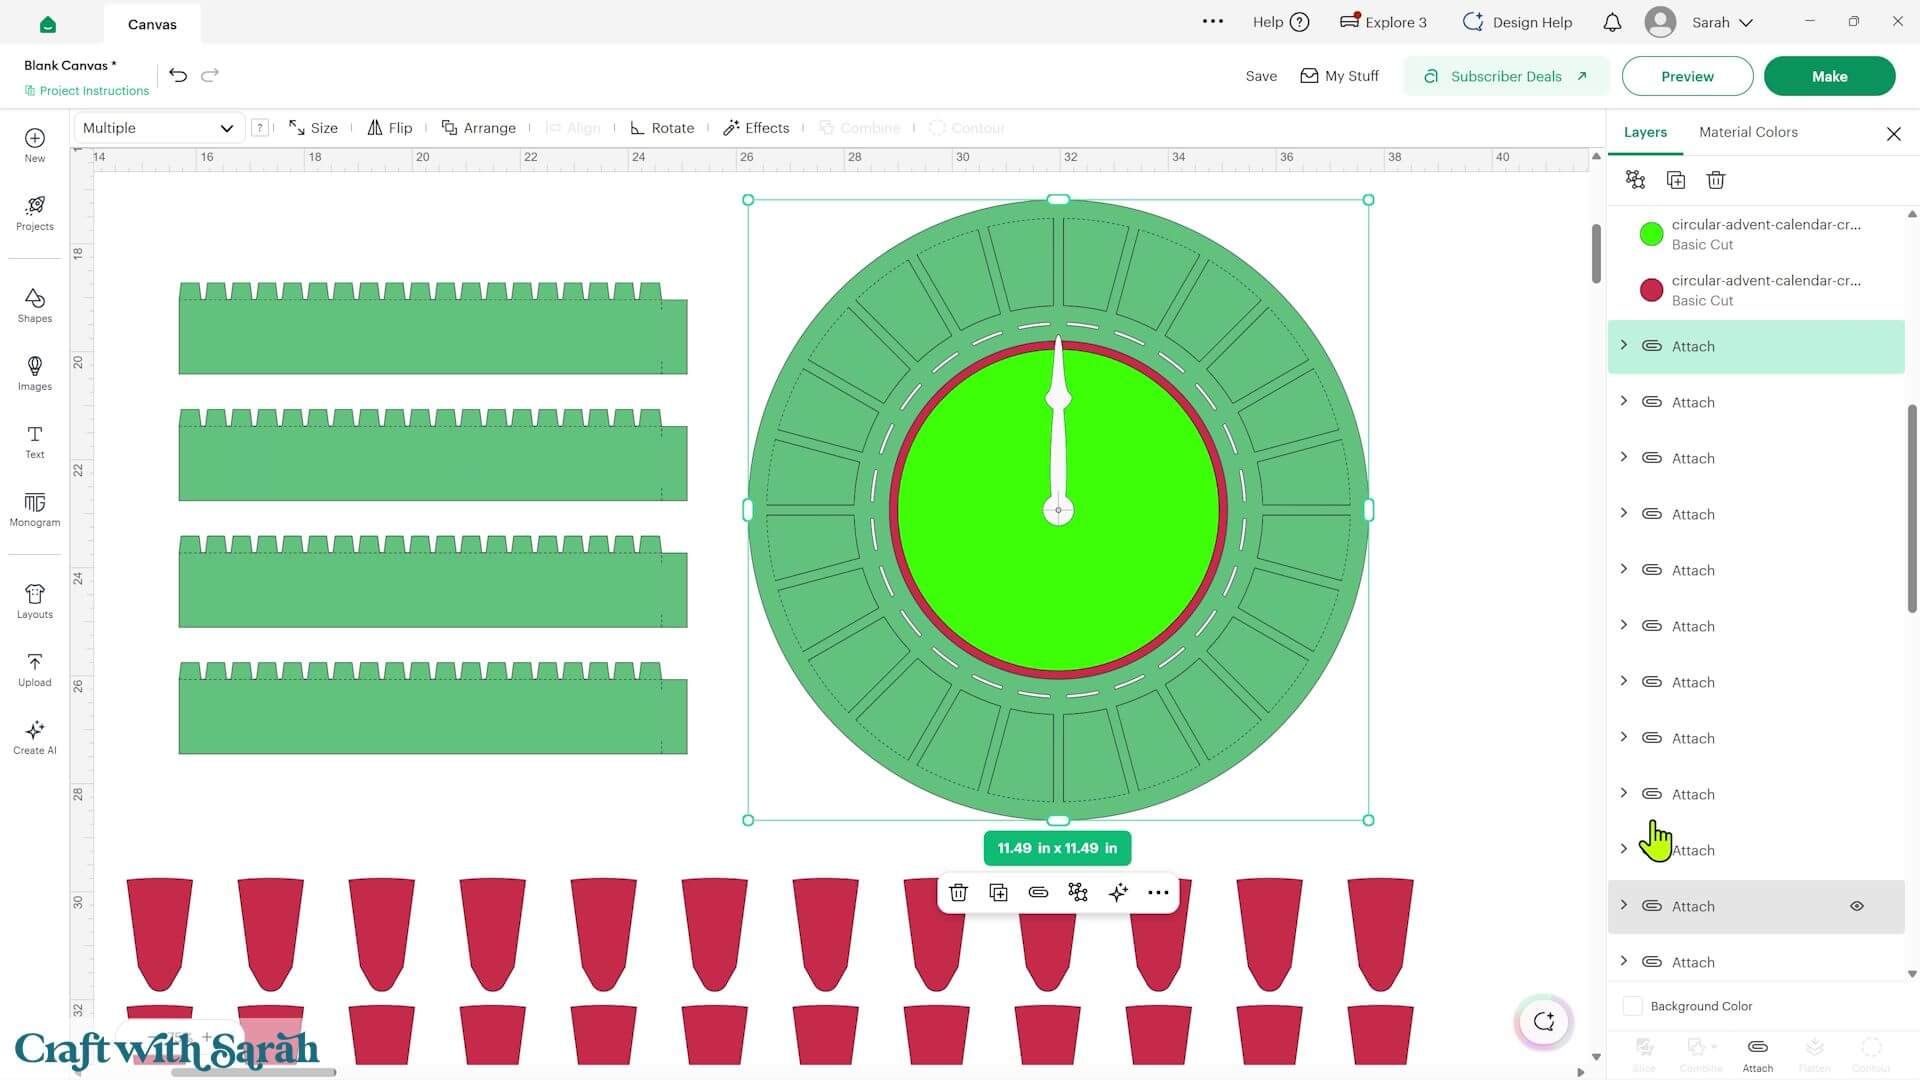
The bright lime green section is intended to be cut from Christmas patterned paper.
I’ve made it such an obvious colour in Design Space so that it’s easy to remember to use patterned paper rather than plain green cardstock.
The numbers and the little doors don’t need any additional formatting.
Finally, look at the three pieces for the display stand at the bottom of the design.
The first doesn’t need any changes.
The second and third pieces have score lines that need formatting.
Open each group, change the line layer to ‘Score’, then select the group and click ‘Attach’.
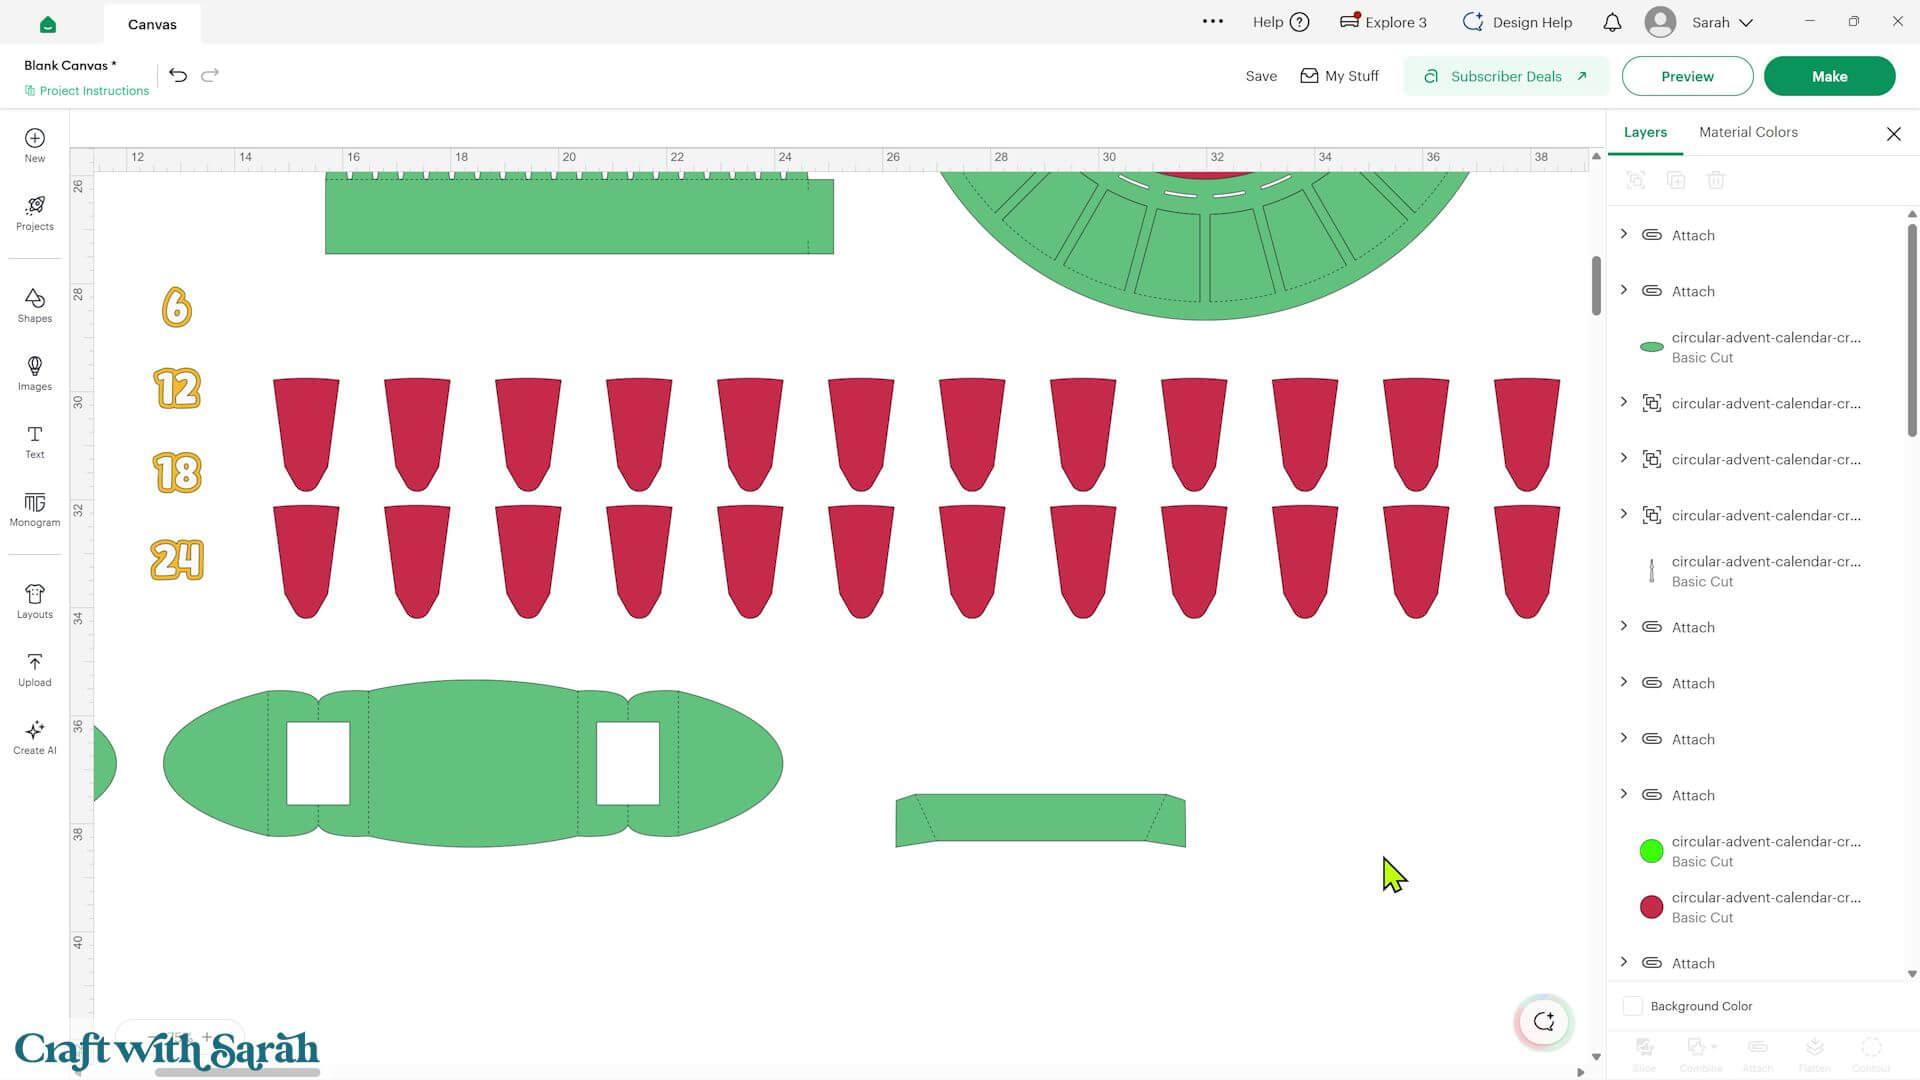
That’s all the score line formatting finished!
If you don’t have a brad or split pin, you can make the advent calendar without the rotating arrow.
Find the arrow in the Layers panel and hide it using the eye icon, or delete it.
You’ll also want to remove the small hole in the middle of the patterned paper circle.
Select the lime green patterned paper piece and click ‘Contour’ at the bottom-right of the screen.
In the Contour window, click the small circular hole to hide it.
Click ‘Apply’.
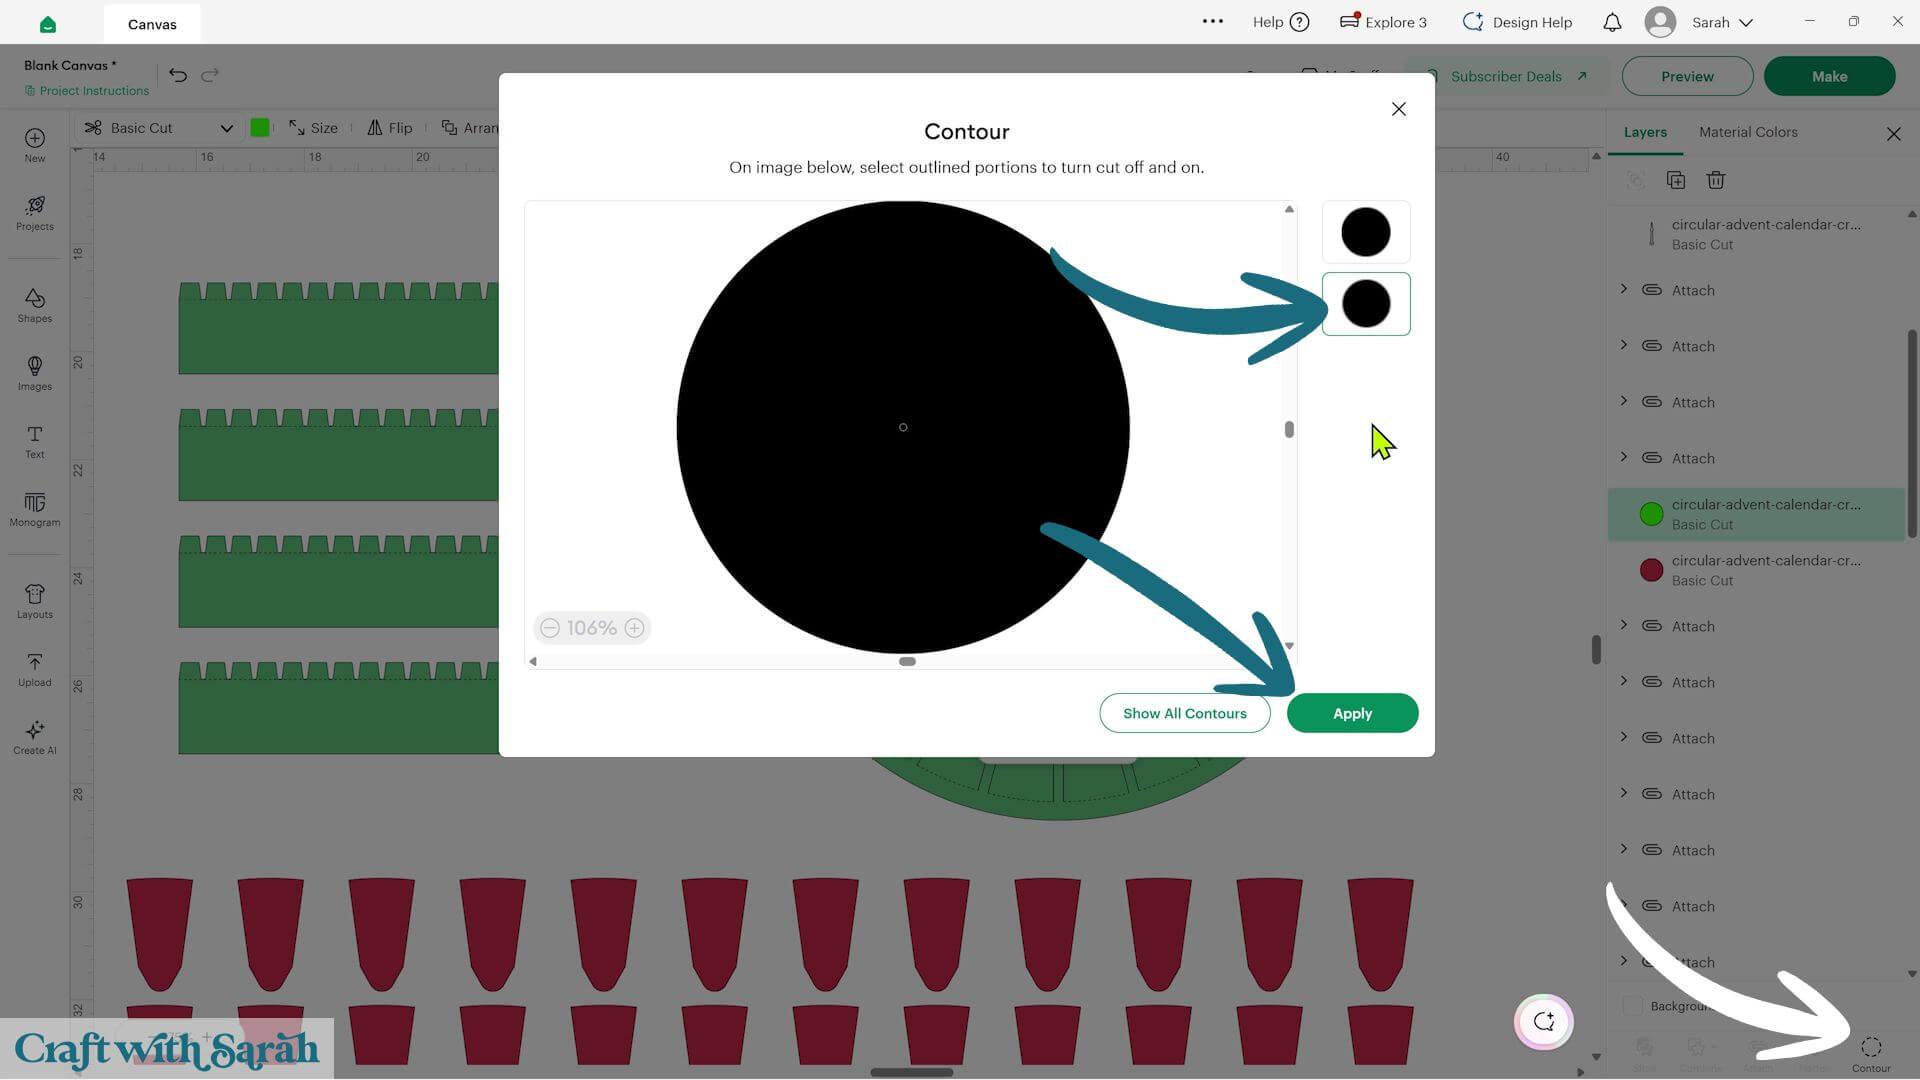
The hole will now be filled in.
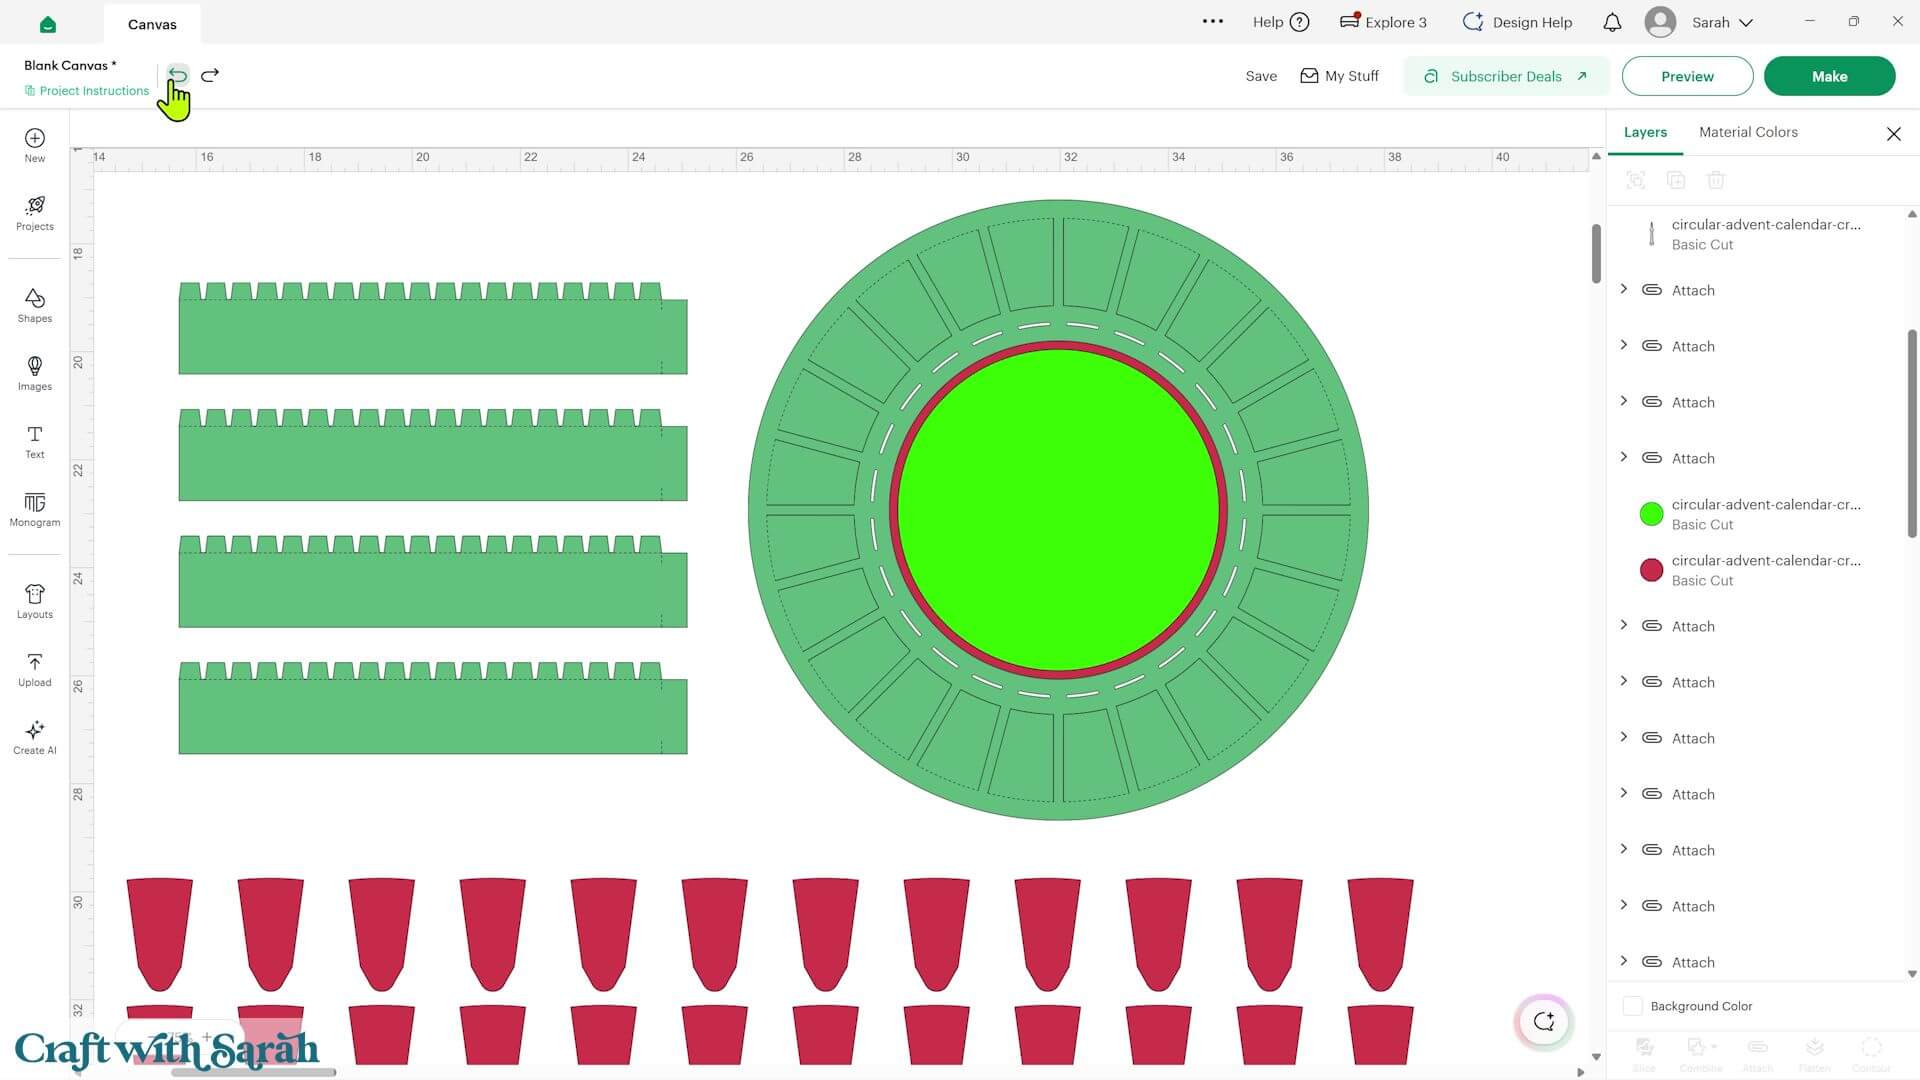
There are matching holes in the layers underneath, but you don’t need to remove those because they’ll be covered by the patterned paper.
If you’re using the rotating arrow, leave all the holes as they are.
Step 3) Cut the project
When you’re happy with how the project is looking in Design Space, save your file, then click “Make” and follow the instructions on-screen to cut out all the pieces.
Don’t worry if the numbers appear in a random order on the cutting mats.
They’ll all cut individually, so it doesn’t matter what order they appear in.
You can change the paper size using the dropdown menu on the left.
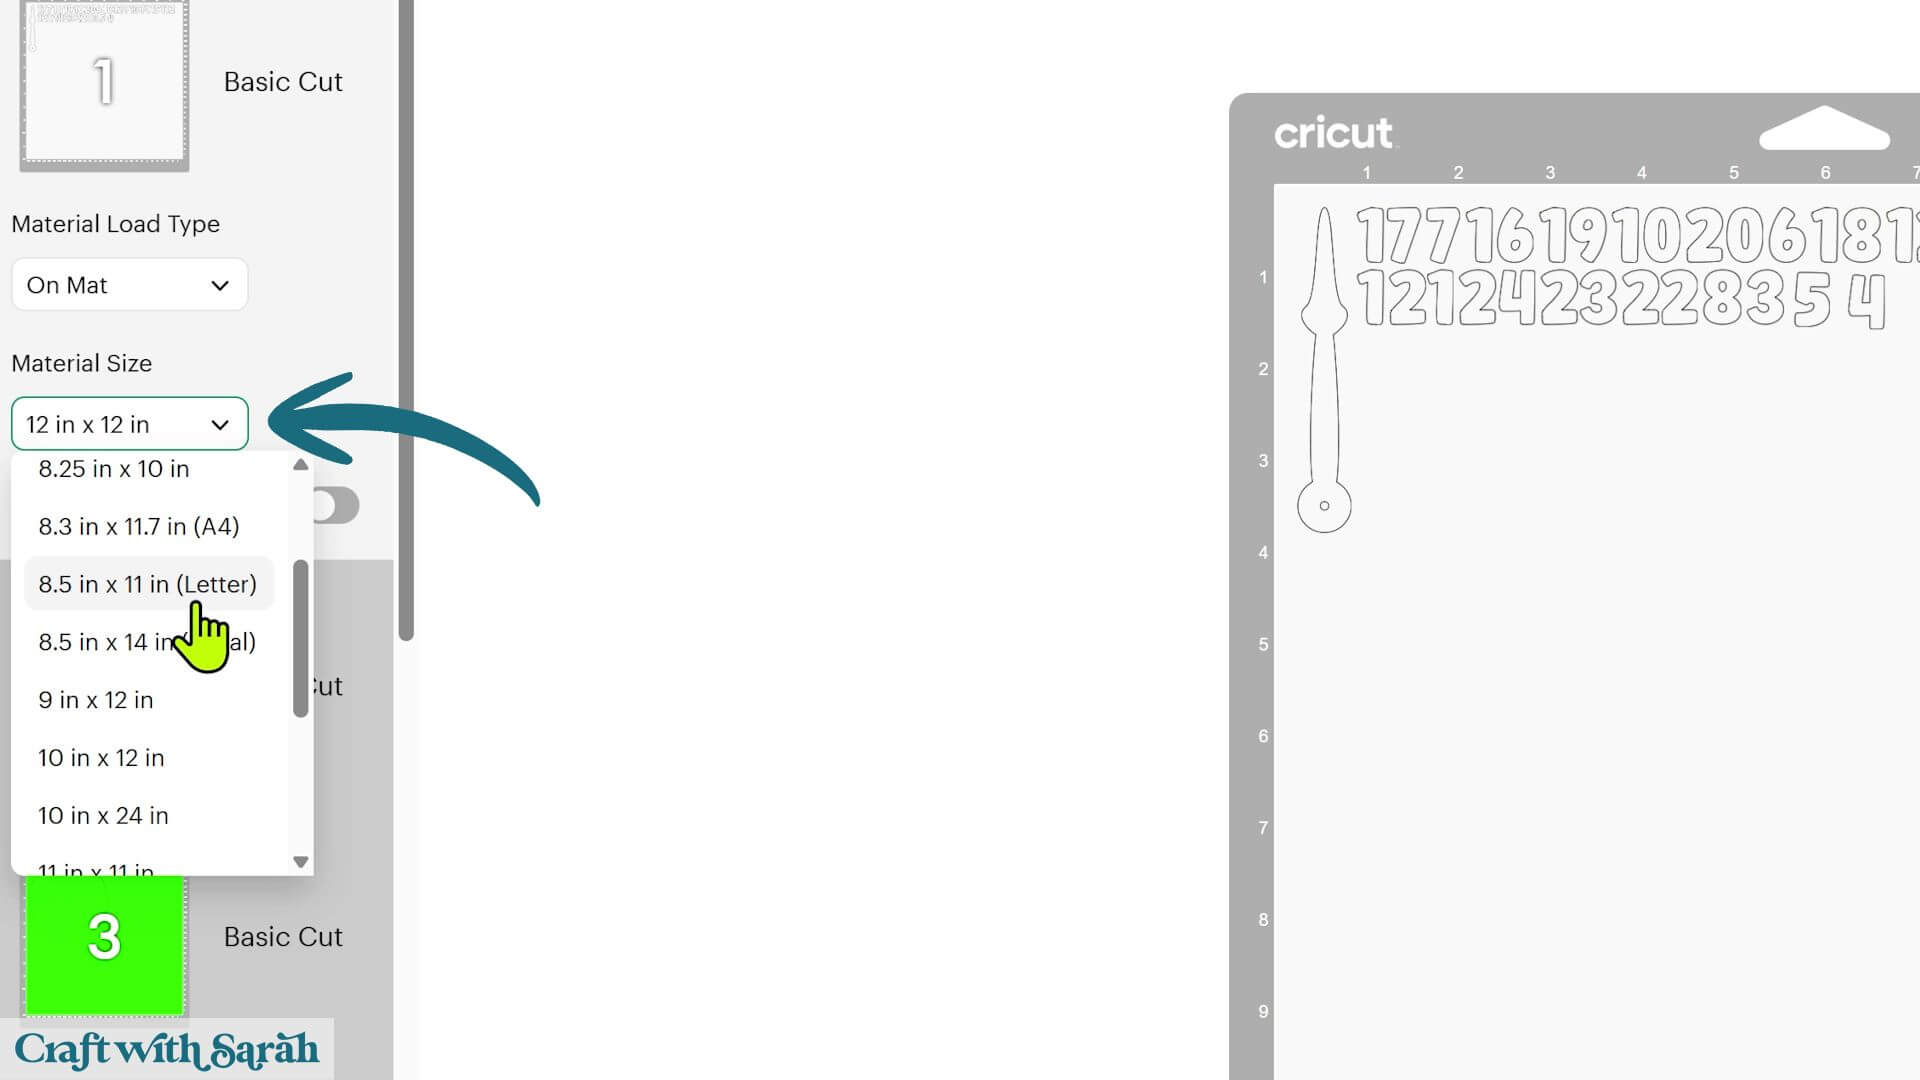
However, some of the larger base pieces require the full 12 x 12 inch cardstock size.
These are designed to fit very close to the maximum cutting area of your Cricut.
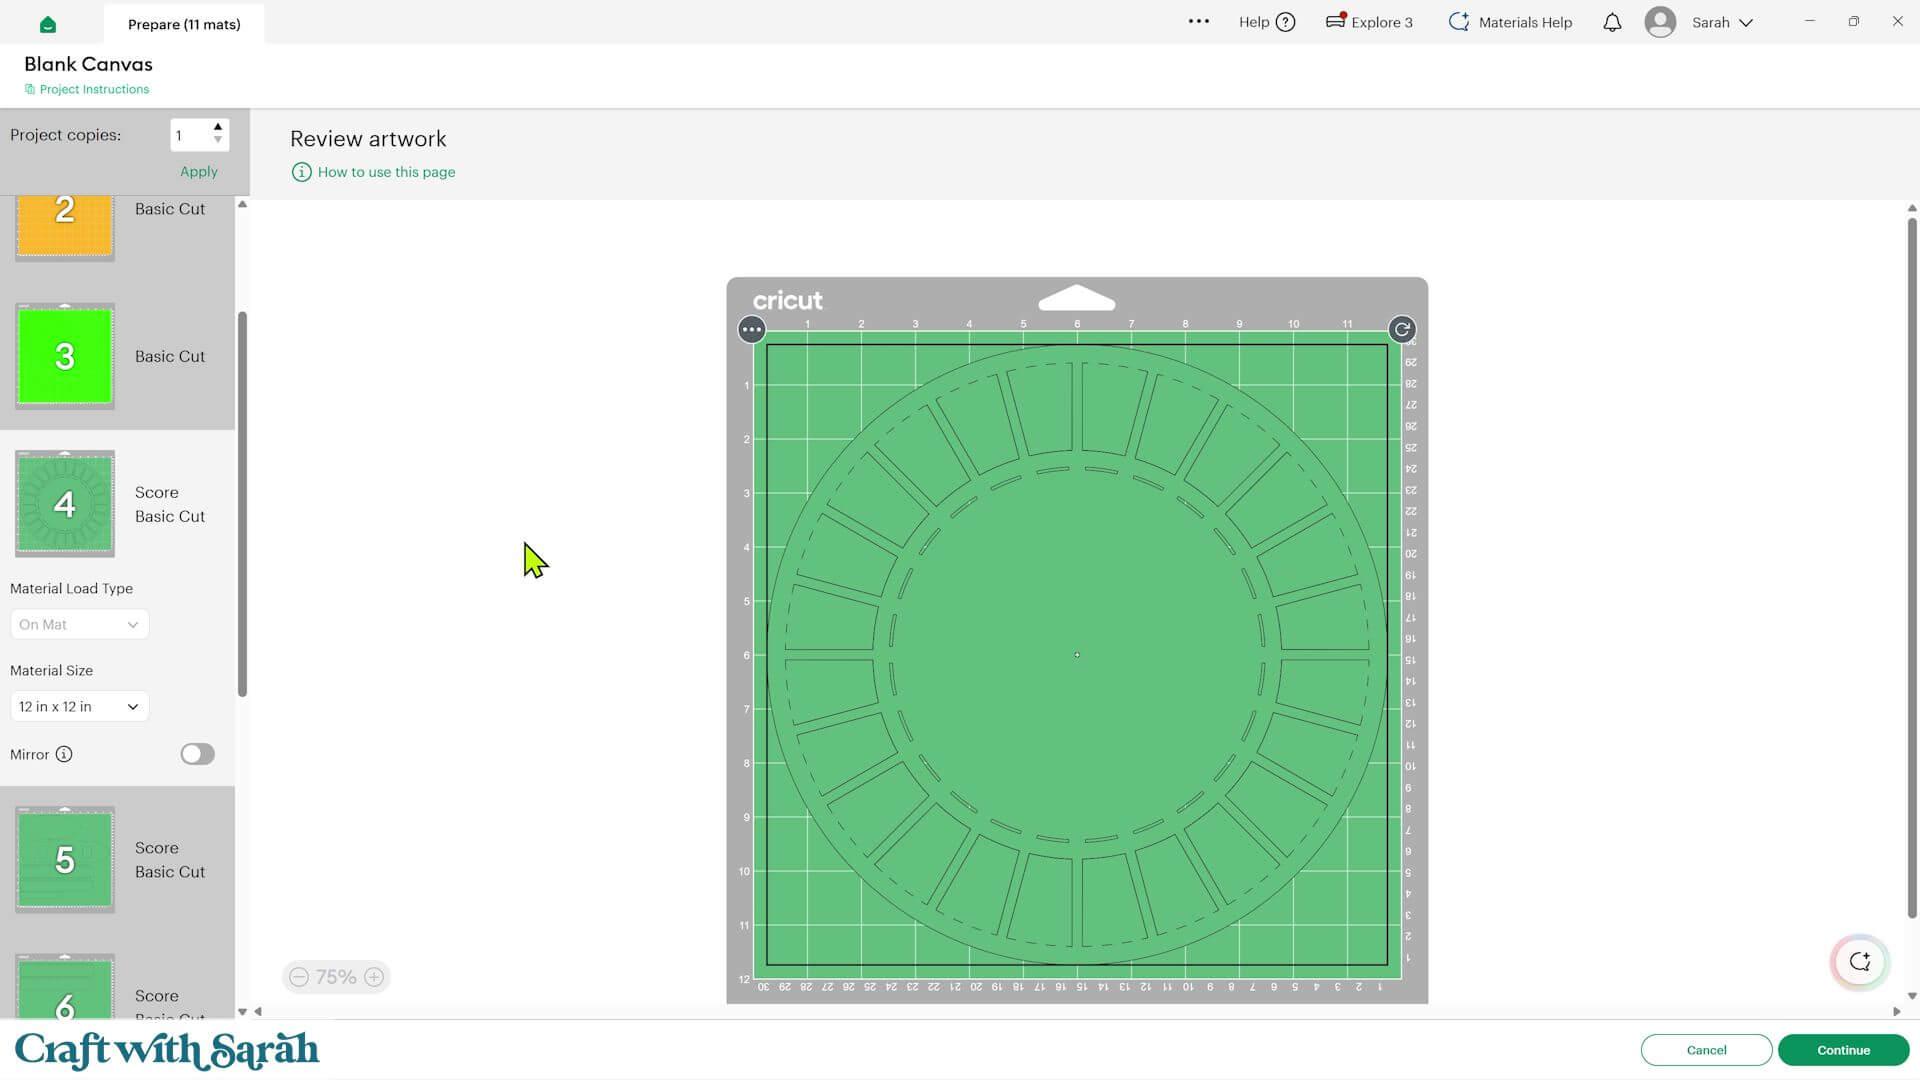
Remember that the bright lime green pieces should be cut from patterned paper.
When you’re happy with the cutting mats, click ‘Continue’ and follow the onscreen instructions to cut everything.
TIP: New to using cardstock with your cutting machine? Check out these machine help guides for Cricut, Silhouette and ScanNCut that go through every step of the process, including tips for getting the best quality cuts from your machine.
Step 4) Stick the base together
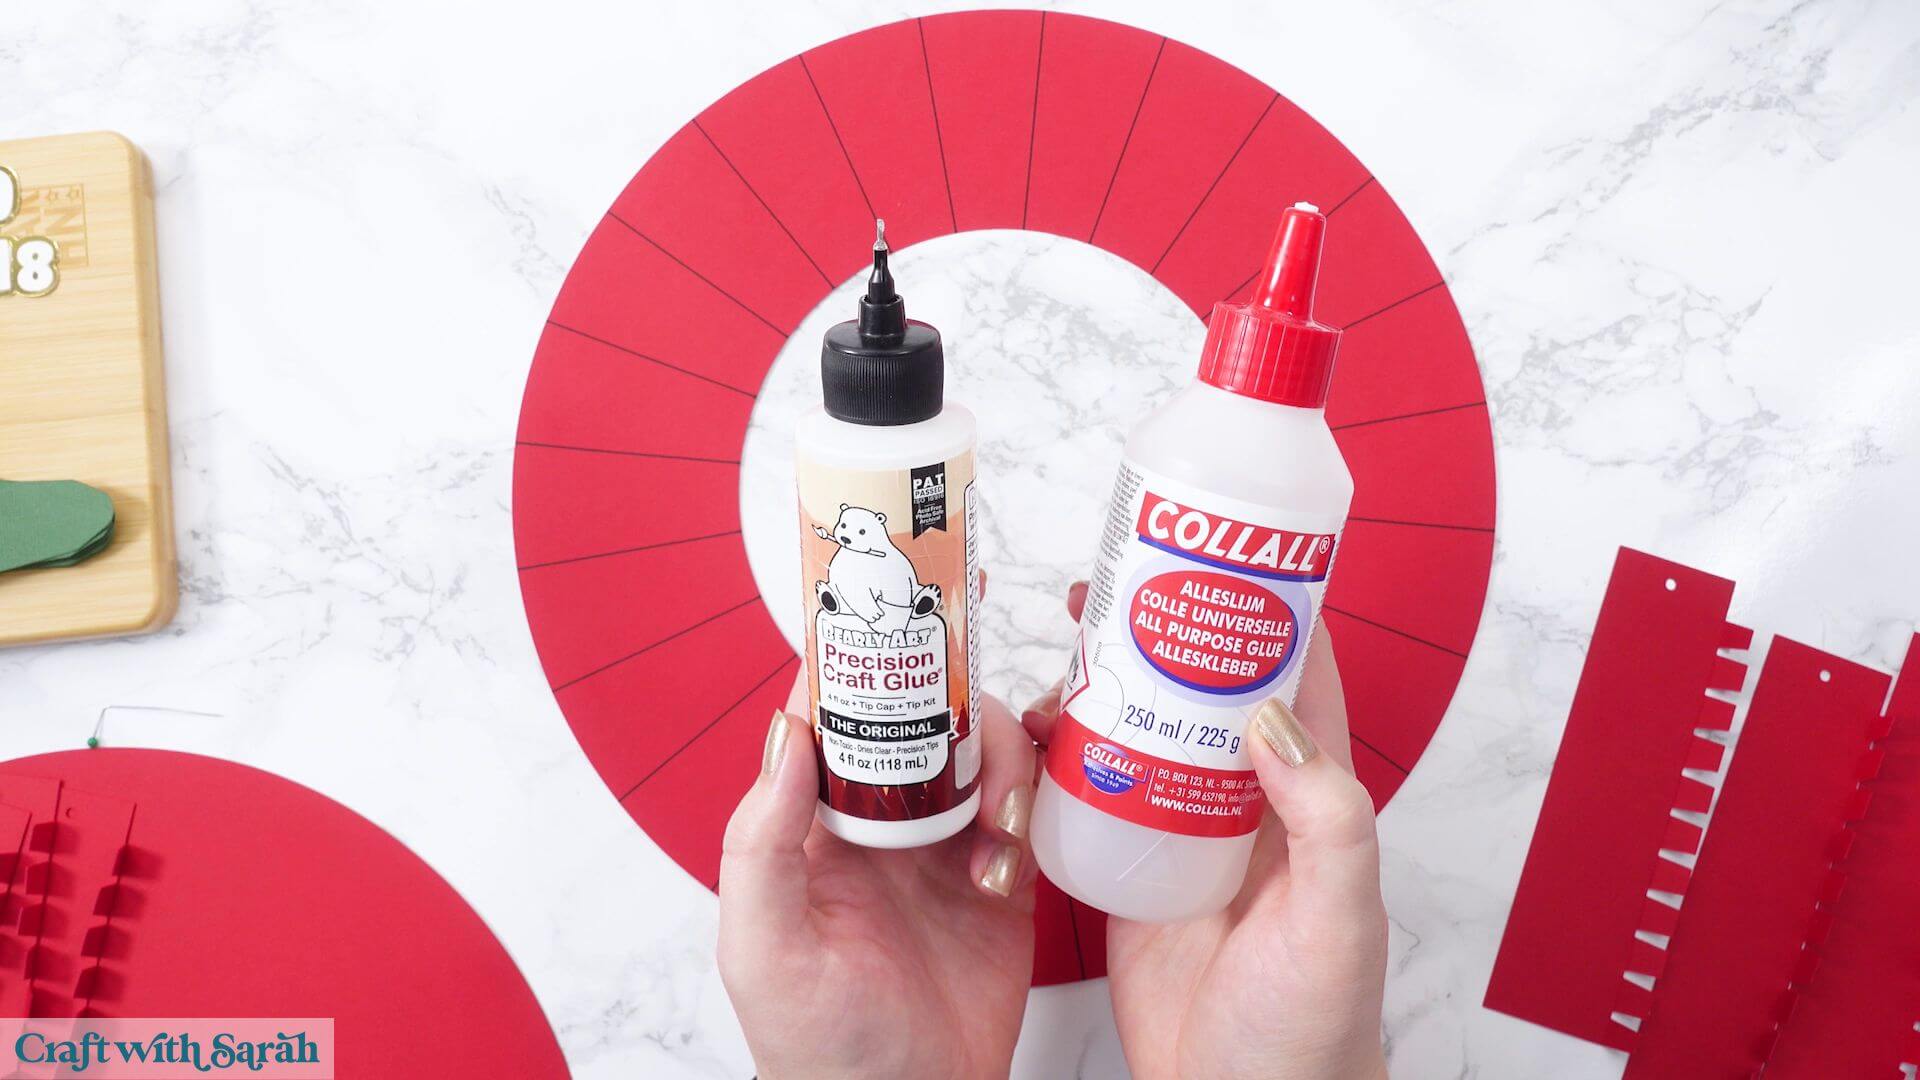
My favourite glues to use on papercraft projects are Bearly Art Glue and Collall All Purpose Glue.
These are great because they don’t “warp” or bend the cardstock like some glues do. You can use as much of it as you want and the card stays perfect – and it dries perfectly clear too!
Bearly Art Glue comes with a tiny nozzle to make it easy to apply glue to small pieces of card. Collall glue doesn’t come with this, so it’s best to decant it into needle tip applicator bottles so that you have more control.
We’ll start by building the base of the advent calendar.
This is the section that will hold all 24 chocolates.
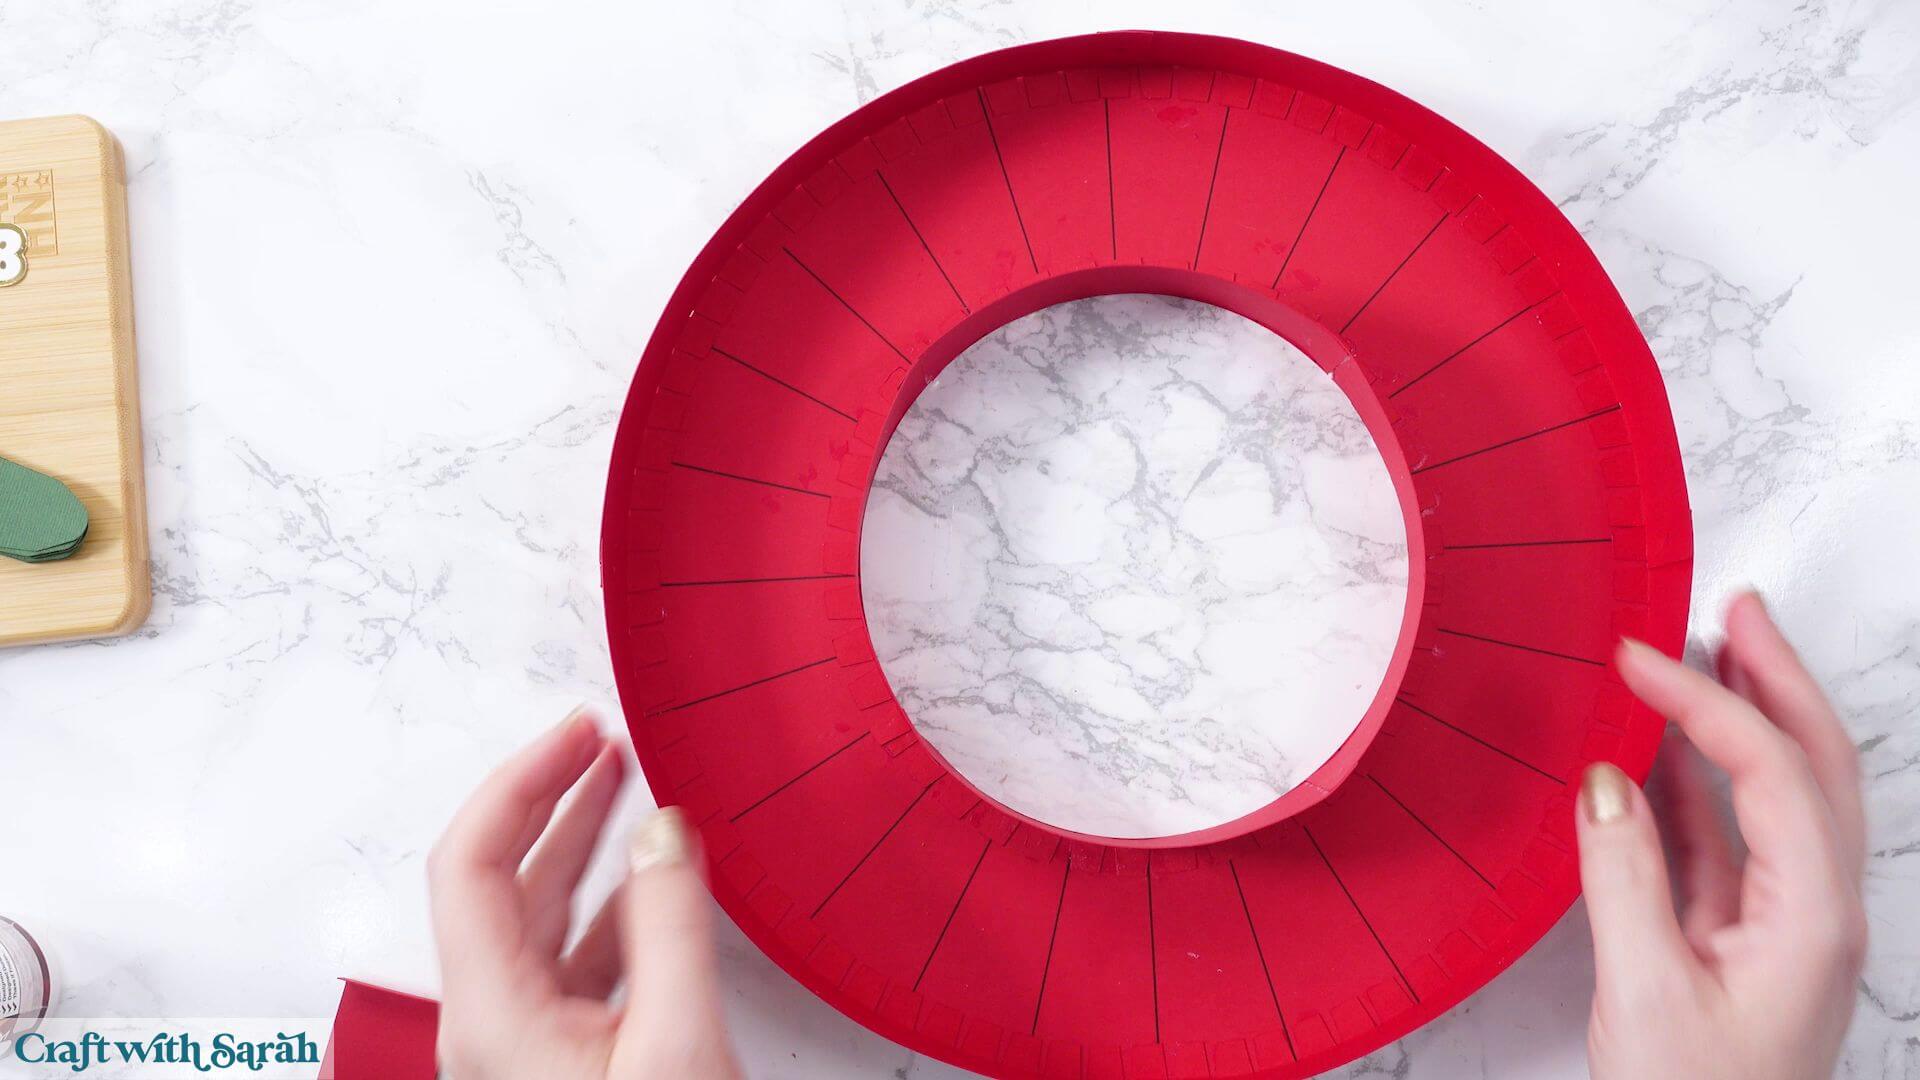
Find the large circular piece with the pen lines drawn around it.
These lines show where the dividers will go.
You’ll also need the red strips with the crocodile teeth tabs along their edges.
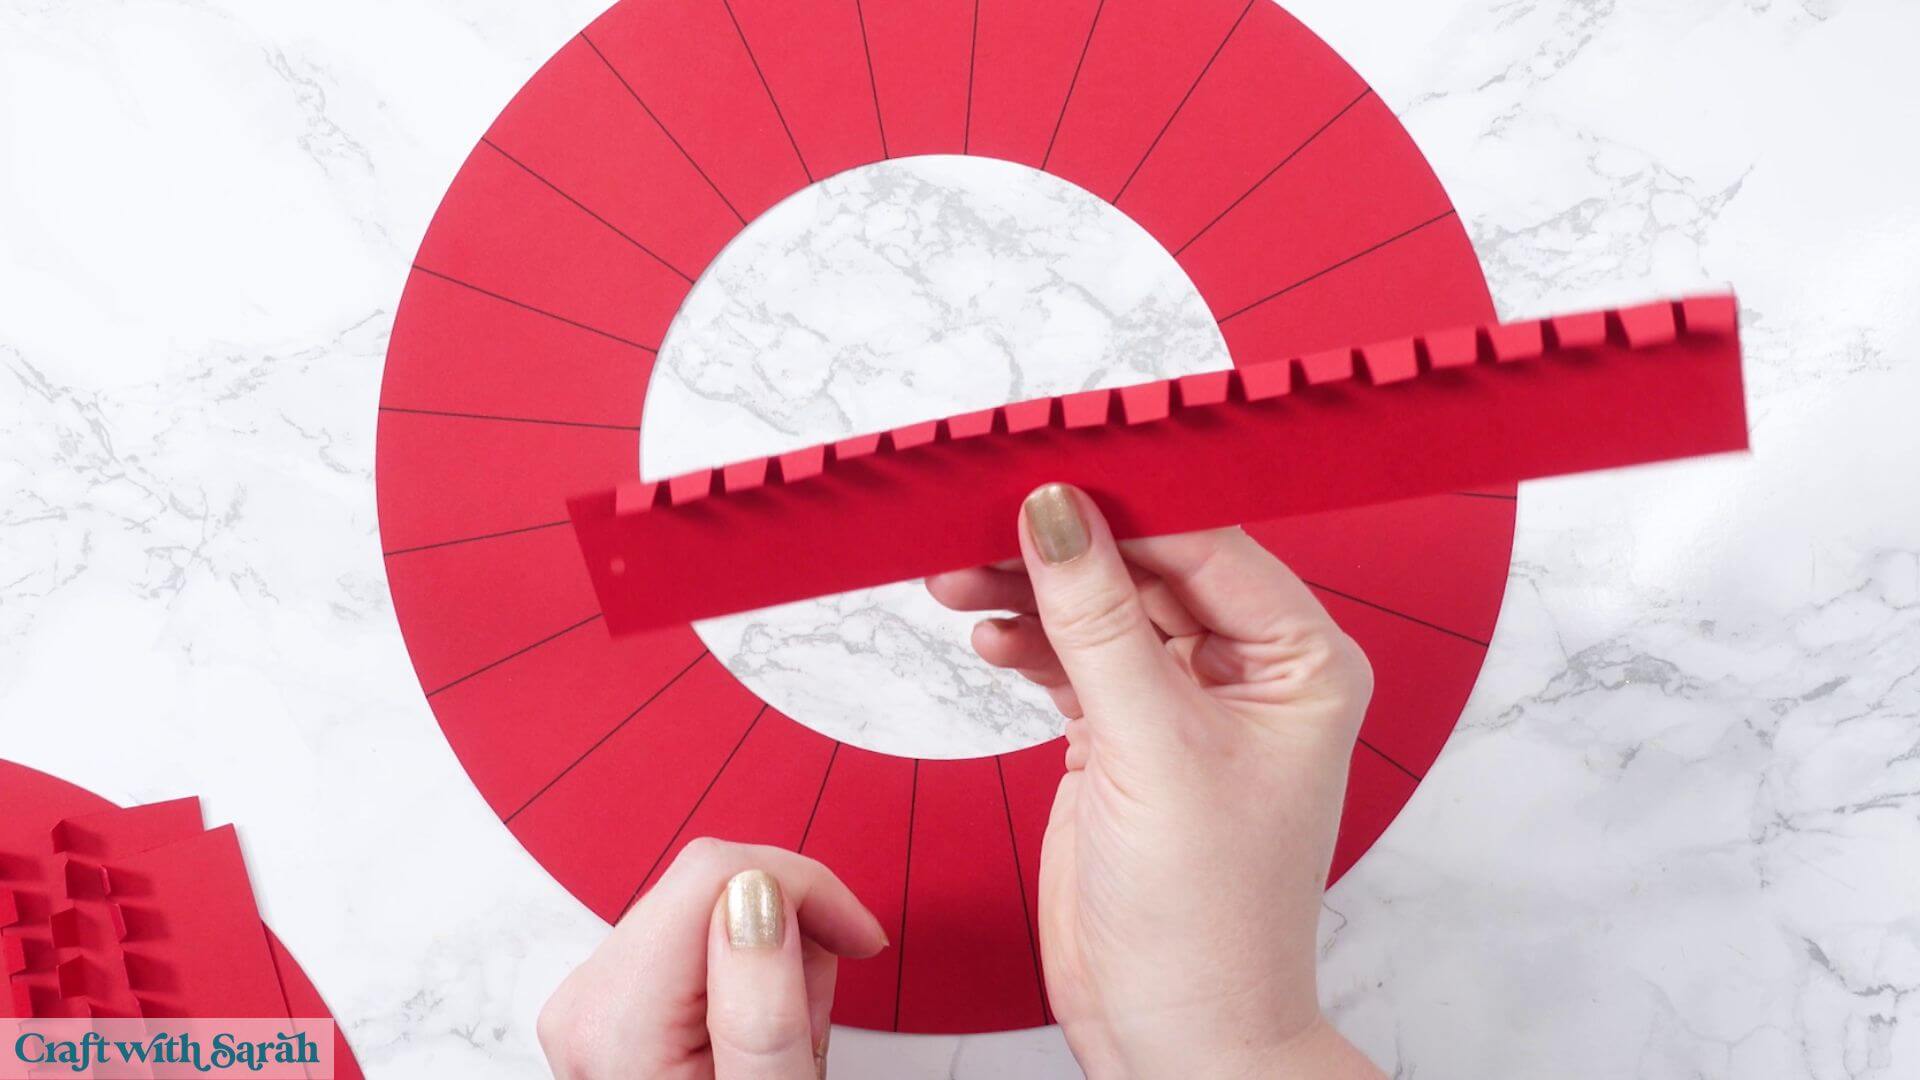
If you’ve changed the colours in Design Space, you can identify the correct pieces because the base strips have small circular cutouts near one end.
There are eight strips in total:
- Four long strips of equal length.
- Three shorter strips of equal length.
- One strip that’s slightly shorter than the other three.
The four shorter strips will form the inner wall around the circular hole.
The four longer strips will form the outer wall.
It’s easiest to build the inner wall first because otherwise the outer wall would get in the way while you’re trying to work in the middle.
Take the four shorter strips and fold all the crocodile teeth tabs inwards along their score lines.
Start with one of the three strips that are the same length.
Add glue to the tabs.
Position the strip around the edge of the circular hole, with the tabs pointing outwards onto the cardstock rather than into the hole.
You can start anywhere around the circle.
Try to line the edge of the strip up as closely as possible with the circular cutout.
Cardstock doesn’t naturally like bending into a circle, so you may need to hold it in position while the glue dries.
You could use double-sided tape instead, but make sure it’s strong enough to hold the weight of the chocolates.
Another option is to use a combination of tape and glue.
The tape will help hold everything in position straight away, while the glue provides a stronger bond once dry.
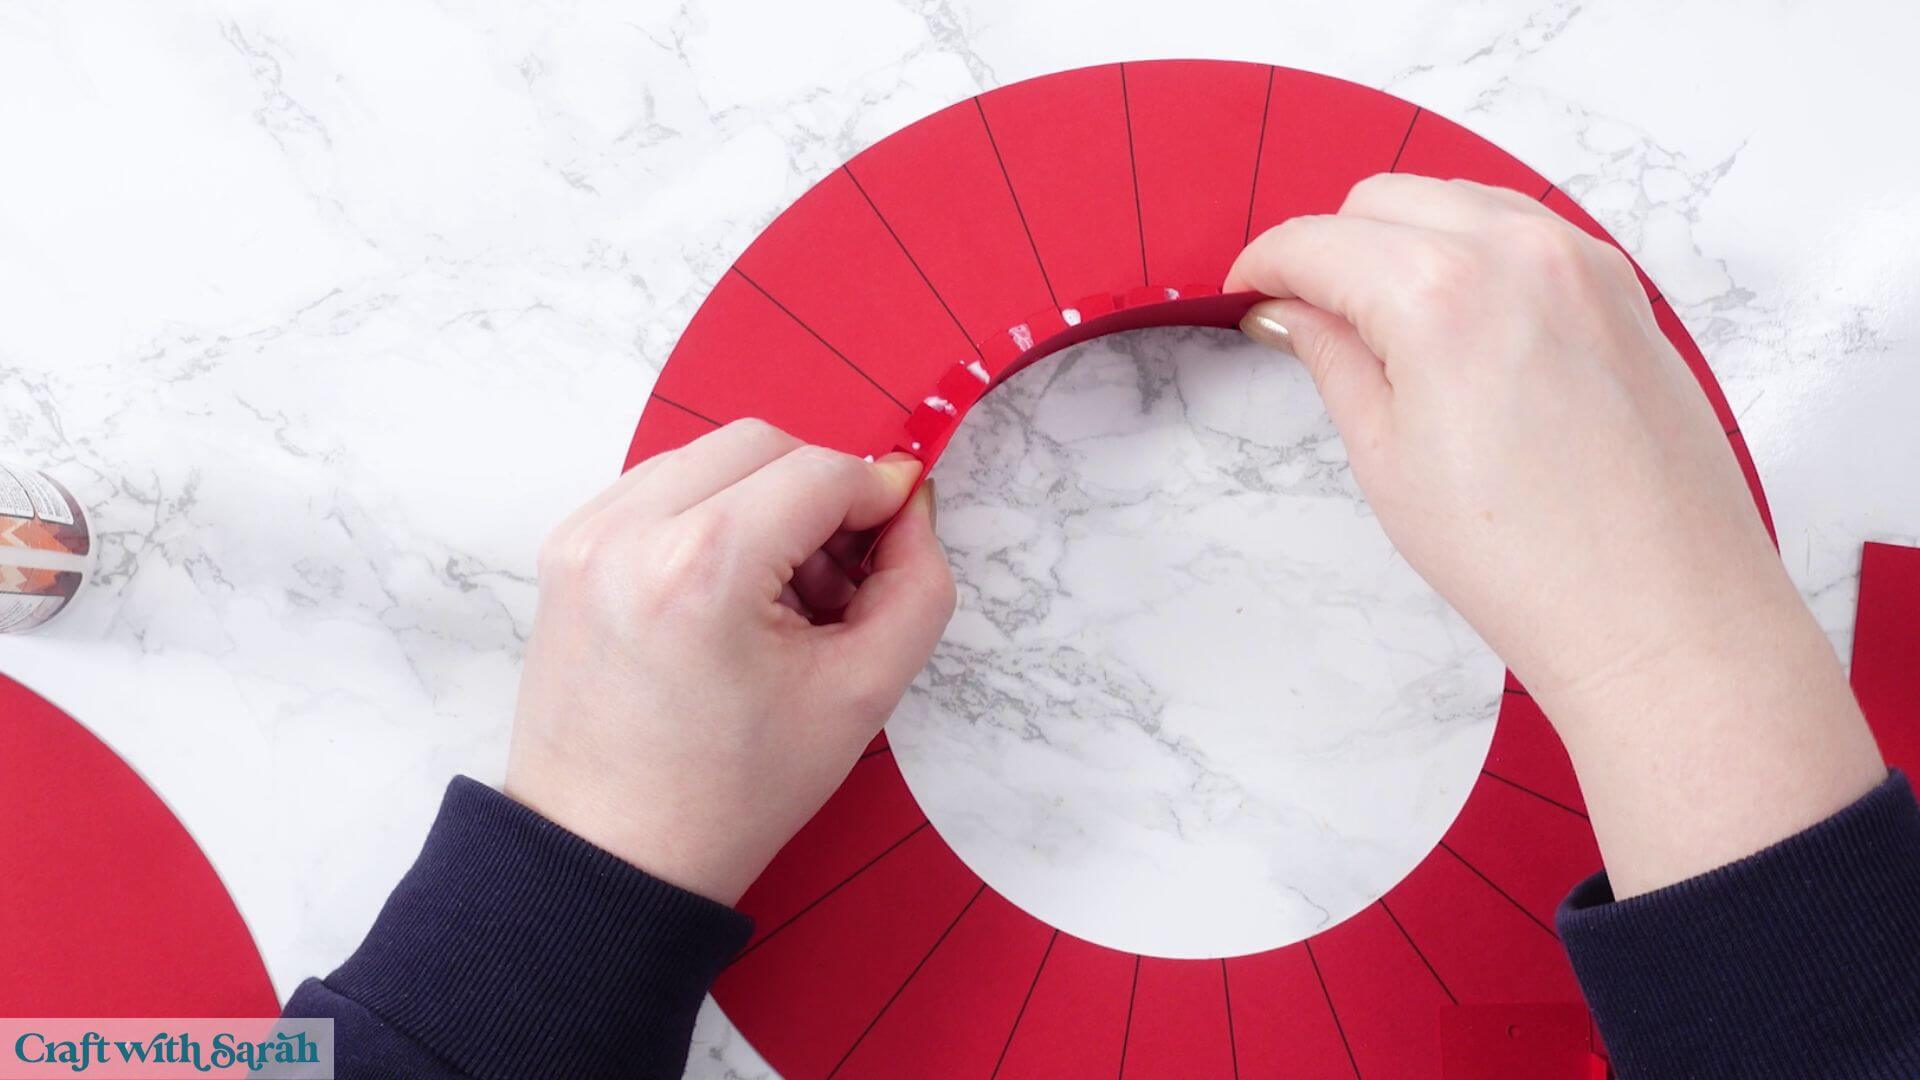
Once the first strip is attached, take the next piece.
You’ll notice small score lines near the ends of the strips.
These show where the pieces should overlap when joining them together.
Add glue to the joining section, stopping at the score lines.
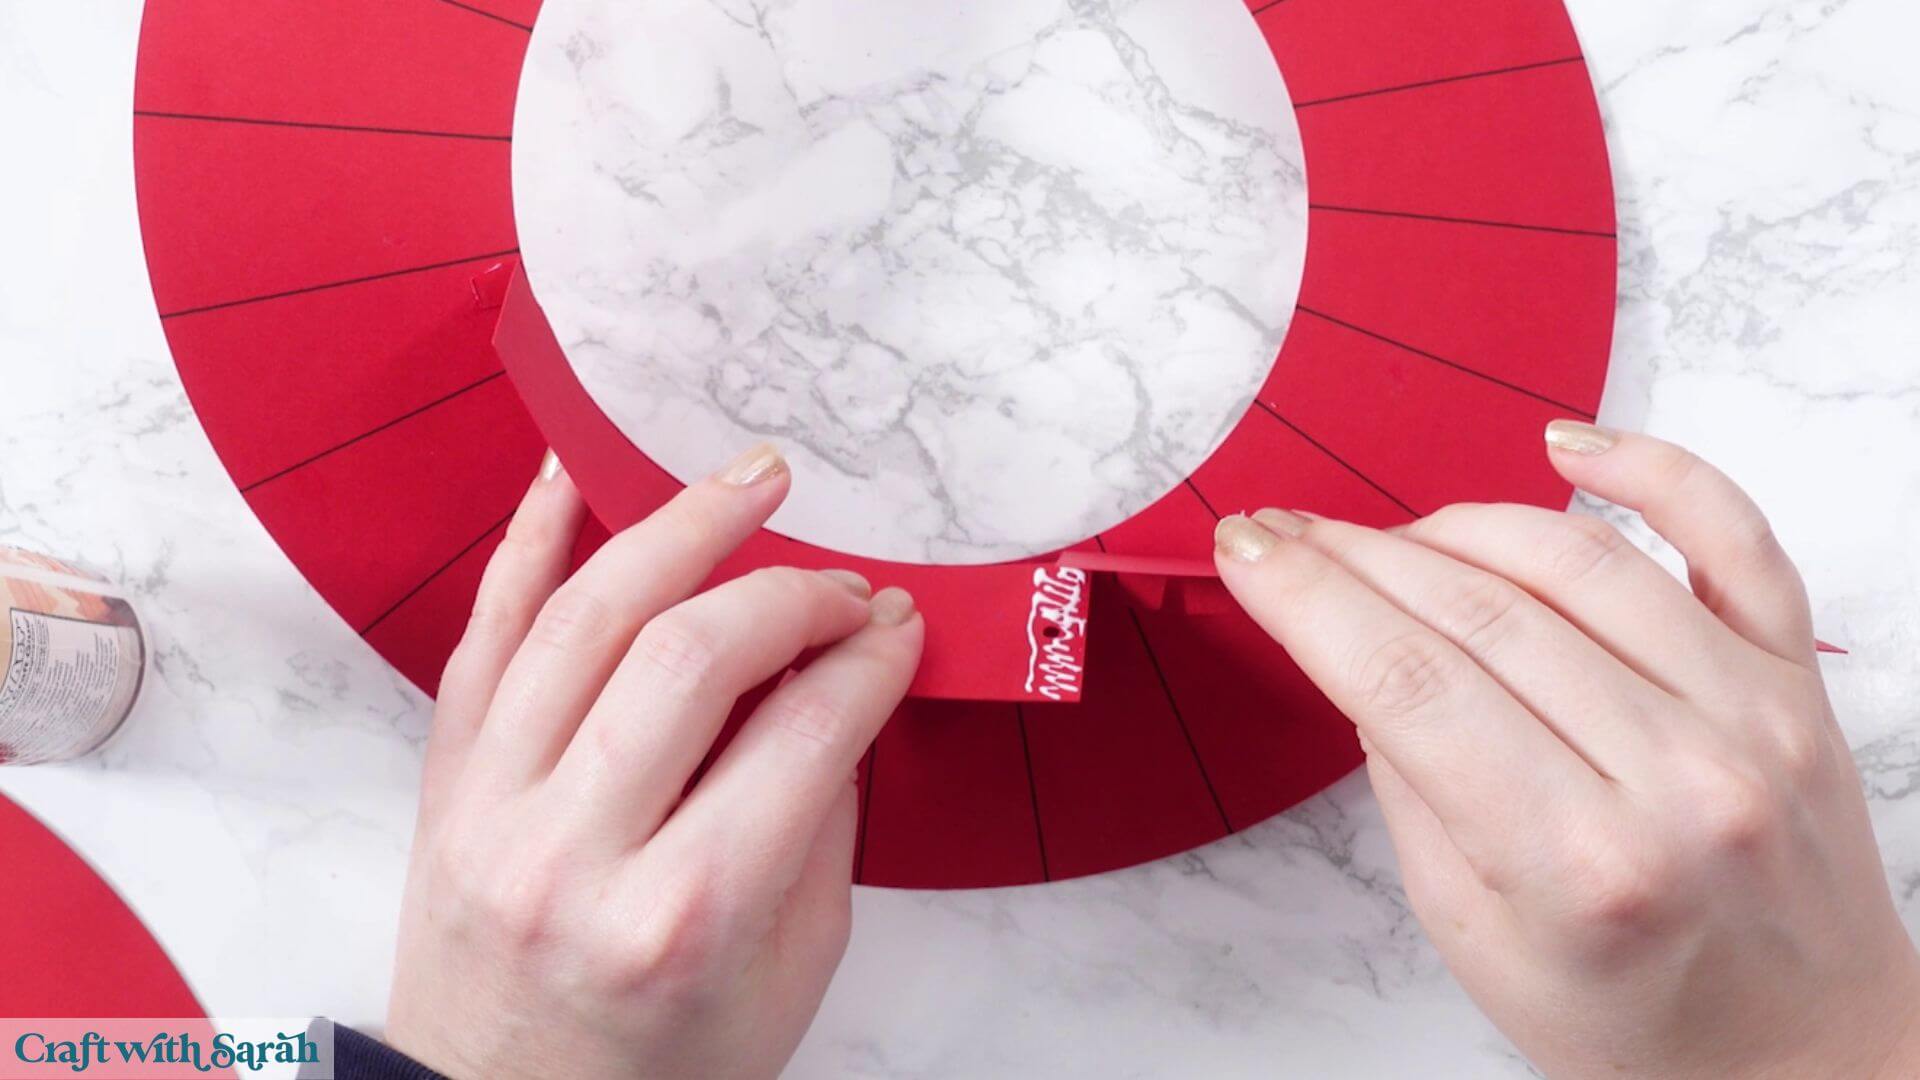
Slide the next strip underneath the edge of the previous one and stick them together.
Then continue gluing its crocodile teeth tabs around the circular opening.
Keep working around the circle, adding the remaining strips in the same way.
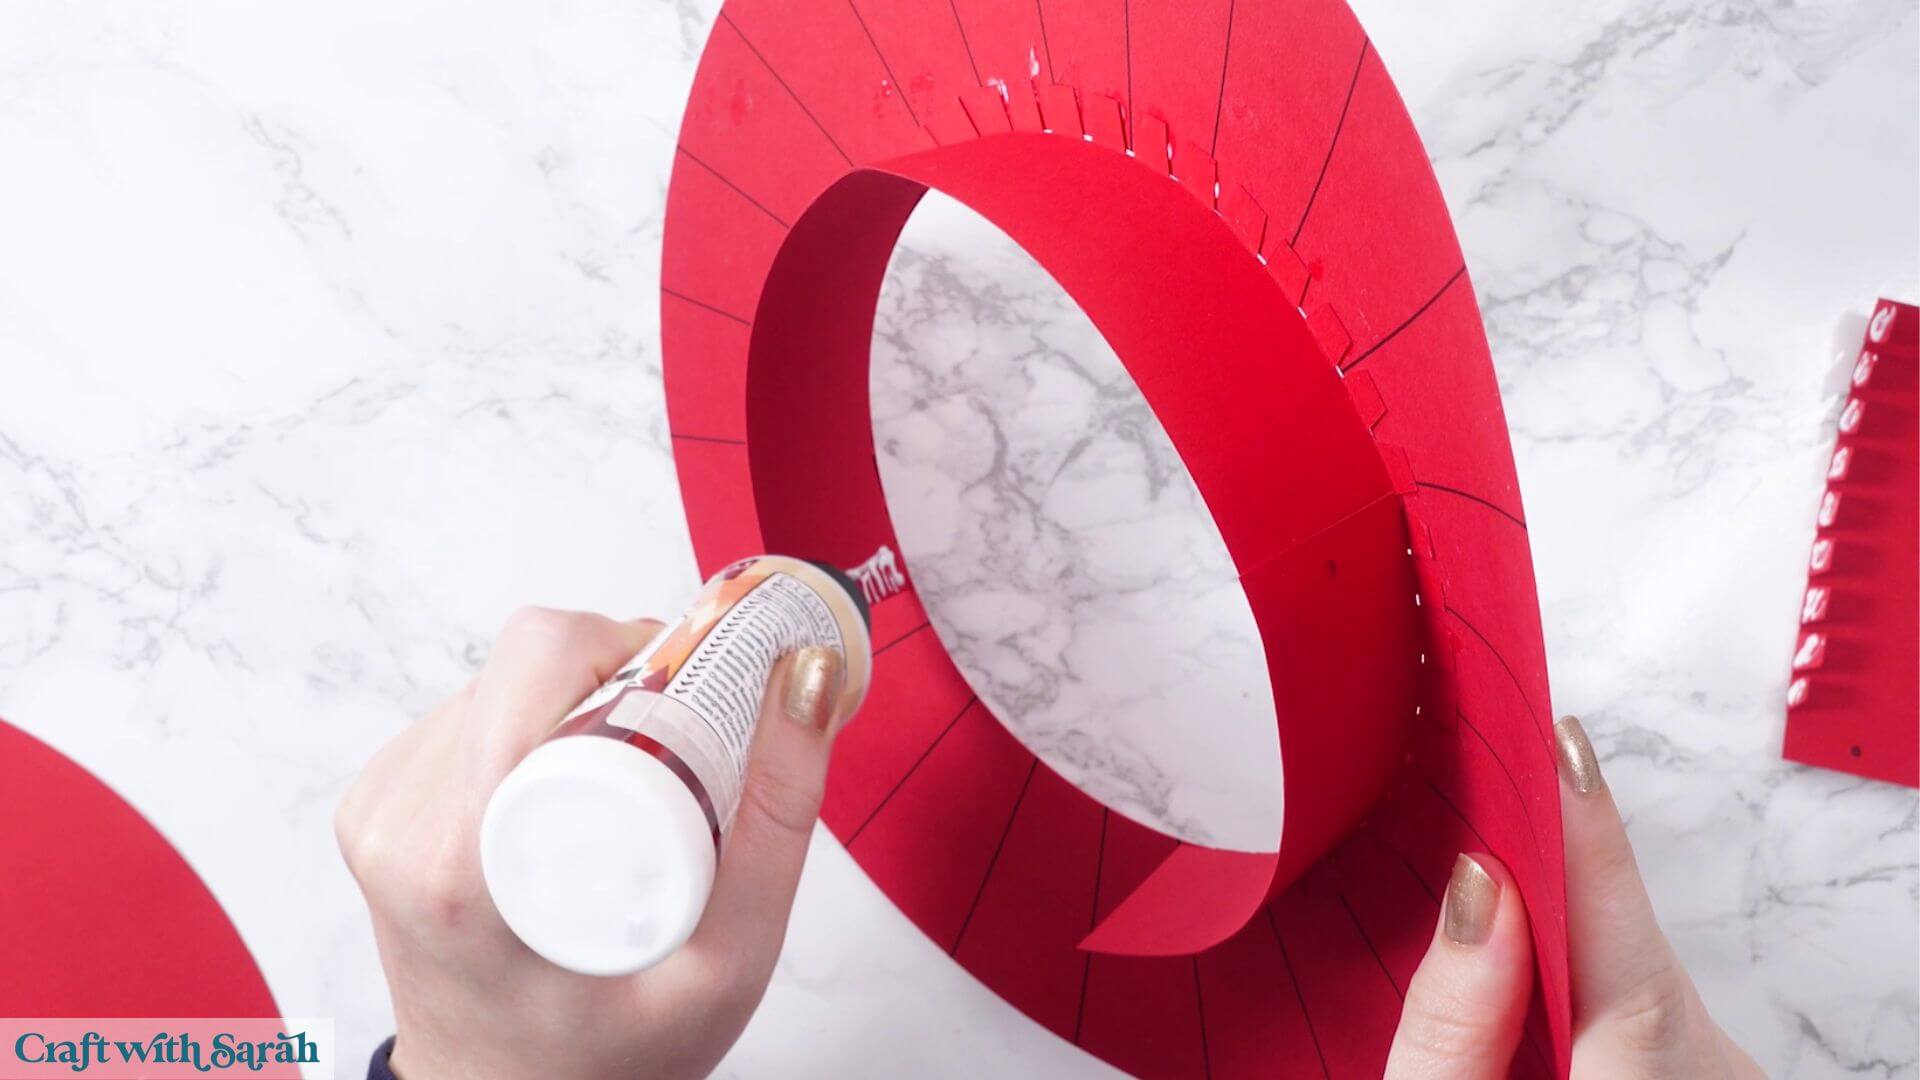
The shortest strip will complete the circle.
It has joining sections at both ends, so you’ll need to glue it to the strips on either side.
Try to keep the inner wall as close to the circular cutout as possible.
Don’t worry if the glue is a little messy because this section will be hidden once the calendar is assembled.
However, it’s worth taking your time to keep the wall reasonably accurate because it will help the dividers fit correctly later.
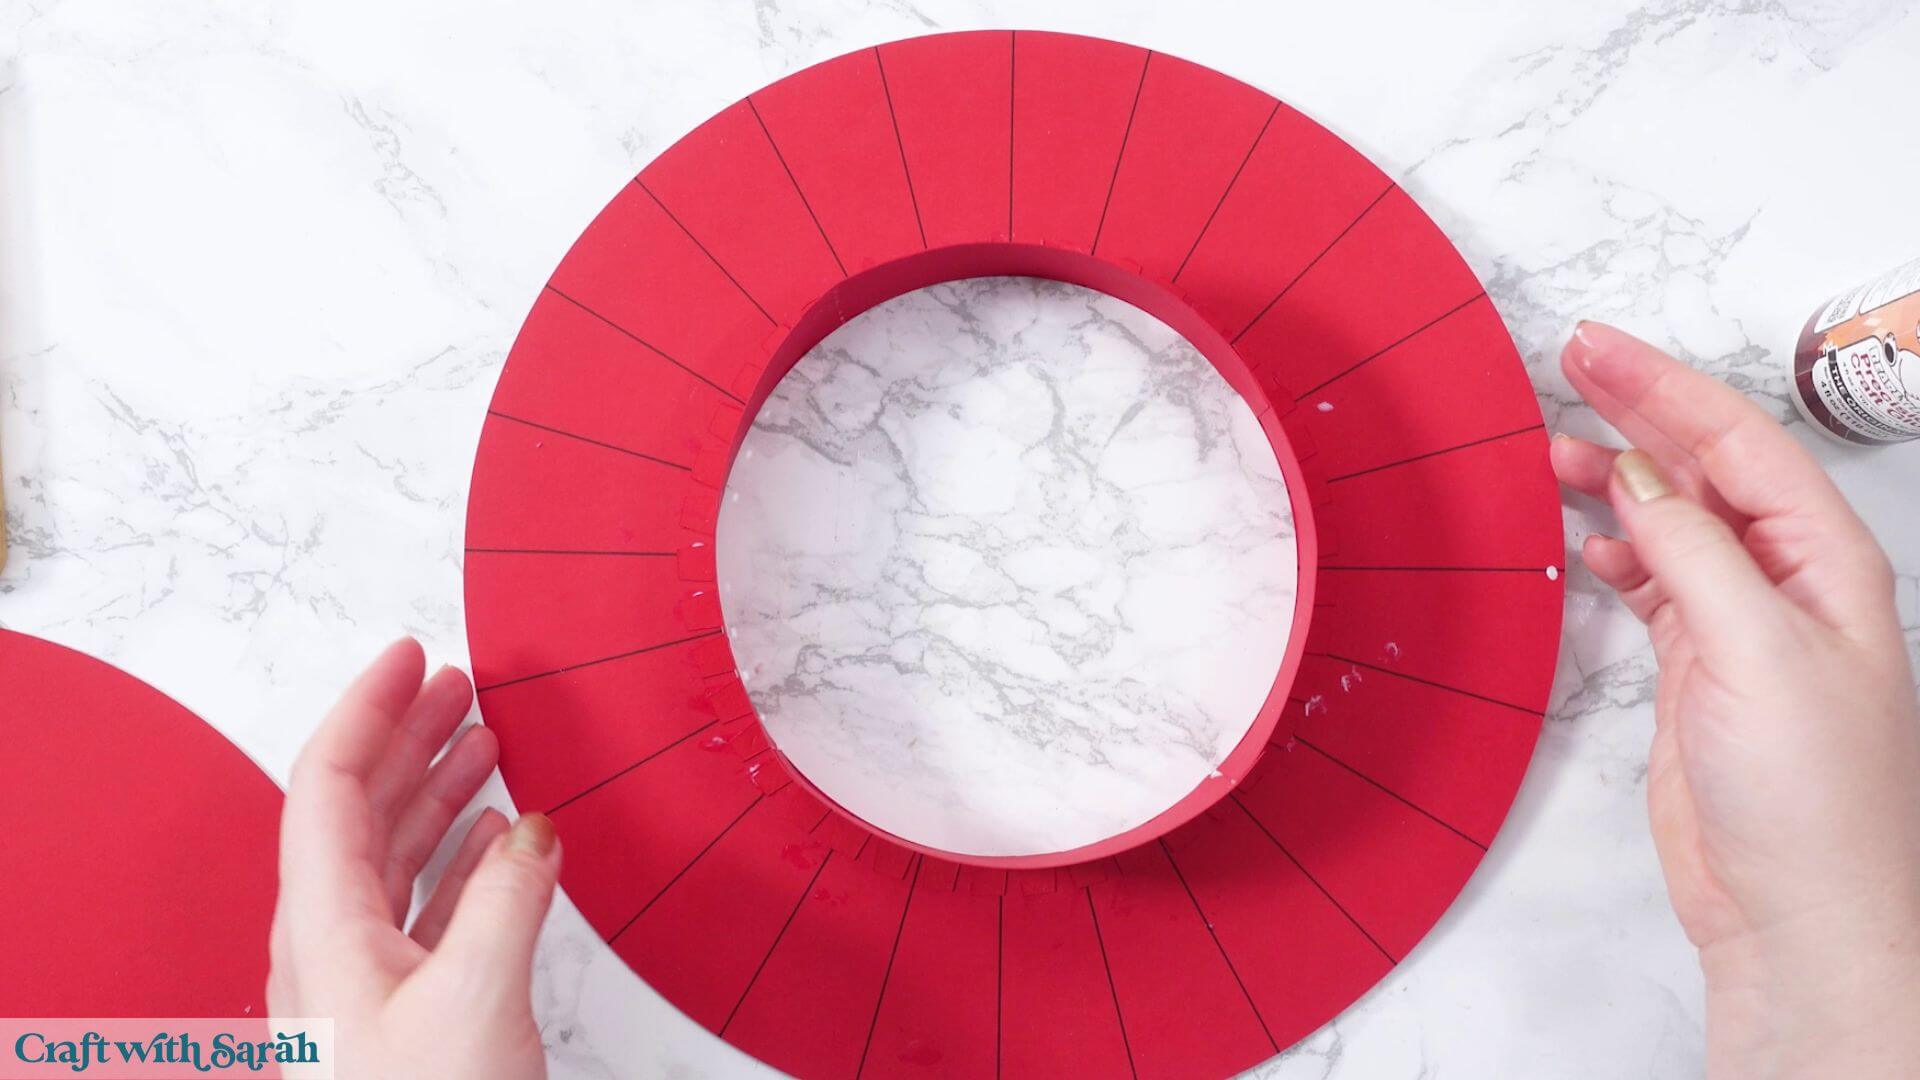
Next, take the four longer strips.
Fold all the crocodile teeth tabs along their score lines.
This time, the tabs should point inwards towards the middle of the large circle.
Start attaching the strips around the outside edge of the base.
Try to position them as close to the outer edge as possible.
Just as with the inner wall, use the score lines near the ends to work out where the pieces should overlap.
Glue the joining sections together as you work around the circle.
Continue until all four strips are attached and you’ve created the outer wall.
You should now have a circular ring-shaped box with an inner and outer wall.
Step 5) Add the chocolate dividers
Next, we’ll add the 24 dividers that separate the chocolates.
Each divider has a score line near both ends.
These tabs need to fold in opposite directions.
It doesn’t matter which end folds left and which folds right, as long as you’re consistent with all 24 pieces.
Fold one tab in one direction and the other tab in the opposite direction.
Repeat for every divider.
This is a good step to do all at once so that they’re ready to glue into position.
Now we’ll attach the dividers using the pen lines on the bottom of the base as guides.
Take one divider and add glue to the two folded tabs.
Don’t add glue along the bottom edge of the divider itself.
Position the divider over one of the pen lines.
One tab will glue to the inner wall and the other to the outer wall.
Try to keep it reasonably straight, but don’t worry if it doesn’t line up perfectly with the drawn line.
You might still be able to see a little of the pen line underneath.
That’s fine because the top of the calendar will cover it later.
Hold the divider in place until the glue starts to dry.
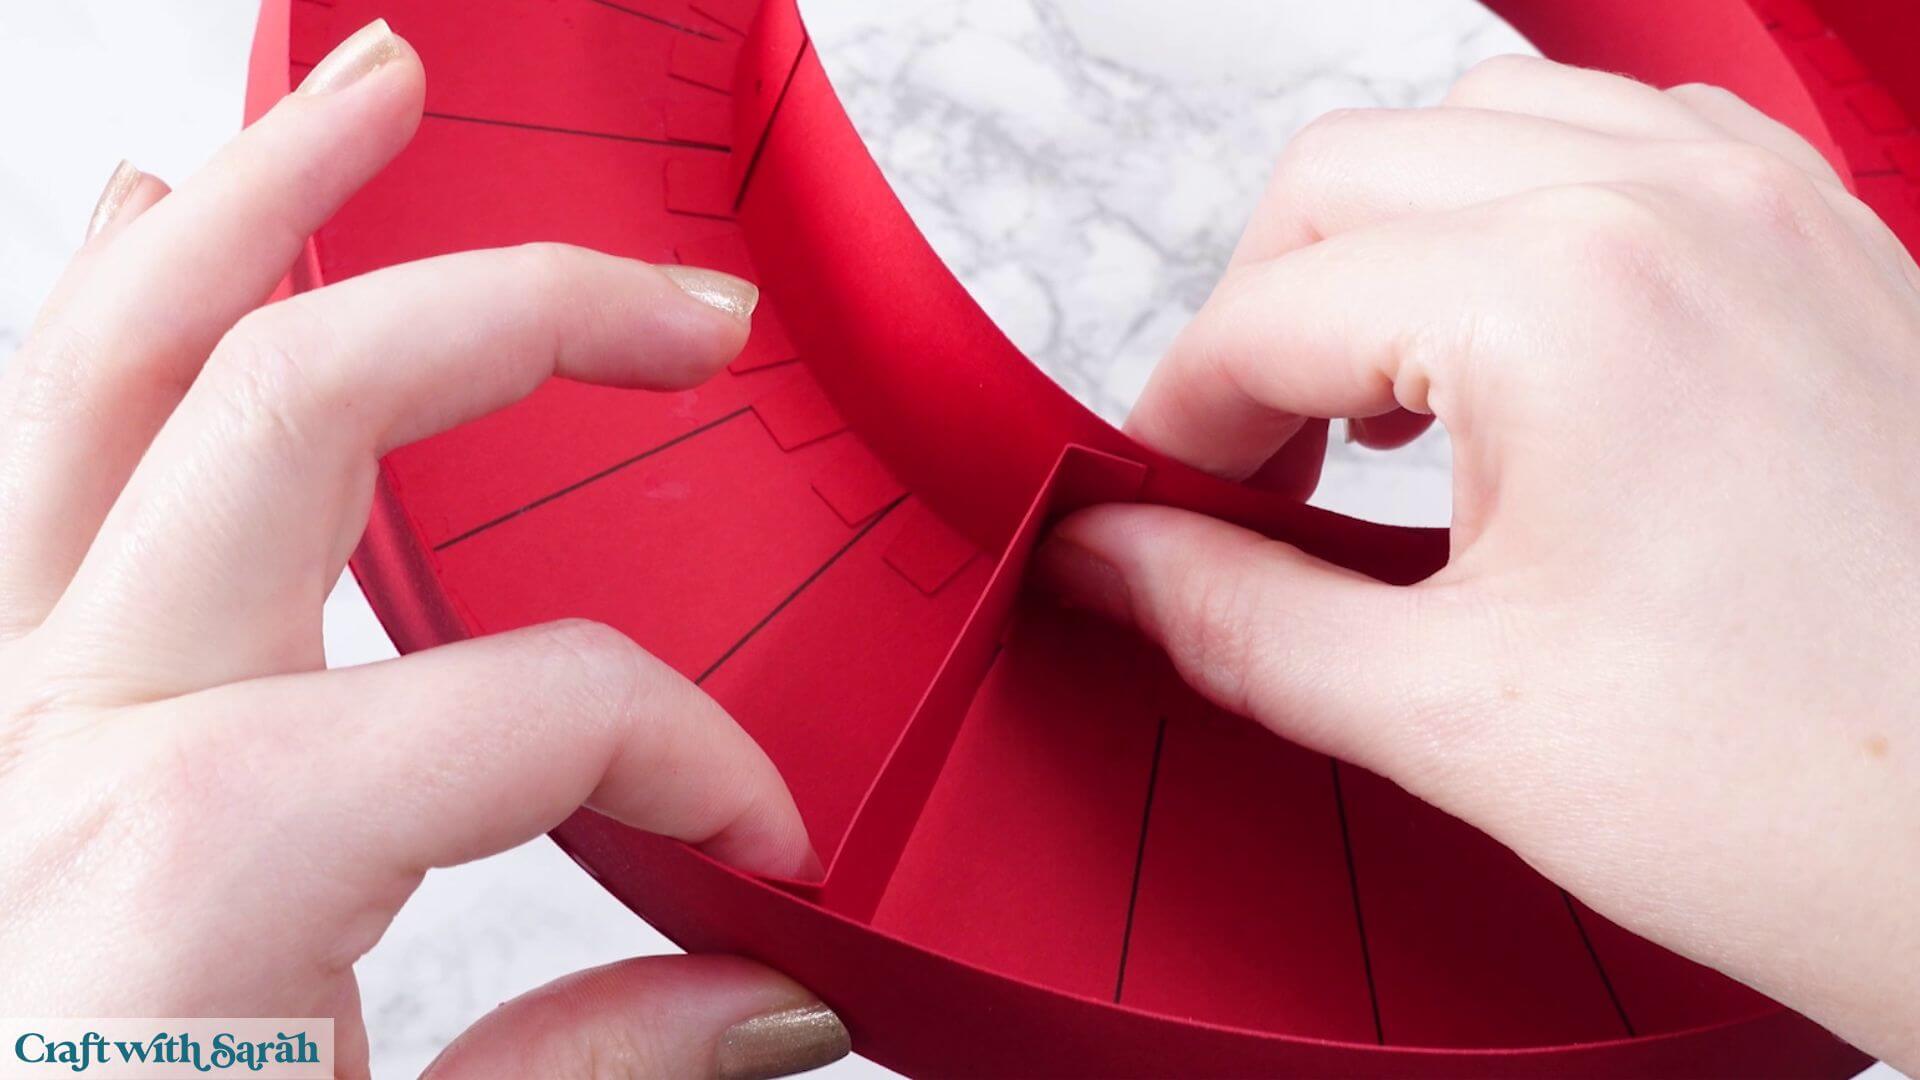
Repeat this process for all 24 dividers, making sure the tabs continue to face in the same directions.
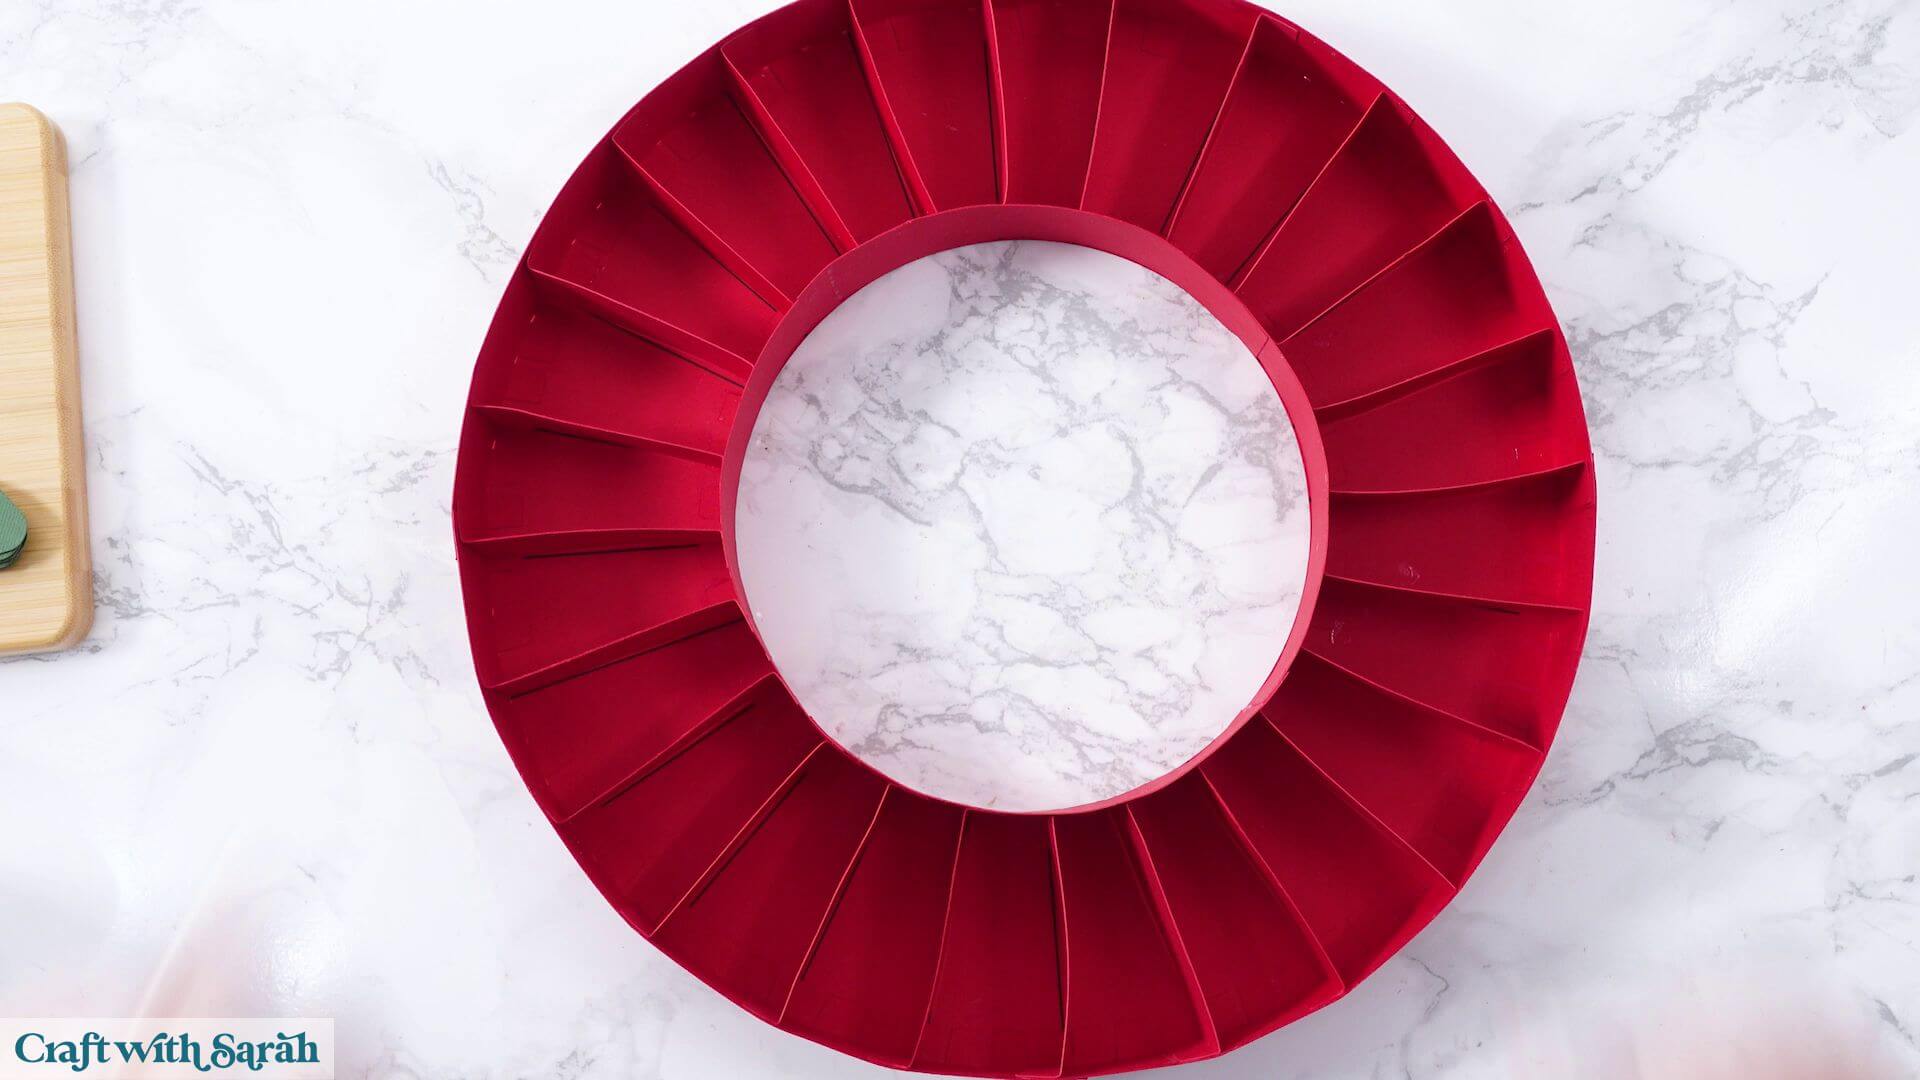
Once they’re all attached, you’ll have 24 individual compartments ready for the chocolates.
Step 6) Put the chocolate inside
Before adding the chocolates, we need to cover the hole in the bottom of the base.
Turn the whole structure upside down.
Find the solid circular piece included in the SVG.
Glue this onto the bottom of the calendar.
This covers the central hole and makes the base more stable.
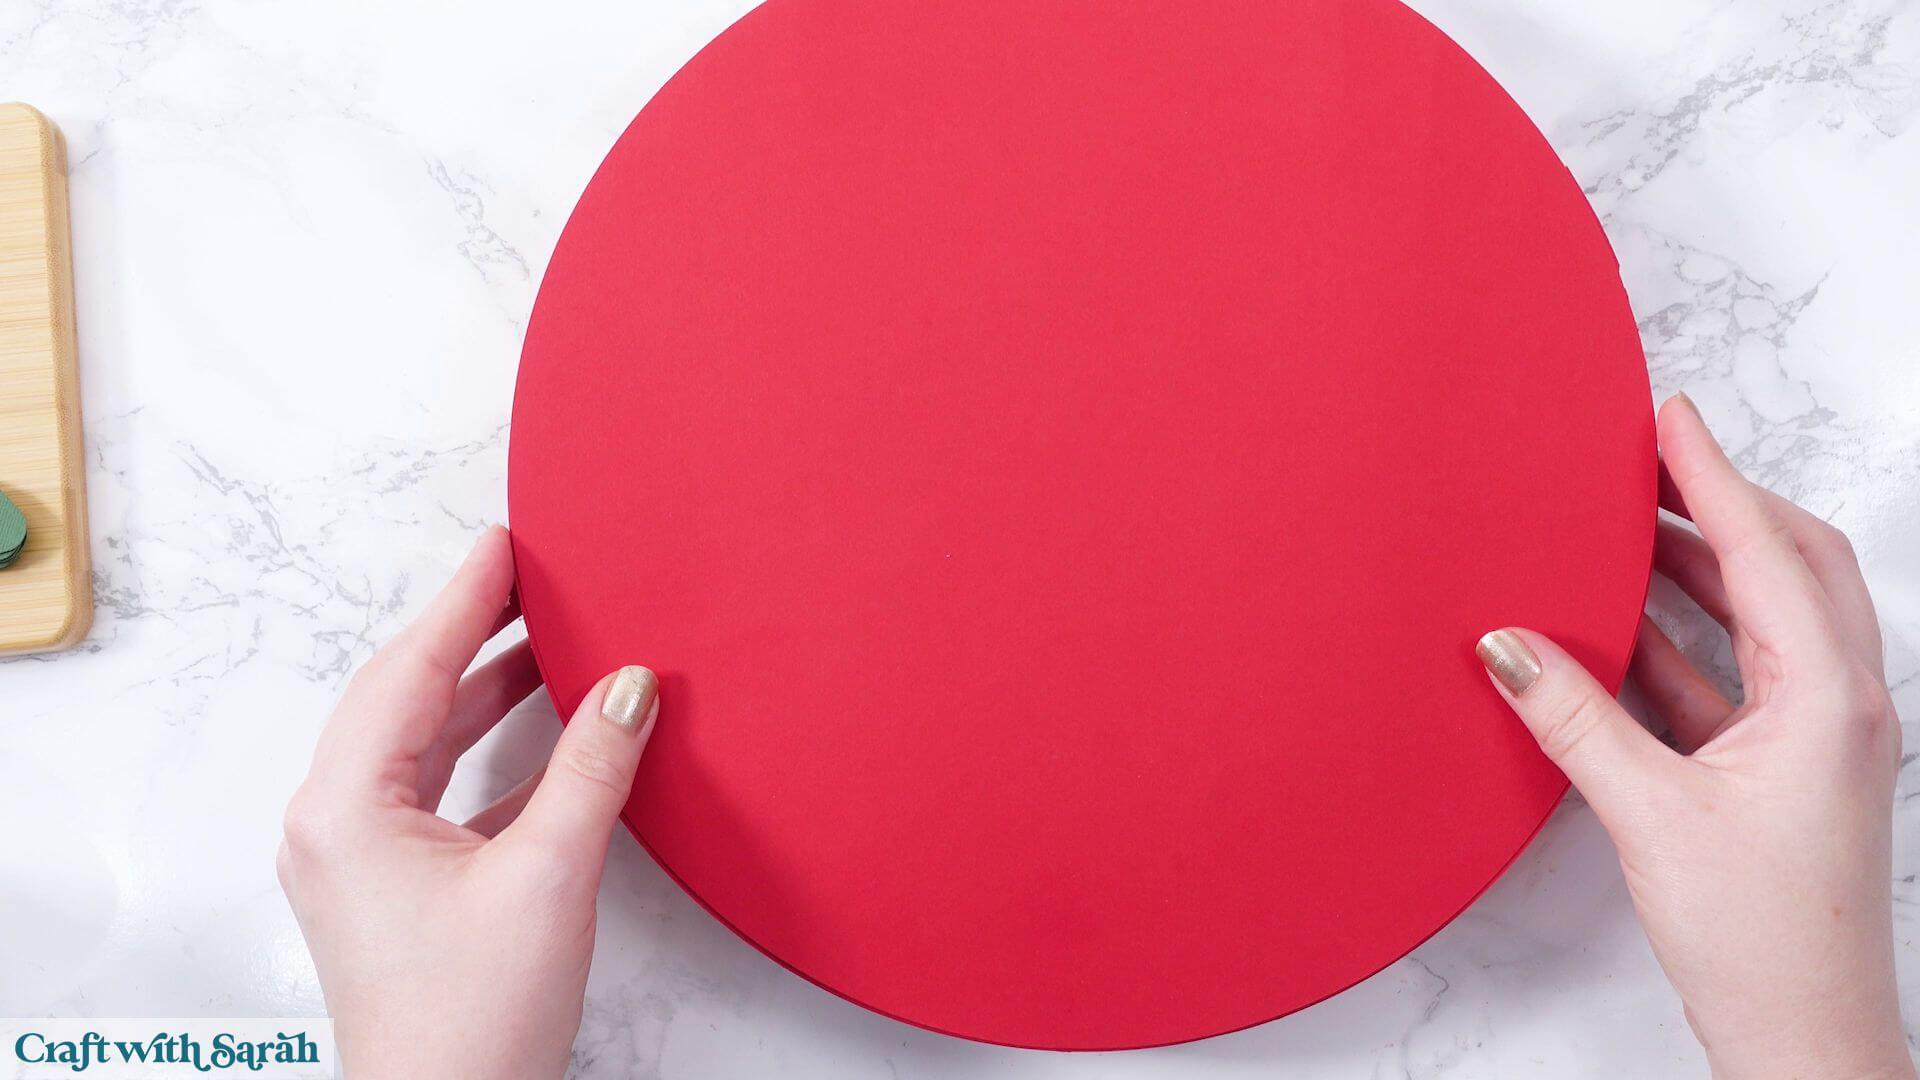
It also helps when opening the little doors later because your fingers won’t go through the hole in the middle.
Leave the glue to dry completely before turning the base back over.
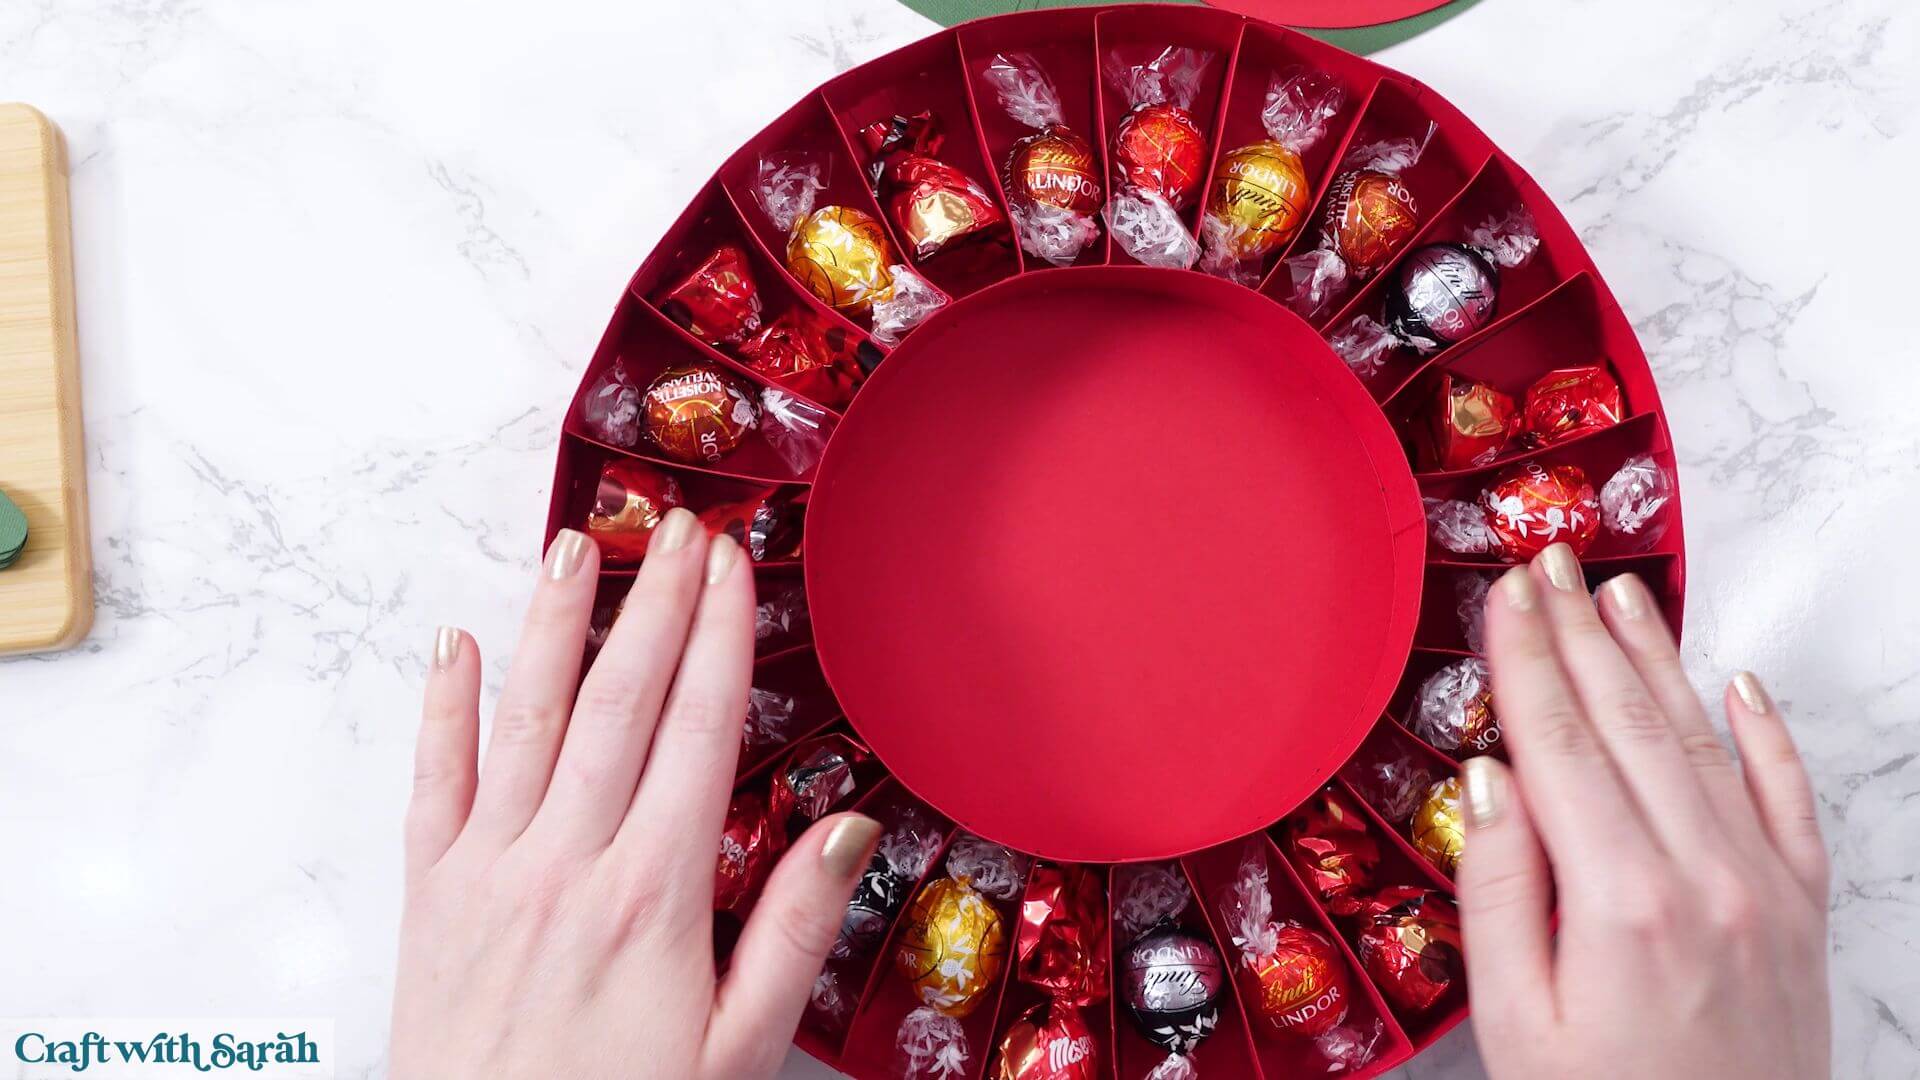
Now for the fun part!
You can add your chocolates at this point or wait until you’ve assembled the front of the calendar.
I’m adding mine now.
The compartments are a lovely size for small individually wrapped chocolates.
I’ve used a selection of different chocolates, including Lindt chocolates, and they fit nicely into the sections.
I’m putting them in a random order so that I won’t know which chocolate I’m getting each day.
You could use the same chocolate in all 24 compartments if you prefer.
Or you could fill them with other small treats instead.
Once all 24 compartments are filled, you’ll notice that the calendar has become quite heavy.
Step 7) Build the front of the advent calendar
Next, we’ll make the top section of the calendar.
This goes together in a similar way to the base.
Find the large green circular piece containing the 24 little doors.
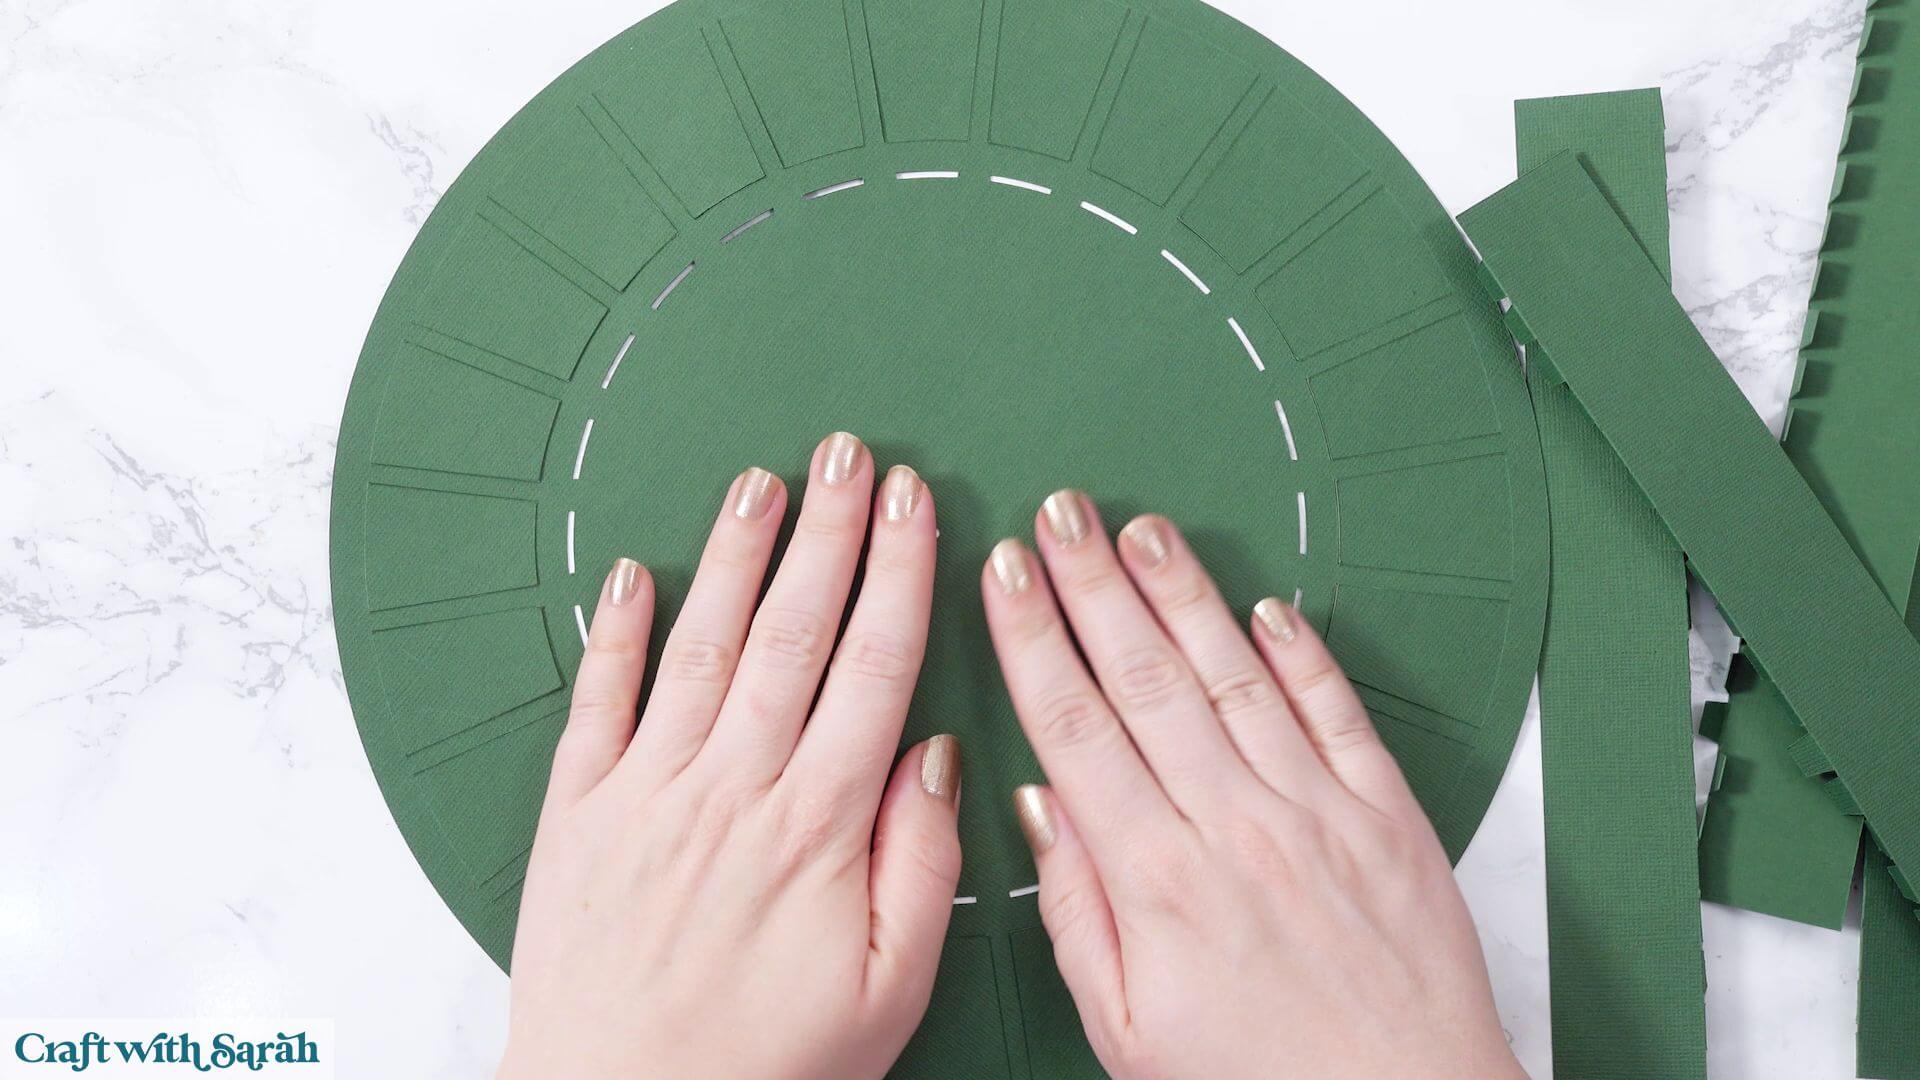
You’ll also need the four long green strips with crocodile teeth tabs.
Fold all the tabs along their score lines.
Turn the front circle upside down.
Position the strips around the outside edge, with the tabs pointing inwards towards the middle.
Glue them around the circle, joining the strips together using the score lines near their ends.
This is the same technique we used when building the outer wall of the base.
Try to keep the strips lined up neatly with the edge of the circle.
Once all four strips are attached, leave the glue to dry.
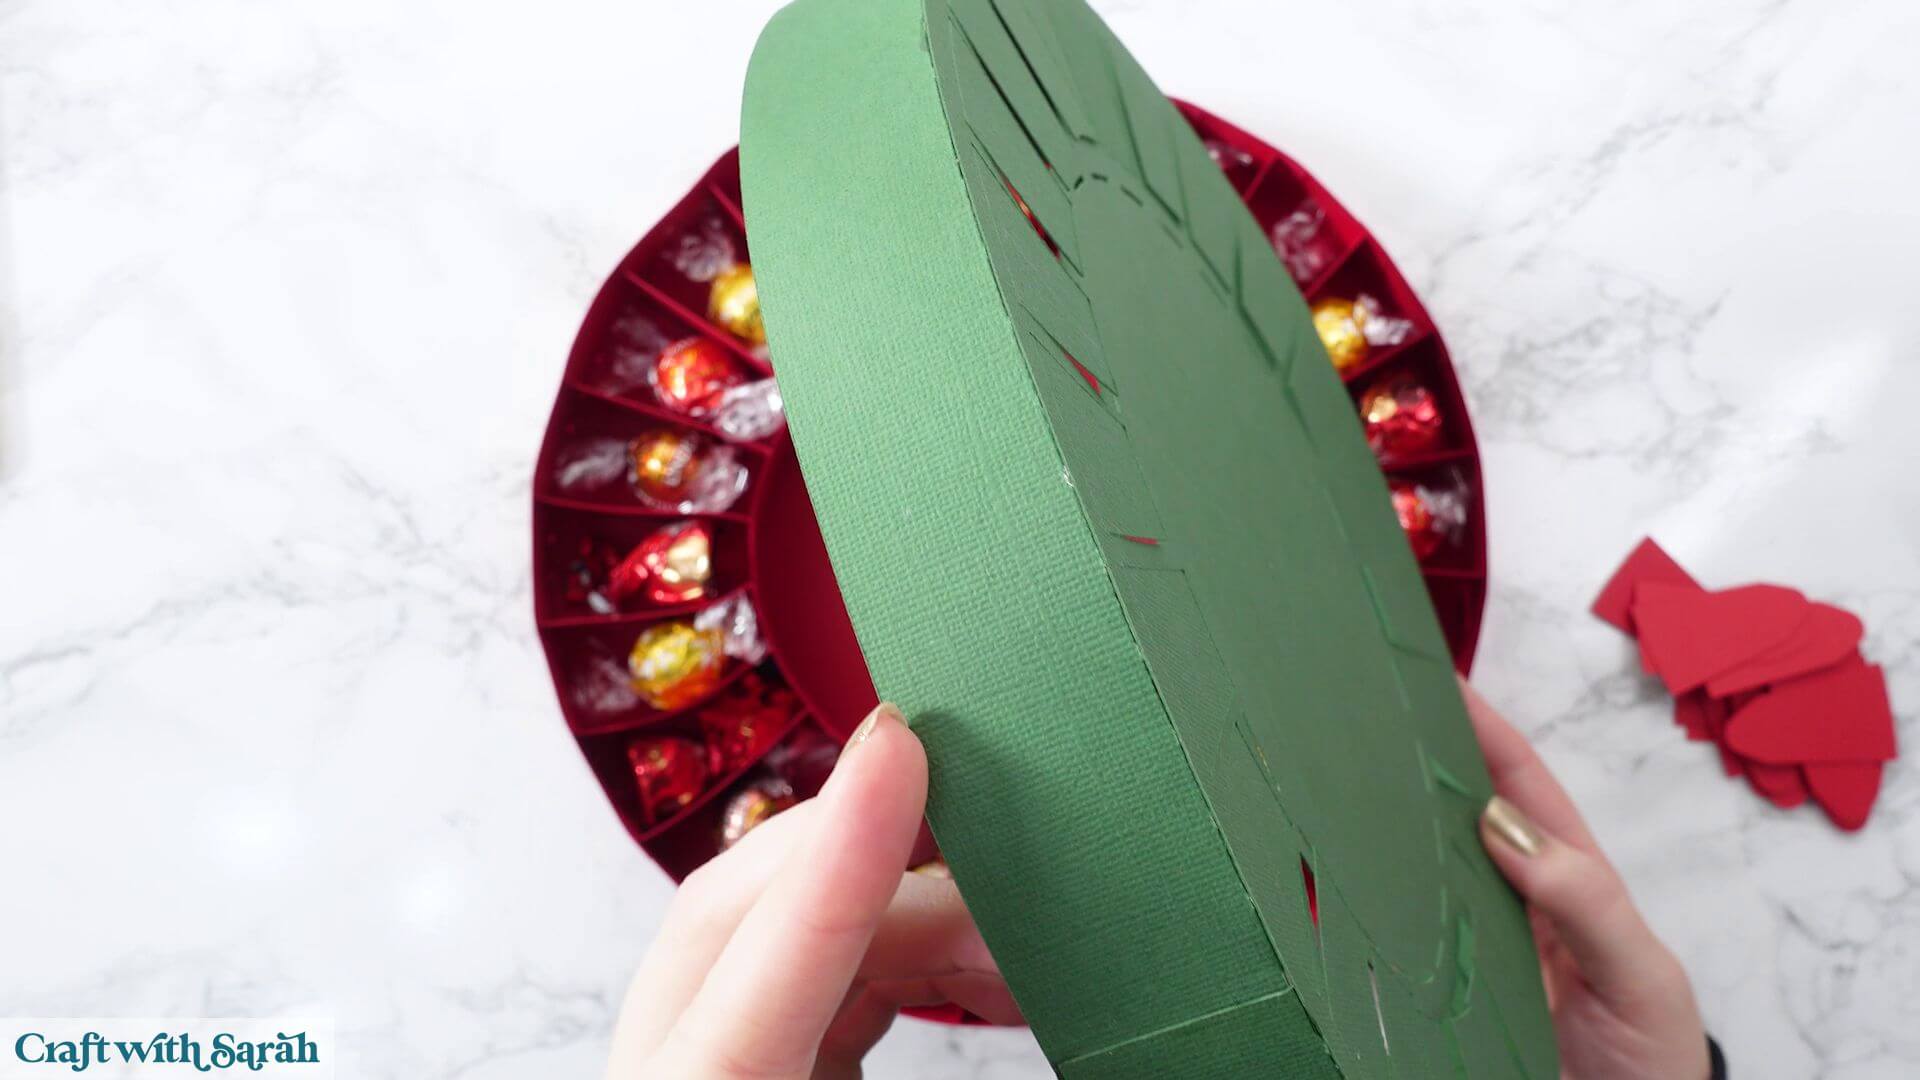
The completed front should fit over the base of the advent calendar.
It will be a fairly tight fit, but it should slide over the top.
Don’t glue the two sections together just yet because we still need to add the decorations.
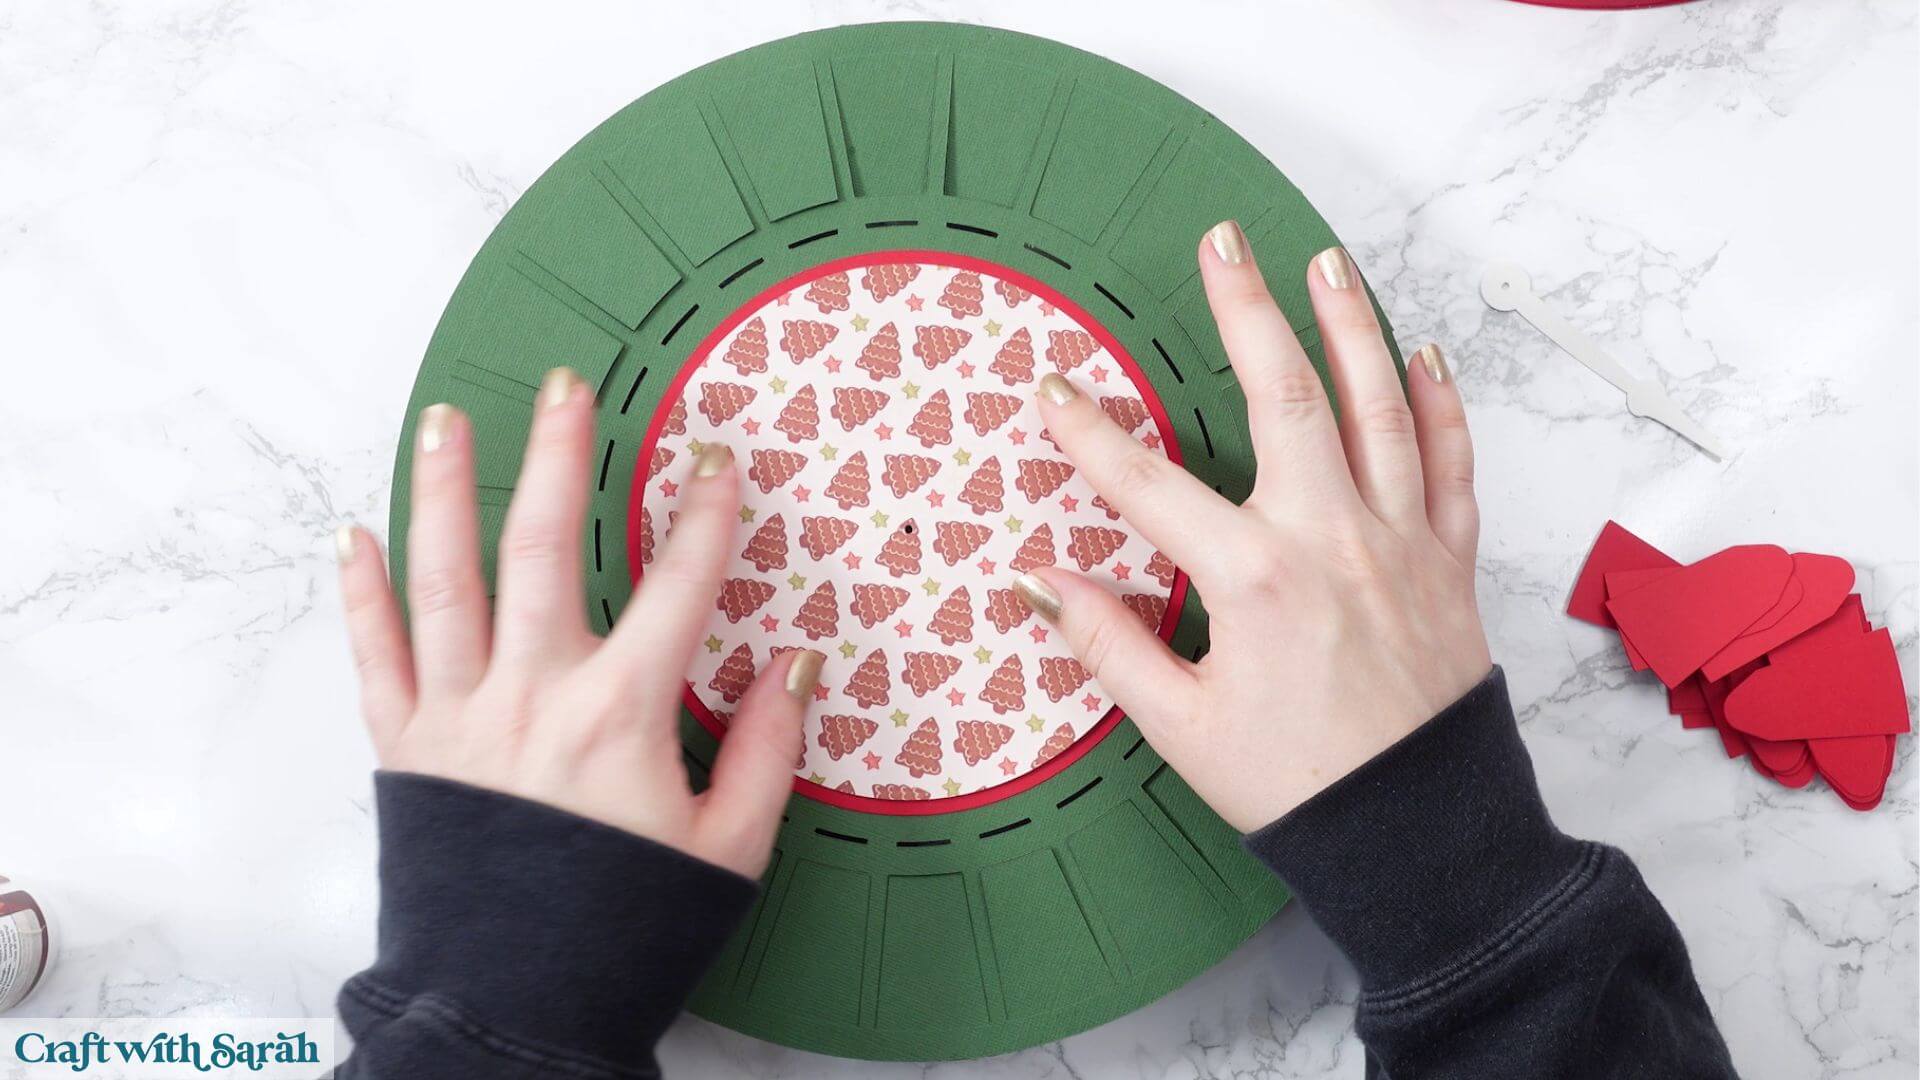
There are several layers that make up the middle of the calendar.
You’ll have the main circle with the hole in the middle, the patterned paper layer and the optional rotating arrow.
Start by gluing the first two layers together.
Make sure the holes in the middle line up accurately.
It can help to lift the pieces up towards the light so that you can see through both holes and check their positioning.
Next, glue the patterned paper layer on top.
Again, make sure the central holes line up.
If you’re making the version without the arrow, you won’t need to worry about the holes because you should have removed the visible one in Cricut Design Space.
If you’re including the arrow, you’ll need a brad or split pin.
The size doesn’t have to be an exact match for the hole in the cardstock.
If your brad is slightly larger, you can gently widen the hole using the end of a weeding tool or something similar.
Take the arrow and push the brad through the hole near its top.
Then push the brad through the matching hole in the middle of the calendar.
Turn the piece over and open out the two legs of the brad to secure it.
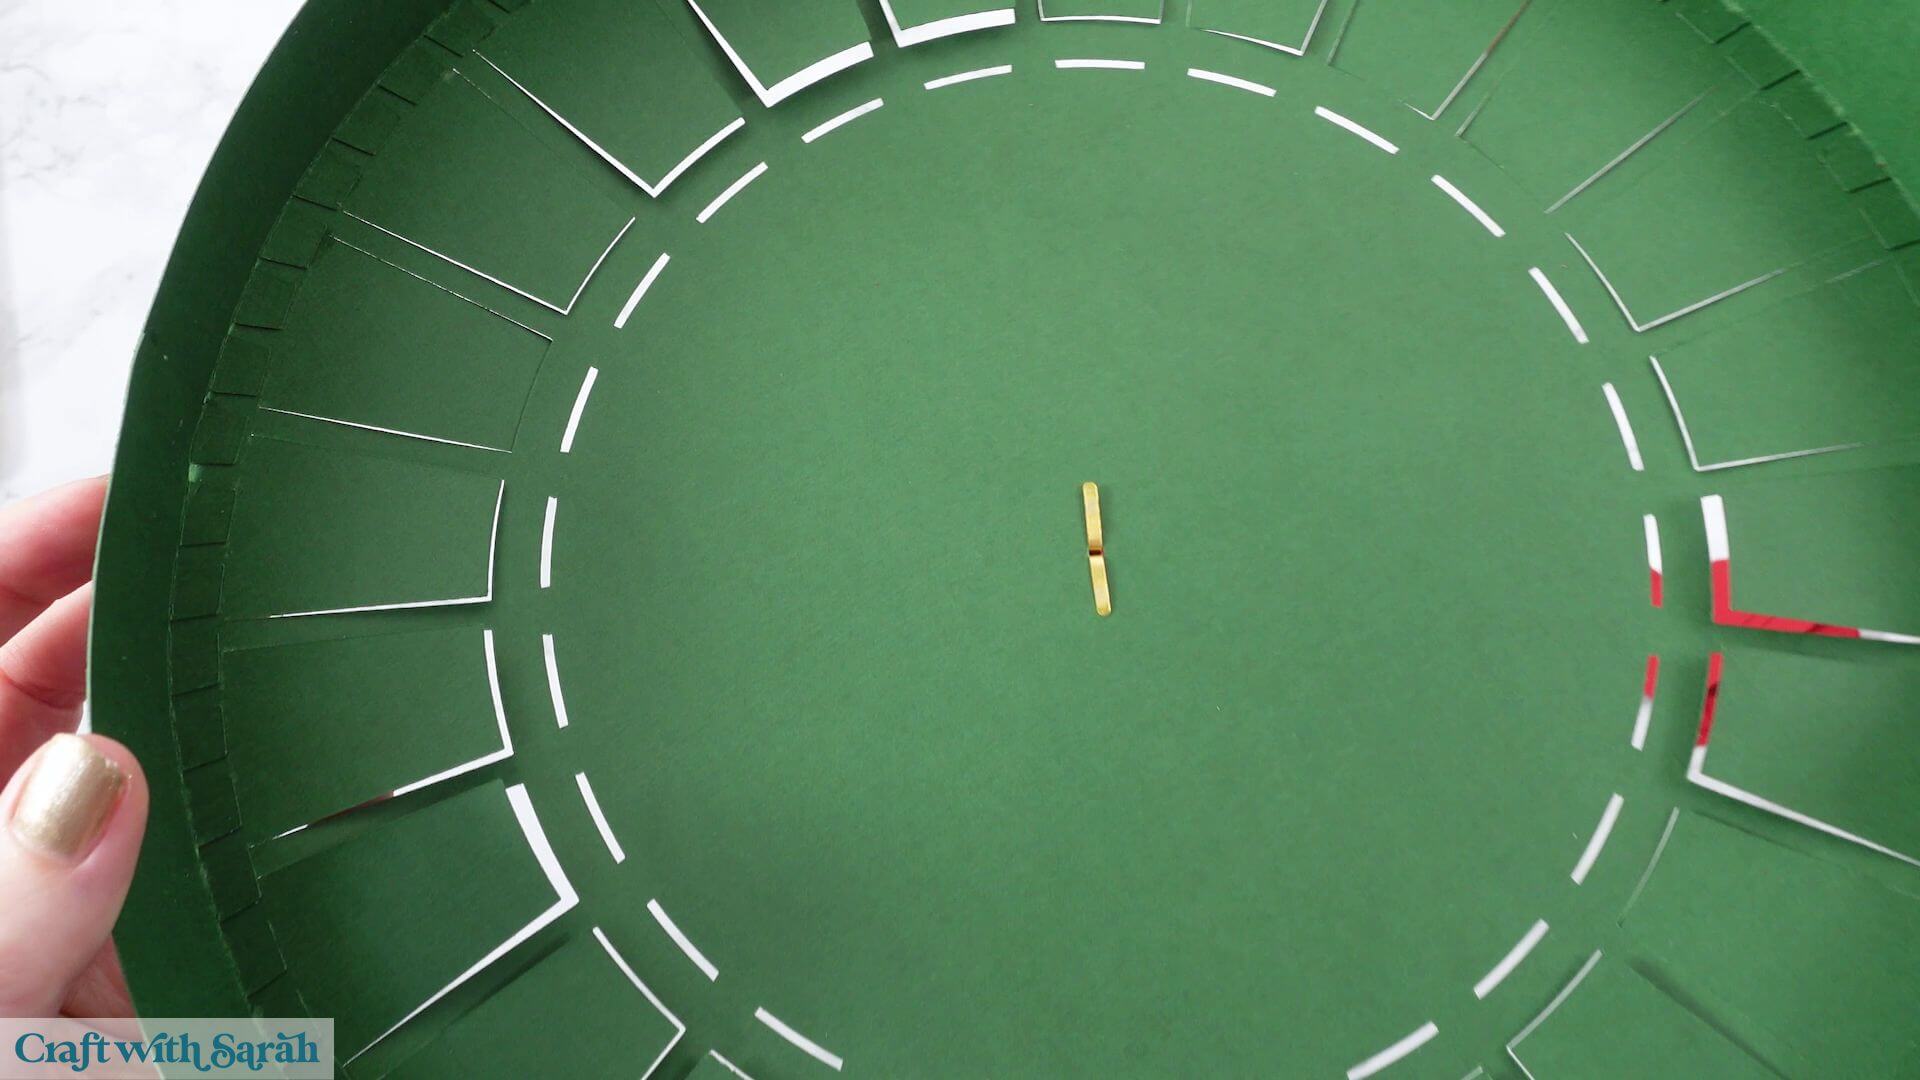
Don’t glue the arrow!
It needs to be able to rotate freely so that you can point it towards the correct day throughout December.
Once the brad is attached, check that the arrow moves smoothly around the centre.
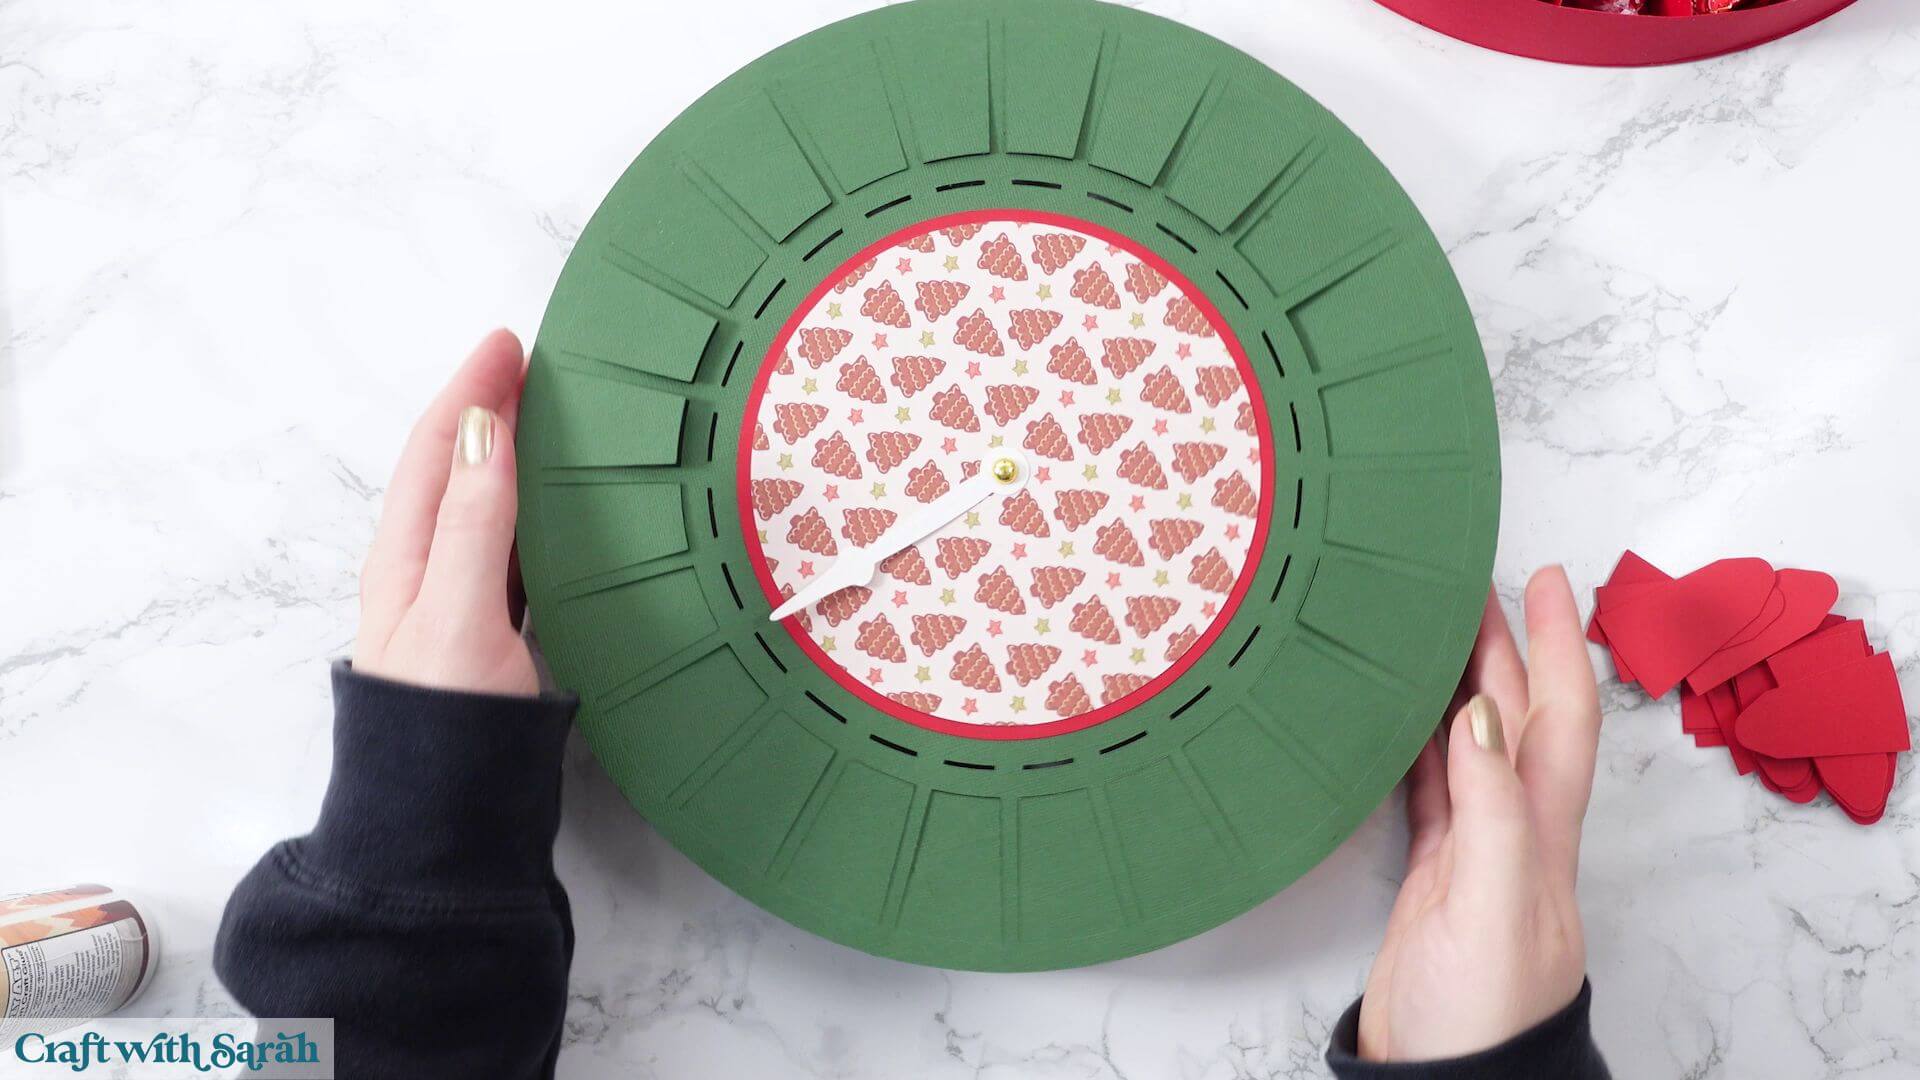
Step 8) Decorate the doors
Next, we’ll decorate the 24 little doors.
You’ll have 24 separate door covers, along with the numbers from 1 to 24.
Each number is made from two layers.
I’ve used white cardstock for the top numbers and gold for the borders underneath.
Start by gluing all the white numbers onto their matching gold pieces.
I recommend doing all 24 before attaching anything to the calendar.
Lay them out in numerical order so that you can easily see which number you’re working with.
This will help avoid accidentally putting any of the numbers in the wrong position.
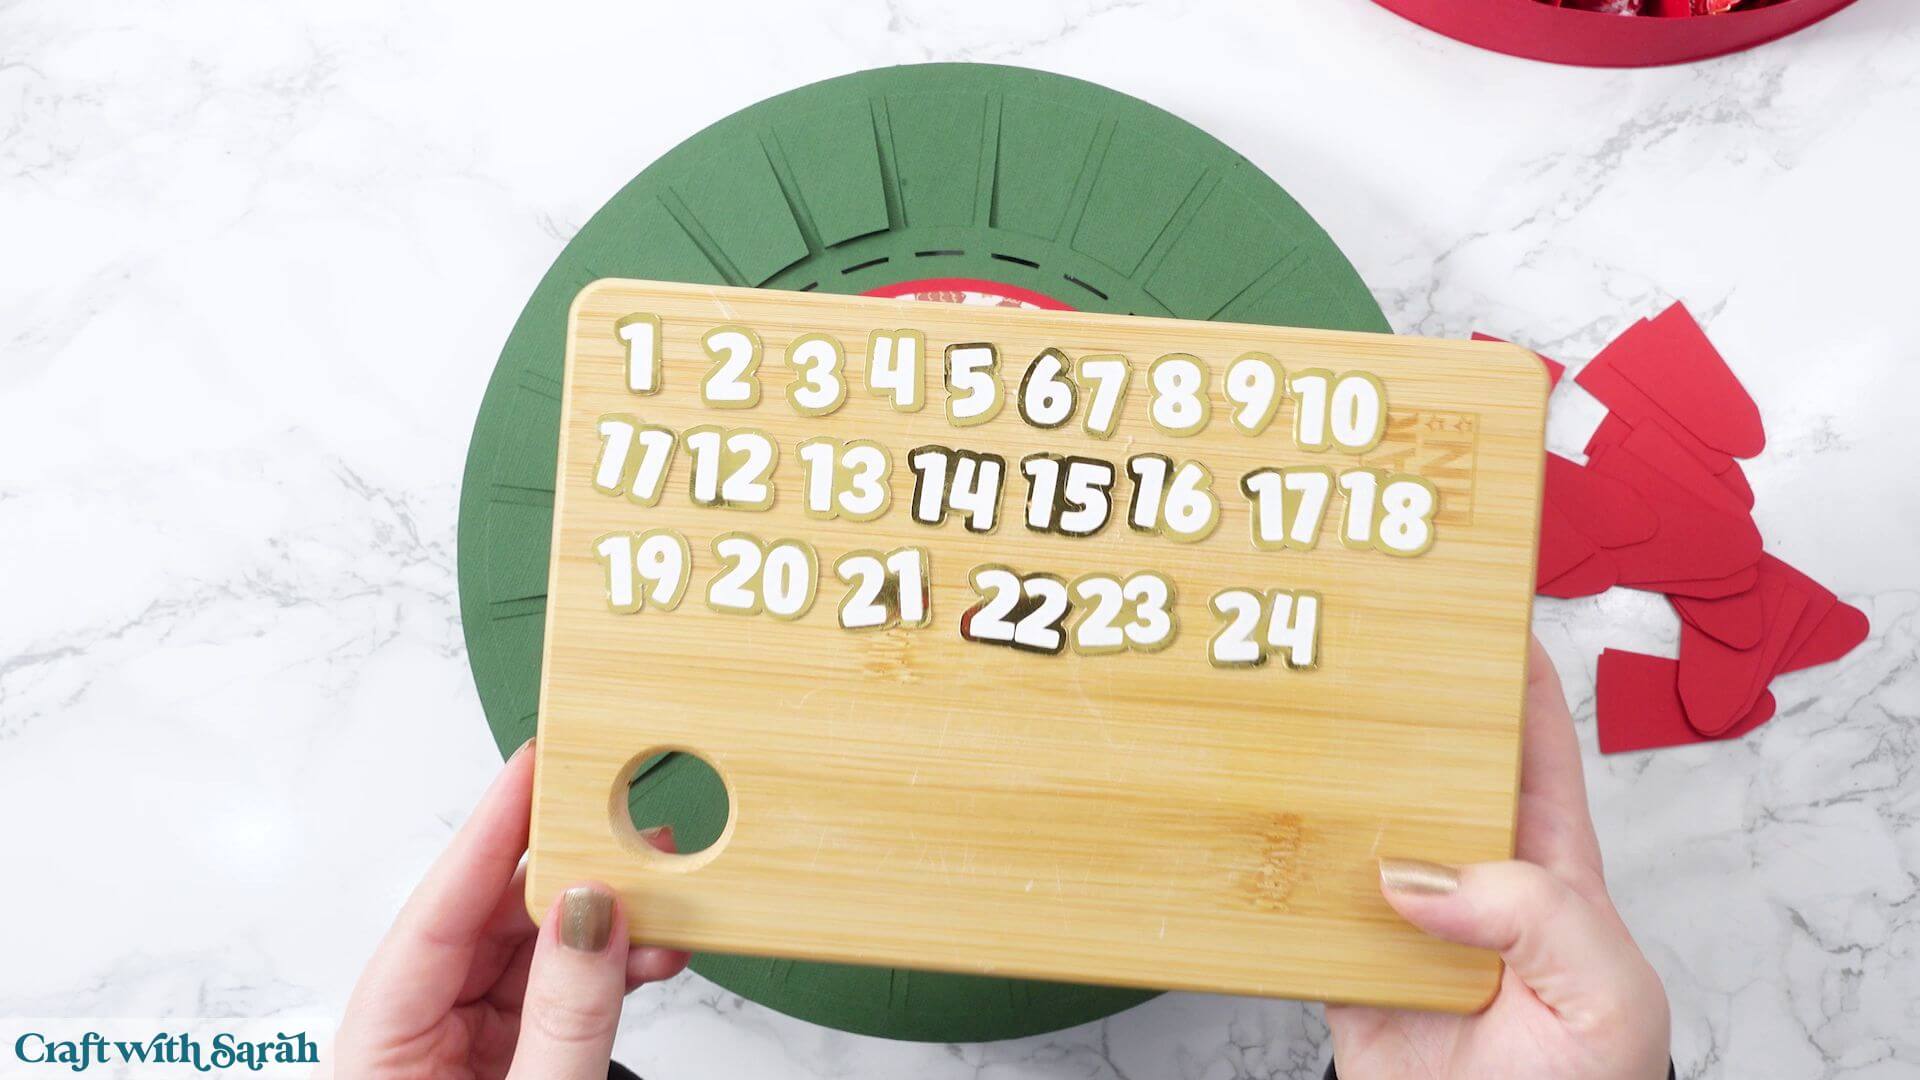
Each little door on the front of the calendar has a score line near its edge.
This is where the separate door cover will be attached.
Take one of the covers and add glue to the section that will sit over the door.
Position it so that it lines up with the score line.
The cover should sit over the green flap, with the red showing on top.
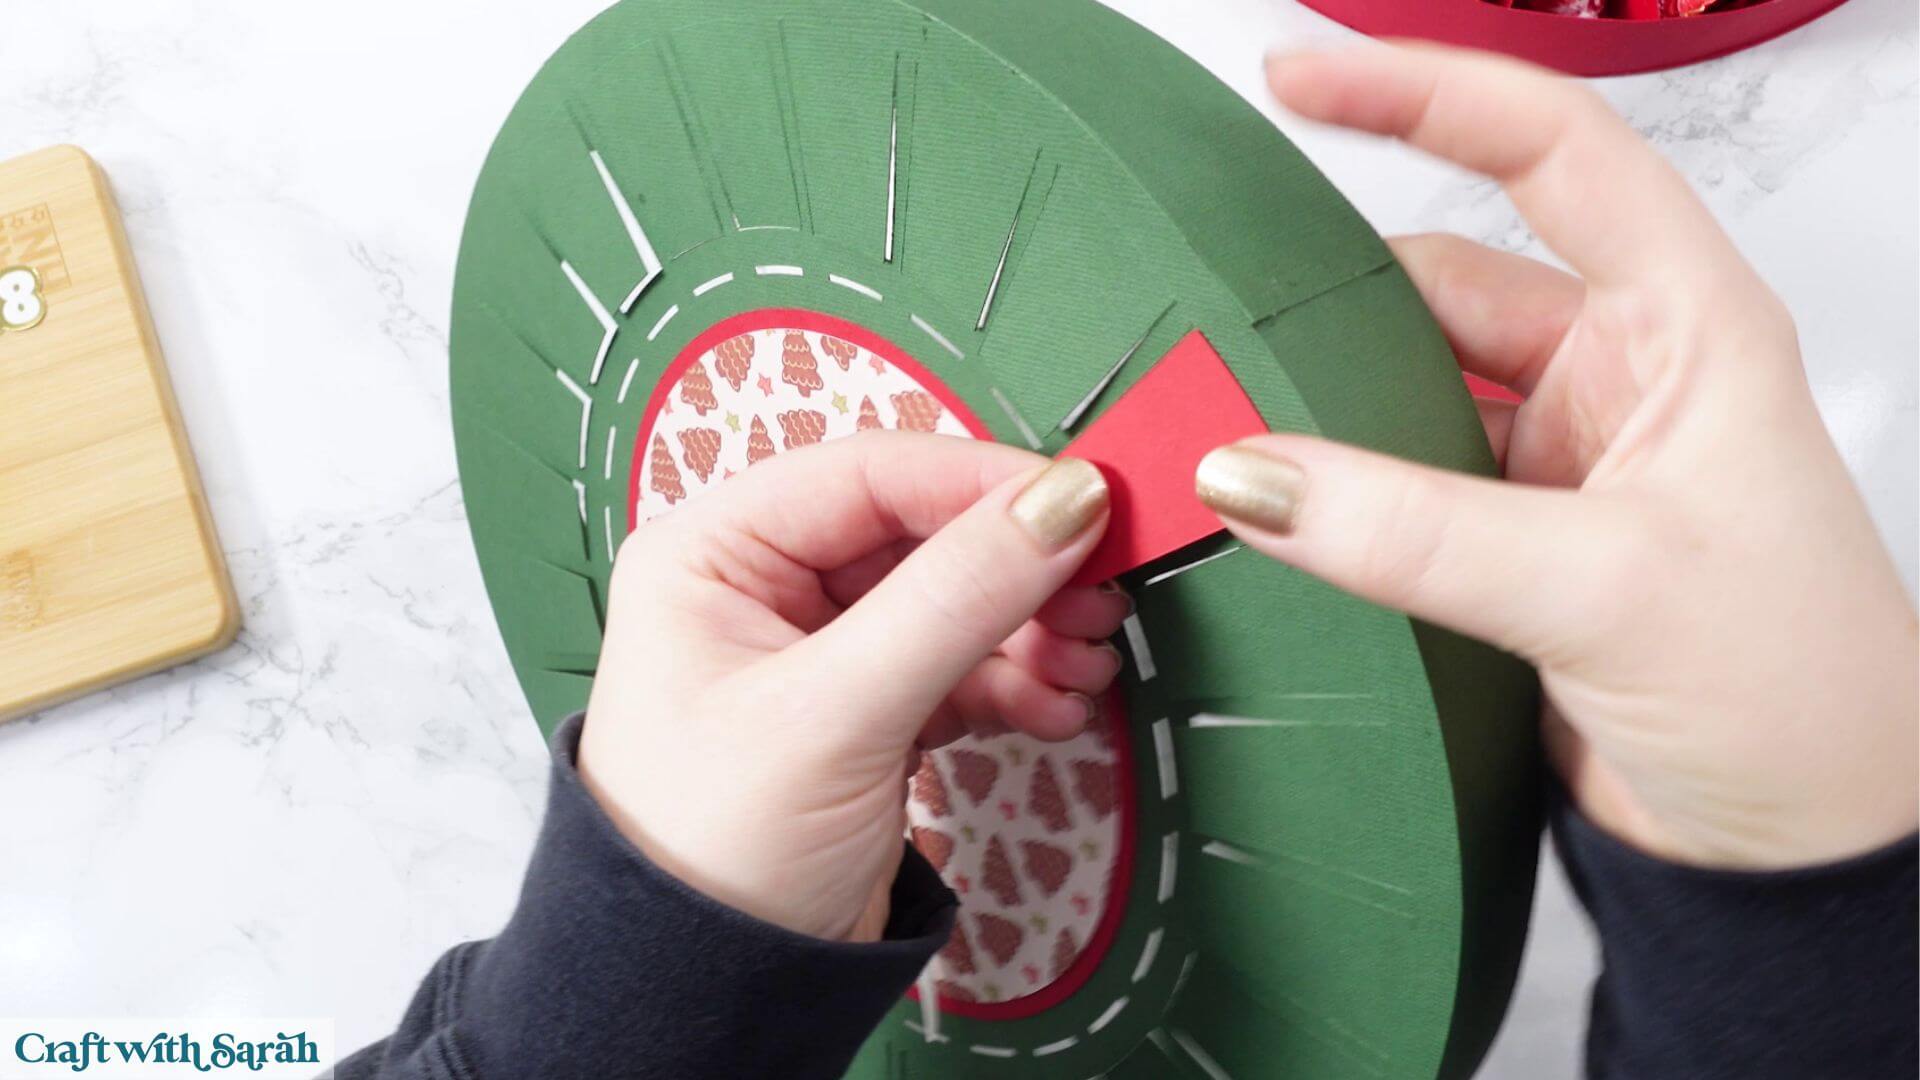
Try to keep the positioning consistent so that all the doors look neat when they’re finished.
You don’t need to be absolutely perfect, but lining them up reasonably well will make the finished calendar look much tidier.
Repeat this for all 24 doors.
Leave the glue to dry before trying to close them.
Once all the door covers are attached and the glue is dry, you can close them.
Each door has a small tab that tucks into a matching slot underneath.
Gently bend the door back slightly.
Slide the end of the tab into the slot and push it down until the door sits flat.
Repeat for all 24 doors.
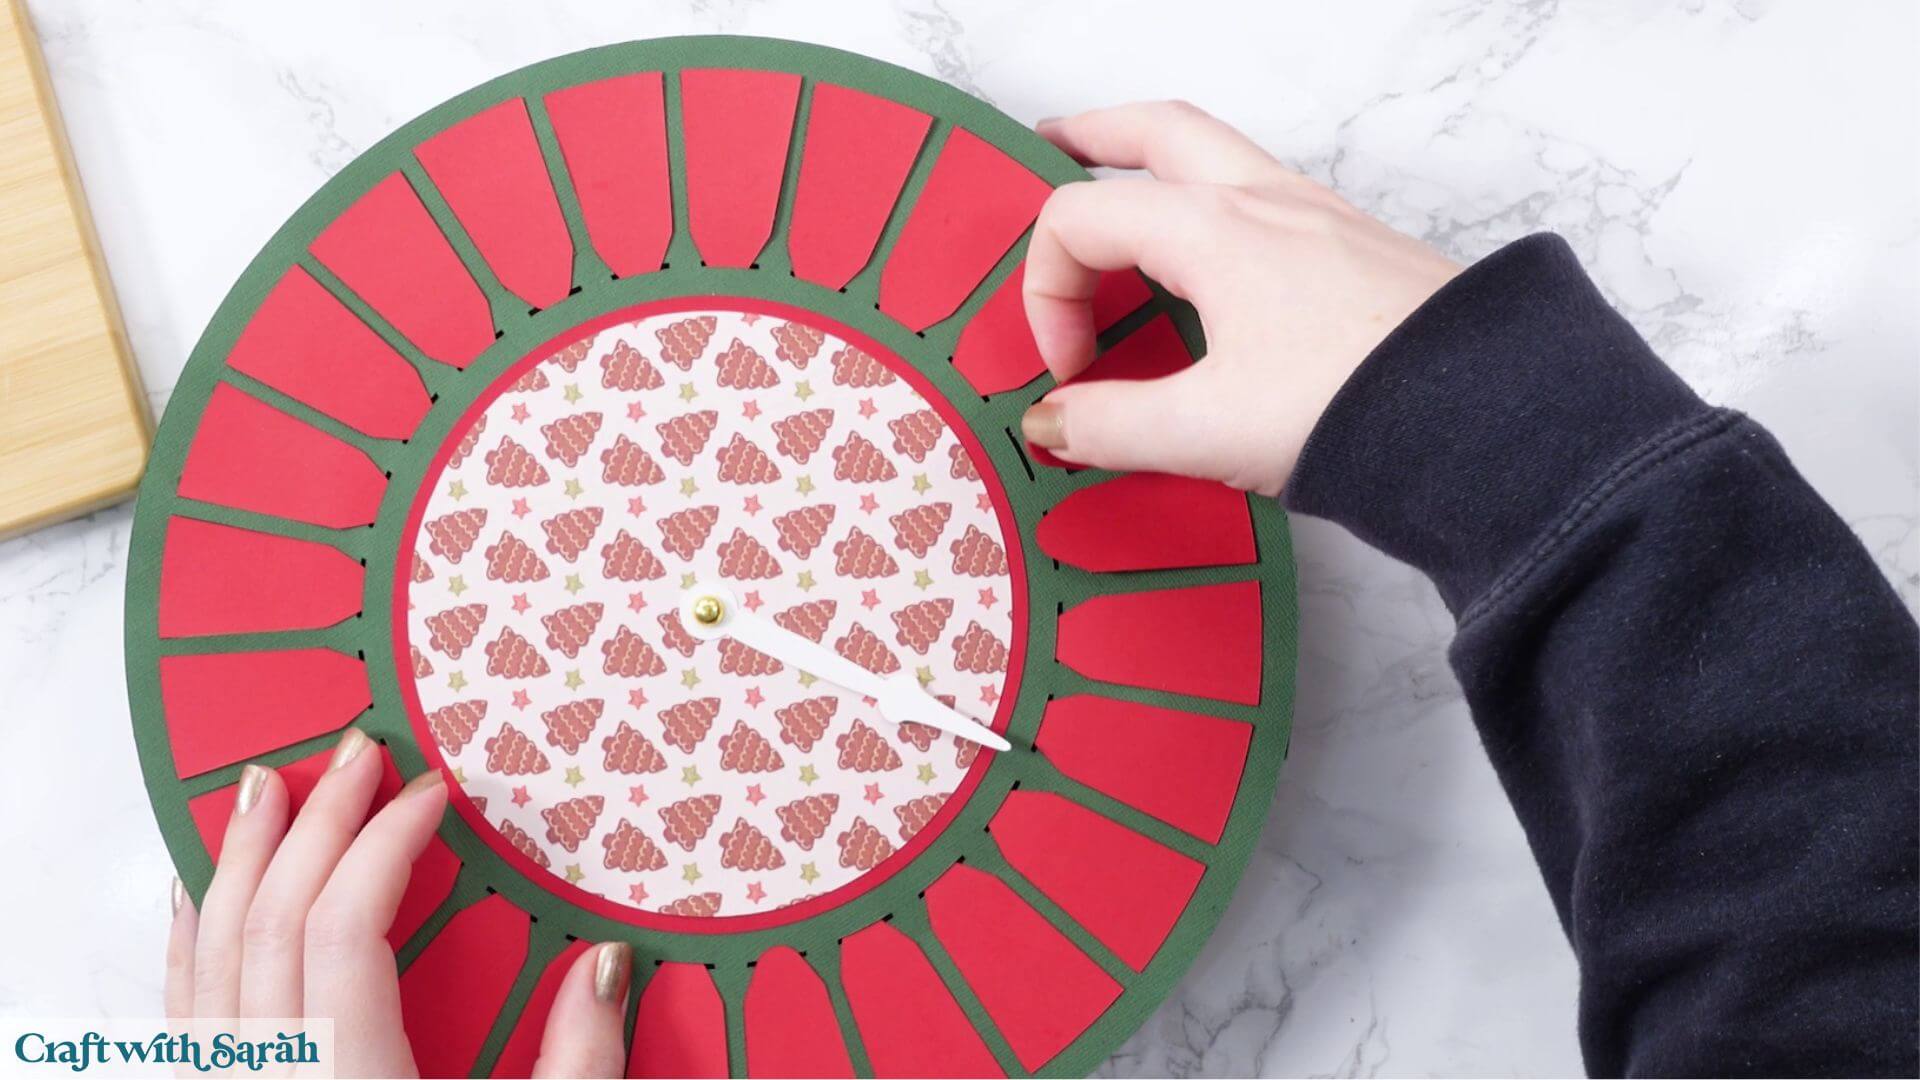
It’s easiest to close them all before adding the numbers because you’ll have a nice flat surface to work on.
Now we’ll add the numbers to the front of the doors.
Decide where you want number one to go, then work around the calendar in order until you reach number 24.
I’m using glue to attach mine, but you could use foam squares if you want to add a little dimension.
Position each number near the top of its door.
This is important because some of the double-digit numbers, particularly the larger ones such as 24, need the wider space at the top.
If you position them too low, they might overlap the edges of the doors.
Try to keep all the numbers at roughly the same height so that the finished calendar looks neat and consistent.
Continue around the entire circle until all 24 numbers are attached.
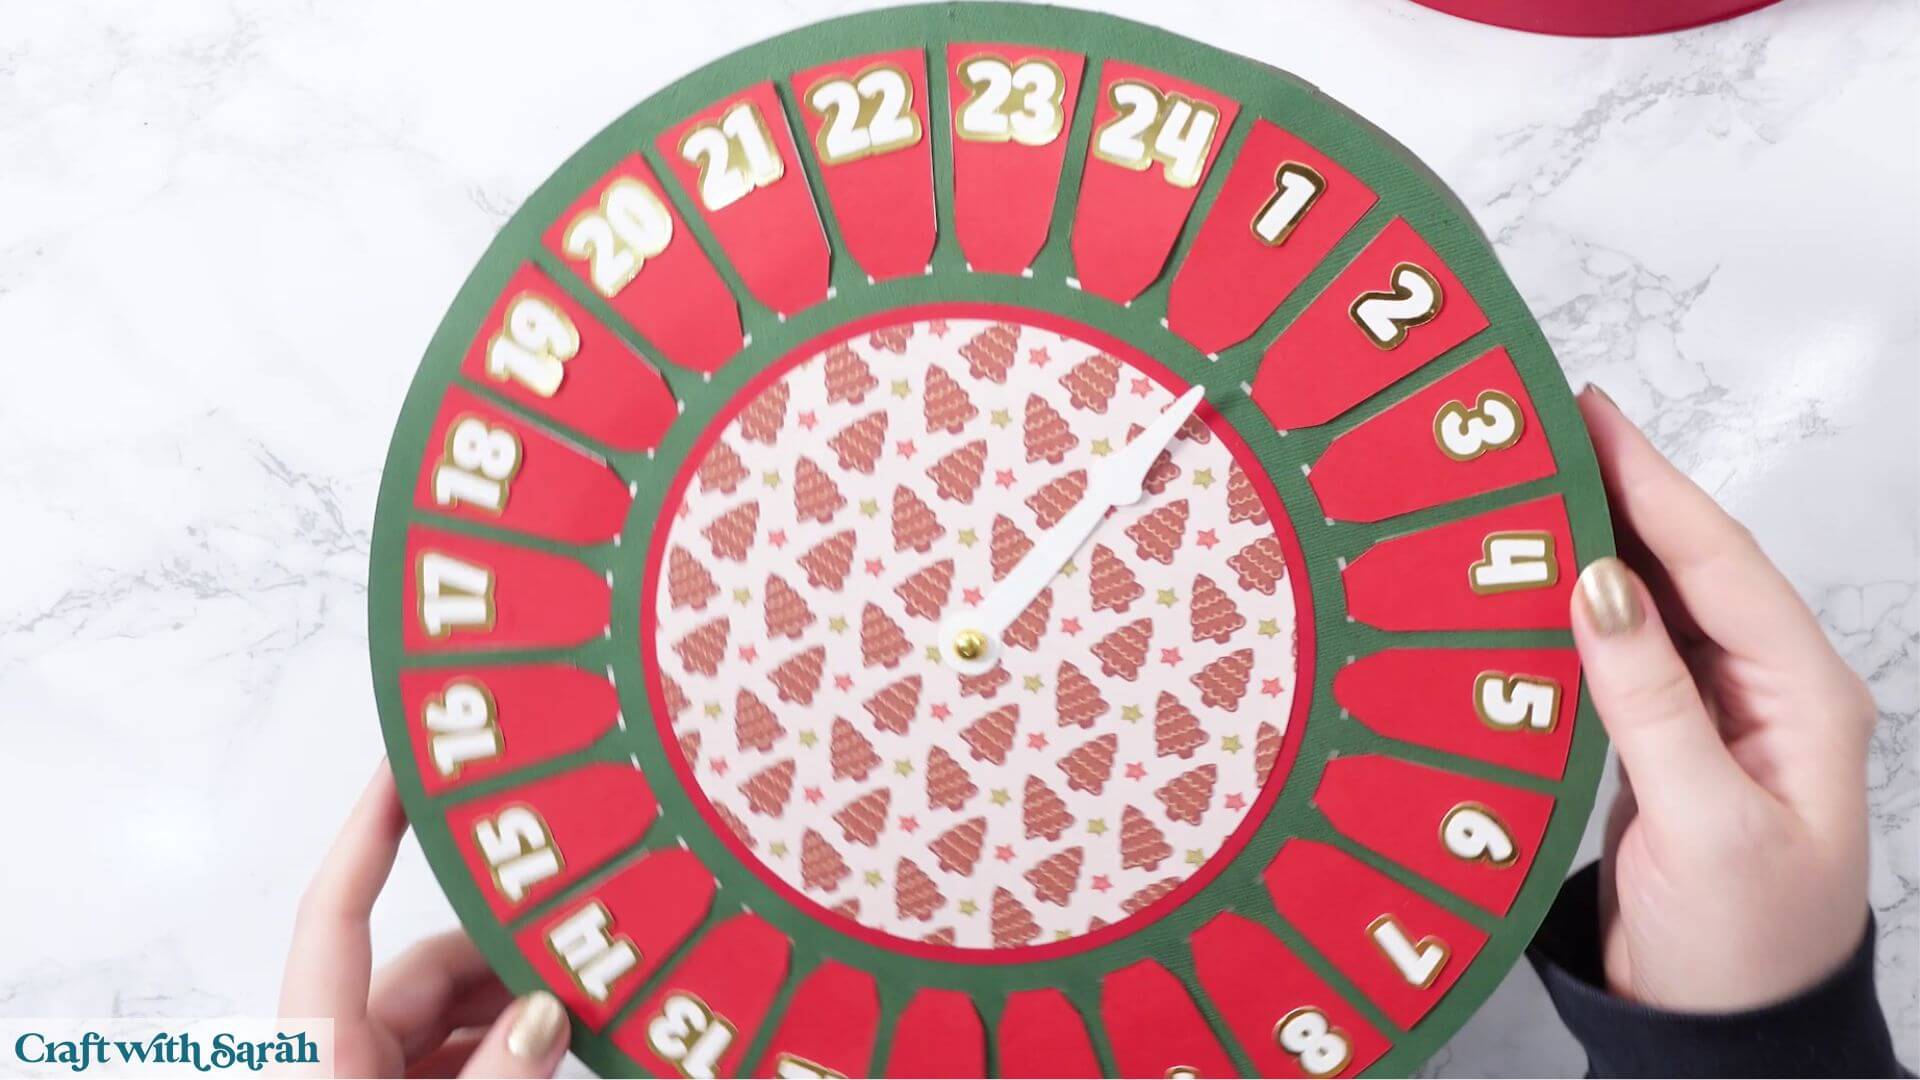
Step 9) Attach the front to the base
Now that all the numbered doors are finished, we can attach the front of the advent calendar to the chocolate-filled base.
Carefully position the front over the base.
Before gluing anything, open a couple of the doors to check that they line up with the chocolate compartments underneath.
You might need to rotate the front slightly to get everything into the correct position.
I recommend checking doors on opposite sides of the calendar to make sure the alignment is correct all the way around.
Once you’re happy, remove the front and add a little glue around the outside edge of the base.
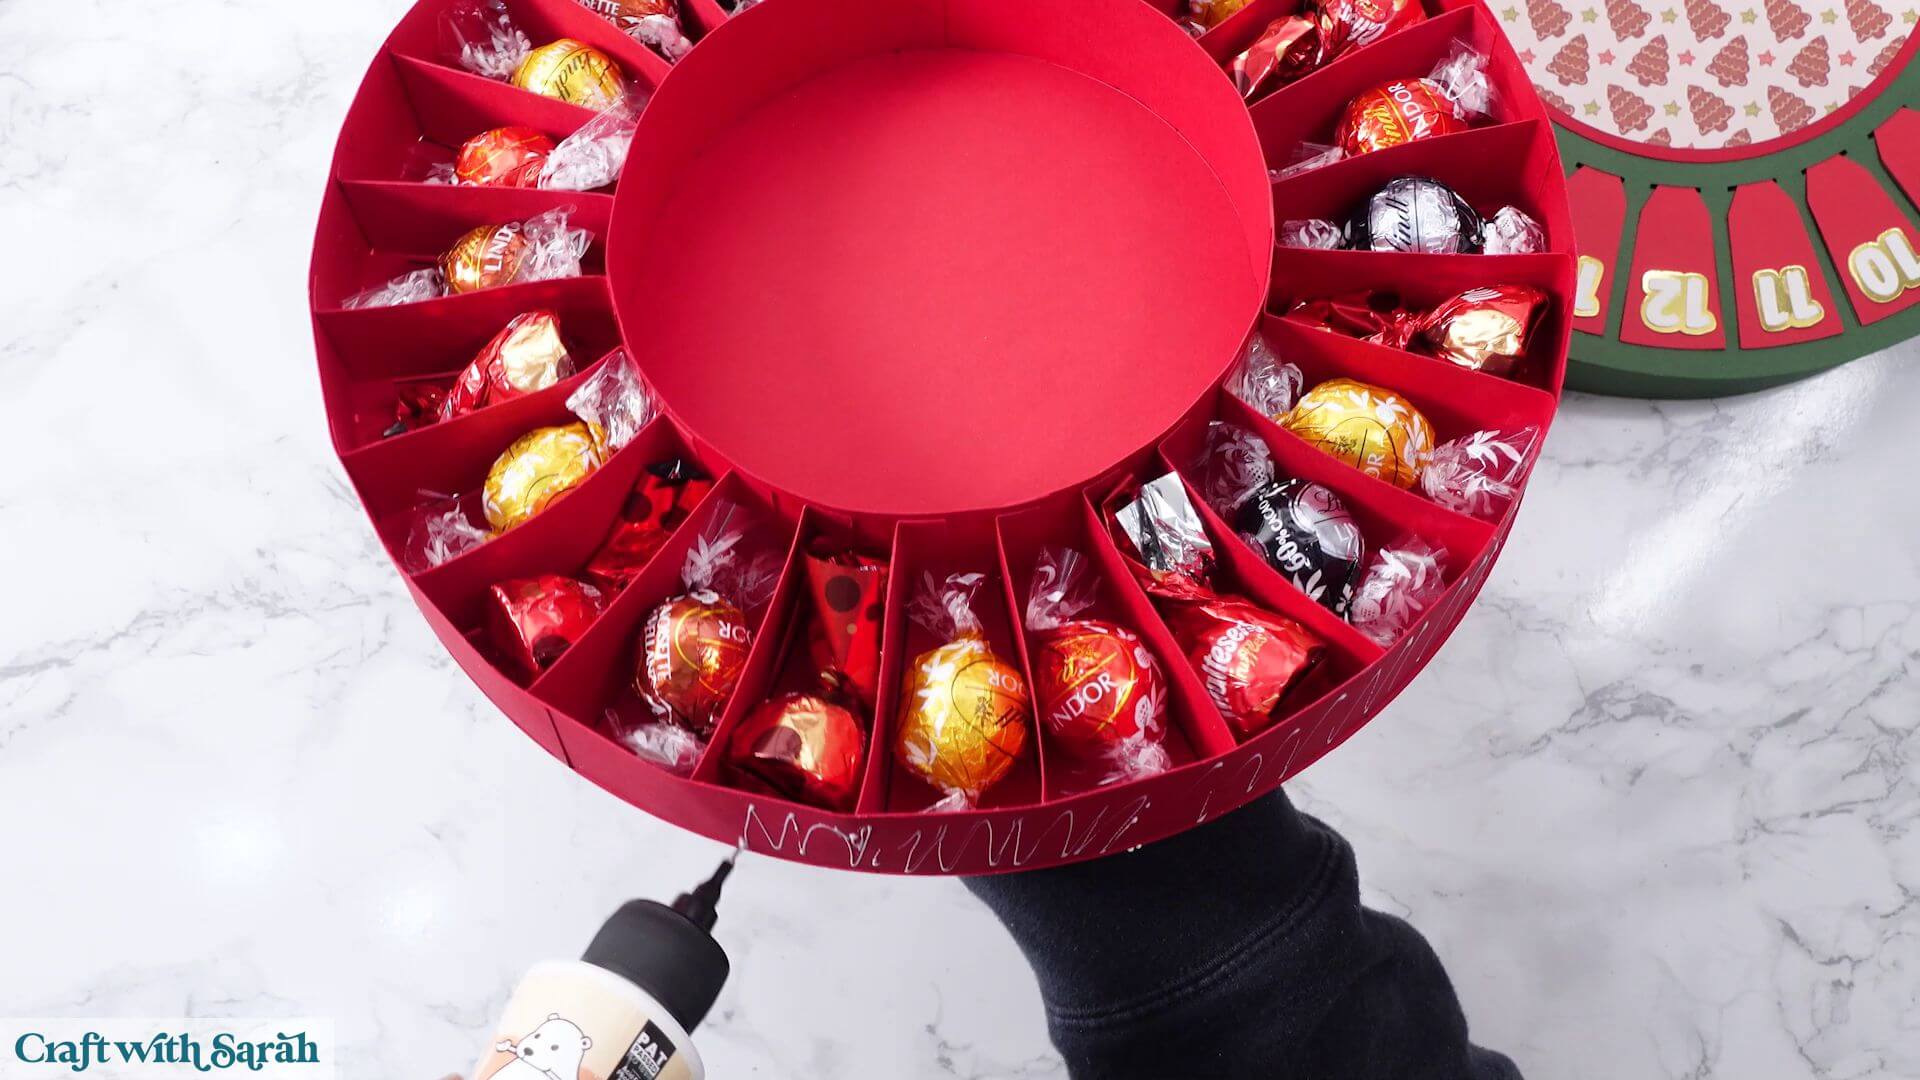
You could also use double-sided tape if you prefer.
Carefully put the front back on, making sure the doors still line up with the compartments.
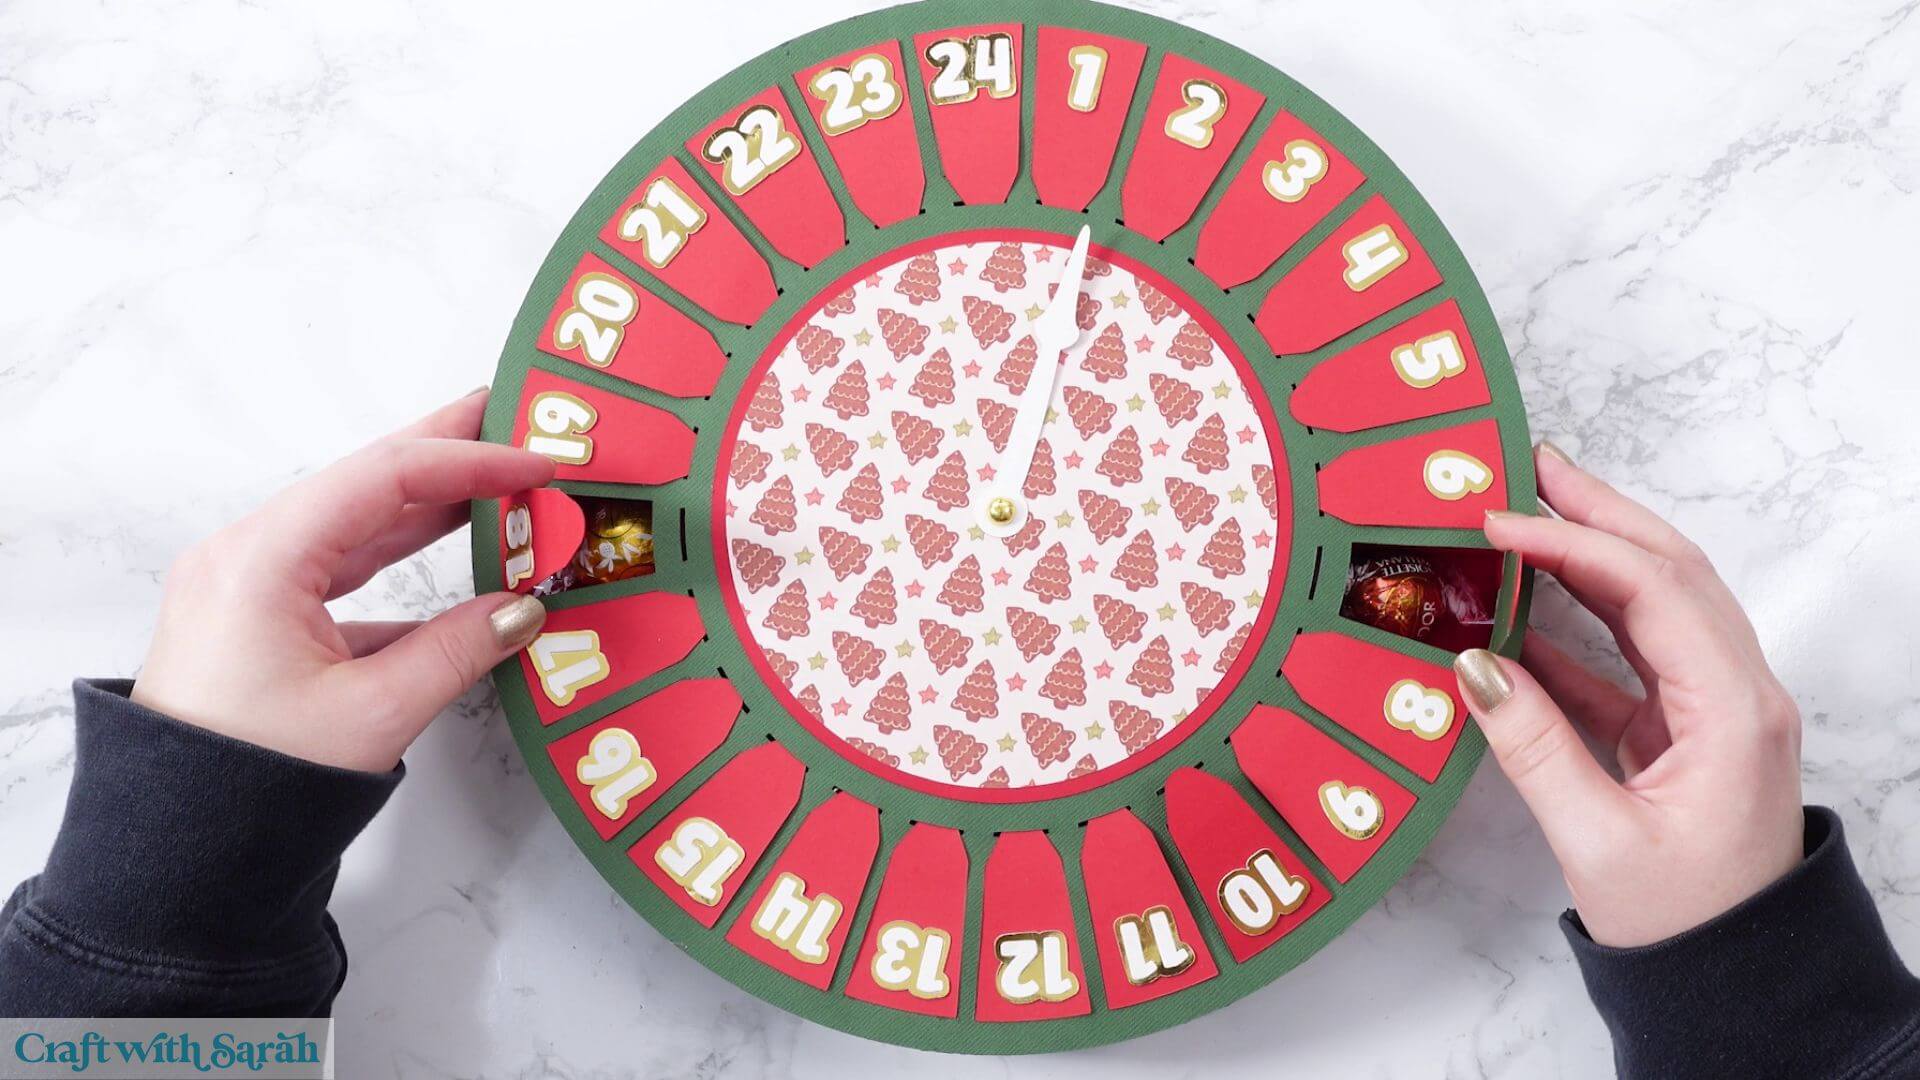
Gently press around the sides to help the glue stick.
You don’t need an enormous amount of glue here. We’re mainly trying to stop the front from rotating and moving out of position.
If the front were able to move around, you might open a door and find that the chocolate underneath has shifted into a different compartment!
Once the glue is dry, close any doors that you opened to check the positioning.
Your chocolate-filled advent calendar is now assembled!
Step 10) Build the stand
The final part of the project is to make the cardstock stand that will hold the calendar upright.
There are three pieces for this.
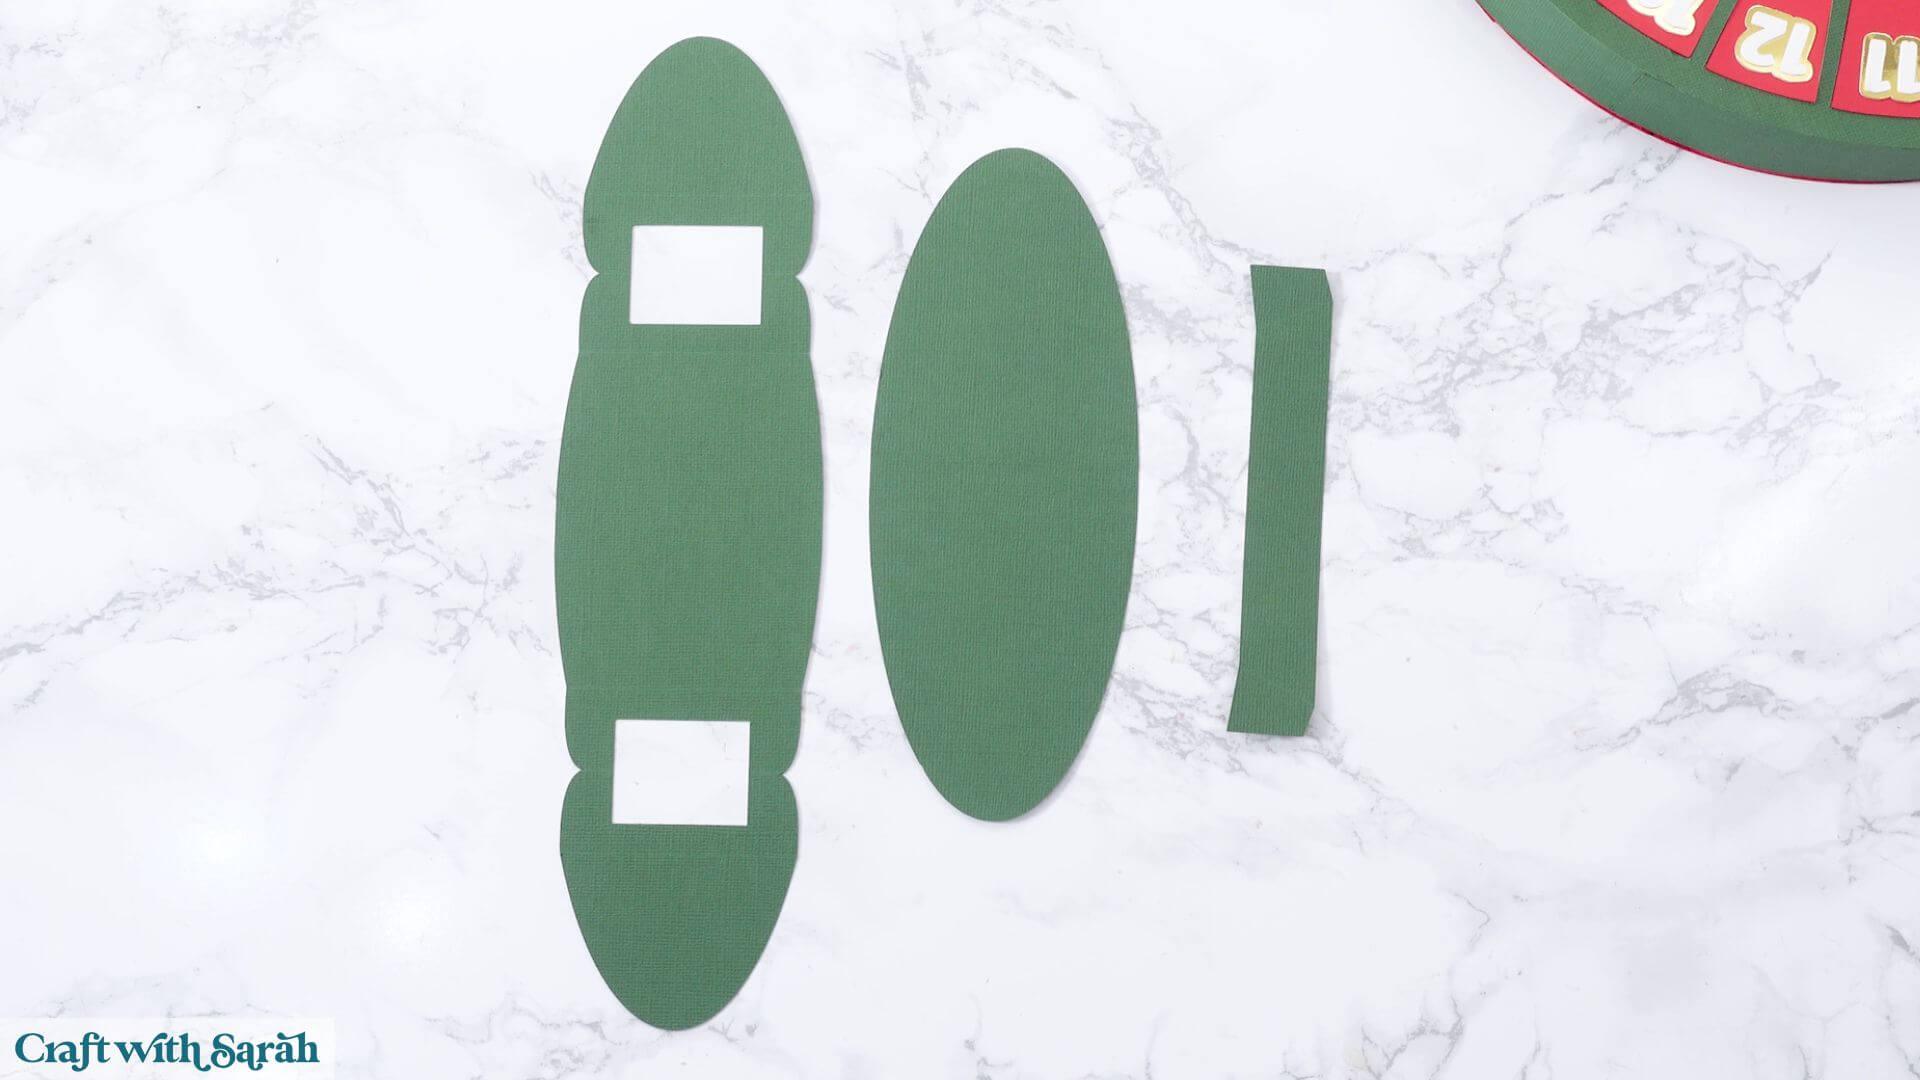
Start with the largest piece.
You’ll see two sets of three score lines.
For each set, the middle score line needs to be a mountain fold, with the crease pointing upwards like the top of a mountain.
The two score lines on either side should be valley folds, going in the opposite direction.
Repeat this for both sets of score lines.
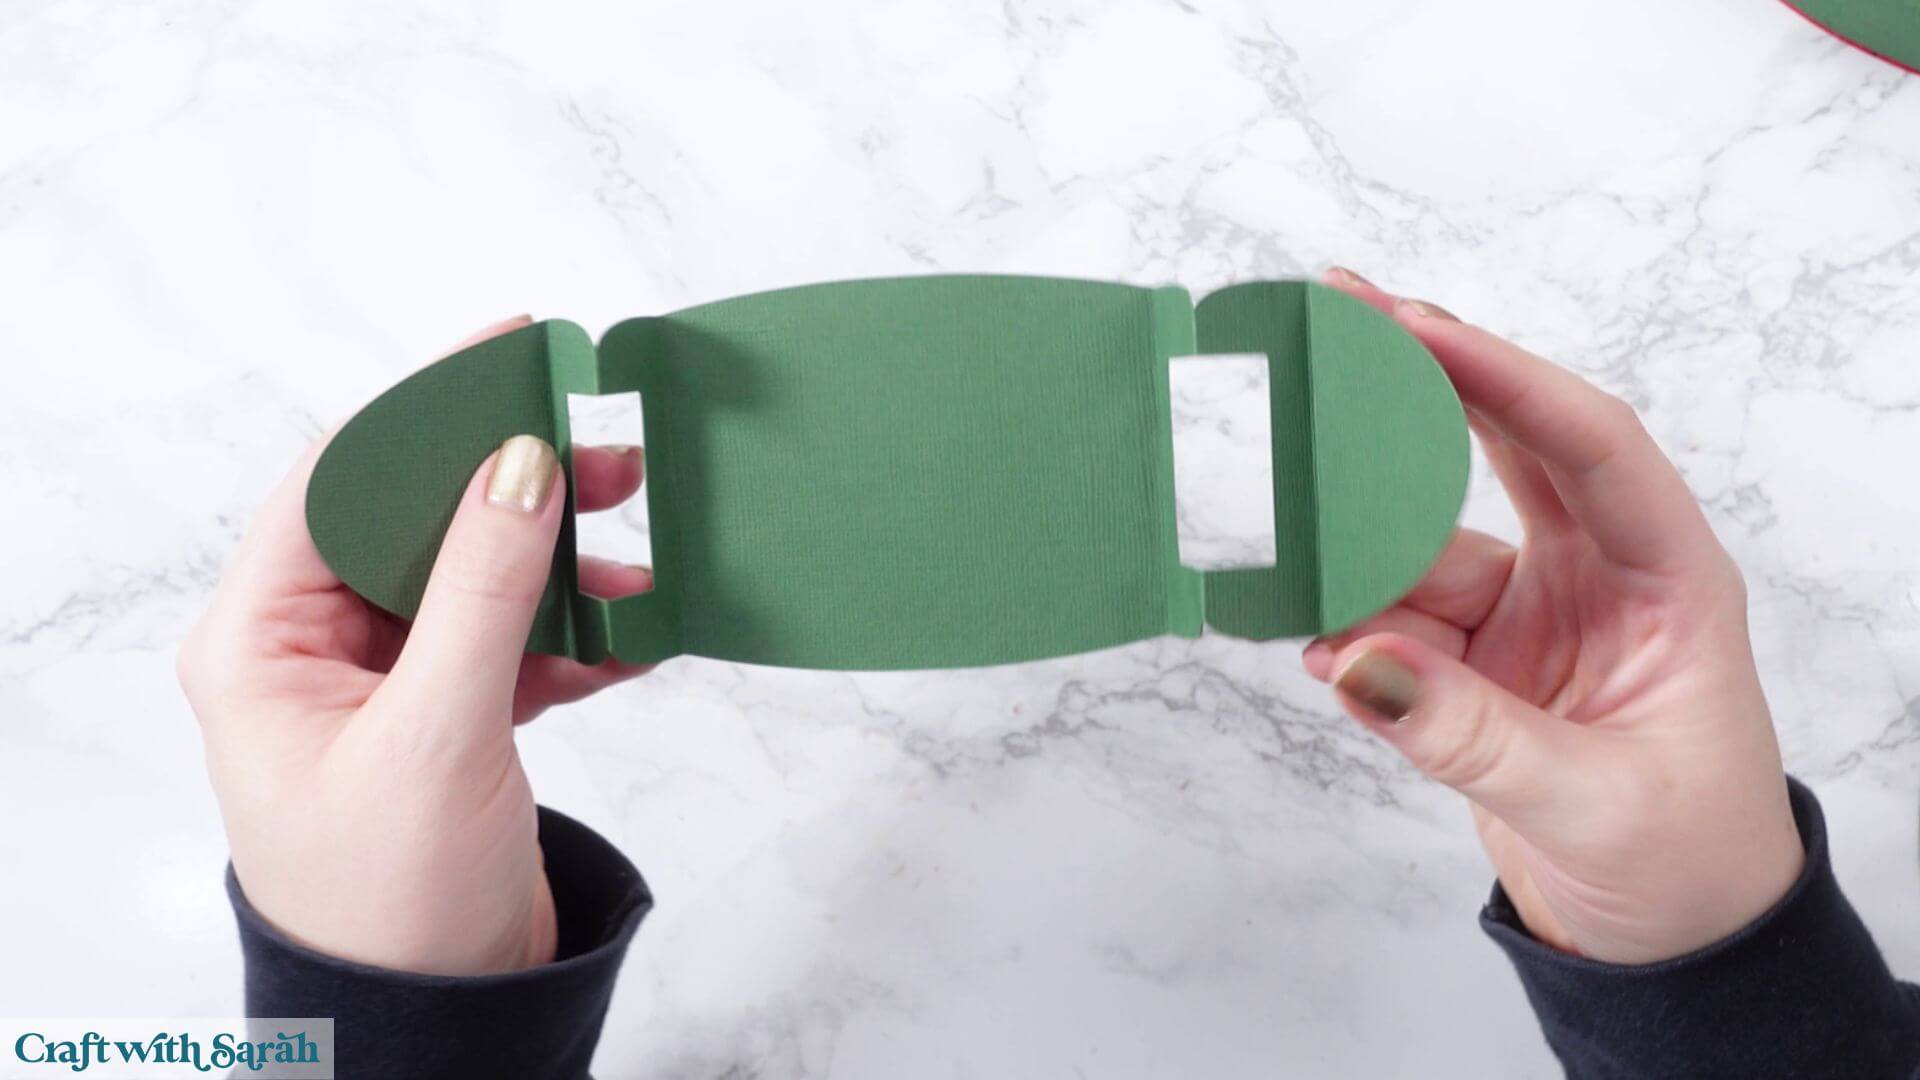
These folds will create two raised sections that help support the advent calendar.
Turn the folded piece upside down.
Add glue to the underside of one half of each raised section.
Fold the cardstock back against itself so that the two halves stick together.
This creates stronger, double-thickness supports.
Press the glued sections together firmly and try to keep them nice and vertical.
You should now have an oval-shaped base with two raised supports.
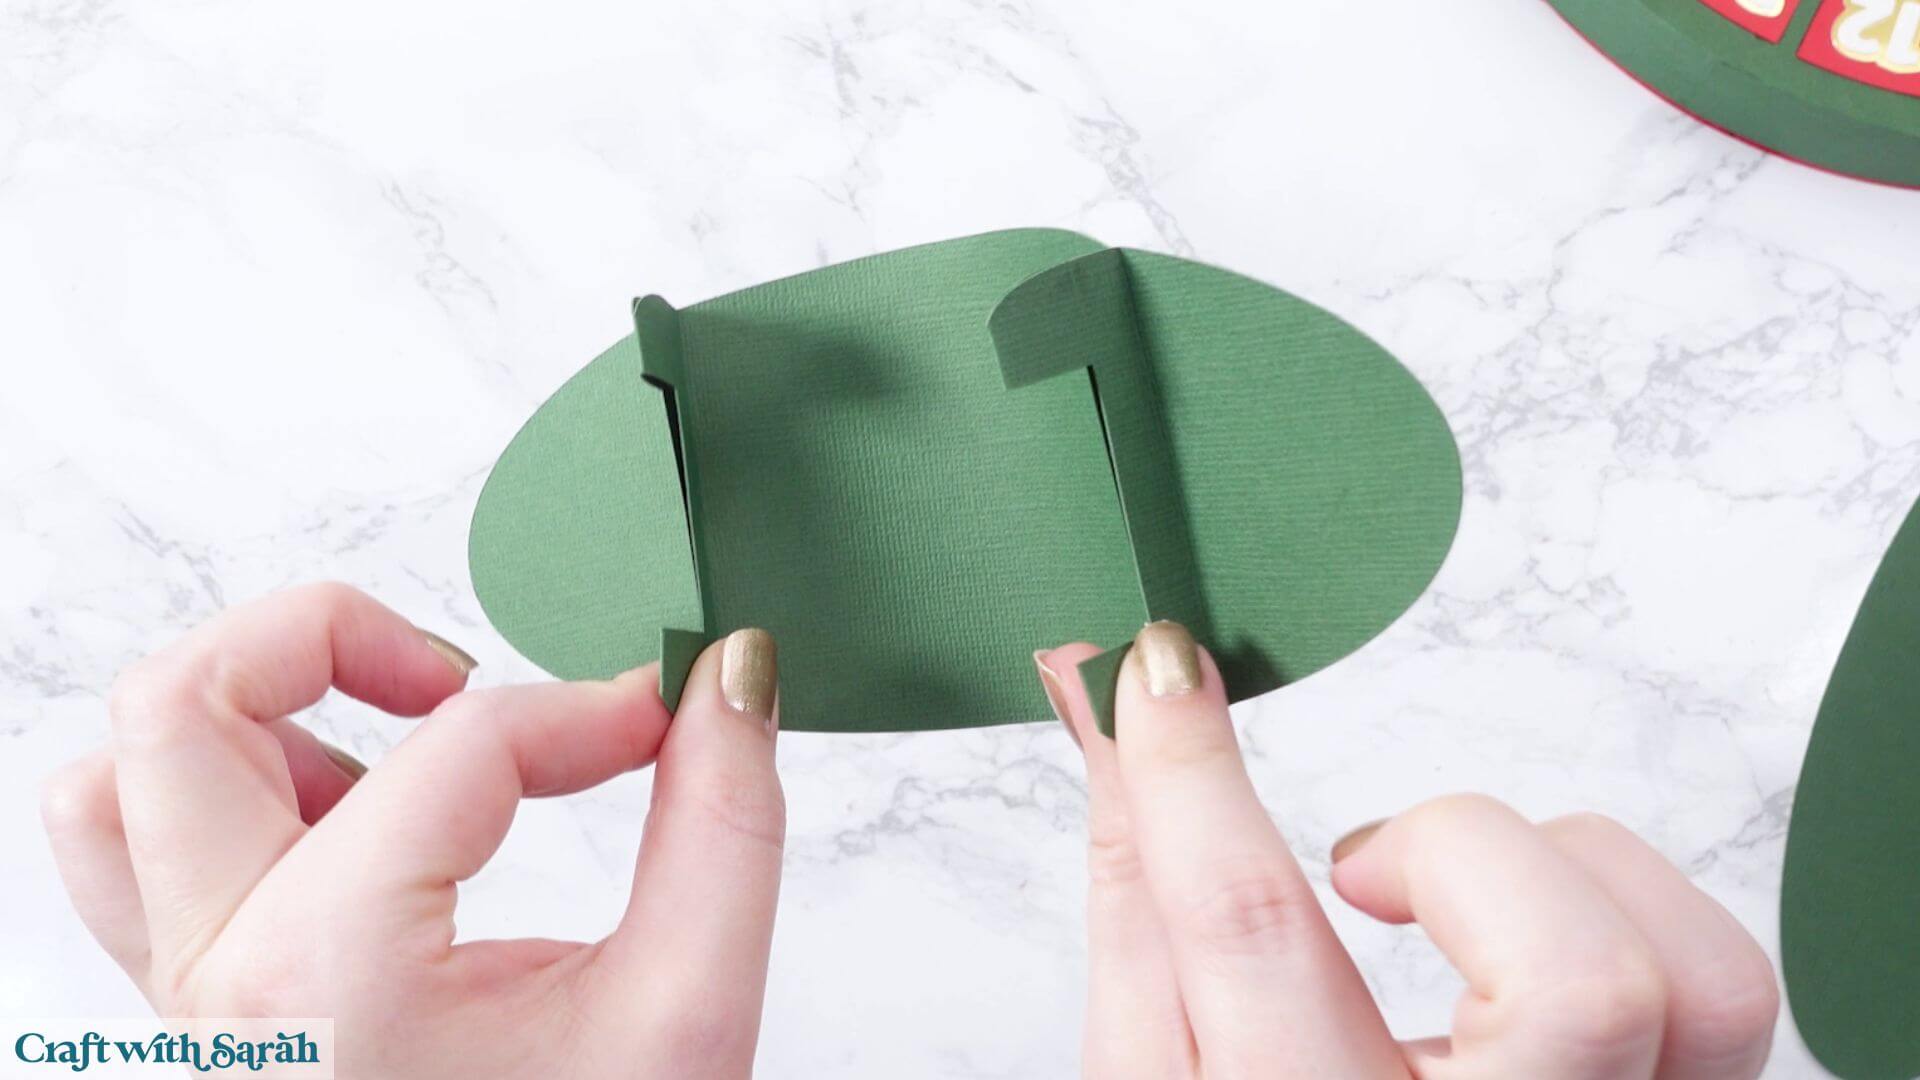
Next, take the separate oval piece and glue it underneath.
This helps strengthen the stand and keeps the bottom nice and flat.
It also helps hold the oval in the correct shape.
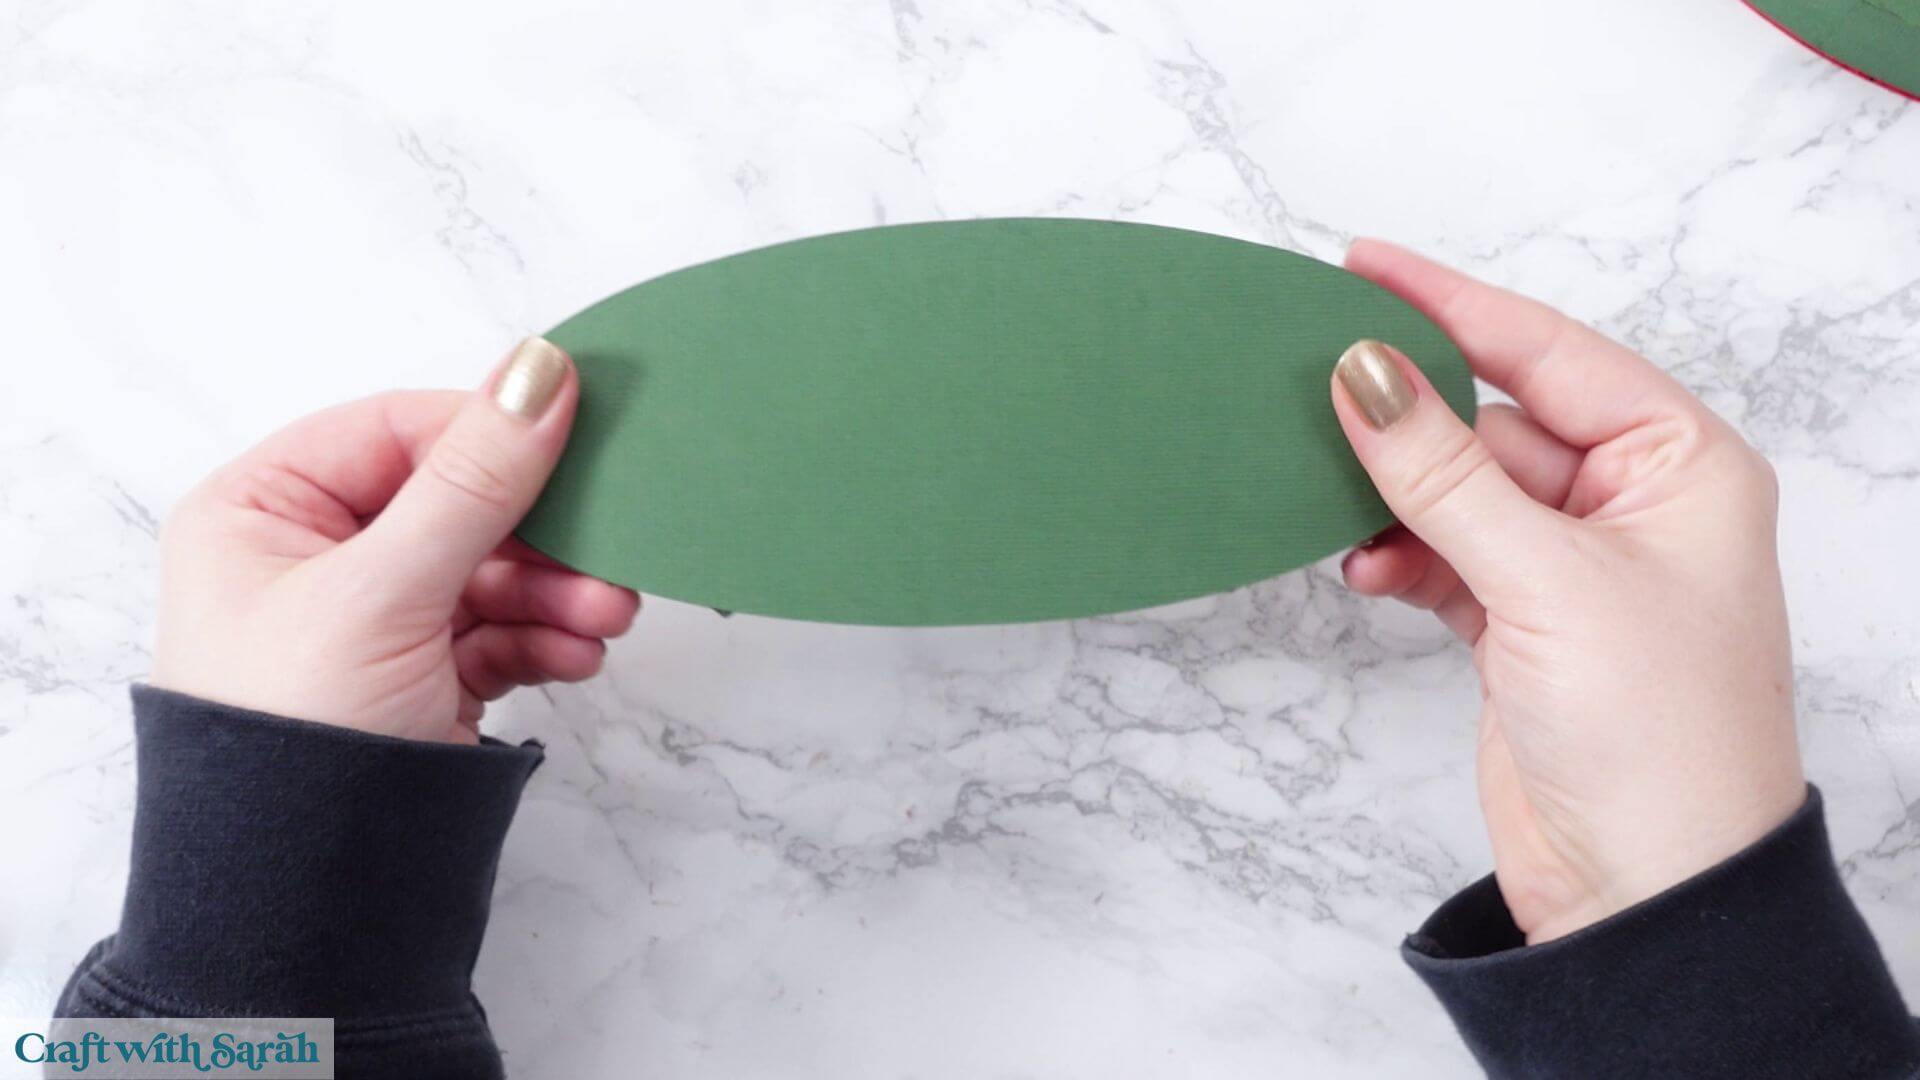
If you’ve used fairly lightweight cardstock, you may want to cut an extra copy of the stand pieces and glue them together for additional strength.
There’s one final piece to attach to the stand.
Fold upwards along its score lines to create the shape shown in the assembly guide.
This piece will form a curved support at the back of the advent calendar.
Add glue to the tabs and attach it to the raised sections of the stand, with the tabs pointing away from you.
The support will curve slightly as it goes into position.
The stand is symmetrical, so it doesn’t matter which of the matching tabs you attach it to.
Press everything together and allow the glue to dry completely before testing it with the advent calendar.
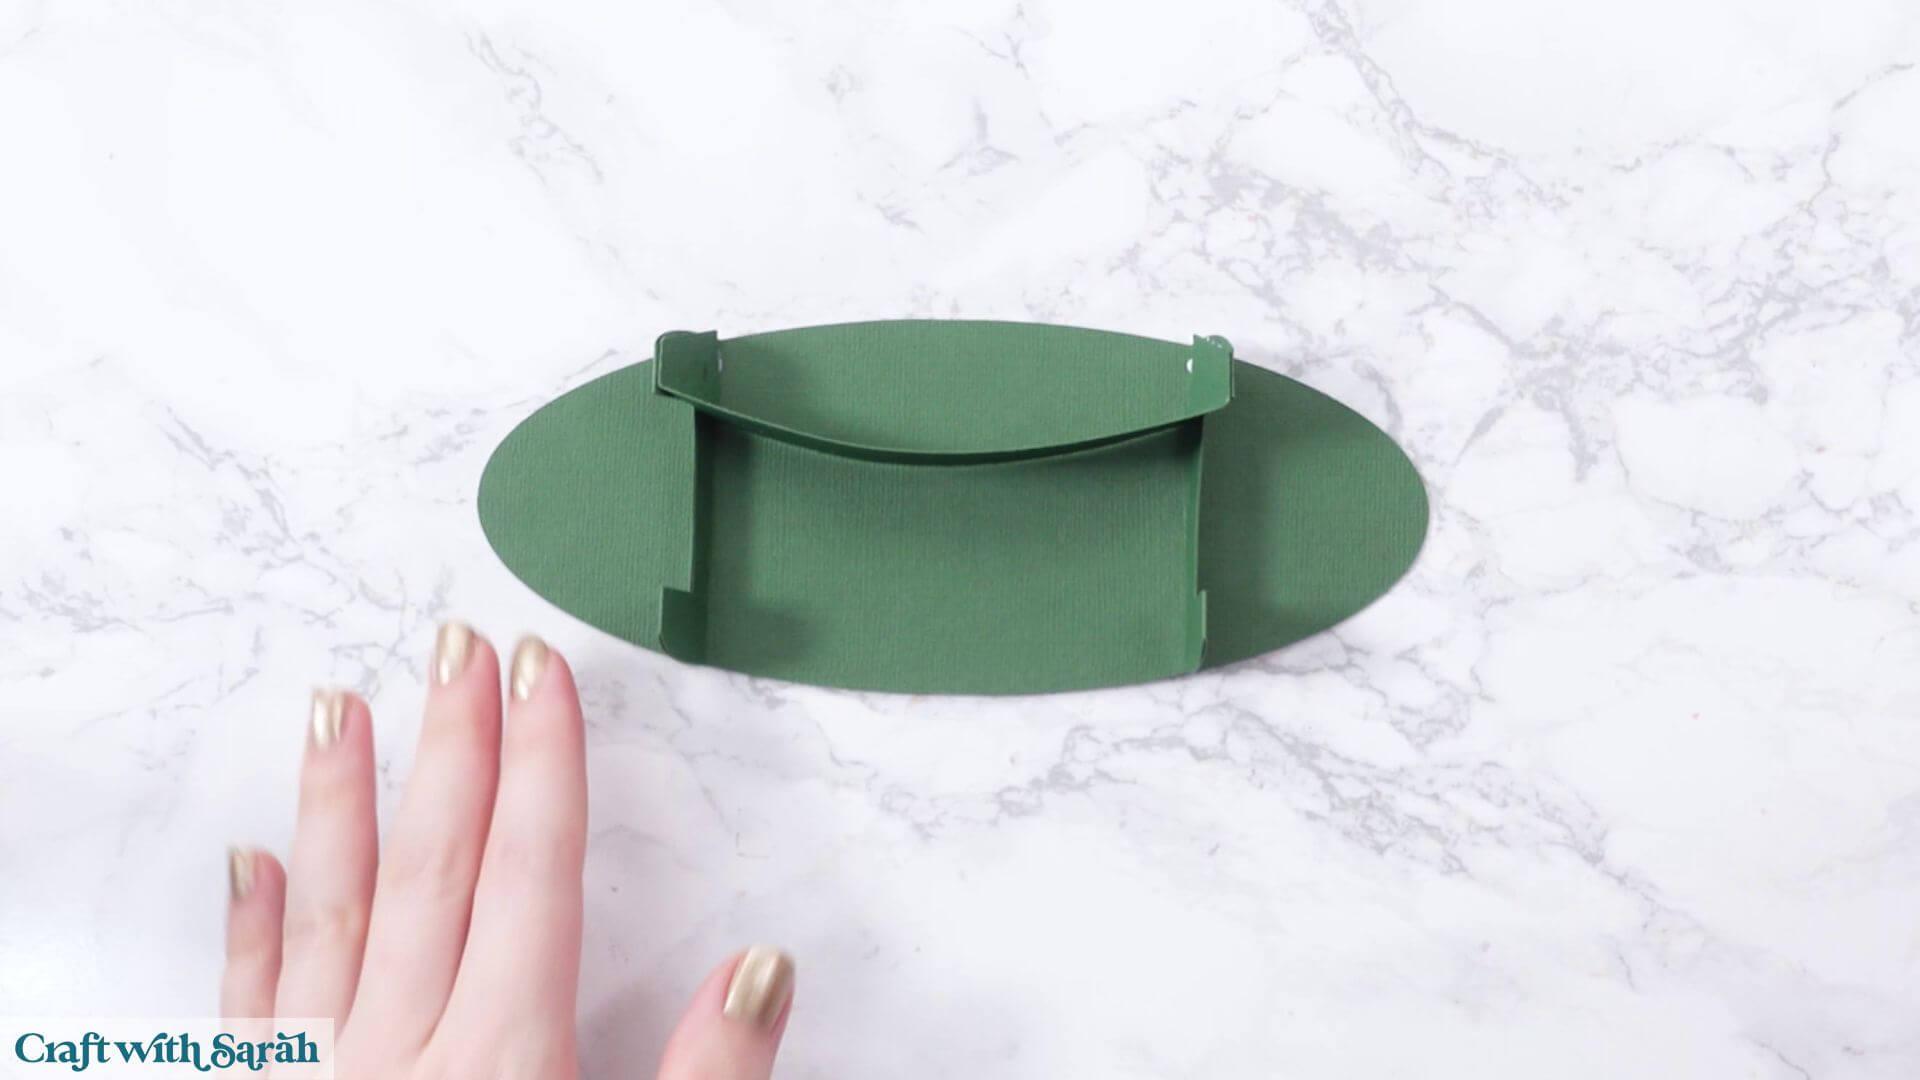
Once the stand is completely dry, place it on your work surface with the curved support at the back.
The two small tabs should be facing towards you.
Carefully position the advent calendar onto the stand so that it sits upright.
Fold the small tabs at the front upwards so that they sit in front of the calendar and stop it from rolling forwards.
The curved section at the back helps support the weight and keeps everything in position.
You might need to adjust the tabs slightly to get the calendar sitting exactly how you want it.
And that’s your chocolate-filled Christmas advent calendar finished!
DIY chocolate advent calendar made with a Cricut
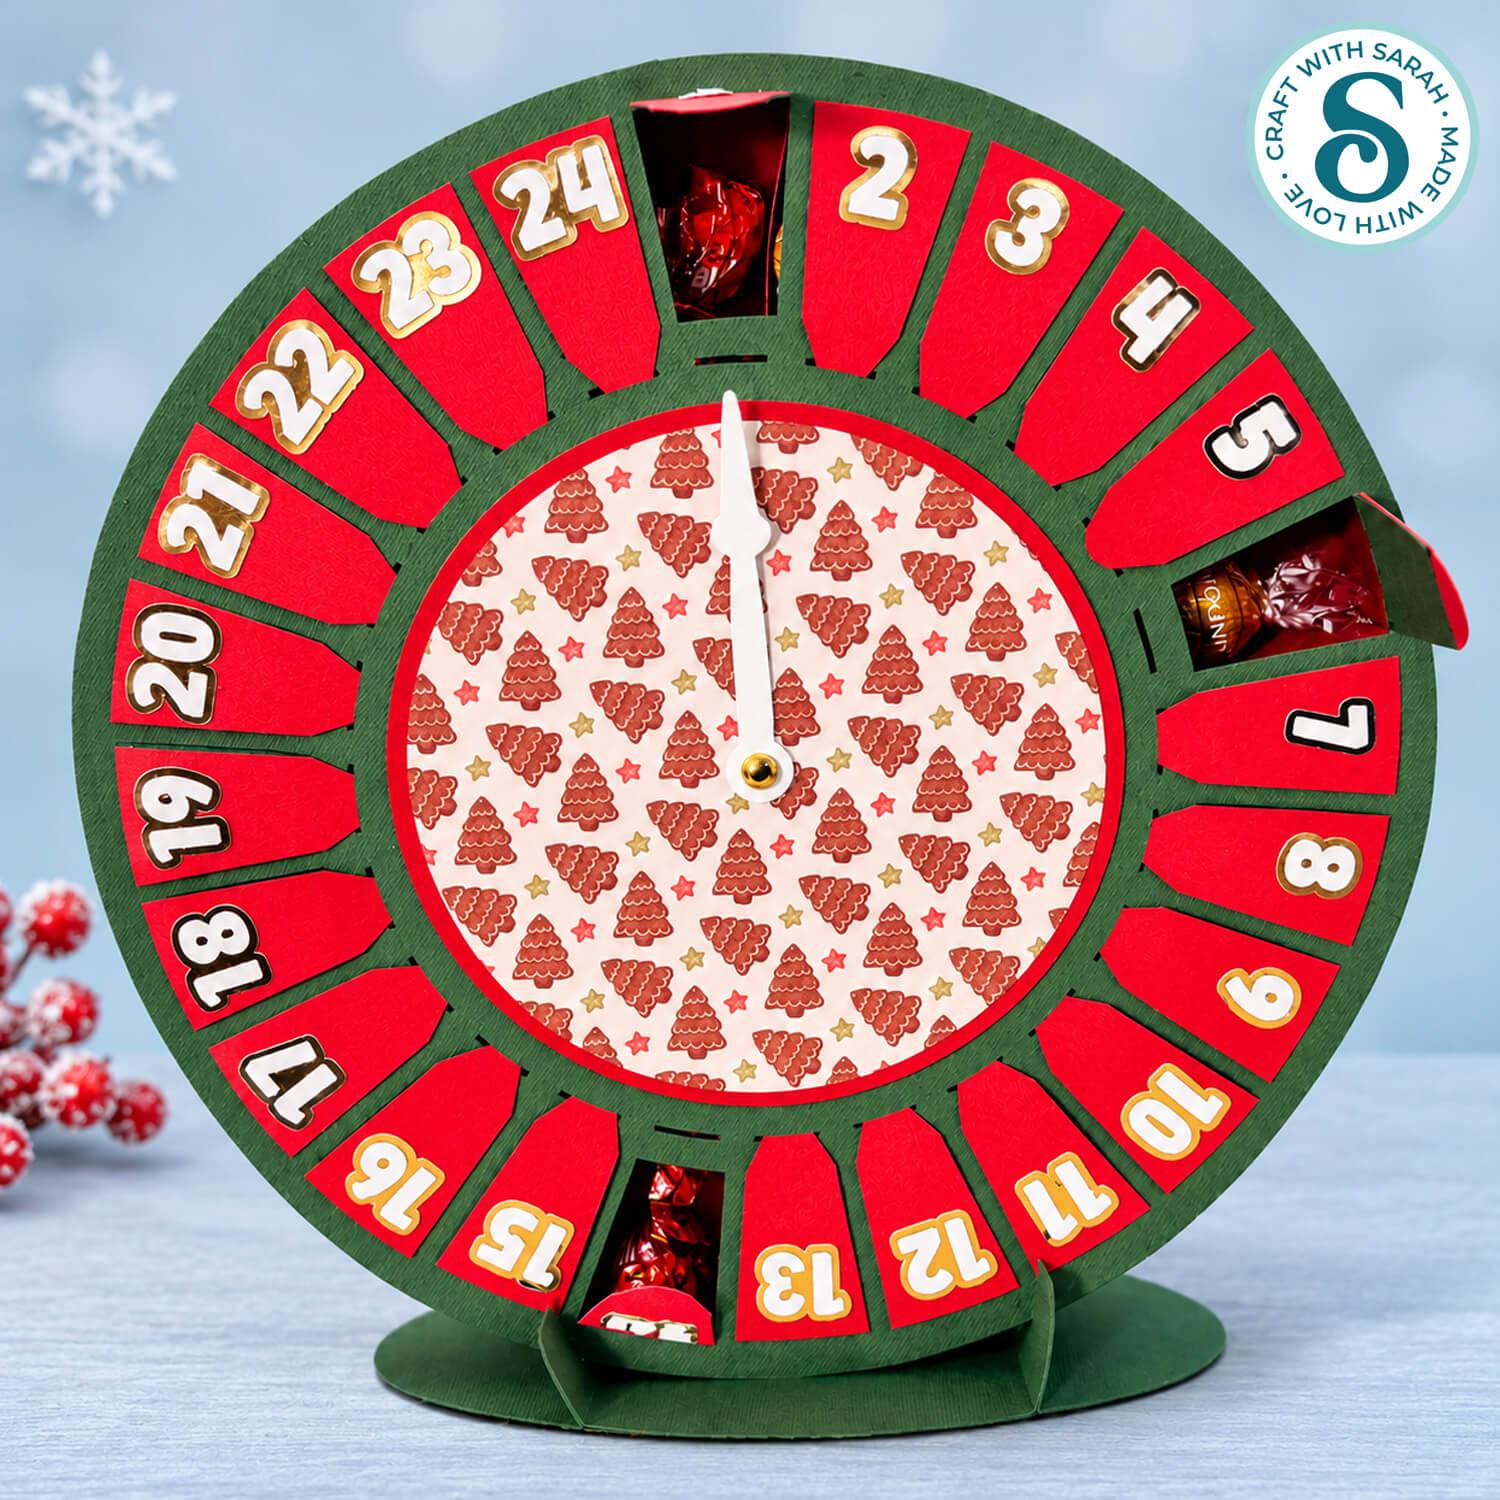
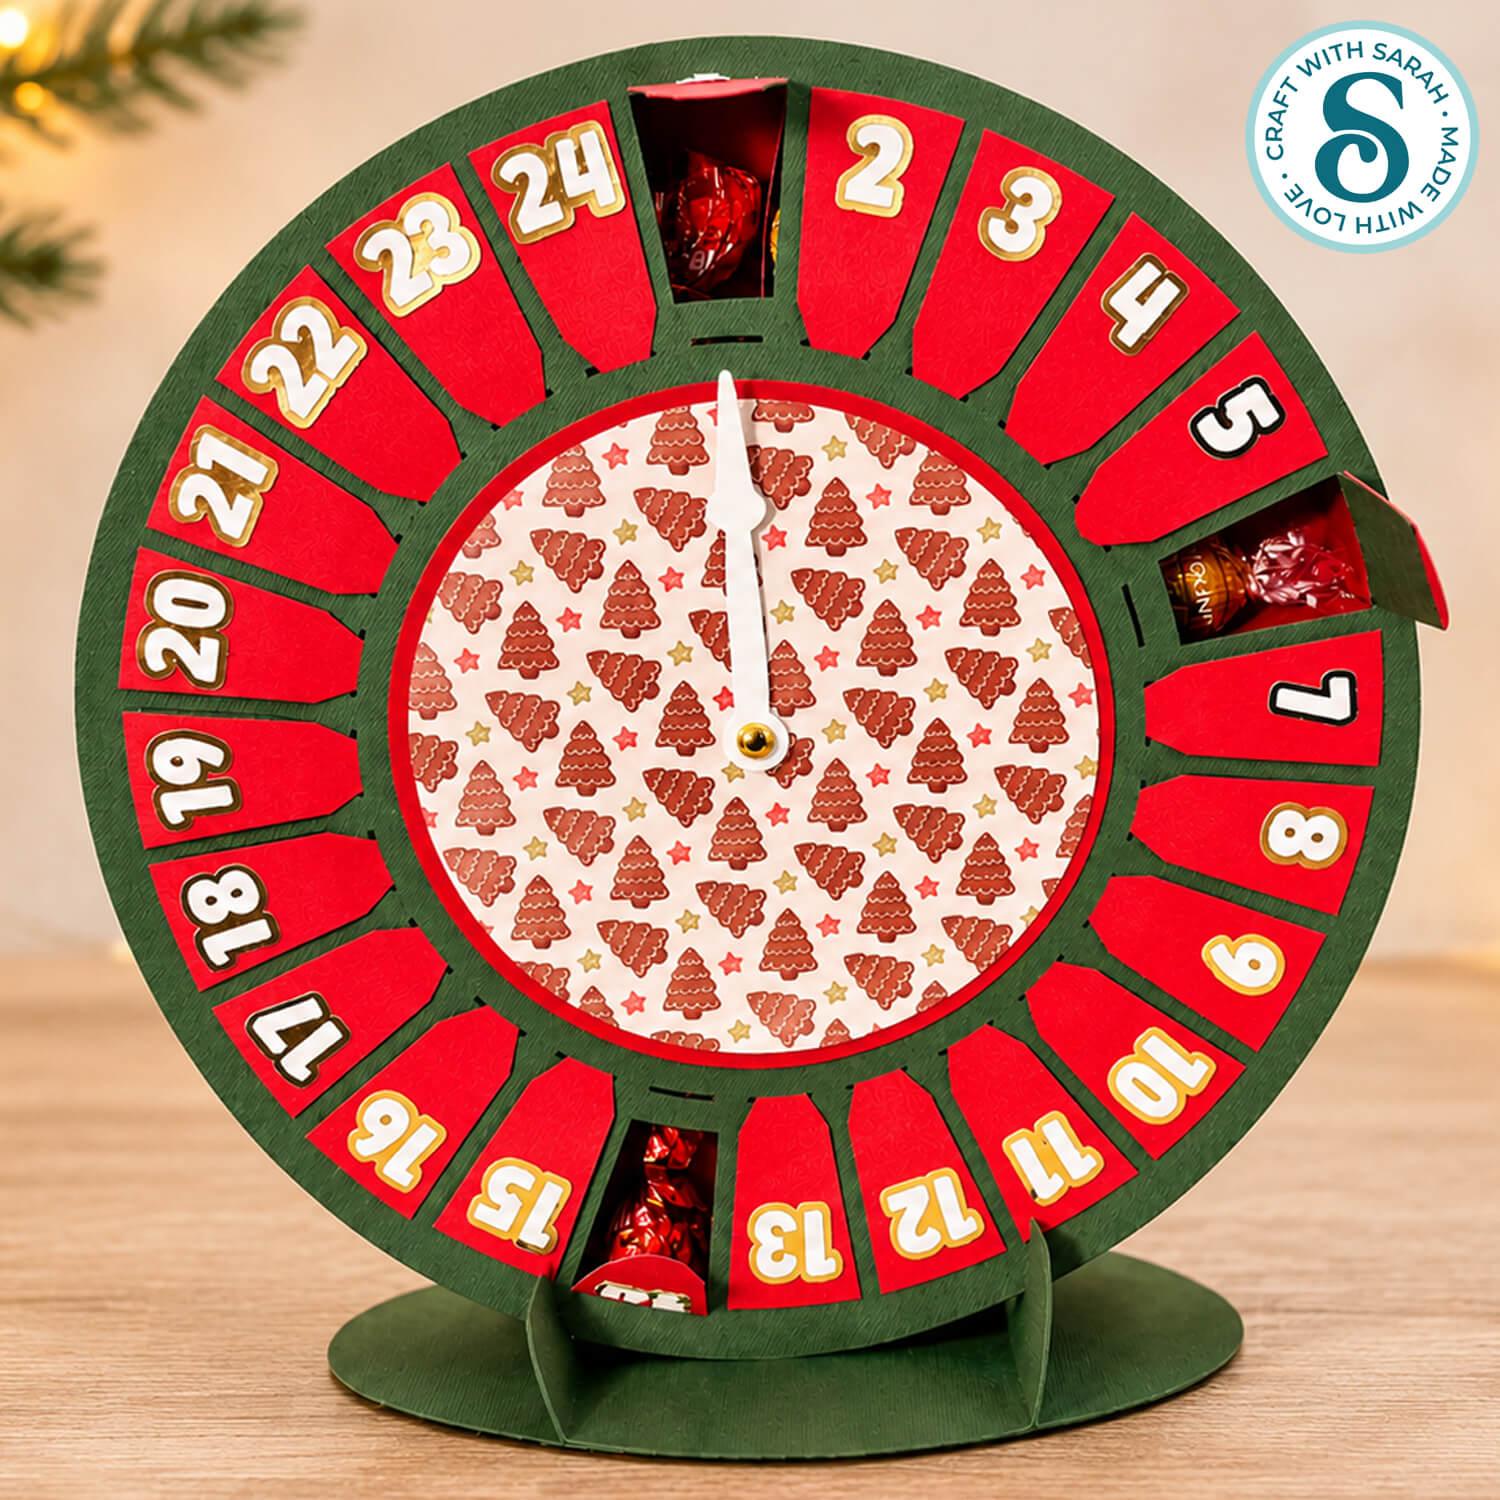
I love how this advent calendar turned out!
The circular design is a little different from a traditional advent calendar, and the rotating arrow is a lovely way to keep track of the days leading up to Christmas.
With 24 individually filled compartments, it’s a wonderful way to enjoy a little chocolate treat each day.
It’s also a lovely handmade gift, especially if you fill it with someone’s favourite chocolates.
And because the doors can be opened and closed again, you can refill the calendar and bring it out year after year.
I hope you enjoy making this chocolate advent calendar with your Cricut machine!
Love making advent calendars with your Cricut?
If you love making handmade advent calendars, why stop at just one? Here are some more daily Countdown ideas for December:
- Spinning wheel advent calendar
- December countdown cubes (free)
- Santa in chimney (SO impressive!)
- Advent calendar with doors
- Winter village giant sign
Happy crafting,
Sarah x