Halloween Borders for Card Making 👻 HCC 2025
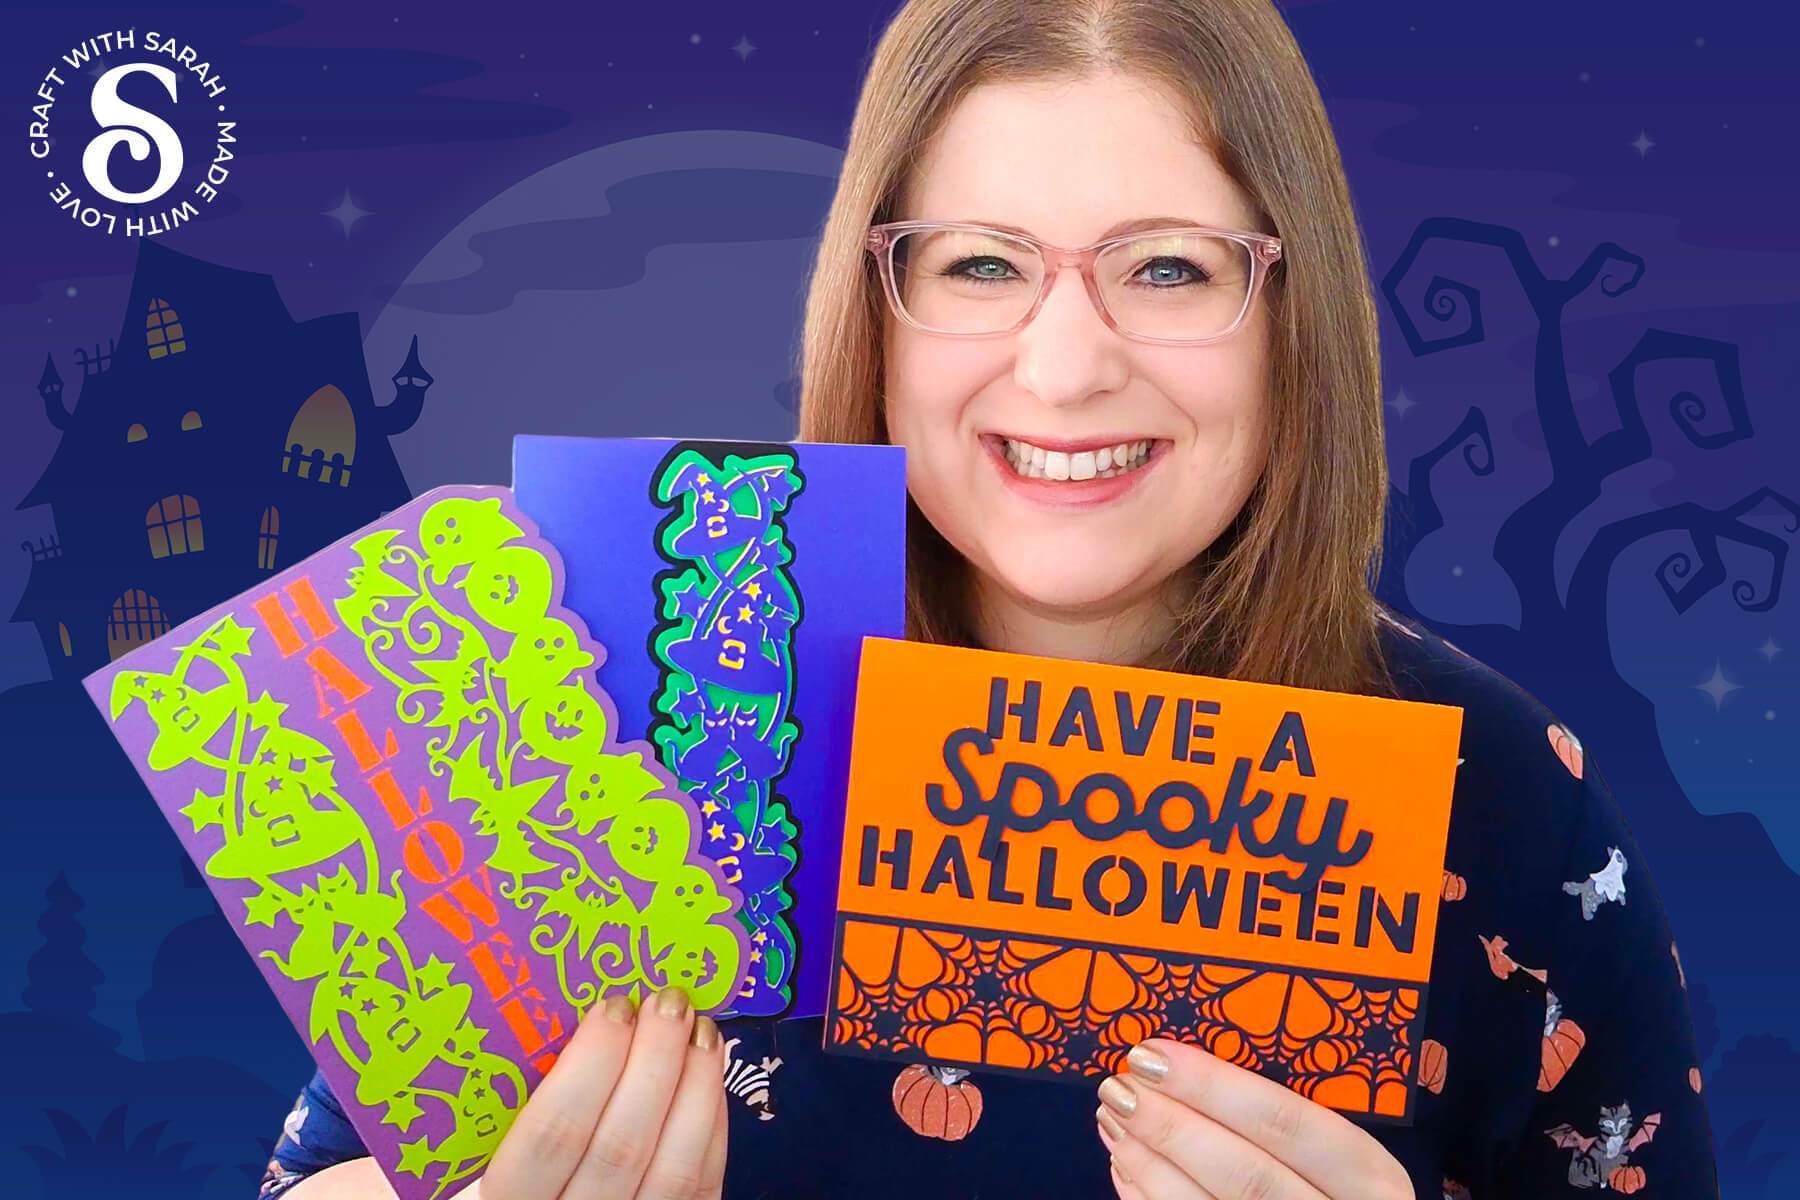
If you’ve been looking for new handmade Halloween card ideas, this is a simple but impactful way to start.
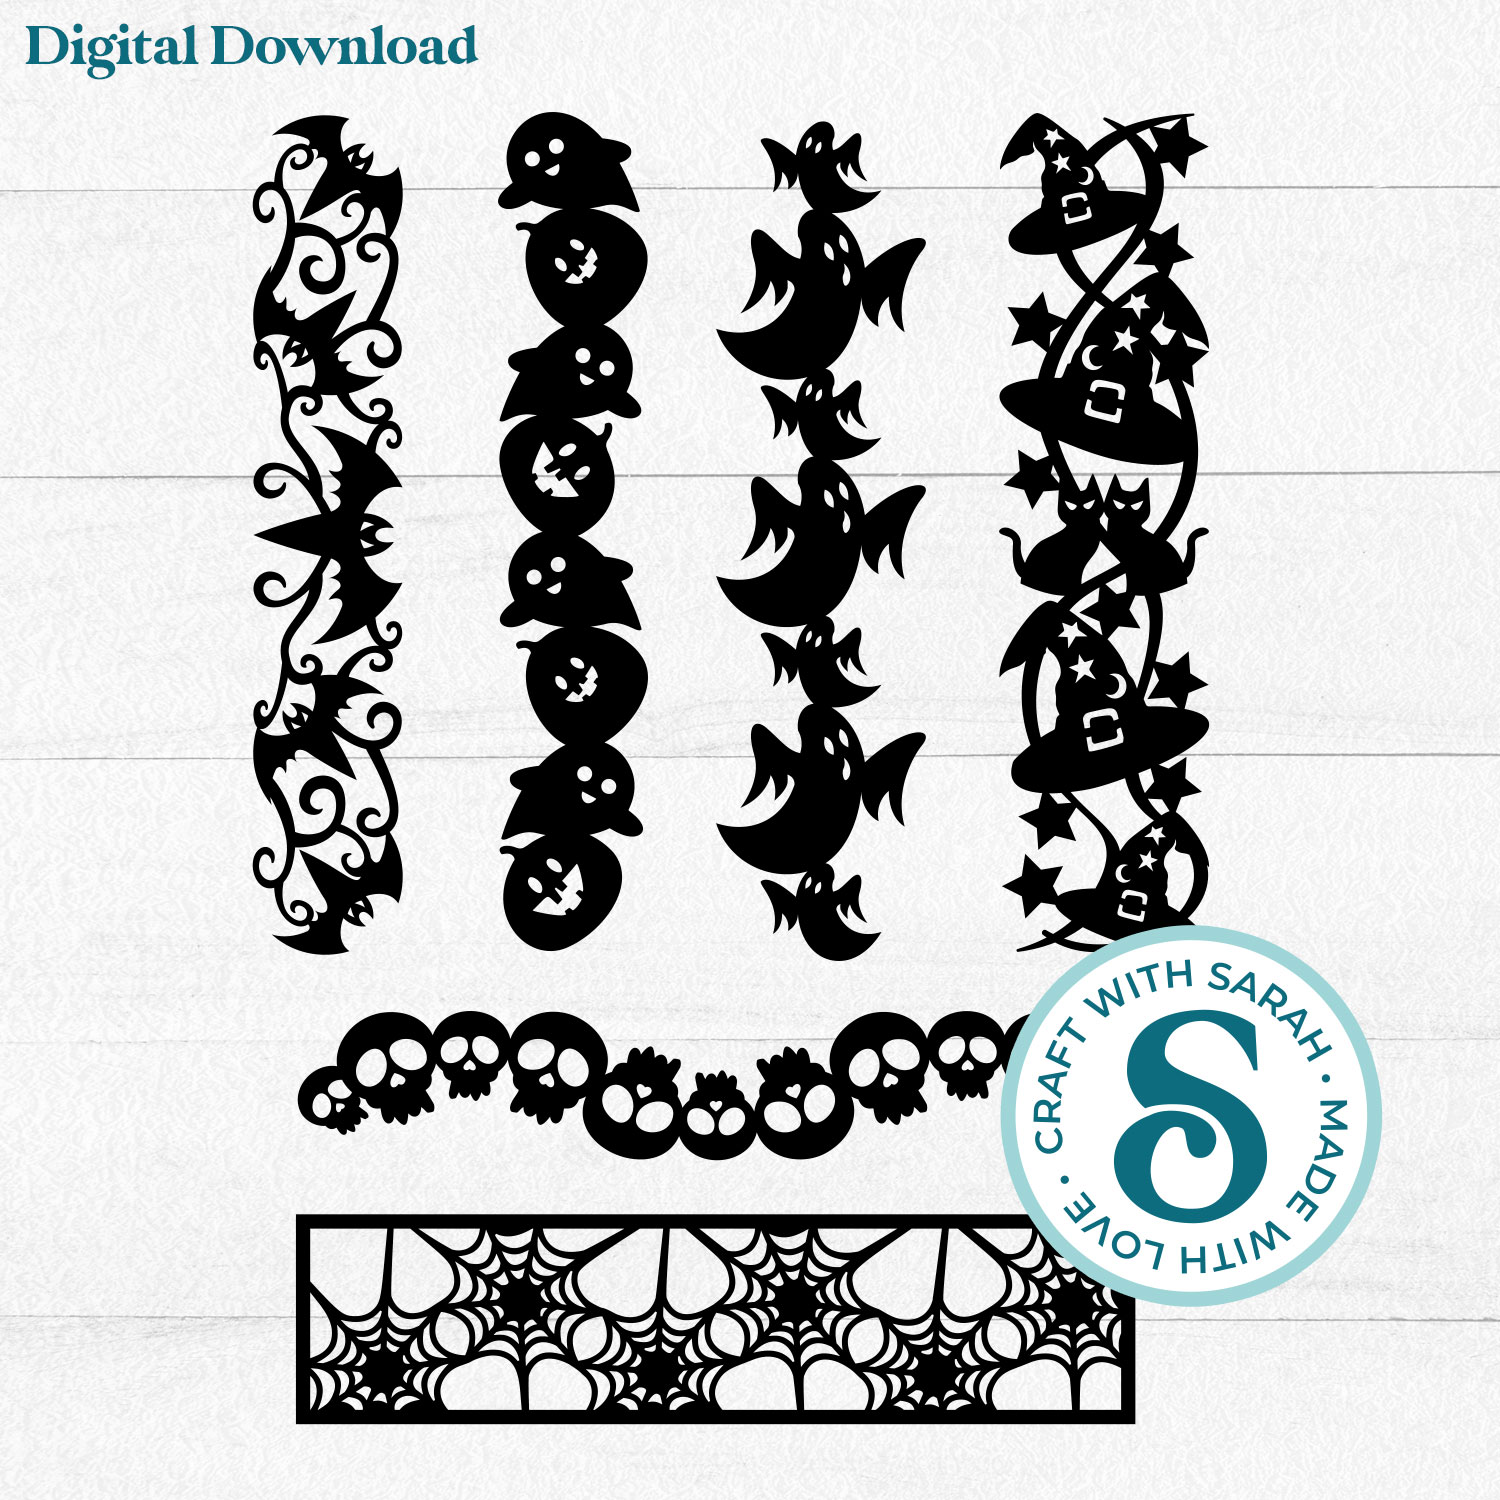
In today’s tutorial, we’re using six Halloween borders to design custom Cricut Halloween cards right inside Design Space.
These border cut files were inspired by one the most downloaded project from the 2025 Card Making Countdown — a similar set of decorative border designs that proved to be incredibly popular.
This time, I’ve given them a spooky twist to match the season.
The beauty of working in Cricut Design Space is how flexible it can be. You can take a few simple design elements, like these Halloween borders, and turn them into personalised cards in just a few minutes.
I’ll walk you through how to combine the borders with card bases, combine them with text, join the borders together and add colour with Offset layers. It’s a great way to build your confidence with the Design Space software while making something that’s perfect for spooky season. 🎃
The finished Halloween cards can be completely custom based on however you wish to design them. The card examples in this tutorial are for inspiration only. The real magic happens when you start experimenting with your own layouts, colors, and card sizes.
However you decide to use them, these cut files are a great addition to your Halloween project library. It’s time to open Design Space and get creative! 👻
This project was part of the 2025 Halloween Craft Countdown.
Halloween Border Cards Supply List
Here is a list of the materials that are used to make this project.
Please note that some of the links included in this article are affiliate links, which means that if you click through and make a purchase I may receive a commission (at no additional cost to you). You can read my full disclosure at the bottom of the page.
- Cricut machine
- Light blue Cricut cutting mat
- Coloured Card
- Glue (I like Bearly Art Glue and Collall)
- 3D foam pads
This project is suitable for the following types of Cricut machines: Explore series, Maker series, Joy Xtra and Joy. You’ll need to make the cards smaller to cut on the Joy, and cut the base cards by hand without the machine.
Foundation learning
If you're new to making papercrafts with your cutting machine, check out these links to get you started.
They include videos on topics such as: which file to use with your type of cutting machine, how to load the files into your cutting machine's software, how to cut cardstock with your type of cutting machine, how to recolor and modify/customize the cut files and tips for displaying your projects.
- Help guides for Cricut machines
- Help guides for Silhouette machines
- Help guides for ScanNCut machines
The following tutorials are Cricut-specific, but many of the ideas will work similarly with a Silhouette or ScanNCut machine and any cut files that are shared in them are compatible with all types of cutting machine.
- How to score with a Cricut (even without scoring tools)
- Print then cut tutorial
- Design Space tools (Combine, Attach, Slice, Weld, Flatten, etc.)
- Pattern fill tutorial (for making backgrounds & cutting images to a specific shape/size)
- Free envelope SVGs that can be sized to fit any card
- Presentation boxes for handmade cards
- How to write inside cards with Cricut pens
- How to cut layered designs at a small size
- Design Space tips & tricks
- Cricut pens tutorial
- How to mount multiple designs in the same frame with magic guides
Video Tutorial for DIY Halloween Cards
Watch the video below to see how to make this project. Keep scrolling for a written tutorial.
A big Design Space update is currently rolling out that changes how the screen looks, including the position of some of the buttons and tools. I had already recorded all the Countdown videos before the update was released, so unfortunately there will be areas of the videos that look different to your screen.
To help with this, I've recorded a walkthrough video that explains all of the Design Space changes so that you can see how to do everything in the new version.
Part 1: Uploading the cut files
Here’s how to make your own custom Halloween cards using a Cricut machine.
Step 1) Download the cutting file & upload to Design Space
Get the files using the box below.
Purchase the File(s)
This cut file is available as part of the Instant Access Bundle.
Or, purchase this design individually here

Before you upload the SVGs to Design Space, you need to unzip the download folder that they come in.
- How to unzip a folder on Windows computer
- How to unzip a folder on a Mac
- How to unzip a folder on an iPad/iPhone
- How to unzip a folder on an Android device
After unzipping, upload the SVG file(s) into your cutting machine software.
Not sure how to use cut files with your type of machine? The following links lead to videos on how to open cut files in:
- Cricut Design Space
- Silhouette Studio
- CanvasWorkspace (for ScanNCut machines)
The download folder also contains printable PDF versions of the templates for hand cutting.
If you are using Cricut Design Space, start a new project and then click the “Upload” button on the left of the screen.
You can then either click “Browse” to find the file on your computer, or drag-and-drop it.
All of the border designs come in one file to make them quicker to upload.
Upload the file in the “Cutting Machine Versions” subfolder called svg-halloween-borders-craftwithsarah.svg
This is how it should look after you have selected the file:
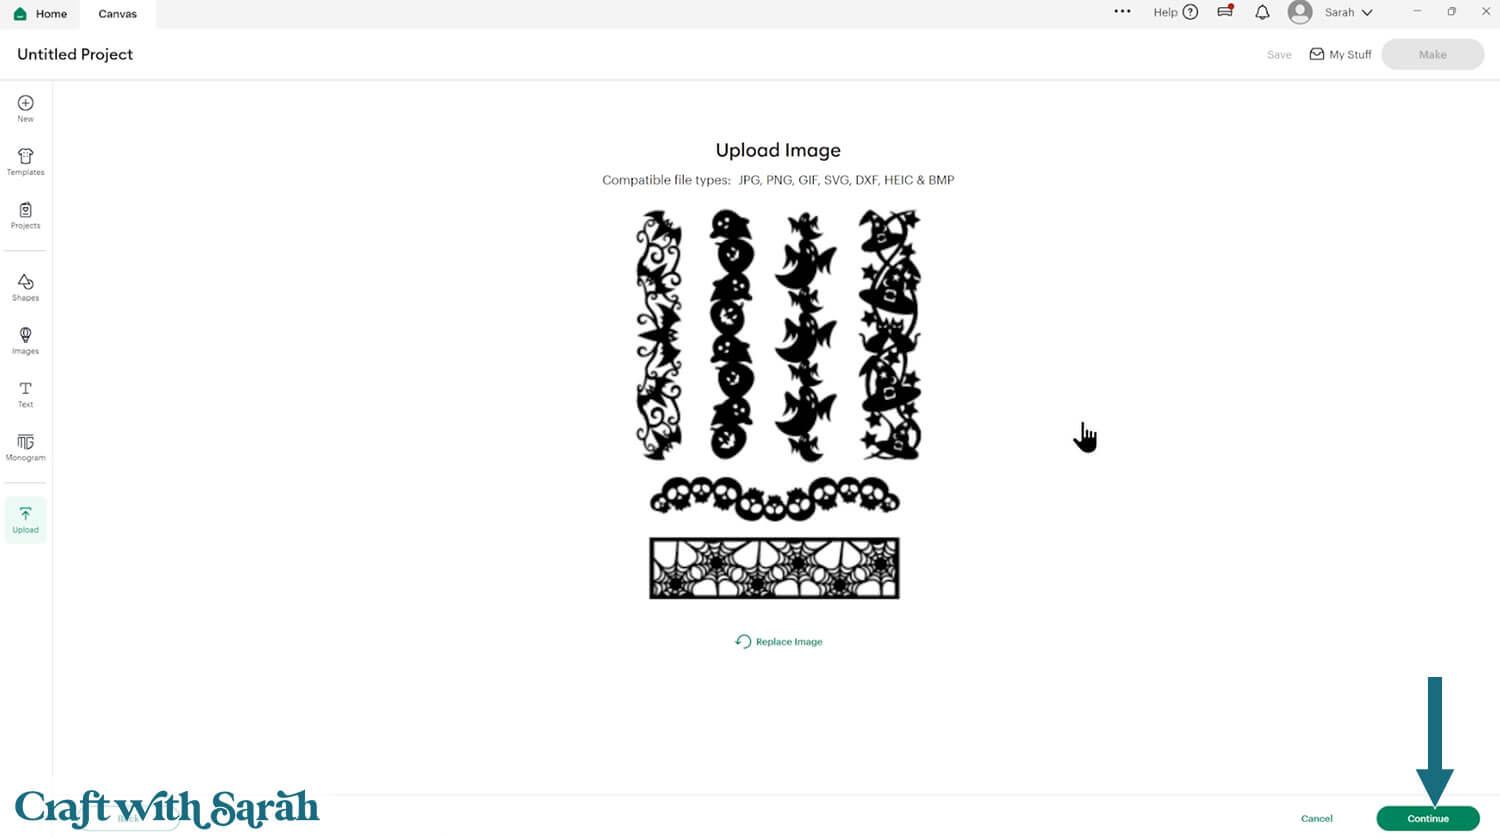
Don’t worry if the image preview appears blurry – it will show in full quality once it’s inserted onto your project.
Press “Upload” on the next screen.

After uploading, the design should be automatically inserted onto your Canvas.
Cricut have recently (as of June 2025) introduced a feature where you get a “pop out” bar of similar images when you Upload a design. To hide this bar (to give you more space for designing!), click the arrow that’s about half way down the page.
If the design doesn’t get inserted onto your Canvas, it will show under “Uploads” in your “Recently Uploaded Images”. Click on it and then press “Add to Canvas” to put it onto your Project.
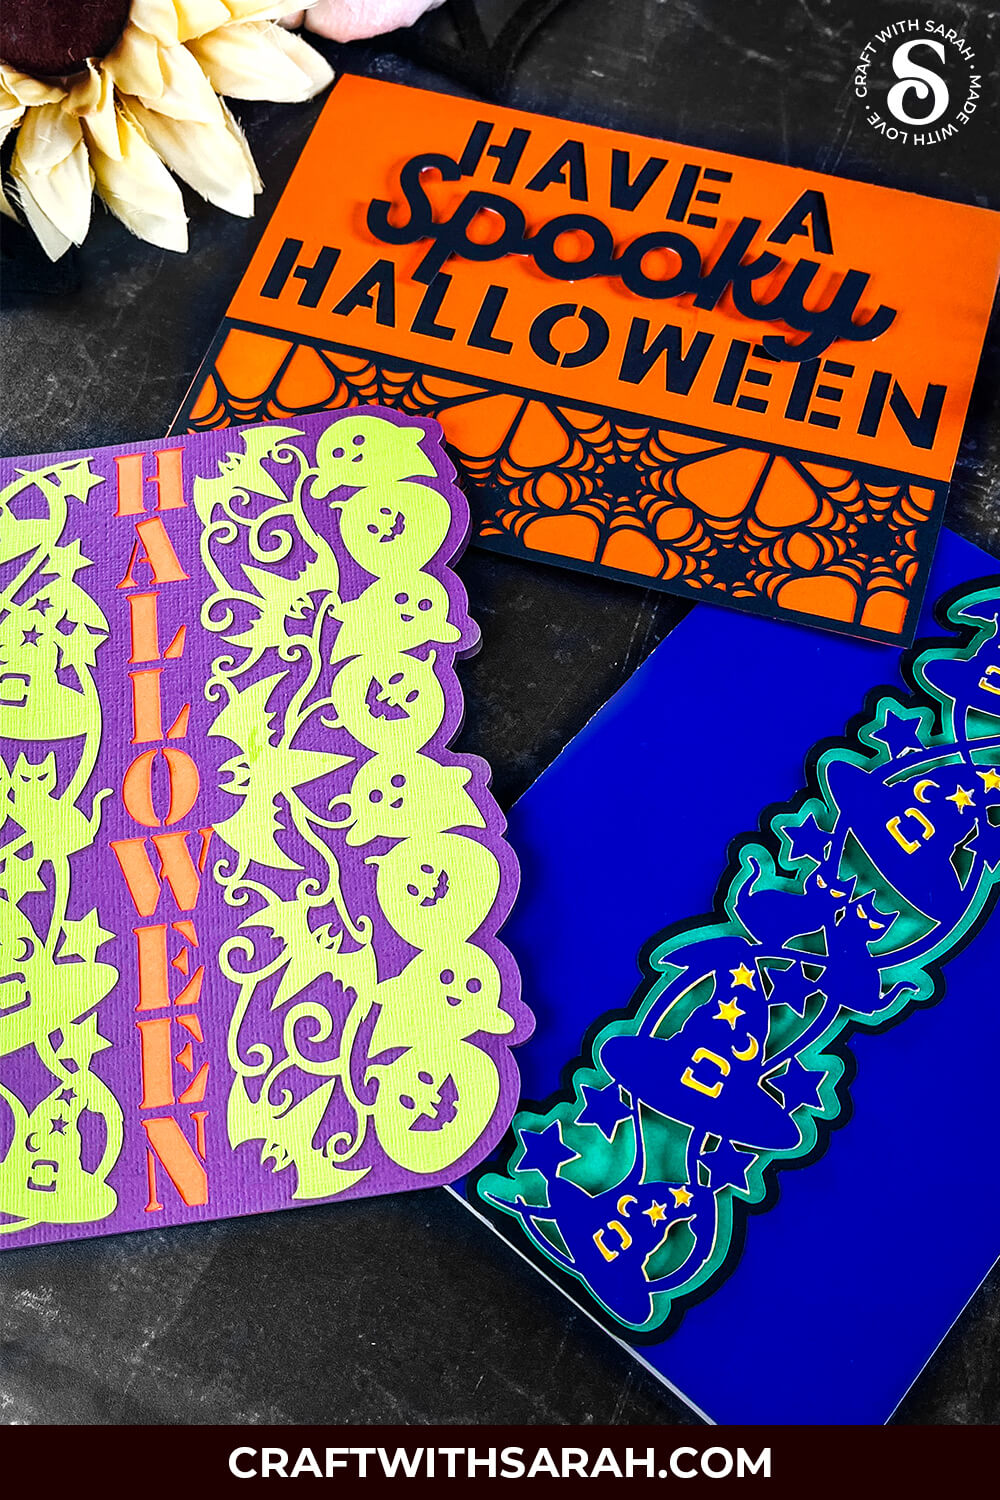
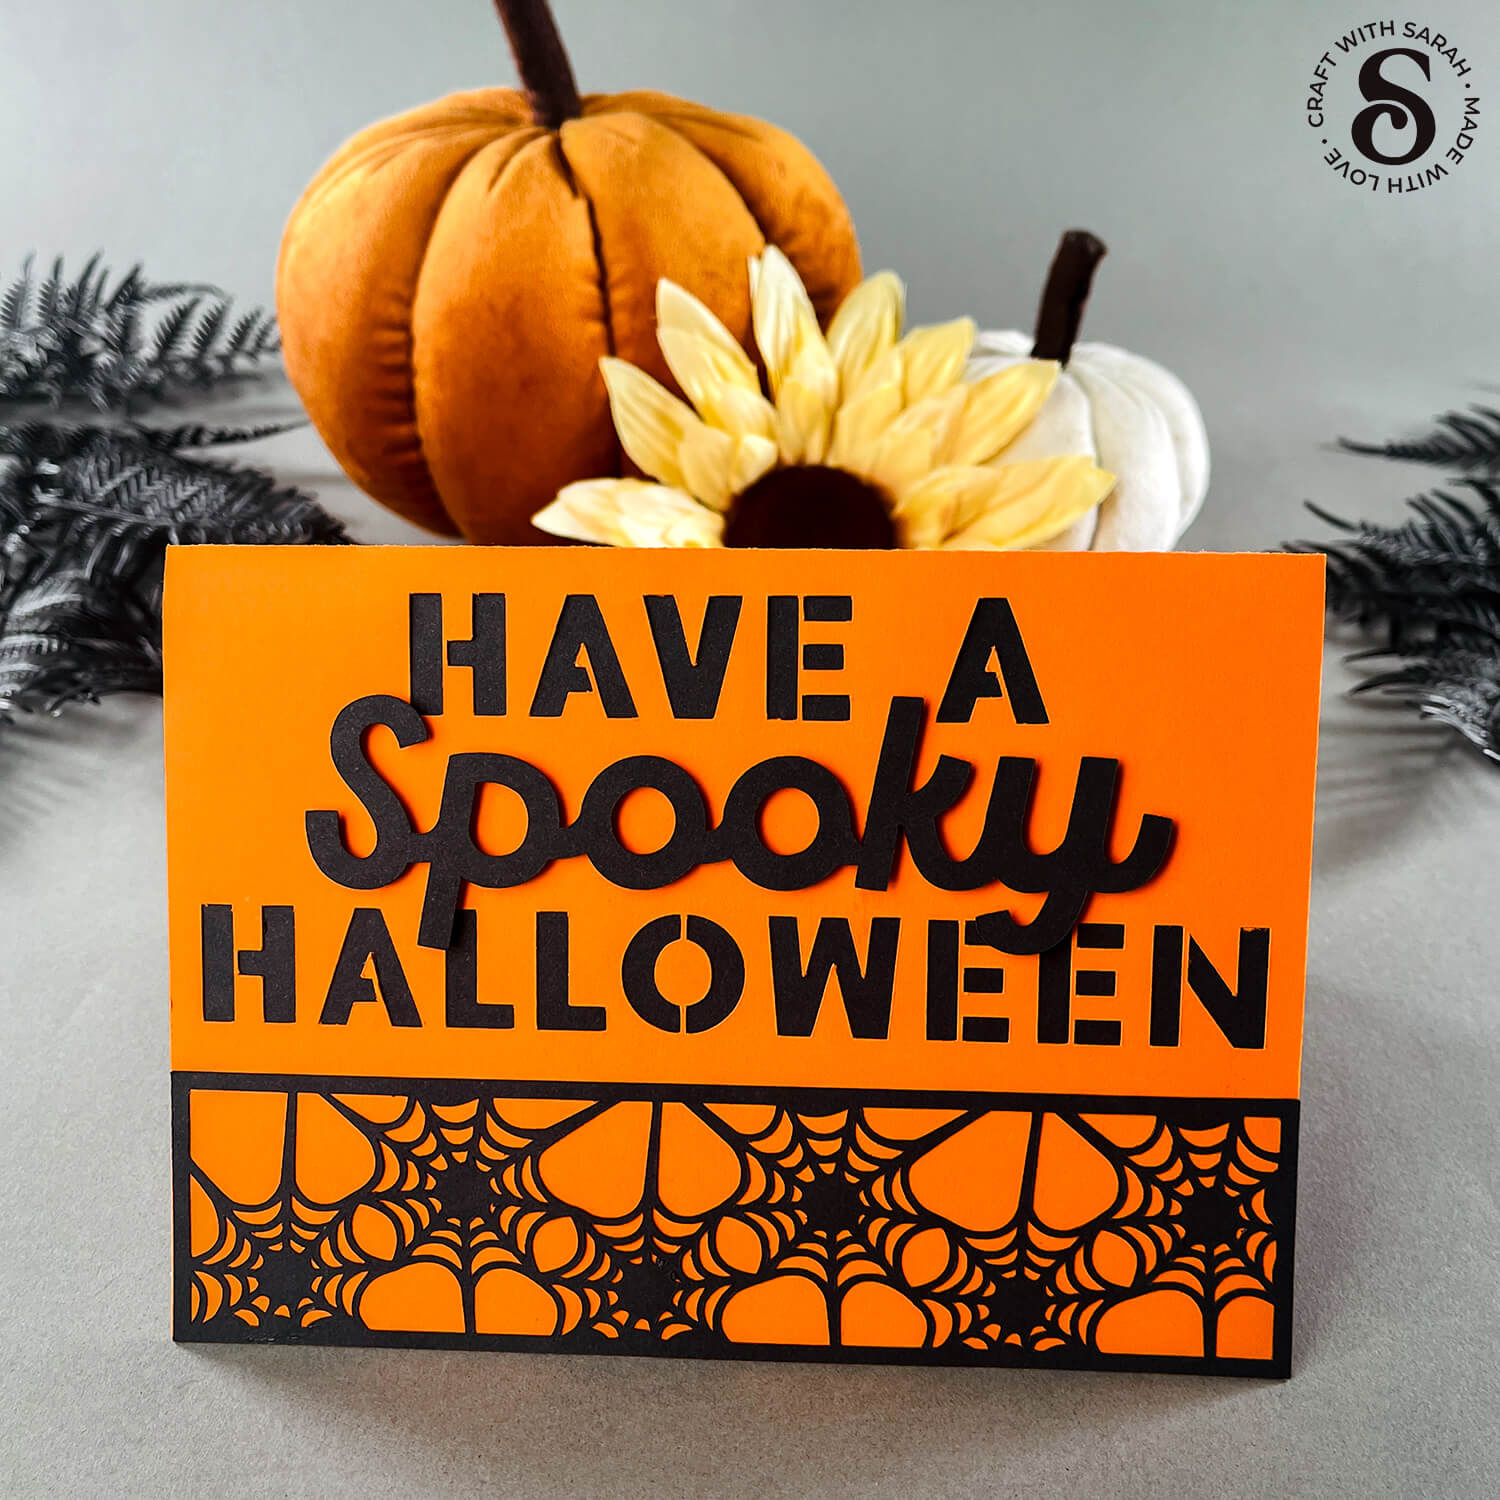
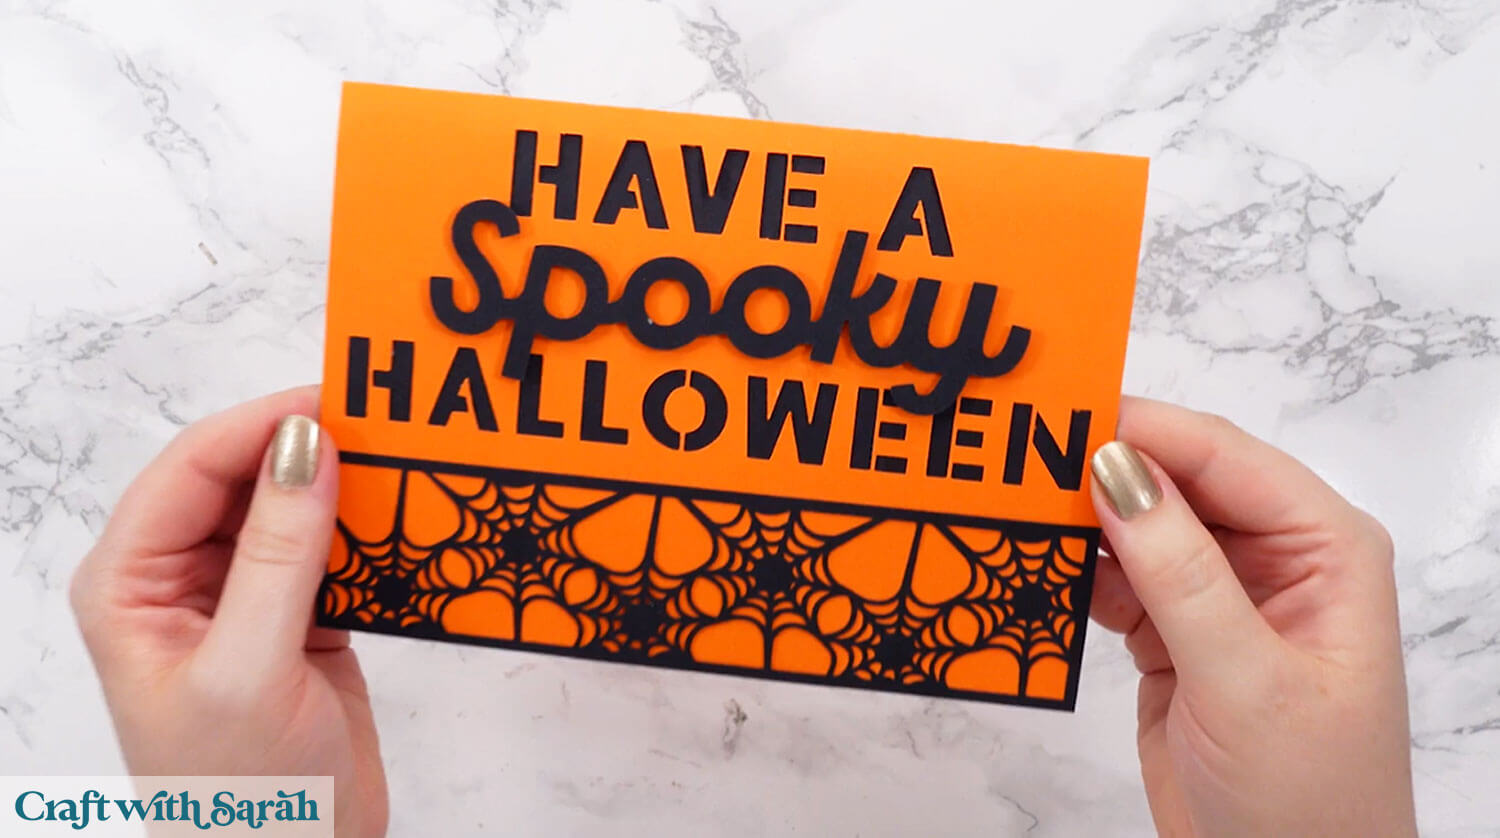
Card One) Spiderweb Border
DESIGN SPACE TOOL FOCUS: Subtract, Text
Start by creating a 5×7 inch base card in Design Space. To do this go into Shapes and choose a square.
Make it 10×7 so that it will be the correct size once folded.
If you have a scoring stylus or scoring wheel you may want to add a score line.
Go into Shapes and choose a score line.
Make it the same height as your card and rotate it 90 degrees. With the card and score line selected press Align > Center.
Then with them both still selected, click “Attach”. Attach is what tells the Cricut where to do the scoring.
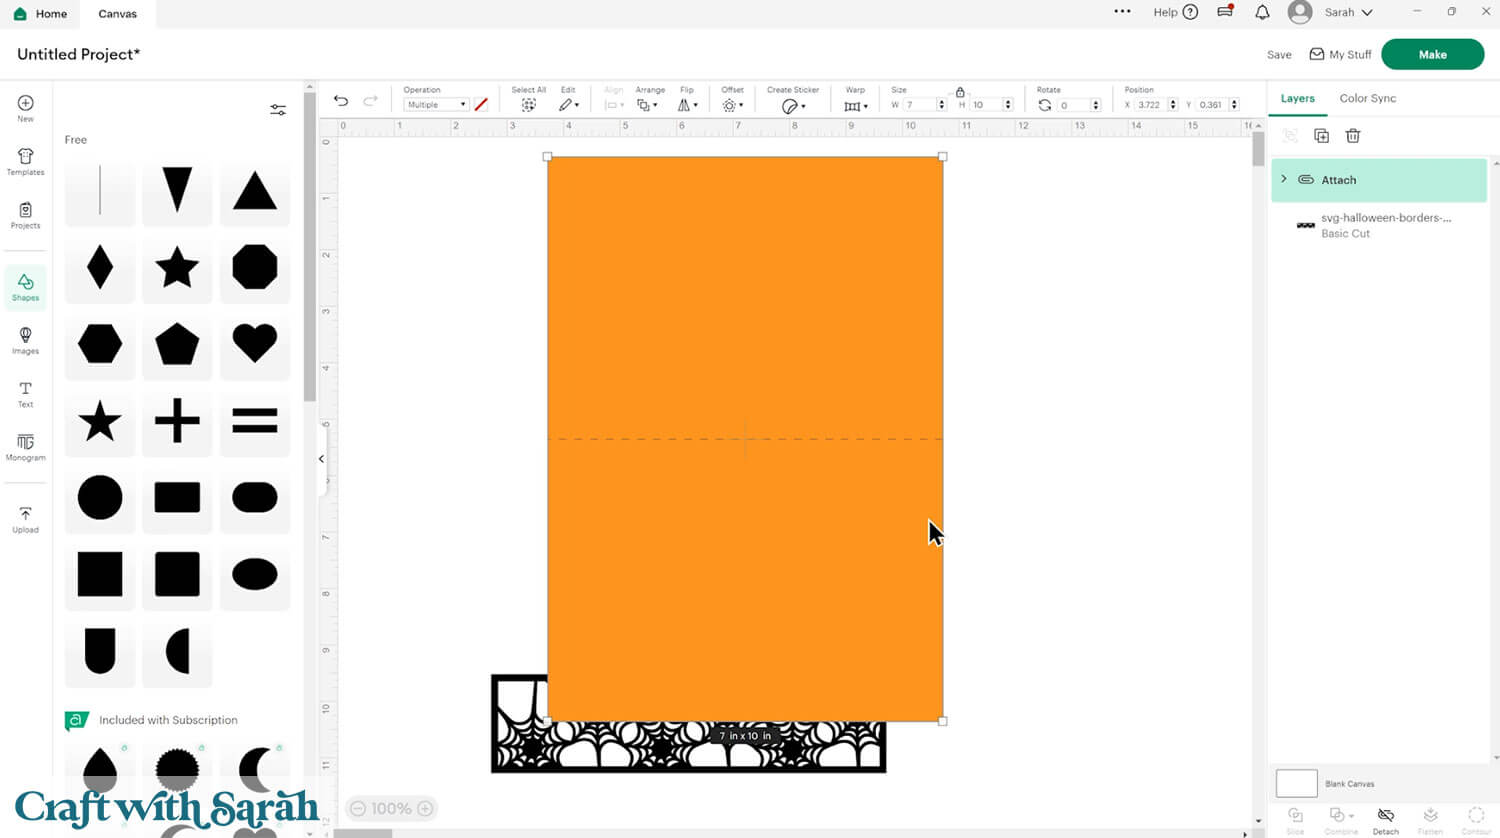
Position the spiderweb border along the front edge of the card. Resize to the width of the card if needed.
You may need to use Arrange > Bring to Front to move the border on top of the card.

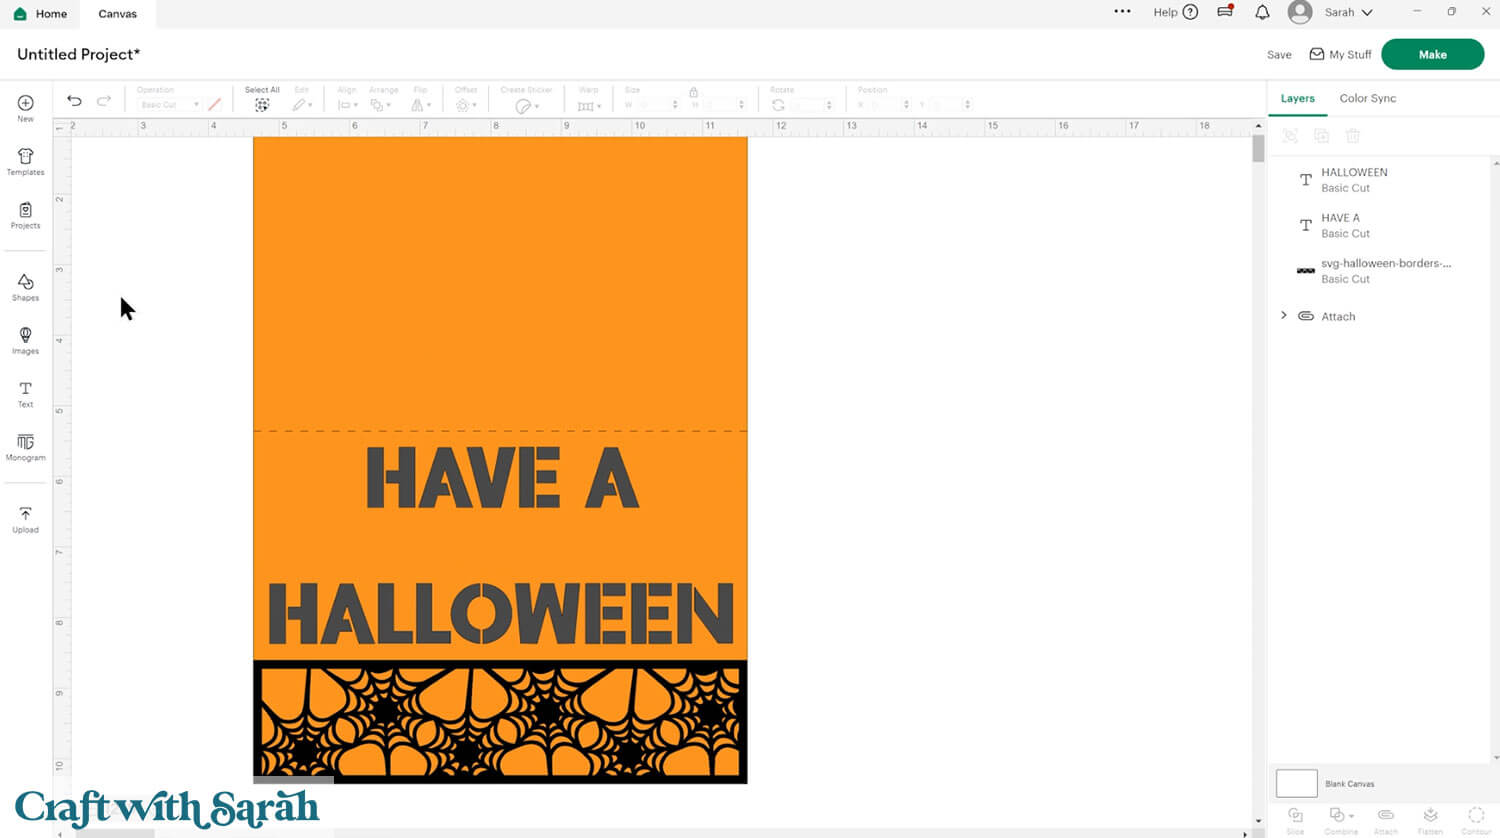
To add a greeting, type out the words “Have a” and “Halloween” using a stencil font.
Stencil fonts are helpful because the letters will cut cleanly without losing the insides of letters like “A” and “O”. You may want to tick the stencil filter for easy searching.
The font I used was “BFC Atlas Stencil”.
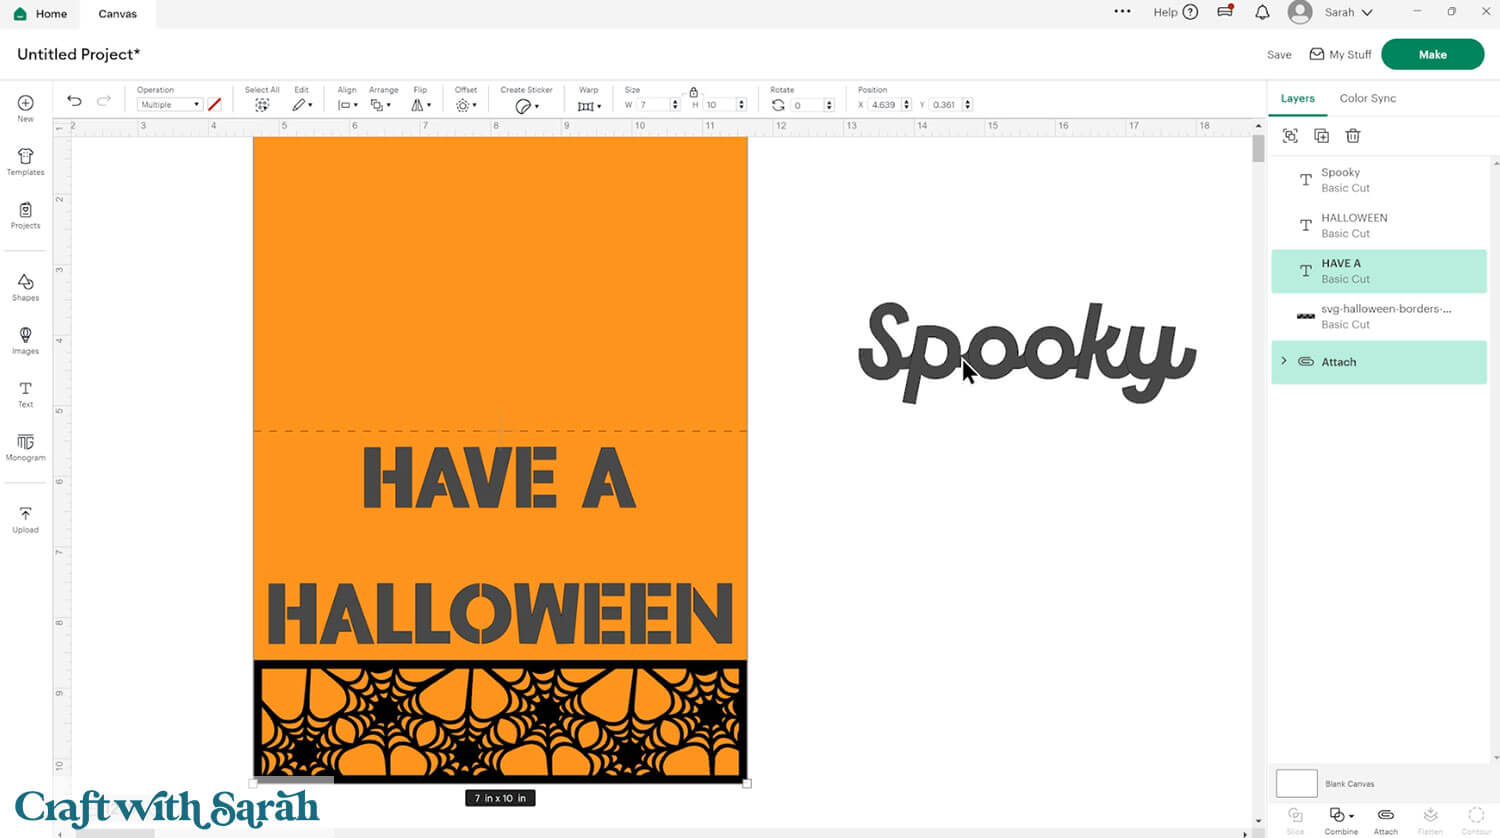
I wanted a different font for the word “spooky” to go in the middle. I used “BFC Blue Sports Car-Connected”.

To position your text, start with “Have a” and “Halloween” layers and select them along with the card. Then press Align > Center Horizontally.
Detach the score line from the card temporarily so that we can do the next step (Design Space won’t let you do the next part properly if you don’t).
Then select the text and the card and press Combine > Subtract to cut the text out of the card.

Drag the score line to the top of the layers panel and Attach it to the base card again. Move the “Spooky” back into place.

Select another square, resize it by dragging the corners until it covers the text section. This will be stuck behind the card front to fill in the color on the text.
Press Arrange > Send to Back to see what it will look like.

Press “Make” and follow the on-screen instructions to get everything cut from cardstock.
Glue the black rectangle to the inside of the card.

Glue the spiderweb border to the front and use foam squares to attach the “Spooky” word so that it stands out a bit from the rest of the card.
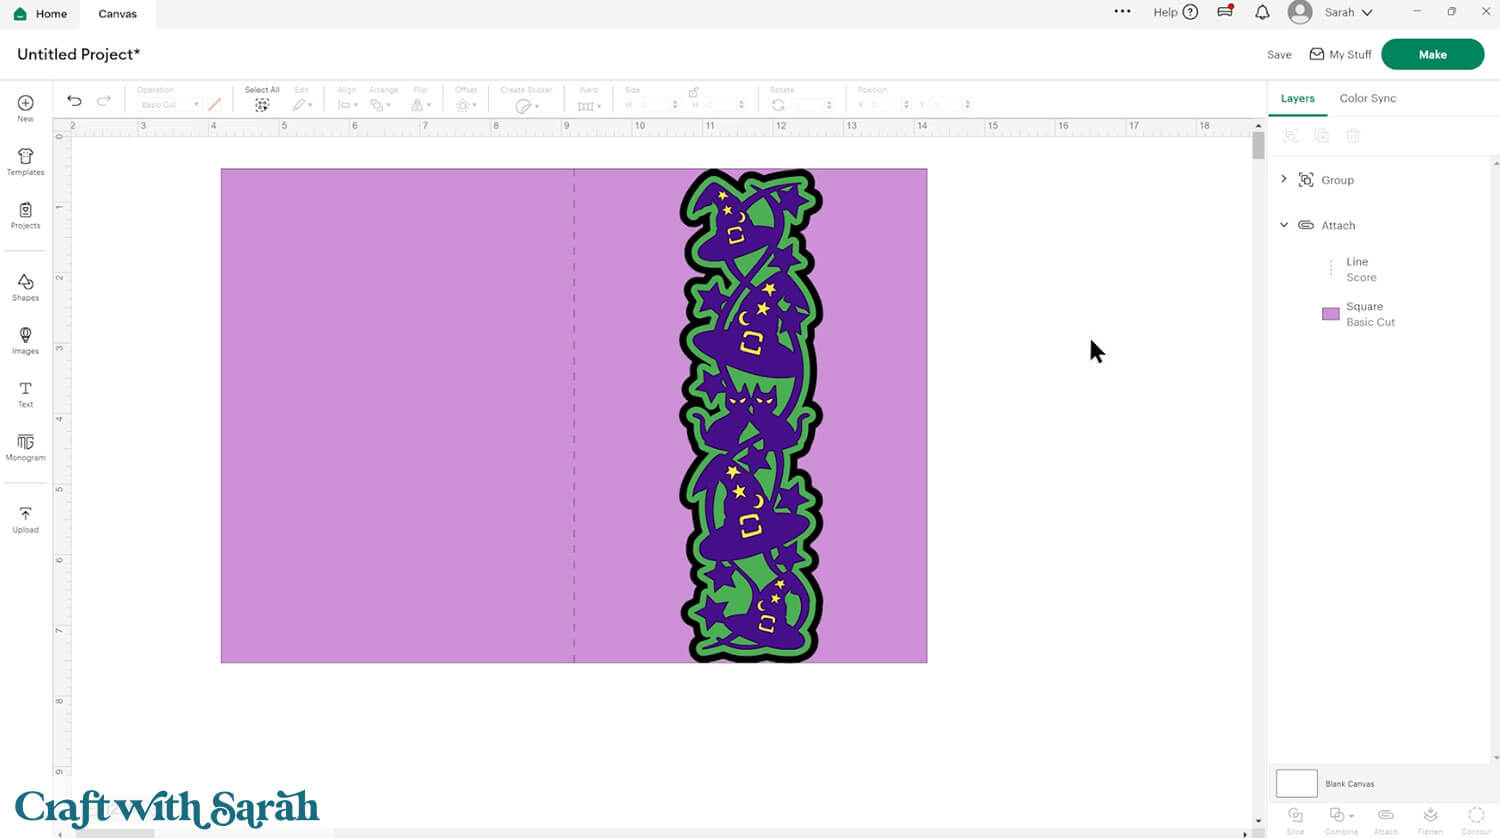
Card 2) Witch Hat Card with Offset
DESIGN SPACE TOOL FOCUS: Contour, Offset
For the second card, we’ll use the witch hats and cats border. This card introduces the offset tool and the contour tool.
Start by creating another 5×7 inch card, this time in portrait orientation.
Add the witch hat border design and duplicate it to make a copy. Change the bottom layer to yellow.
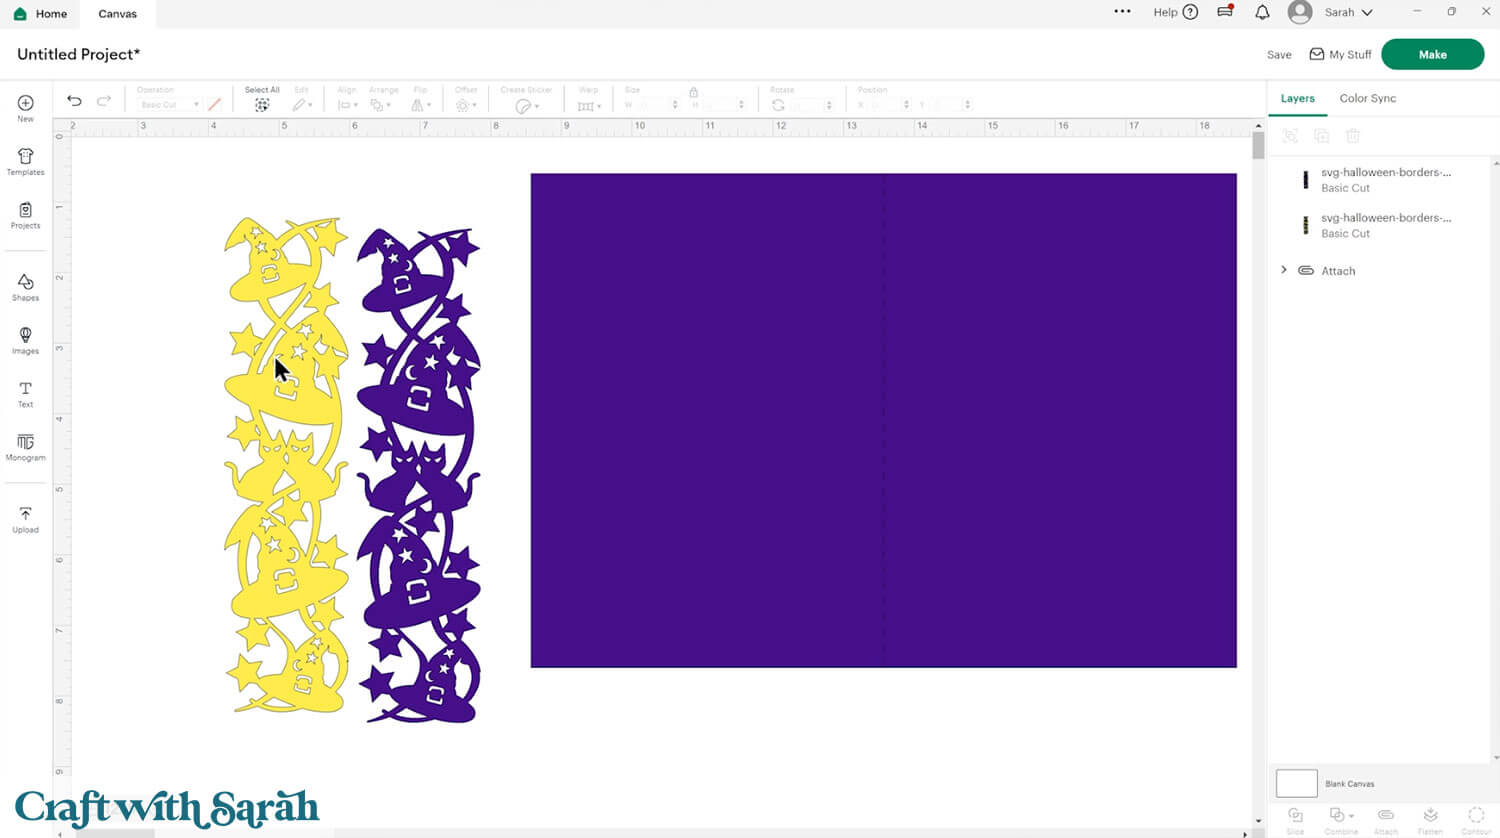
Select both copies of the border and go Align > Center to put them on top of one another.
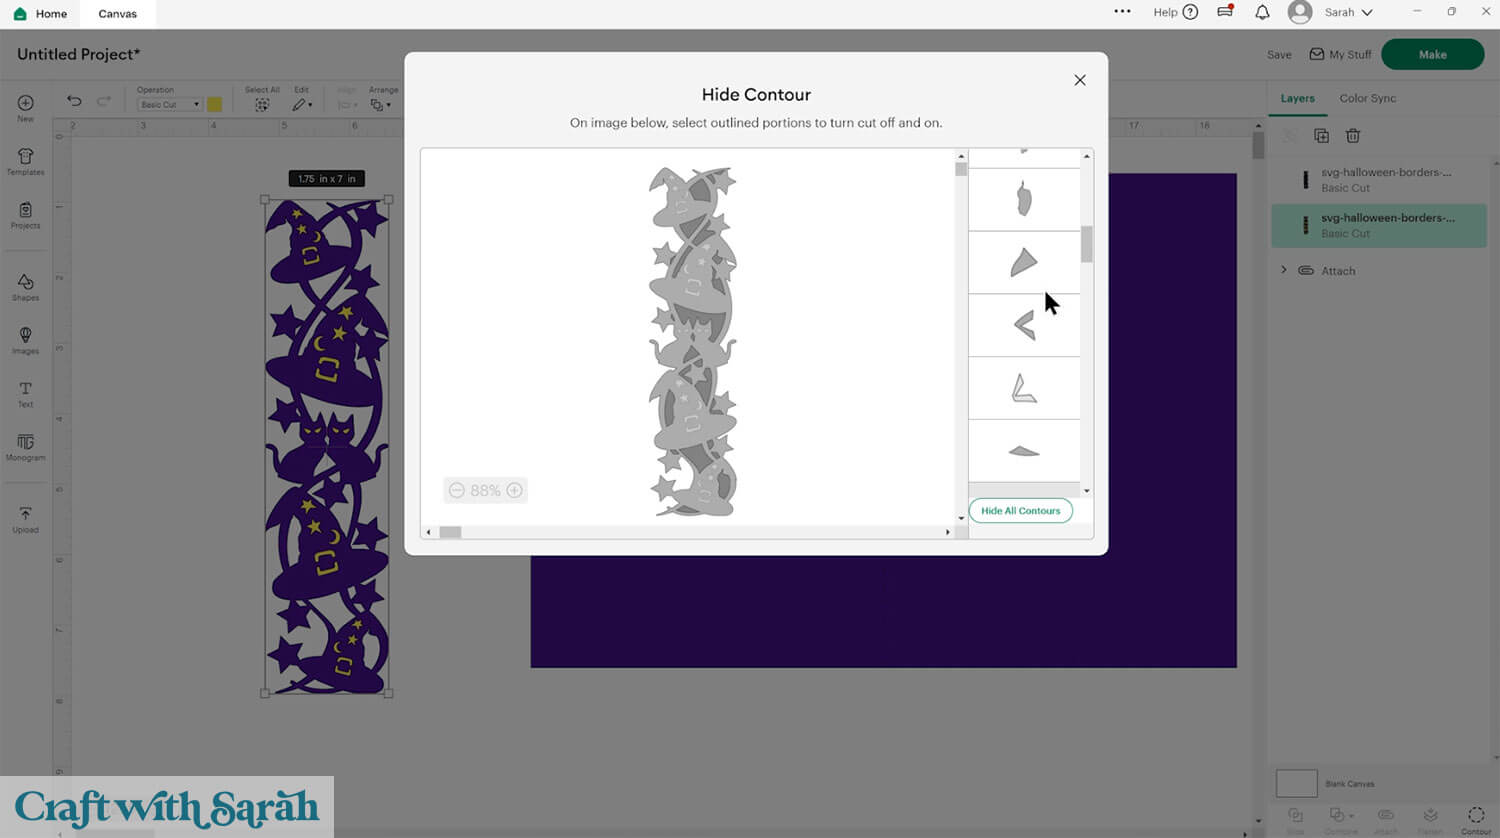
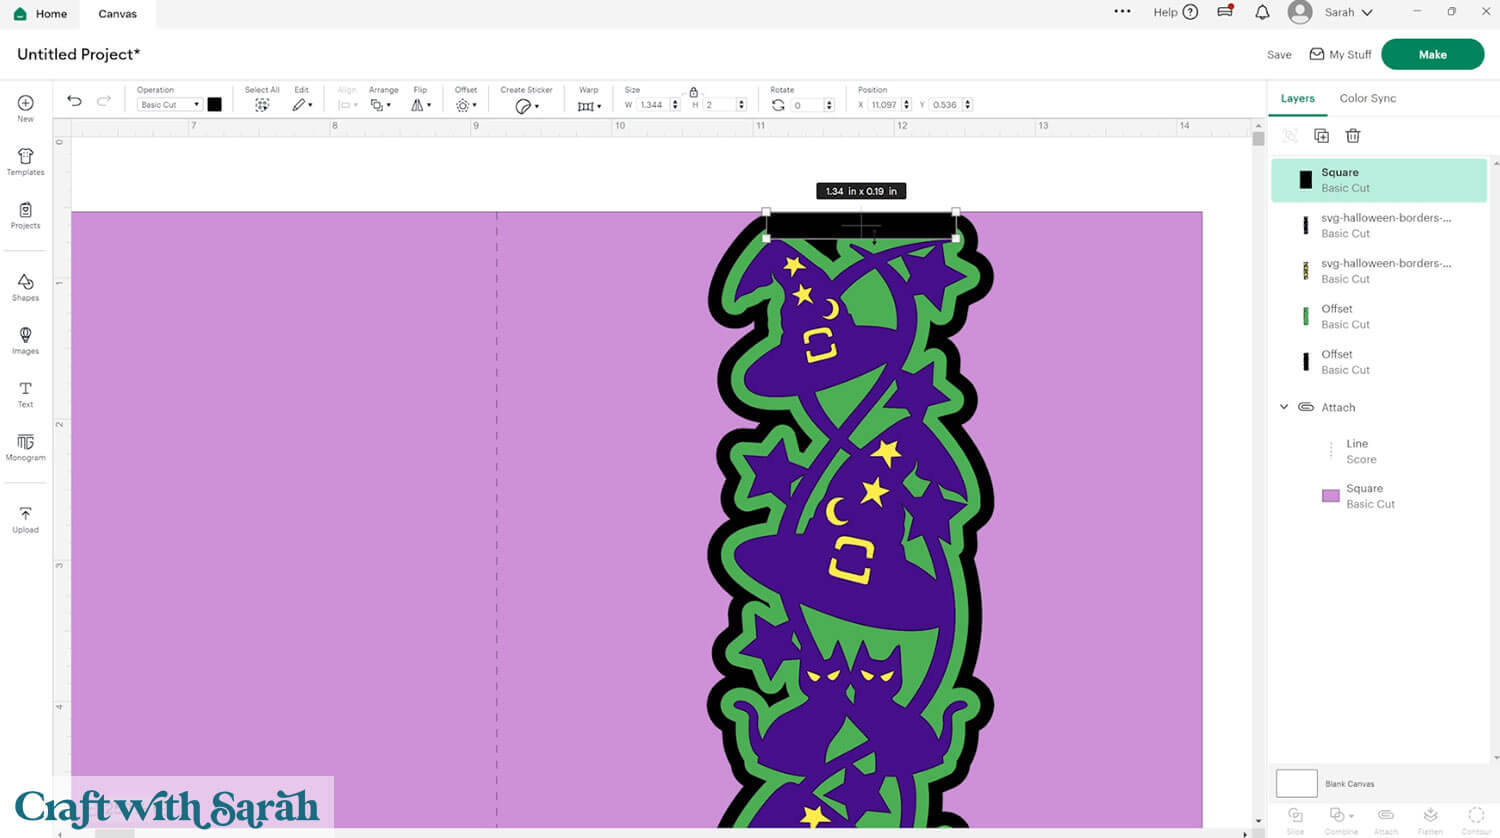
In the Layers panel, click the yellow layer and then press Contour.
Fill in the stars, moons, hat buckles, and cat eyes by clicking the gaps in the window. This makes them stand out when layered behind the purple.
Next, click the bottom layer and use the Offset tool to create a bright green outline around the border.
IMPORTANT – a recent Design Space update has changed the location of the Offset tool. If you don’t see it along the top menu any more, select the layer you want to Offset, then click the pencil “Tools” menu (far-left button on top navigation). This will slide out a menu from the left of the screen and you’ll find Offset in there.
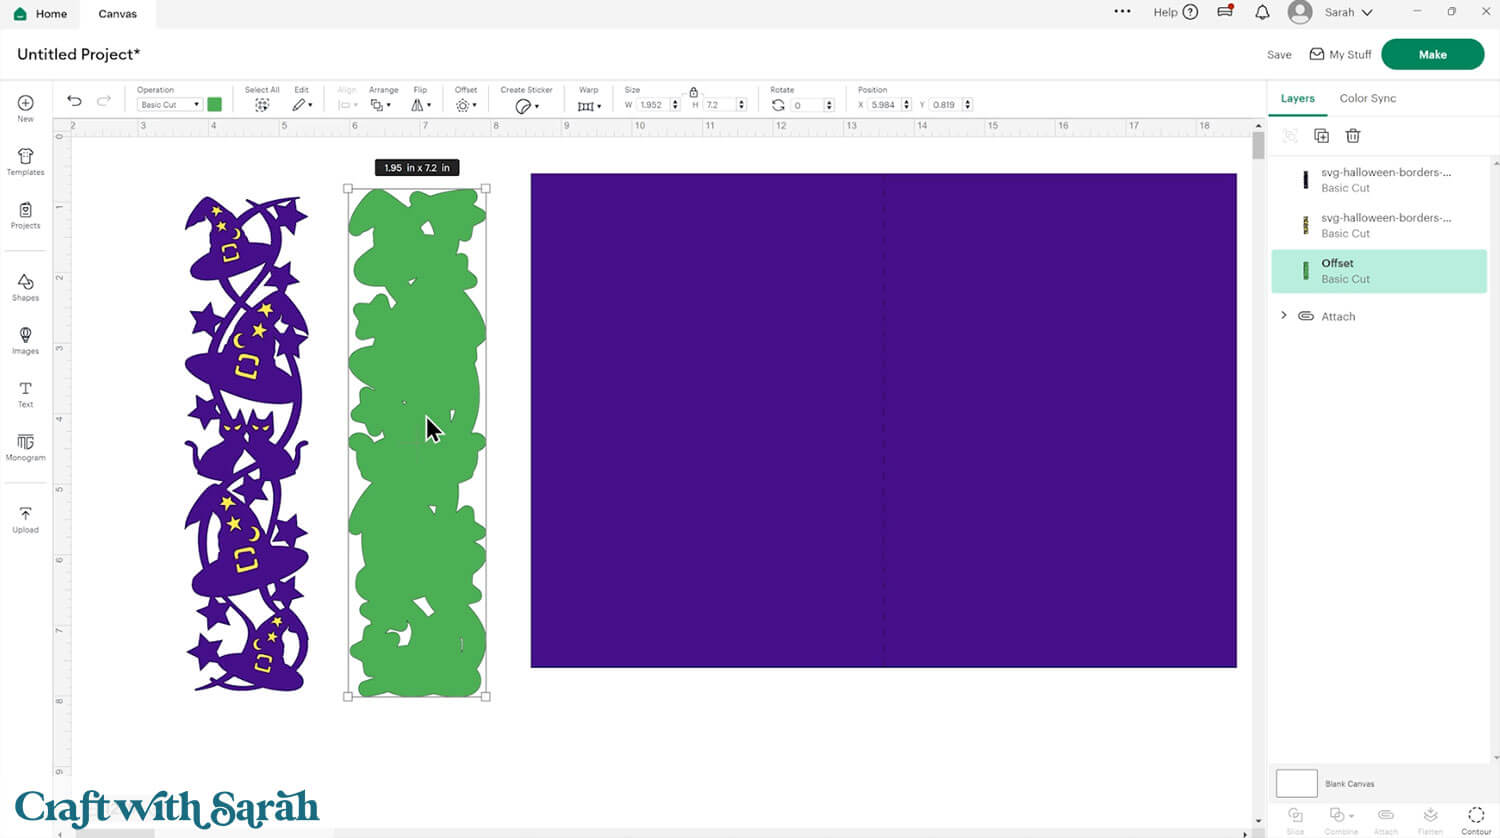
Repeat the Offset to make another border.
You can use the Contour tool on the Offset layers to remove any small shapes that might be too tricky for the Cricut to cut.
Drag the layers onto your card to see how it’s looking. You may need to resize it to fit the card.
I changed the color of the base card to show you the gaps at the top and bottom which I want to clear up.
To fix them, Ungroup the layers in the border (if you have Grouped them – don’t worry if you haven’t) and select a square.
Resize the square till it just covers the gaps but it is still touching the border.
You can send it to the back to see how it looks.
Do the same along the bottom of the card.
Then, select both rectangles along with the bottom layer of the Offset border and go Combine > Weld.
That fills in the gaps around the bottom layer which I think looks a bit neater.

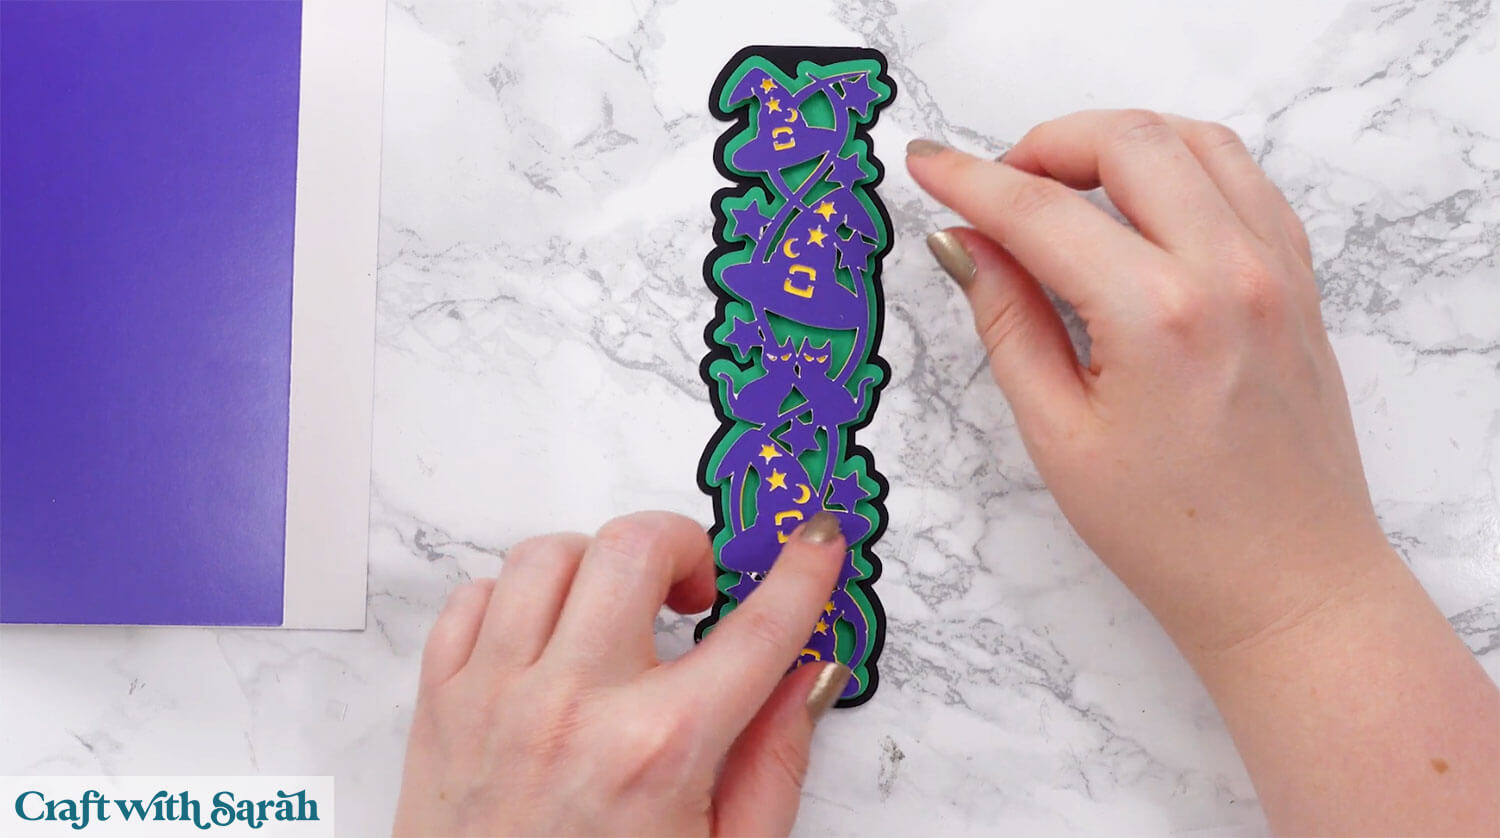
Click “Make” and follow the cut process to get all the pieces cut out.
Fold along the score line (if you added one).
Glue the green layer on top of the black. Use foam squares to attach the yellow layer. Glue the purple layer on top.
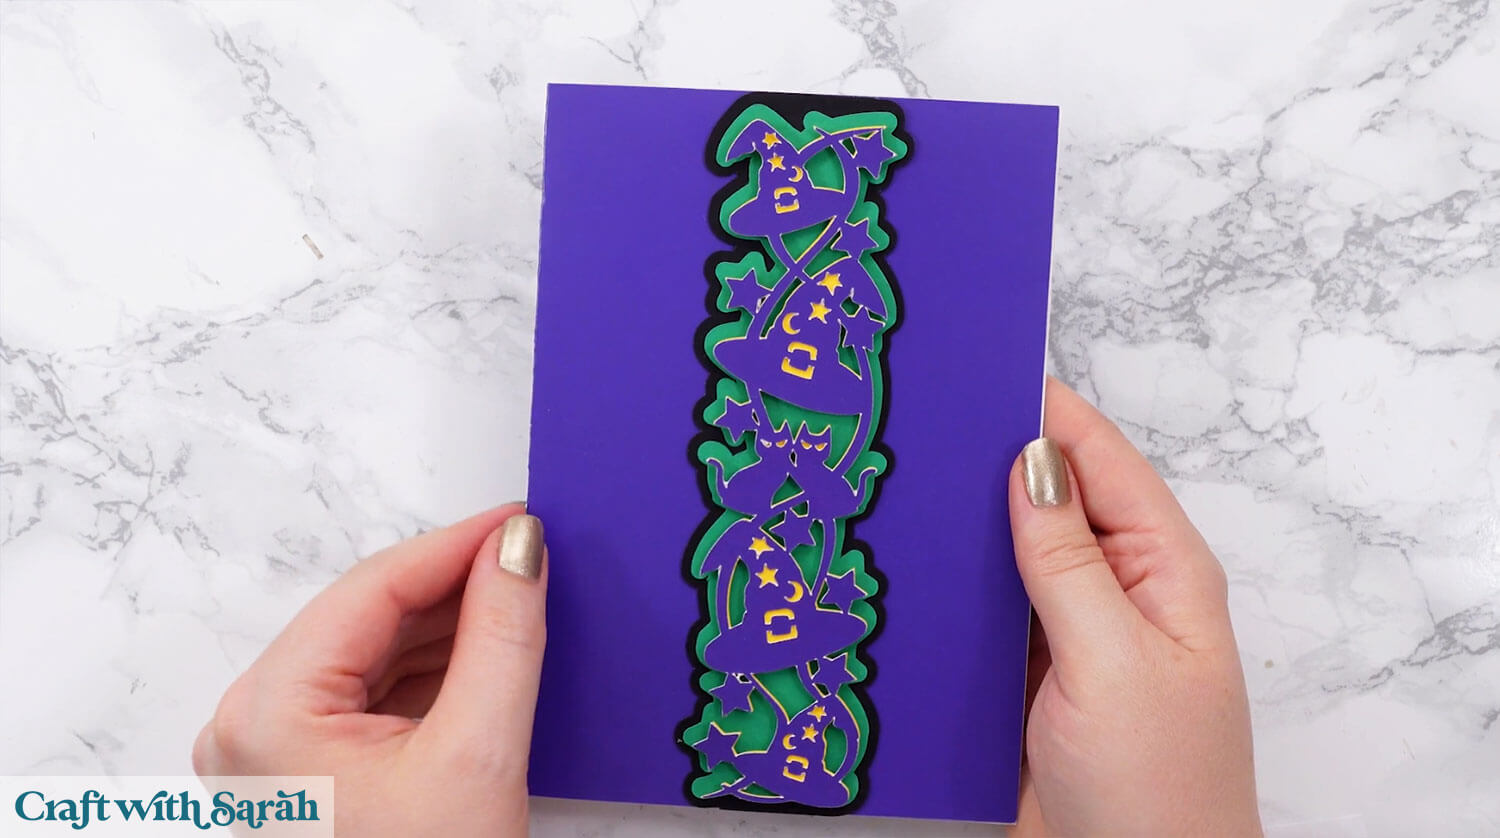
Now you can glue or foam onto the card front and then your card is complete!
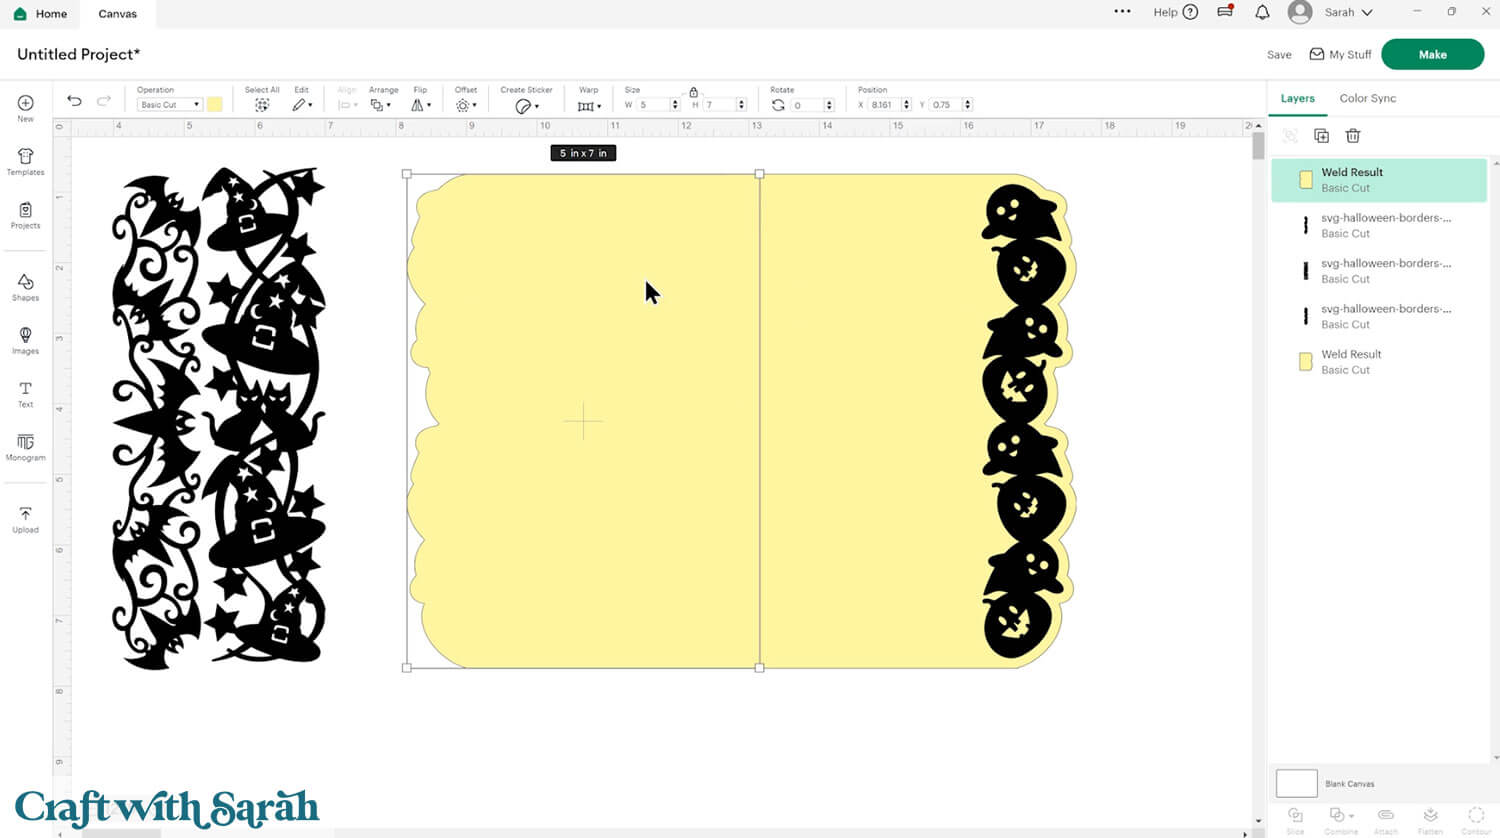
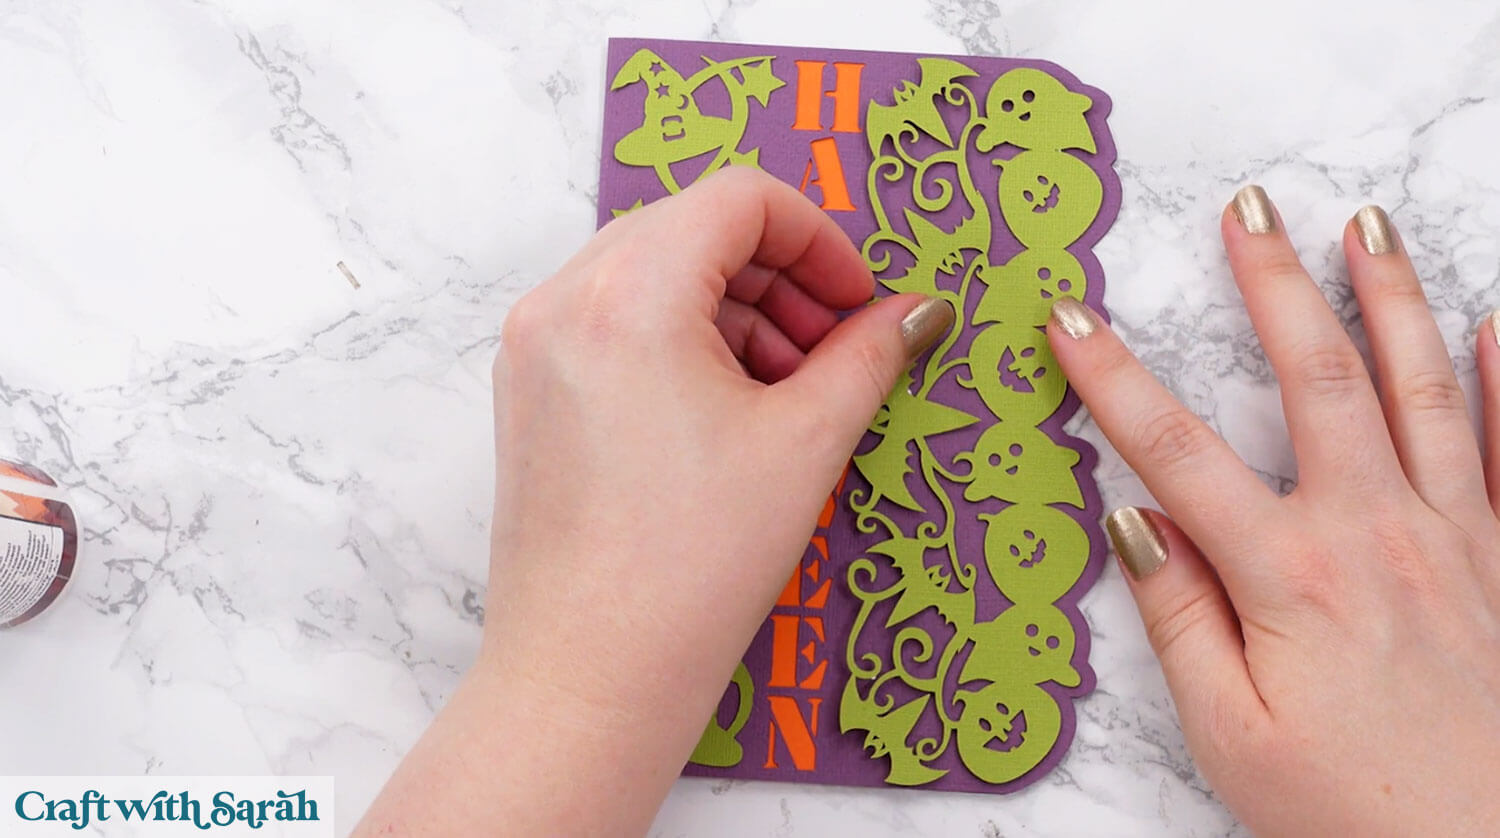
Card 3) Combining Borders Together
DESIGN SPACE TOOL FOCUS: Offset, Align, Slice, Weld, Text, Subtract
This is the most advanced of the three cards. This card has a shaped side edge that follows the curve of the border.
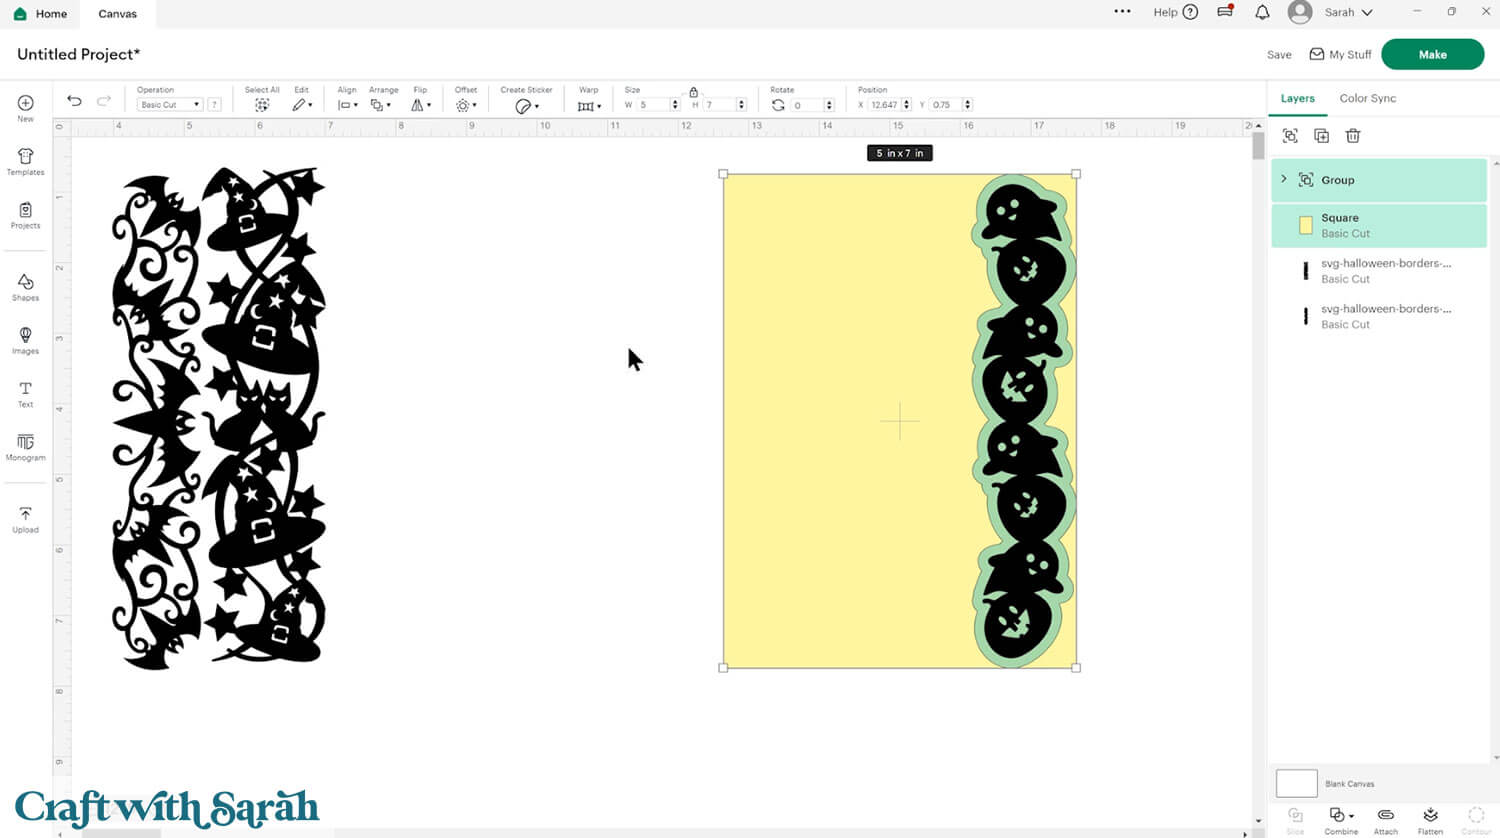
Start with a 5×7 inch rectangle in Design Space.
Add the border and create an Offset around it to form the edge of the card (0.15 offset).

Group the border and offset layer and make the Group 7 inches tall.
Move it over to the right-side of the rectangle.
Use the “Align” tools to align the border to the top and then to the right of the rectangle.
Go into Shapes and choose a square. Change the color so that you can see it clearly.
Drag the square so that it goes over the edge of the card and border.
You may need to add two or more squares to fully cover all the parts of the rectangle that need to be cut away.
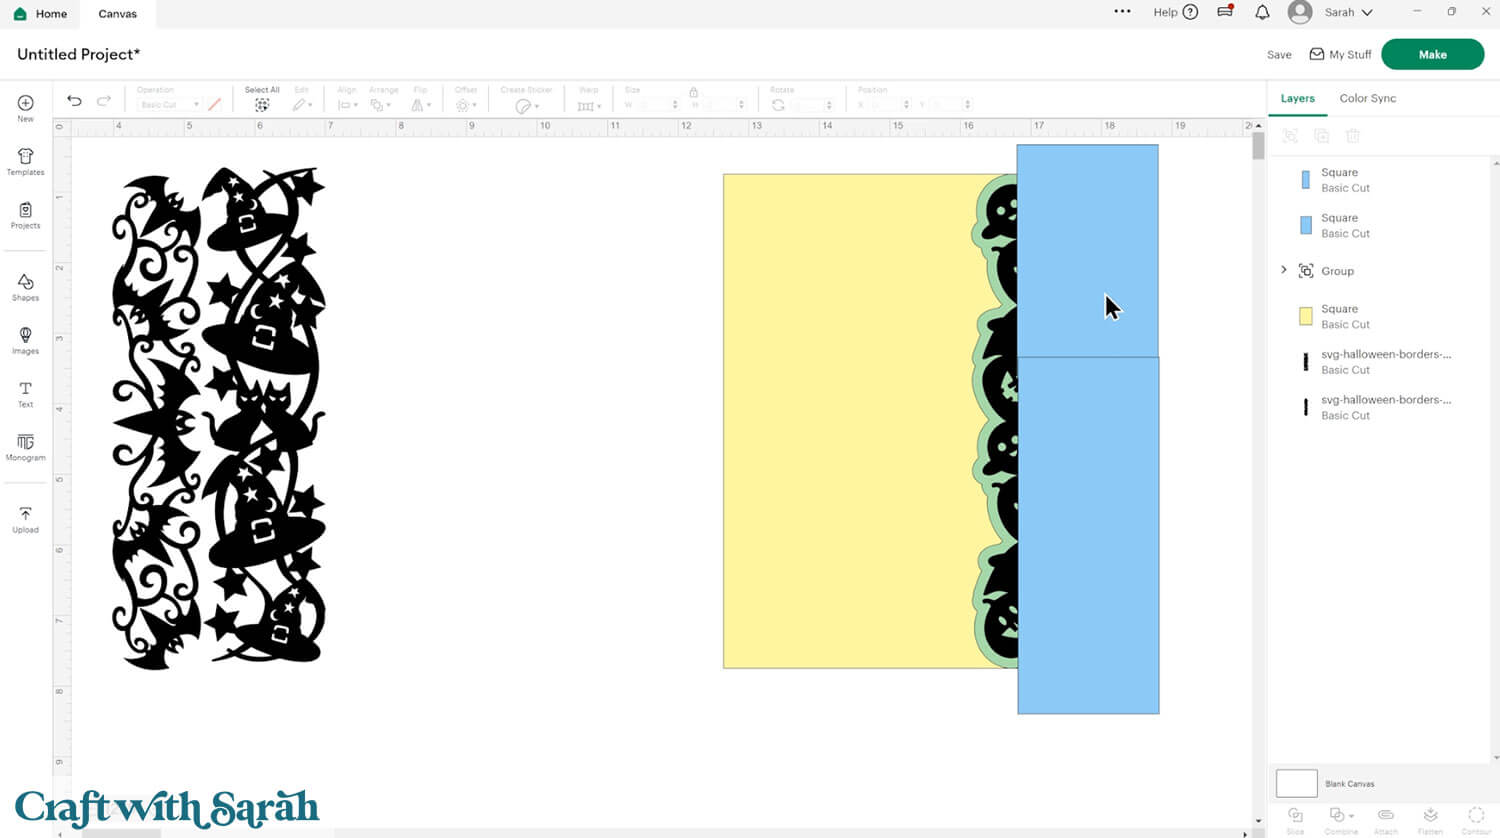
If you used more than one square then Weld them together.
Click the square and your 5×7 rectangle and “Slice” them.
Remember – Slice ONLY works if you have exactly 2 layers selected.
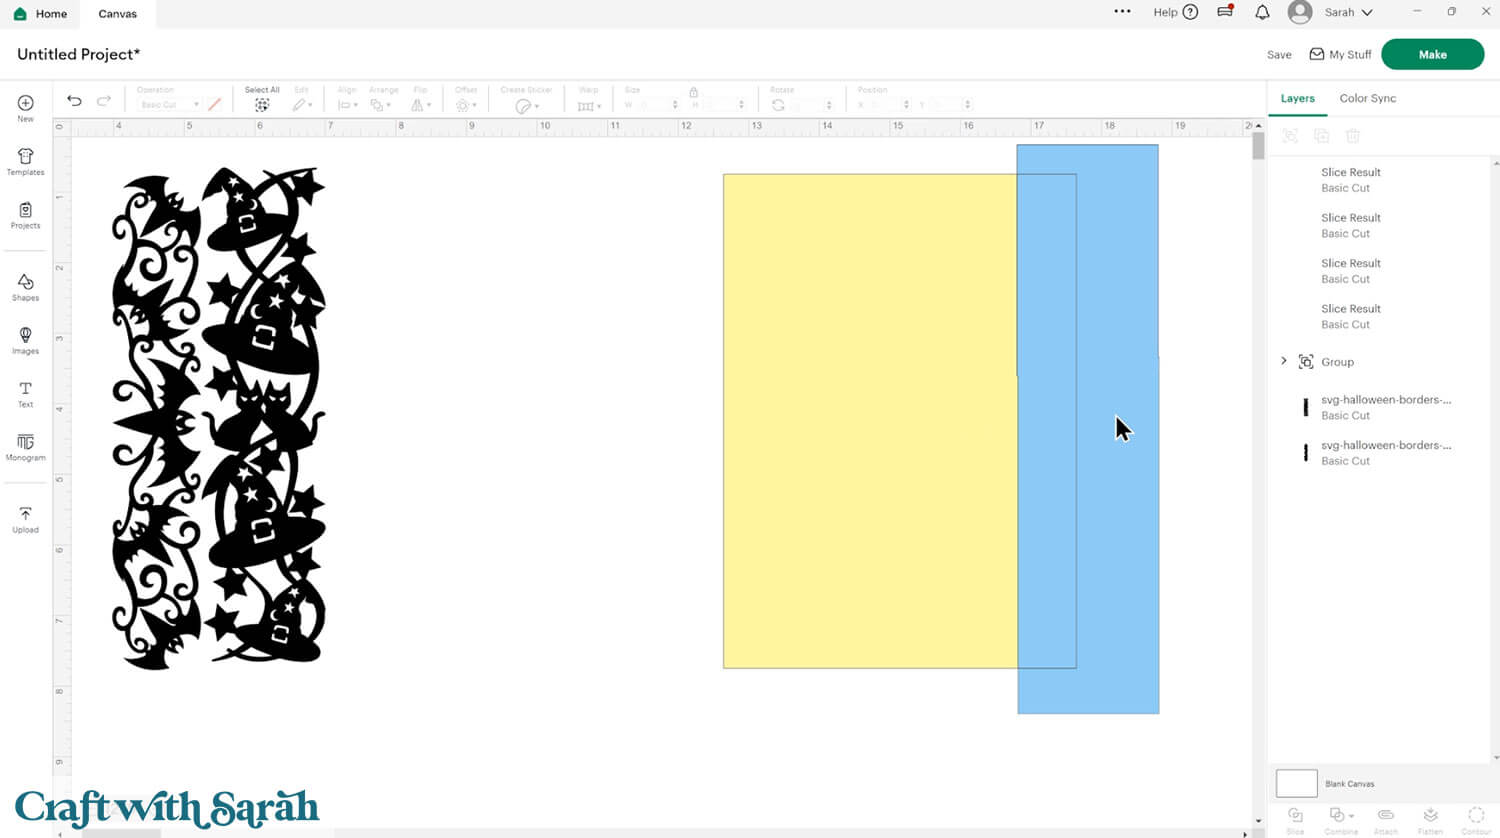
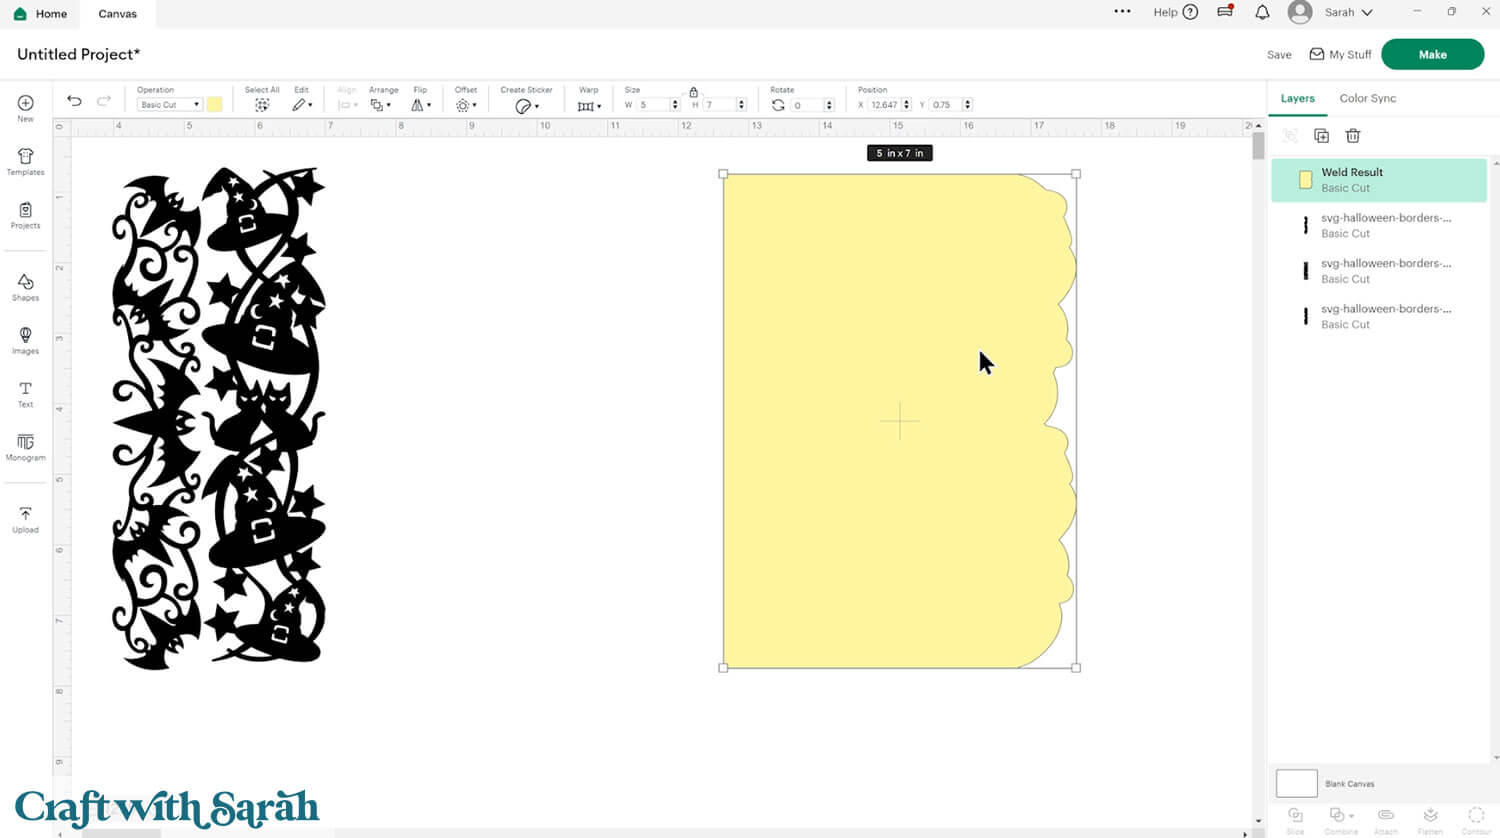
Delete the unneeded Slice results layers then move the remaining rectangle section to the Back.

Select the remaining rectangle and the largest Offset layer and press Combine > Weld to join them into one layer.
Move it to the back, then Duplicate it and Flip the copy horizontally.
Position it next to the original, using Align > Top to make it straight along the top.
The two pieces should overlap ever so slightly.
Weld the two together to join them into one layer. This will be your card base.
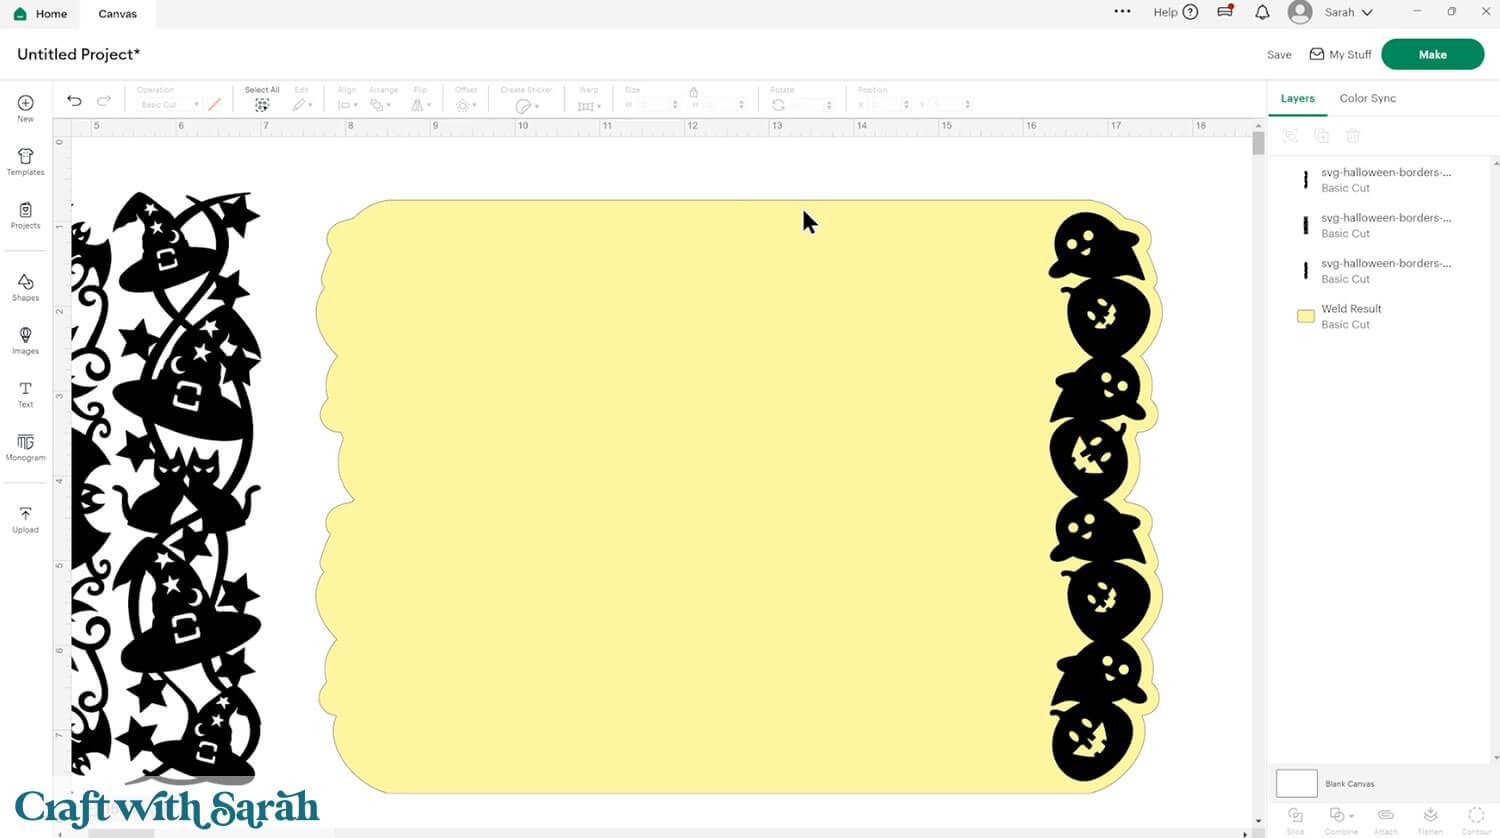
Move the card base to the bottom of the layers panel.
Add other borders to the front of the card if desired.
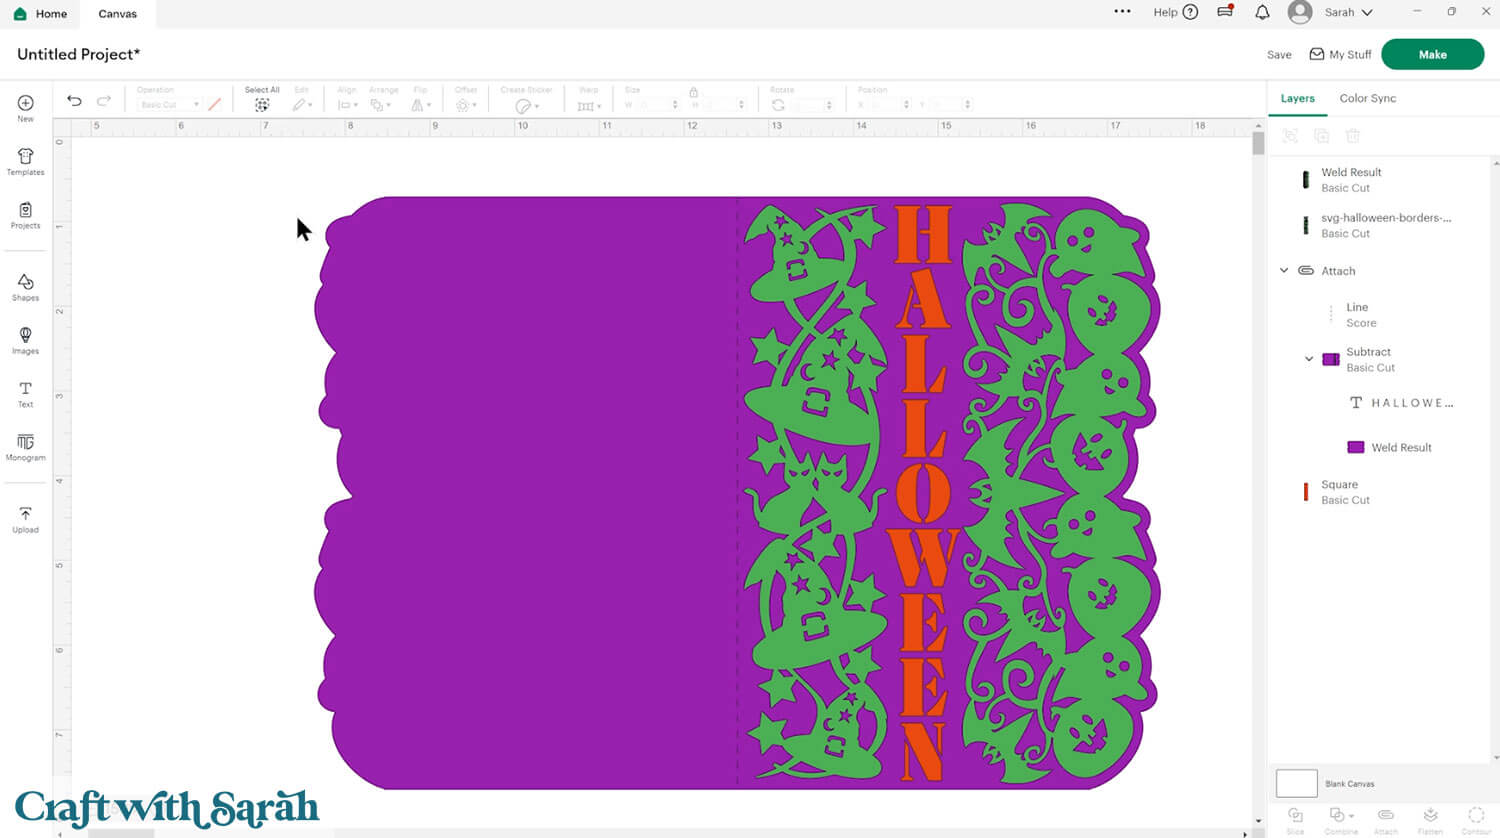
Add some text and “Slice” or “Subtract” it from the card base.
Create a rectangle to go behind the letters so that it will show a colour through.
Add a score line and “Attach” it to the base card.

If any of your borders touch then you can “Weld” them together so it will cut as one layer. I did that for the bats and ghosts borders.
Click “Make” and follow the cut process to get all the pieces cut out.
Fold along the score line (if you added one).
Glue the coloured rectangle to the inside of the card.
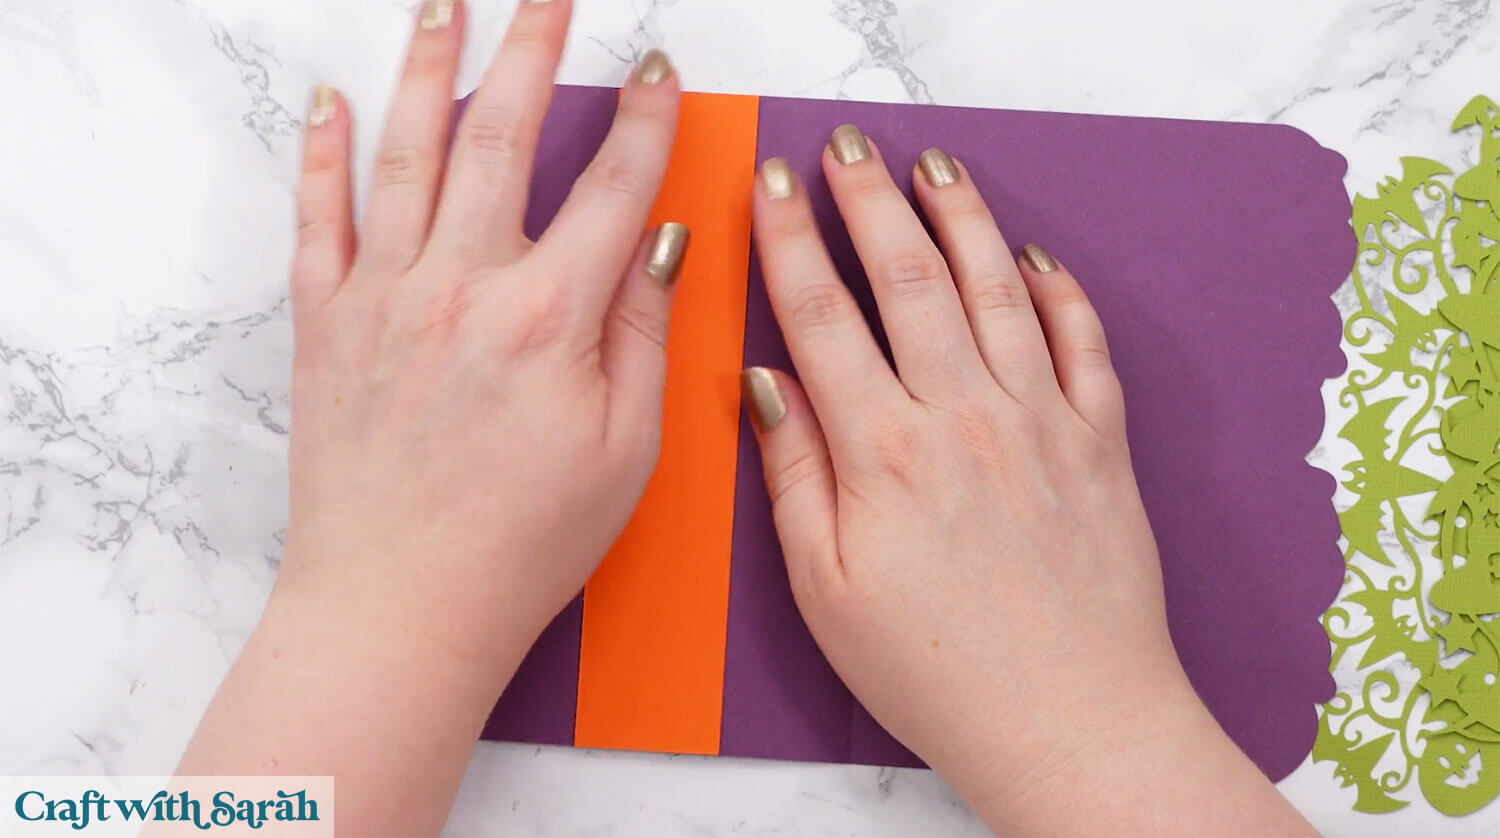
Glue the borders to the front of the card.
Quick & Easy Halloween Card Making Fun
These Halloween borders are a great way to stretch your creativity in Cricut Design Space without overcomplicating your process.
With just a few steps, you can build layered, eye-catching Cricut Halloween cards that reflect your personal style. Once you get the hang of it, it’s easy to experiment with different layouts and card sizes to make each design your own.
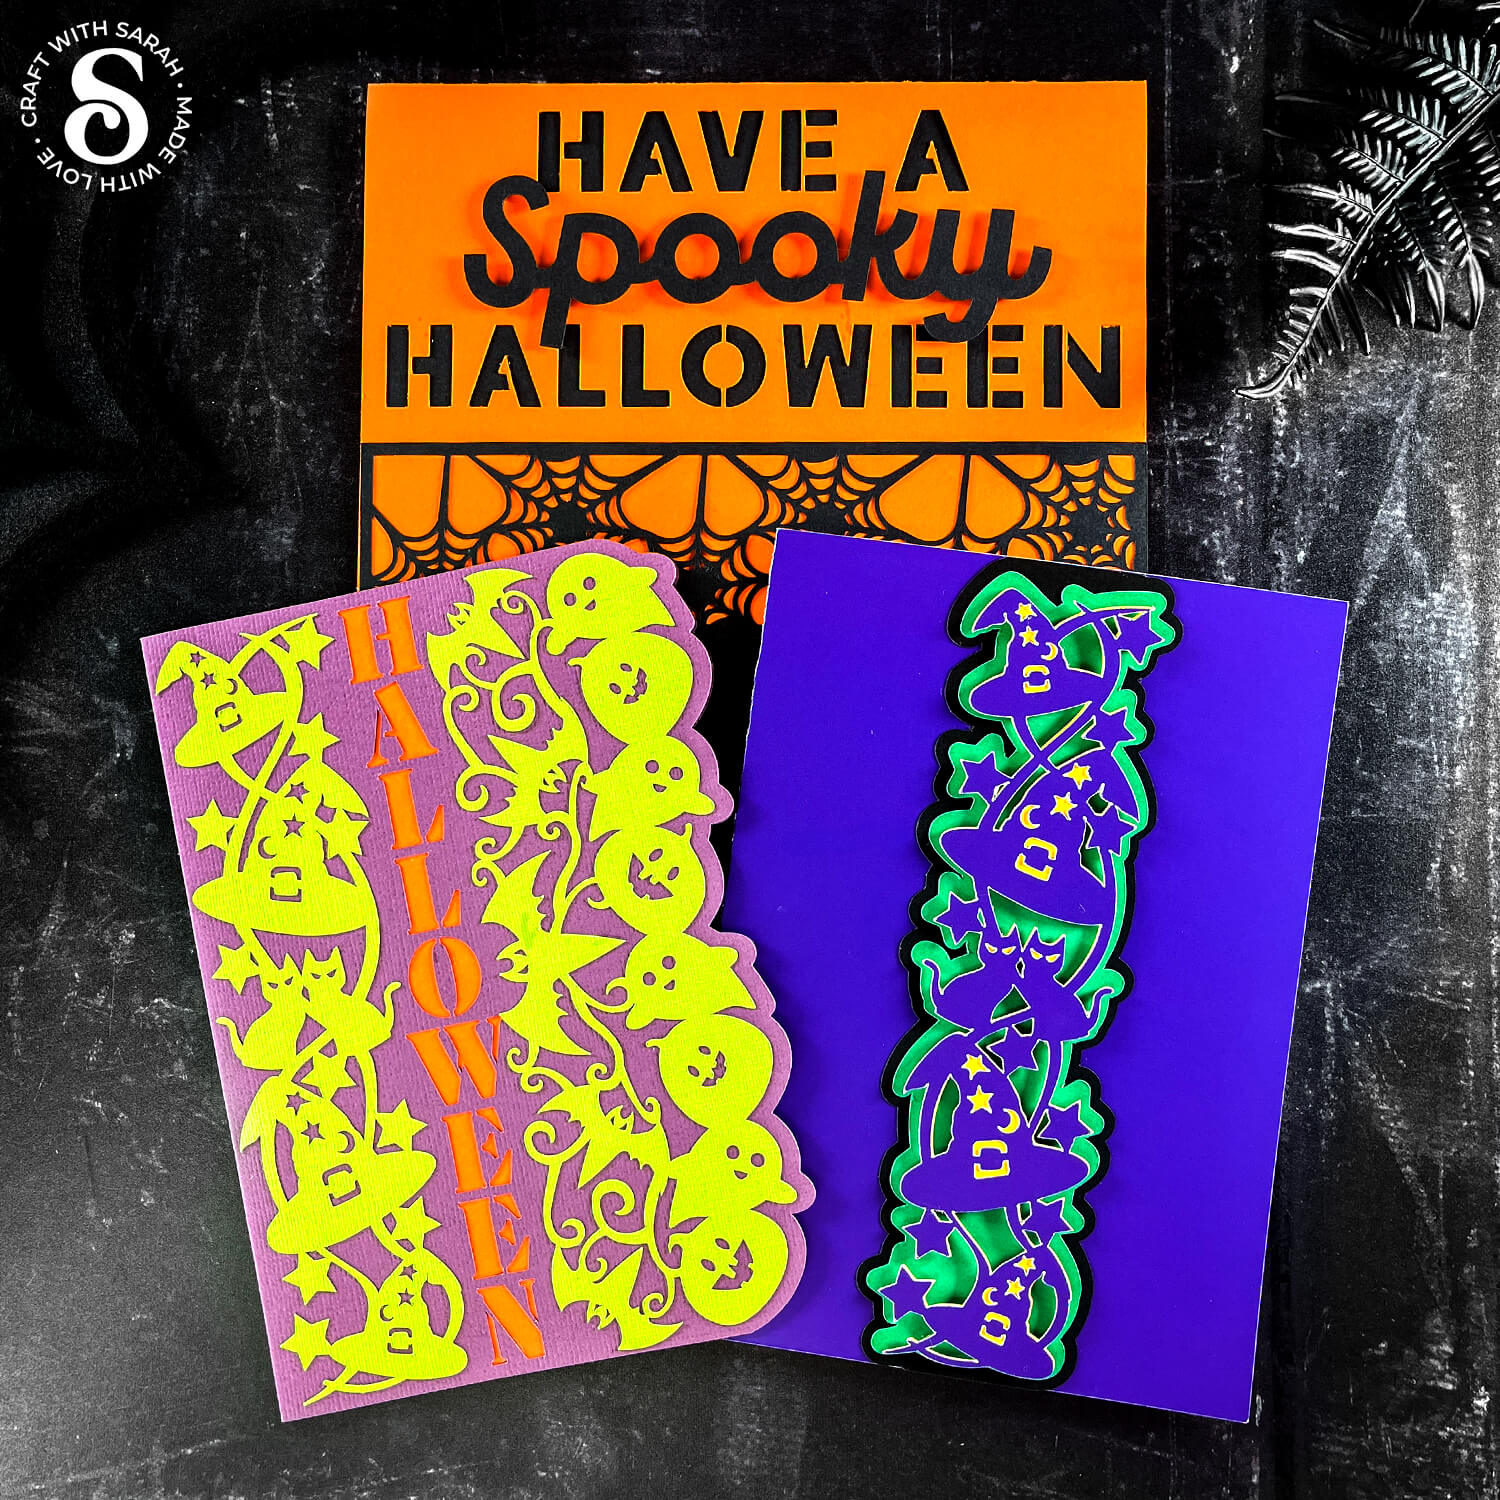
From quick cards for friends to more detailed handmade projects, these files give you a strong foundation to work from. The borders are versatile enough to use across a variety of Halloween cards, and they cut cleanly to keep the process smooth from start to finish.
Give them a try and enjoy building your Halloween collection one card at a time.
Happy crafting,
Sarah x

