Cricut Design Space Background Removal Tool: How to Use it & How Well Does it Work?
Have you seen the news? Cricut Design Space now has a “remove background” feature!
This feature has been much-requested for a long time and I’m excited that as of October 20210 it is now a part of Design Space!
In the first part of this tutorial I’ll show you how to use the remove background tool. Then, I’m going to take three separate photographs (all with a different level of complexity) and compare the remove background tool in Design Space to two other leading background removal tools to see which one performs best. The answer might surprise you!
Cricut’s automatic background remover not working?
First, some troubleshooting tips. To use Cricut’s automatic background remover, you need the following:
- Design Space 6.14 or higher (the update is being slowly rolled out over October. If you have 6.14 but still can’t see the new features, be patient – it will be with you soon!)
- To be using the desktop/computer version of Design Space (not the mobile/tablet app)
- To be a paying Cricut Access member. The background removal tool is only available to Cricut Access subscribers
How to remove backgrounds in Cricut Design Space
Here’s how to remove backgrounds in Design Space using the new automatic background removal feature.
This is really helpful if you want to do a “print then cut” of just one portion of a photo or image, or if you want to cut a part of a photo as a silhouette style from cardstock or vinyl.
Prefer to read rather than watch? Keep scrolling for a written tutorial 🙂
Note: This video was recorded with Design Space version 6.14.267. Later versions might look a little different.
Remove background from image in Cricut Design Space
Step 1: Upload your photo or image
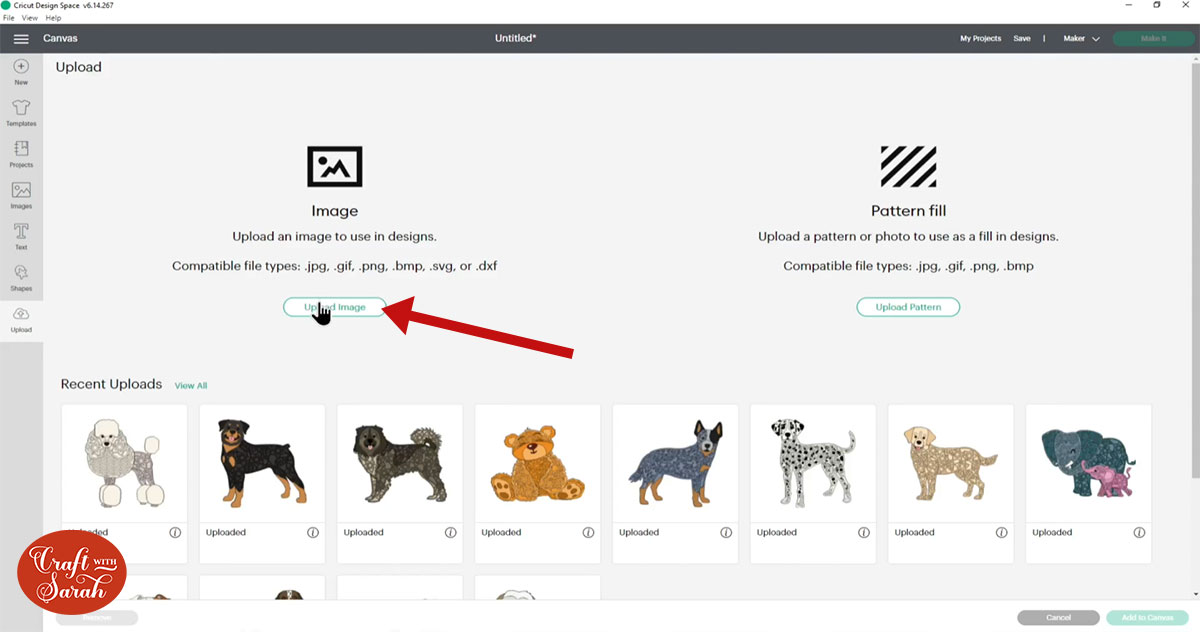
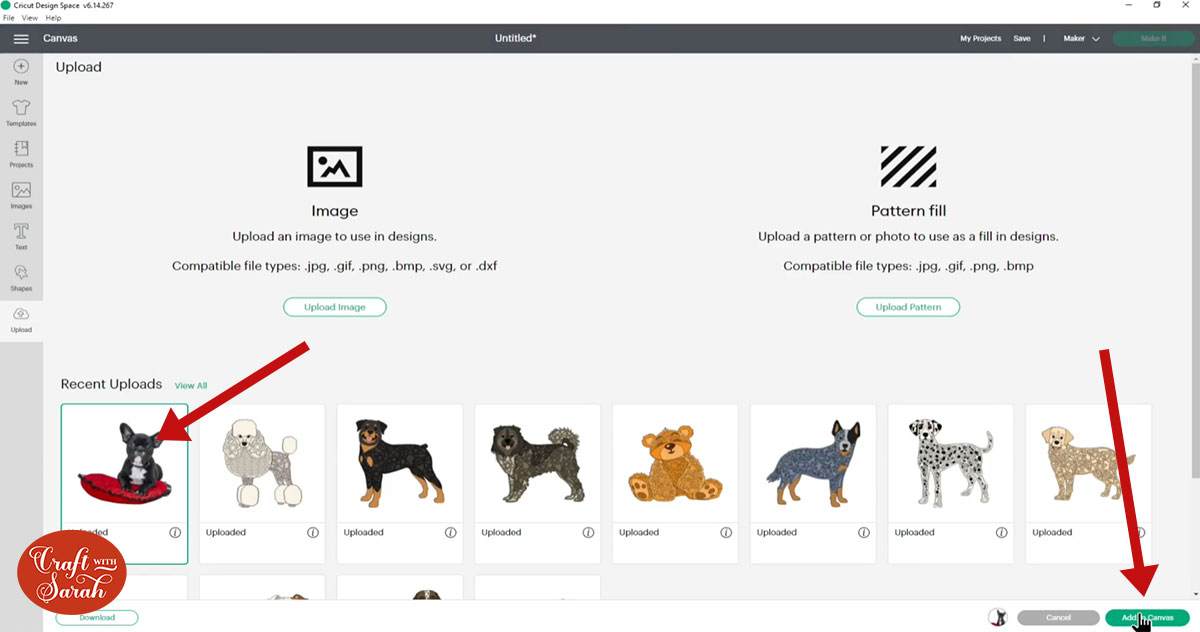
Create a new project in Design Space and then click “Upload”.

Click “Upload Image”
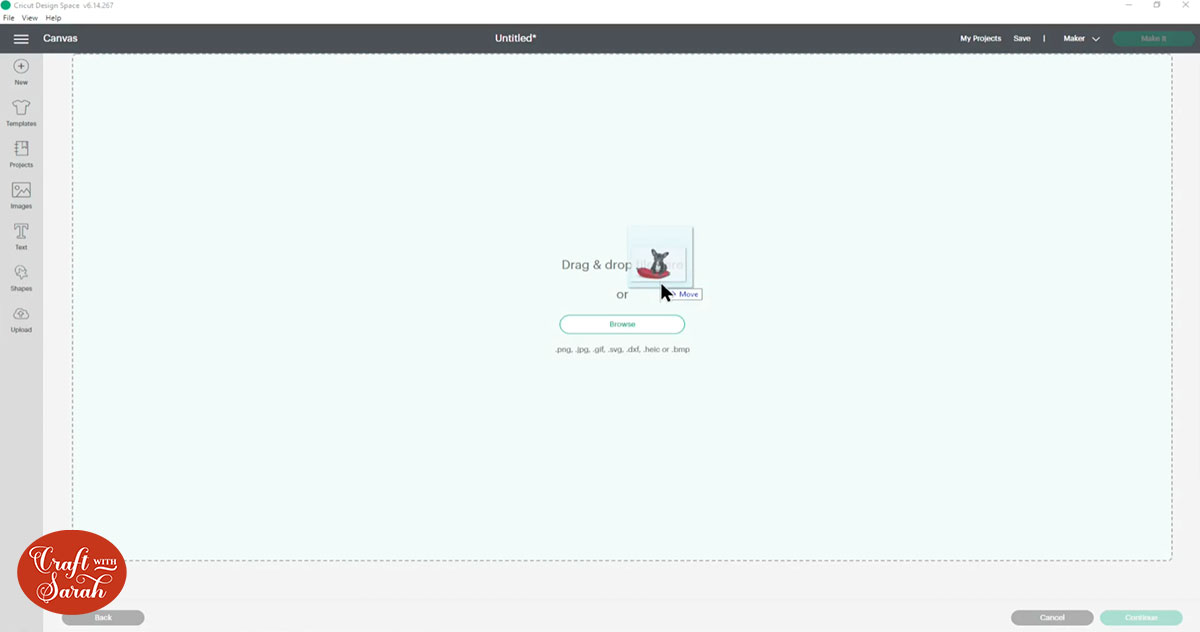
Click “Browse” to select the photo you want to remove the background from on your computer, or drag-and-drop it onto the page.
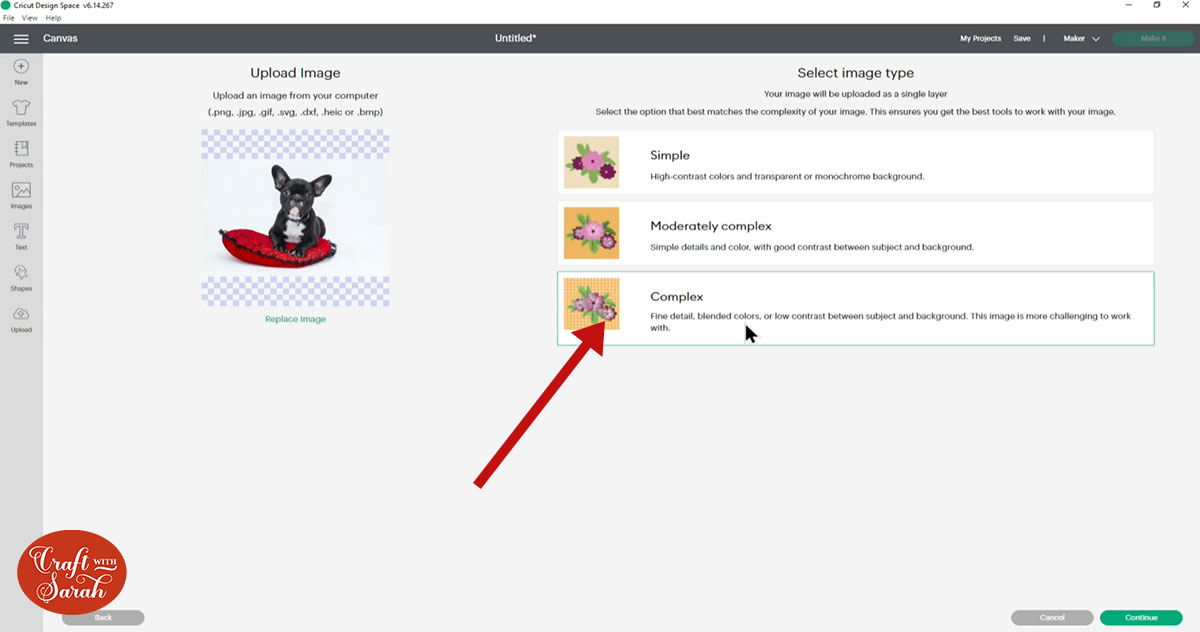
Choose “Complex” and then click “Continue”.
You should now see a new style of screen which looks like this:
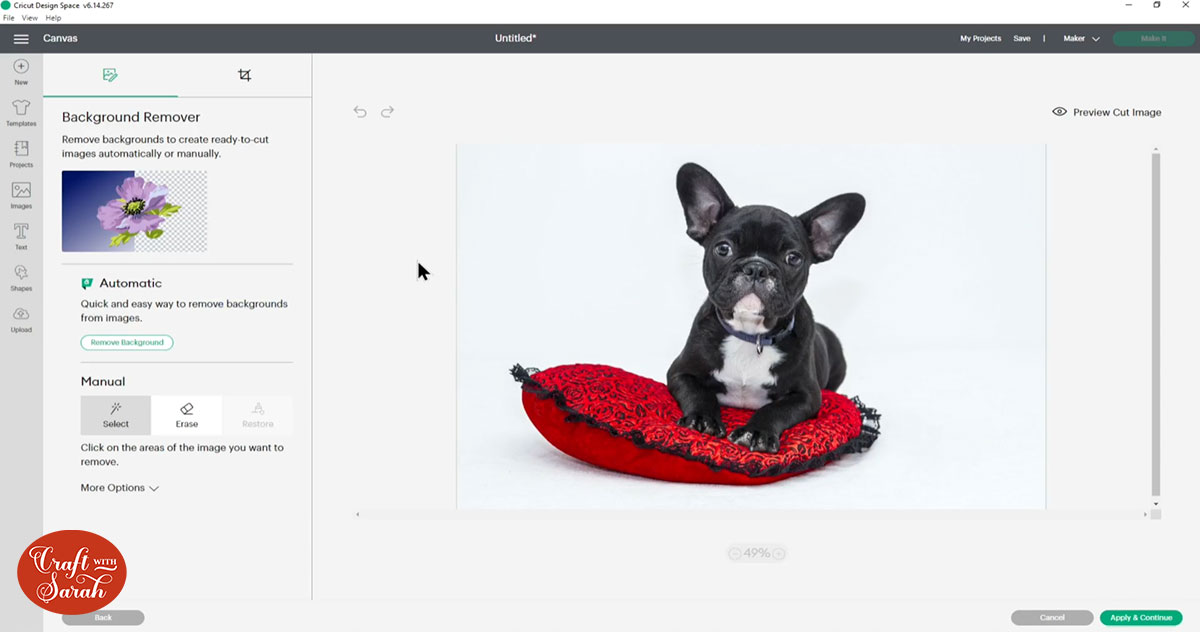
If your screen DOESN’T look like this, it may mean that you don’t have the Remove Background tool in your Design Space yet. If that’s the case, don’t worry – it will update soon! The updates are being released gradually, so it might be a couple of weeks before you get it.
Step 2: Remove the background
Click “Remove Background” to start the removal process.
It may take a little while for the background to be removed, but once it’s finished processing then your photo will update.
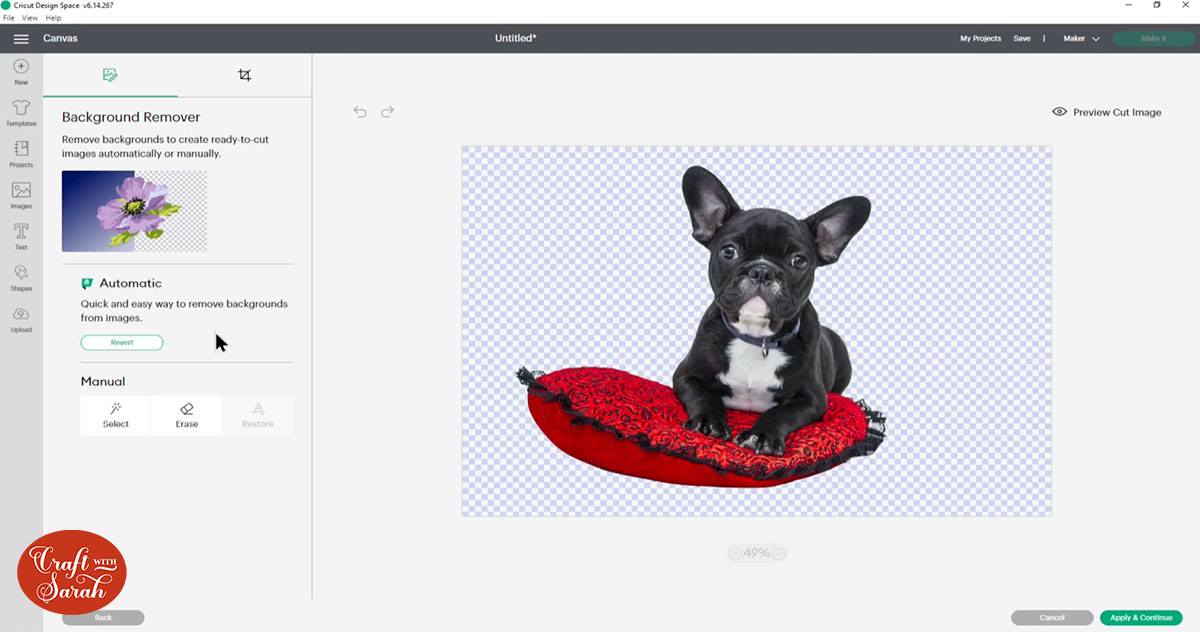
As you can see, it did an excellent job at removing the background from this photo!
Step 3: Clean up the photo if needed
Sometimes, the background removal tool might not manage to erase all of the background, or it might accidentally take out parts of the photo that you didn’t want to be removed.
If that’s the case, you can fix it using the tools under the “Manual” heading.
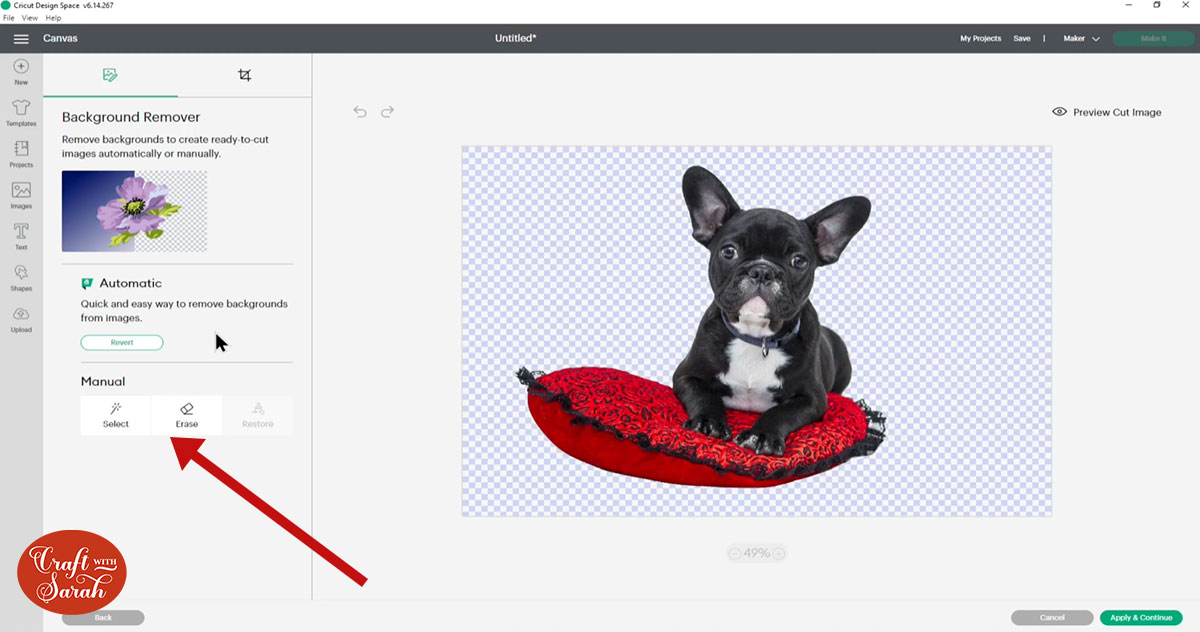
The “select” magic want tool lets you click onto the photo to erase parts of the image that have similar colours.
The “erase” tool lets you click-and-drag your mouse across the photo to erase specific parts that you want to remove.
The “restore” tool sets parts of the image that you click-and-drag your mouse over back to how it looked before you made any changes.
Note: The Restore tool can only be used if you have used the “Select” or “Erase” tool on the image. To get it to show up, try erasing a small part of the image/background and then it should become available to use.
Step 4: Finish the upload process
I personally think that the background removal tool is most useful for print-then-cut images because it lets you cut out specific parts of the photo that the Cricut can then cut around.
However, you might want to cut the outline from card, vinyl or other materials instead.
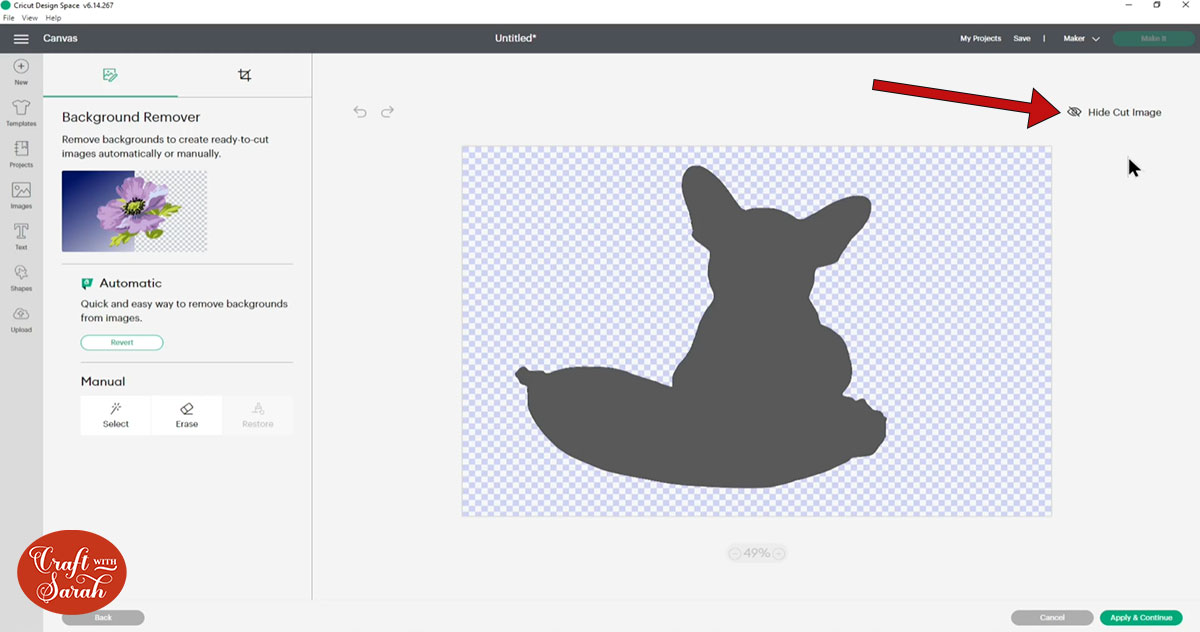
To preview how your photo would look at a cut image, click “Preview Cut Image” on the top right of the screen.
To switch back to the photo version, click “Hide Cut Image”.
When you’re happy with how the photo is looking, click “Apply & Continue” on the bottom-right of the screen.
Choose whether you want to save it as a Cut Image or a Print Then Cut Image and then click “Upload”.

Your edited photo will now appear in your “Recent Uploads”.
To add it to your project, click it and then click the green “Add to Canvas” button.
It’s now ready for you to use in your Project!

Design Space Background Remove VS Remove.bg & Canva
How well does Design Space Automatic Background Removal work when compared to other popular background removal tools?
I tested three different photos in Design Space, Remove.BG and Canva.
Remove.bg
The remove.bg website is free to use but you can only download a low-quality version for free. To get a higher quality version you need to purchase credits, either on a monthly subscription or as a pay-as-you-go option. The pay-as-you-go is the best option if you don’t need to use it very often.
Watch the video at the top of this page to find out how to use remove.bg.
Canva
Canva is an online graphic design too. It’s great for designing printables, social media graphics, posters, business cards and more.
Their free version is very comprehensive, however if you want to use their background removal tool then you need to pay for Canva Pro which is a monthly subscription.
In the UK, this costs £10.99 per month. It will be converted to your local currency if you are outside the UK.
Watch the video at the top of this page to find out how to use the background remover in Canva.
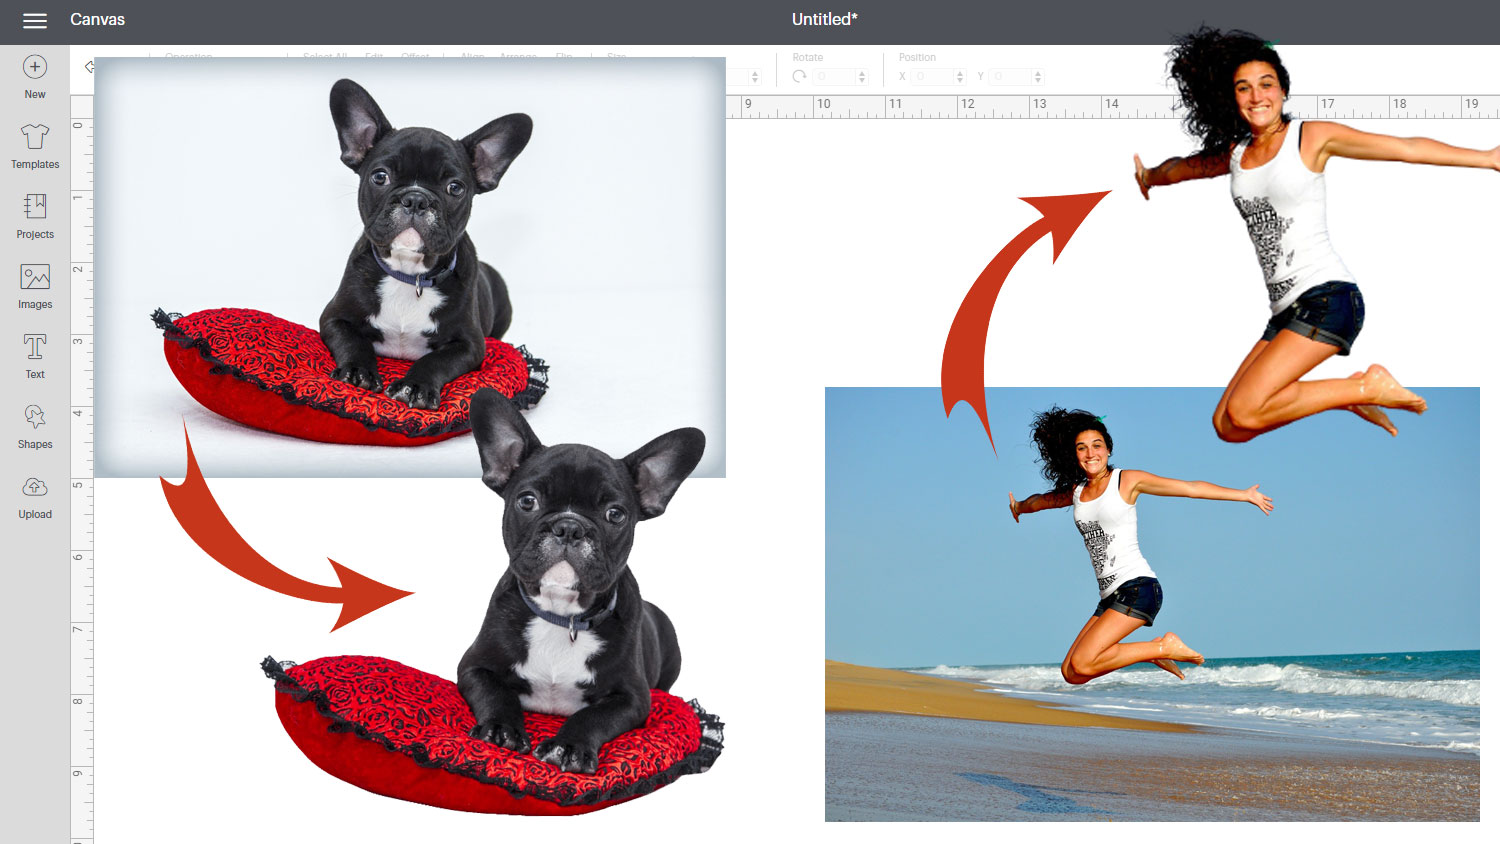
Test 1: Dog cutout on wood
For the first test, I’m using this photo of one of my layered dog SVGs.
This is quite a difficult image for background removal tools because of the detailed wood background and the fact that the colours of the dog are quite similar to the background colour.
Let’s see how well it does…
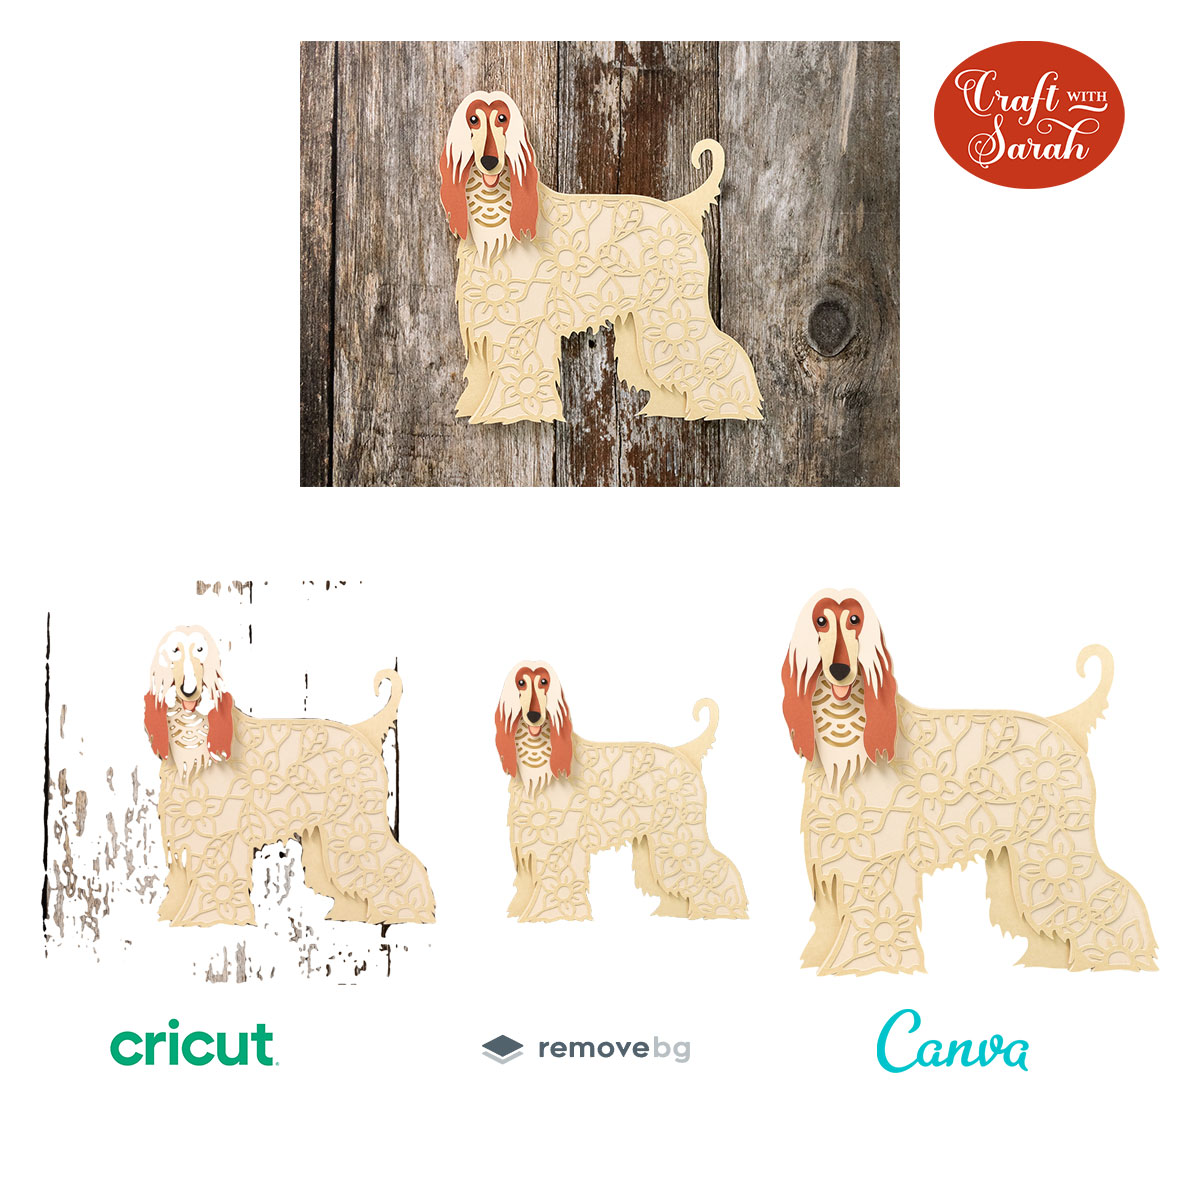
Design Space really struggled with this photo. It’s left big parts of the background still on the screen, and taken out parts that should have remained (e.g. the face of the dog).
Remove.bg and Canva have both performed very well. The whole background is removed, and the full dog shape remains.
Test 2: Girl on beach
The second test is a photography of a girl jumping at the beach. She stands out quite well from the background, but it’s quite a detailed background with the sky, ocean and sand.

Design Space did a much better job this time. The girl has been nicely cut out, apart from her hair which still has quite a bit of blue in it.
Remove.bg and Canva managed to cut the hair out perfectly. You can see every strand of hair without the blue sky still attached.

Test 3: Floral illustration
For the final test I’ve chosen a floral illustration instead of a photo.
I think this will be tricky because the pale pink background is quite similar in tone to the white flowers, and there are lots of tiny details on the stems and leaves.
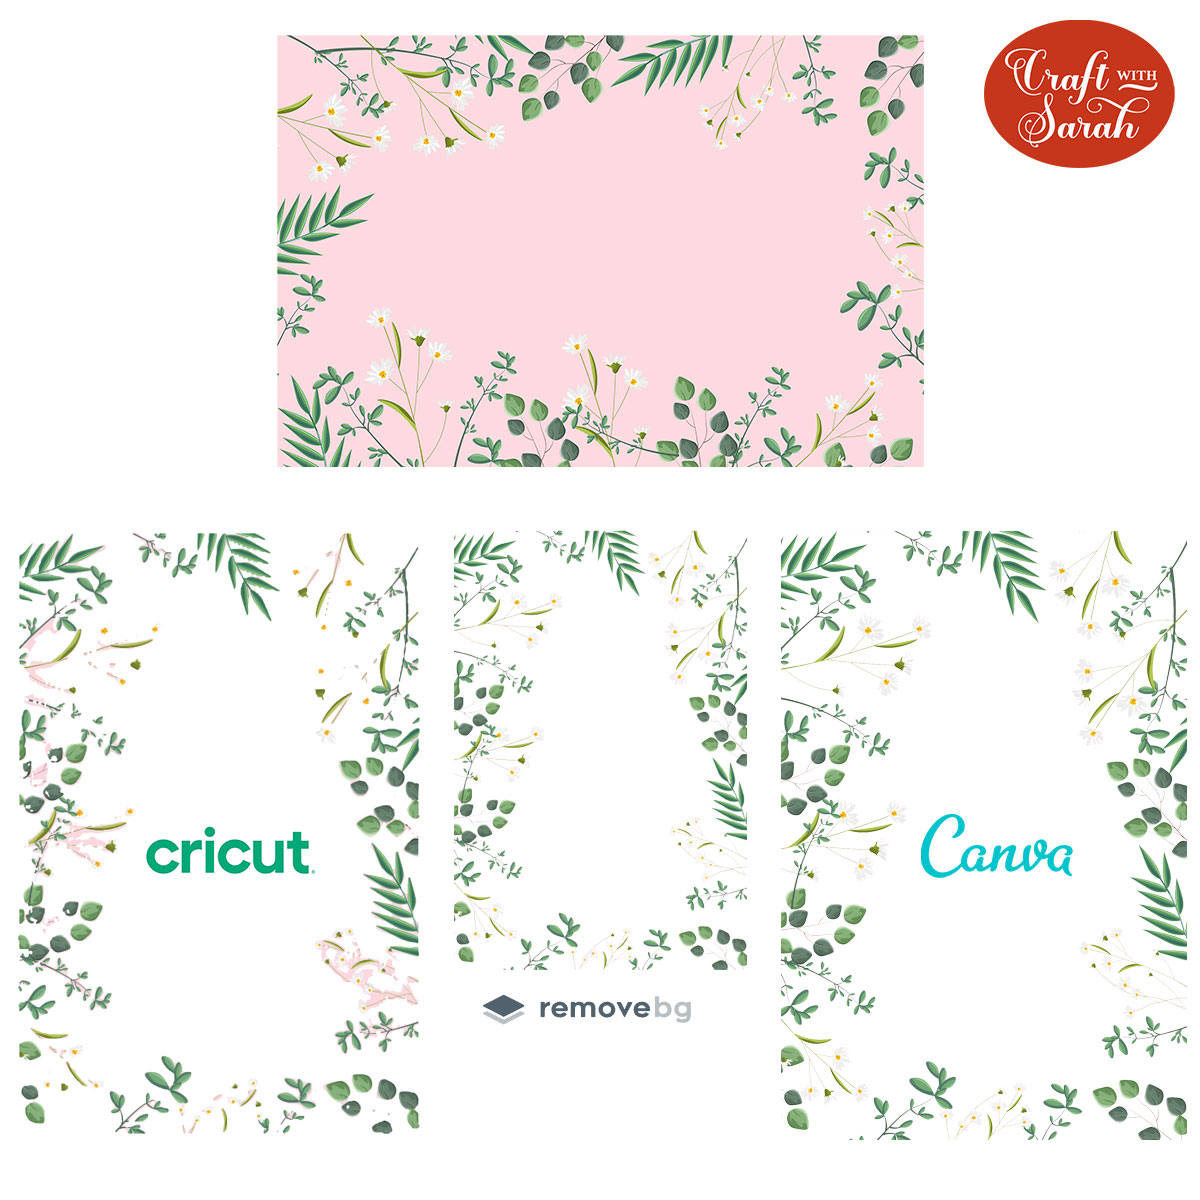
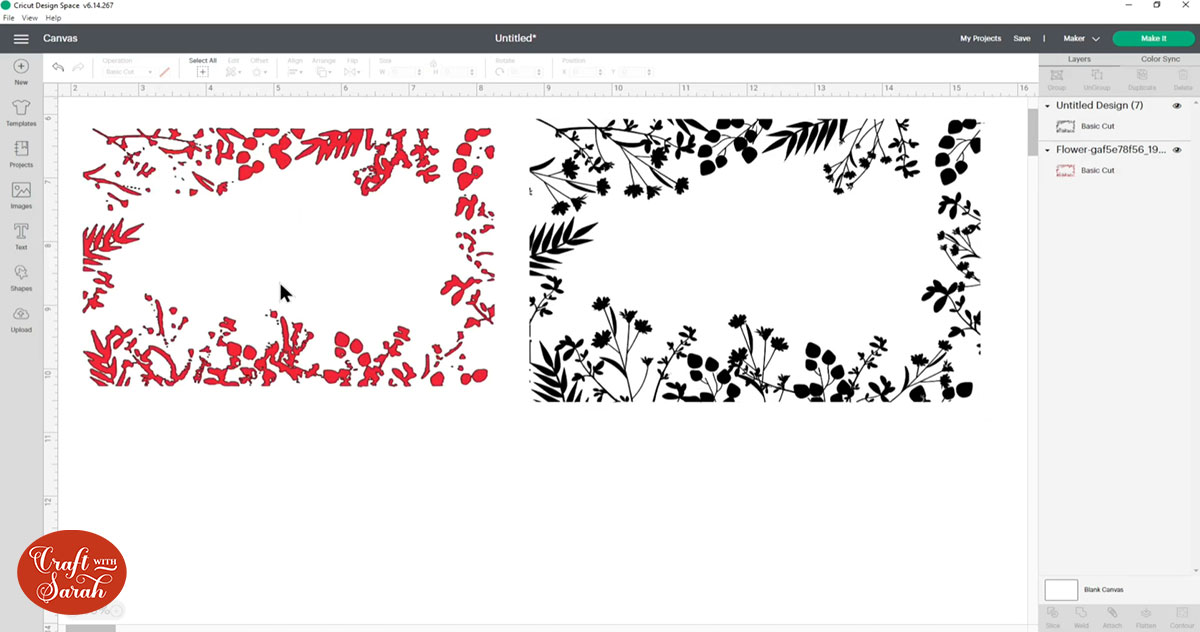
It looked at first glance like Design Space cut this out well, although there is a bit of pink left around some of the leaves. However when I previewed the “cut image” it became more clear that it hadn’t done as good a job as I thought.
Here’s how the “cut” version of the Design Space file (left) looks when compared to the image that had the background removed in Canva (right):
Should you use the Cricut Design Space background remover?
Based on these tests, I would rank the background removal tools in this order:
- Canva
- Remove.bg
- Design Space
The reason I put Canva in 1st place is purely down to personal preference as I already pay for the monthly subscription, so I can get the high-quality images without paying any more than I already did. If I didn’t already pay for Canva then I probably would have put remove.bg in first place as they have a free option and the pay-and-go credits to get higher-quality versions of your photos are very reasonably priced.
I am a little bit disappointed that the new Design Space feature didn’t do as well as Canva or remove.bg. However, it is a brand new feature so there’s bound to be some teething problems in the beginning and I’m confident that Cricut will continue to innovate and improve it as time goes on.
I think it’s great that Cricut are introducing new features into Design Space, especially things like background removal that a lot of people have been asking for for a long time. Hopefully this is a sign that in the next coming months there will be lots of new features that build on this, as well as improvements to how it’s working now.
Generally though, I love Cricut Design Space. I think it’s a really easy to use software and I use it pretty much every day and never normally have any problems with it. But I know that many of you do sometimes struggle with it, especially how to use it to do more complex designs.
If learning Cricut Design Space is something that you would like to know a little bit more about, check out all the Design Space tutorials on my blog.
Happy crafting,
Sarah x

